Overview
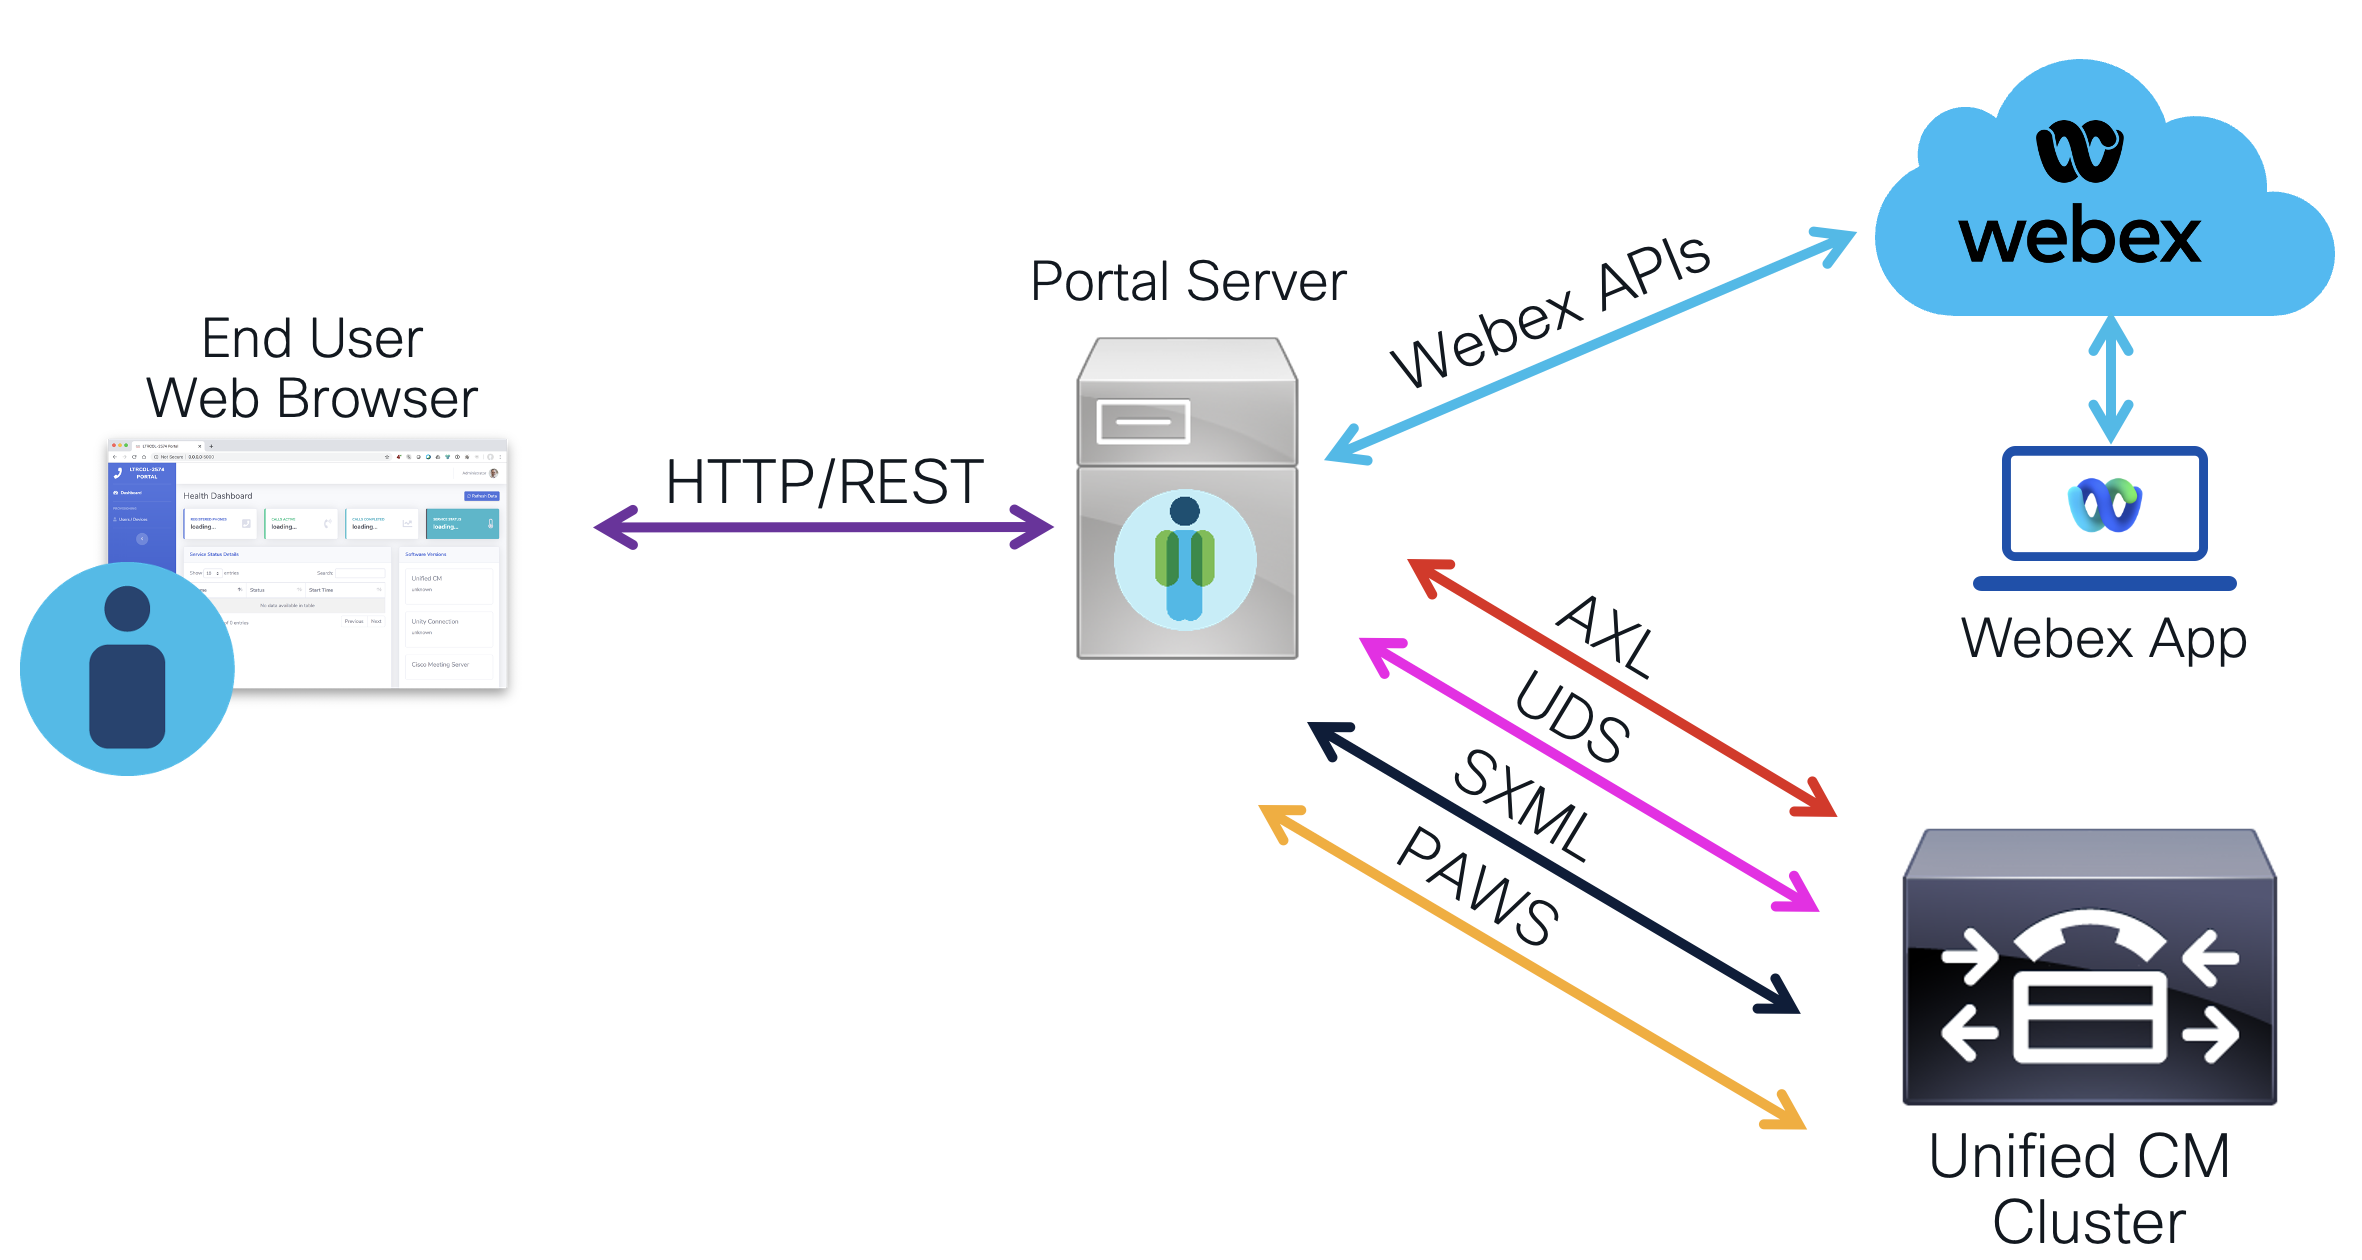
The Cisco Webex Suite, along with other Cisco Collaboration products like Cisco Unified Communications Manager (CUCM) — which offers call control services for Cisco Webex Calling Dedicated Instance — provides a comprehensive set of Application Programming Interfaces (APIs). These APIs can be used to extend and enhance the product capabilities, management, and diagnostics. This course will guide you through commonly used APIs in the Cisco Webex Suite and CUCM, enabling you to programmatically control messaging, meeting, and calling capabilities, including provisioning tasks common to the Suite.
The goal of this lab is to give you hands-on knowledge of how to use these APIs by starting from the basics and building up to more complex tasks. By the end, you will use these APIs to build a simple web-based management portal that will enable you to simplify a series of complex provisioning and monitoring tasks, such as moving a user from UCM calling to Webex Calling.
Let's walk through a few use cases:
- You would like to bulk provision and manage users. You can use directory synchronization features of the Webex platform to syncrhnoize users from either an on-premises directory or a cloud-based directory, however, you may need additional flexibility in how those users are configured beyond what the directory synchronization provides or you can't use directory synchronization and want to manage the users yourself.
- You would like to notify users of events through a text-based messaging bot.
- You would like an automated way to create and manage spaces for teams or projects.
- You would like to integrate the Webex Suite with your business processes, for example by automating the creation of a Webex Meeting when some event occurs in some other system.
- You would like to programatically place or manage calls through a web interface to enable features like click-to-call.
- You would like to monitor and manage the health of your Cisco Collaboration deployment programatically.
These are just some of the examples of problems that can be solved using APIs. We will explore some of these challenges in this lab and walk you through how to use the APIs to solve them. The intention of this lab is not to make you an expert in any one API, but rather to give you a broad understanding of the capabilities of the APIs and how to use them to solve common problems so you can adapt the knowledge to your own use cases.
To be clear, this lab is not a course about web development or programming in Python, Javascript, or any other language. Although you will use Python and some Javascript, we have provided enough information for those unfamiliar with these languages to complete the tasks. Because of the limited time for this lab and our desire to provide you with as much information as possible, you will see that we have provided you with code to lay the foundation for what you will be building and your tasks will largely be to fill in the important parts of the code to make it work. For your final task in the lab, a basic web page (HTML/CSS/Javascript) has already been created for you and your focus in this lab will be to leverage the collaboration product APIs to accomplish the tasks the portal provides.
Cisco's collaboration prodcts generally use one of two types of APIs: SOAP and Representational State Transfer (REST). Most modern APIs are based on the REST architecture, but most of the on-premises Cisco Collaboration products (including Webex Calling DI) use SOAP so it is important to learn both. We will start with an overview of the two types of APIs and then dig into the specifics of how this applies to the various product APIs in particular. We will walk through some of the tools available to interact with the APIs, how to use the documentation, and how tools like the AxlToolkit and Webex Software Development Kit (SDK) can help you build applications without having to worry about some of the details of the API.
As mentioned, this is also not a class about learning Python. We selected Python due to its popularity, readability, and the abundance of external libraries and Software Development Kits (SDKs) like wxc_sdk . If you've had some experience with Python, even as a novice, the concepts introduced here shouldn't be overly complicated. If you're new to Python, don't worry; we've provided enough guidance for you to complete the tasks with little to no prior knowledge.
In Python, indentation and spacing are essential for defining code structure, replacing the need for curly braces or keywords. As you complete the lab, ensure your code is properly indented, using comments or existing code as alignment guides. Correct indentation is crucial for your code to work correctly.
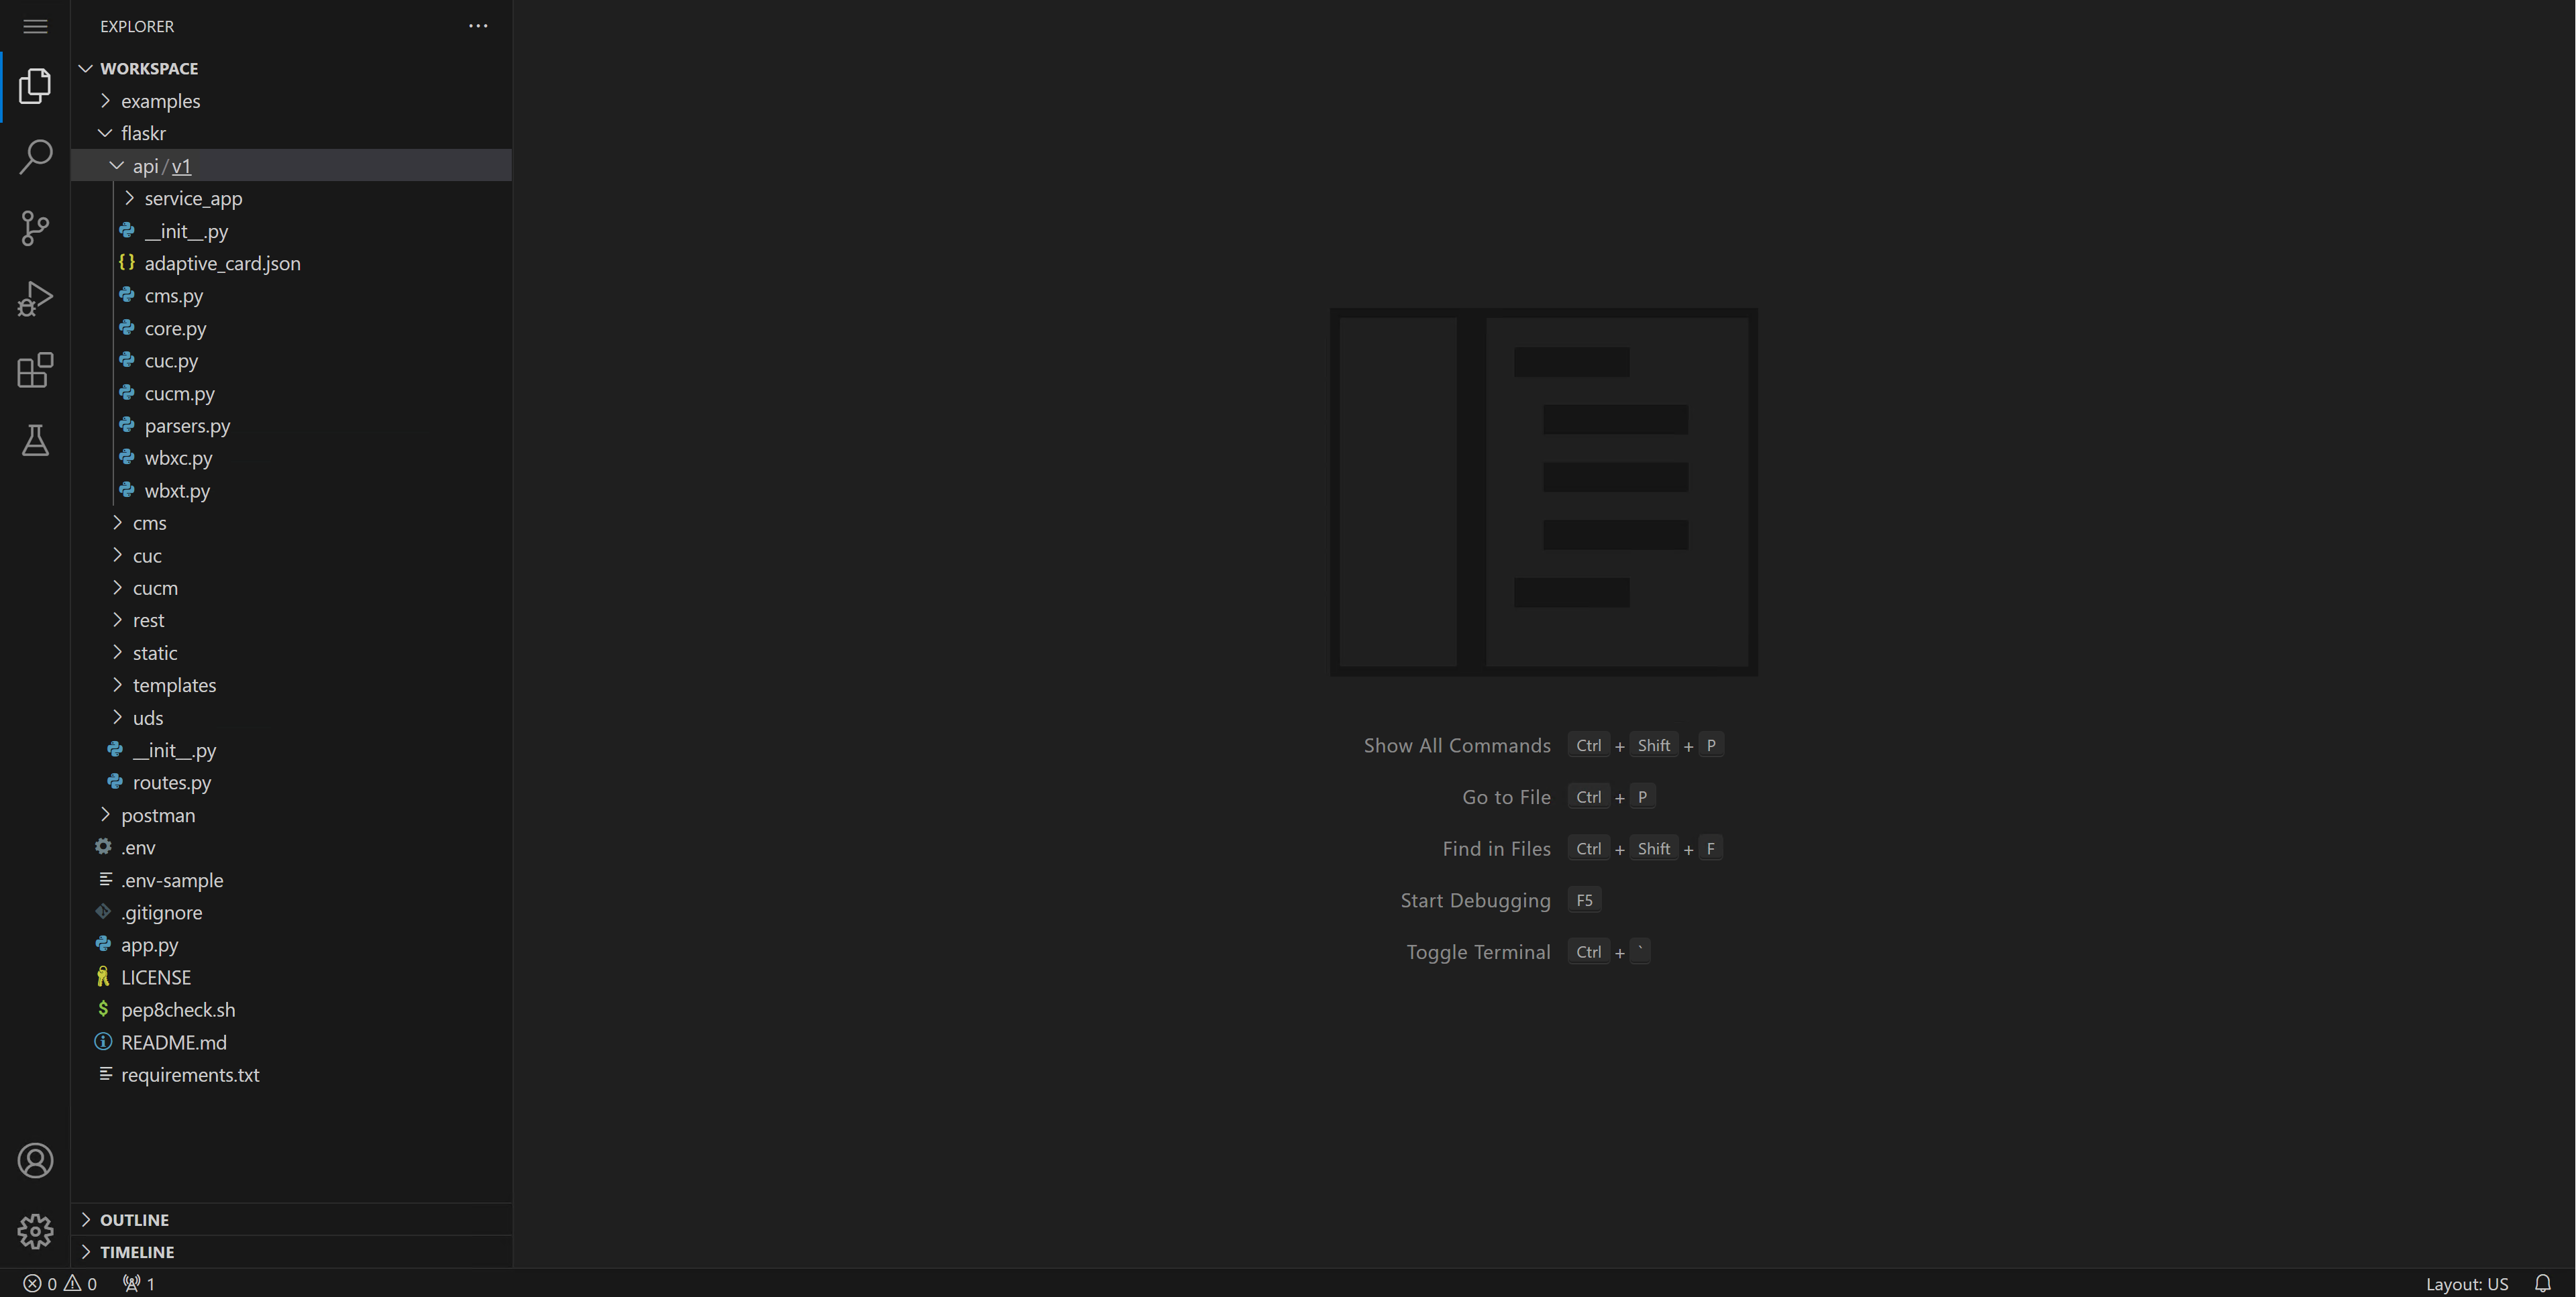
For all Python coding in this project, you will use Visual Studio Code (VS Code) , a popular free source code editor from Microsoft. You will edit and run your Python code in this lab environment on a remote Linux development server. Your Pod's dedicated development server has a web-based VS Code instance running on it. This web-based VS Code application is called code-server and behaves identically to VS Code running locally on your PC. You can find more information about VS Code, code-server, and your development environment in the Reference section of this lab guide.
To begin, you will launch VS Code and run a simple Python program by following the steps below.
Step 1 - Launch Visual Studio Code
-
Access your VS Code instance:
https://dev1.pod22.col.lab:8443
-
On the left side, click the
Explorer
icon
 and you see a list of folders and files under
Workspace
. The files you will be
working with initially will be in the
examples
folder.
and you see a list of folders and files under
Workspace
. The files you will be
working with initially will be in the
examples
folder.
- In the Explorer , navigate to examples and click to open hello_world.py . You now have the file open for editing.
Step 2 - Run a Program
One of VS Code's features is the ability to run applications from within the development environment.
-
In VS Code, click the Run and Debug button.

-
Once you click anywhere in list of "RUN AND DEBUG" configurations, You should see a predefined
Configuration
for running a python script named
Python: hello_world.py
at the top of the list. Make sure it is selected:

-
Click the green start arrow next to the
RUN AND DEBUG
text
 .
Doing so launches a
terminal
window at the bottom where the output of the script is displayed.
.
Doing so launches a
terminal
window at the bottom where the output of the script is displayed.

- You will notice that the output is displayed as a log line, since the "logging" facility was used to display the text instead of a print. This is how we will generally display all console-type output.
Congratulations on successfully running your first Python program in Visual Studio Code! You are now well-equipped to delve into the world of Cisco Webex APIs.
Cisco collaboration products make use of one of the two most prevelant web services types, REST and SOAP. We will start with SOAP and then move on to REST in later sections. Most of the Cisco Unified Communications Manager (CUCM) APIs (Administrative XML (AXL), UC Manager Serviceability (SXML), Platform Administrative Web Services (PAWS), etc) are exposed via SOAP-based XML Web Services, which conform to the Simple Object Access Protocol (SOAP) Specification 1.1 and the Web Services Description Language (WSDL) Specification 1.1 . SOAP provides an XML-based communication protocol and encoding format for communication.
If you are not familiar with XML, it stands for eXtensible Markup Language and is a markup language that defines some relatively simple rules for encoding data. It was primarily designed to transmit and receive structured data in a well-defined format both systems can understand. In it's most basic form, XML defines tags which are enclosed in angle brackets (<>) and these tags surround the data described by the tag. Tags can form a hierarchy with tags inside of other tags. For example, to define a basic phone device, you might say that a phone device needs three parameters, a name, a description, and a phone number. To describe such a phone using XML, you would define the following structure:
Notice how for each tag, there is a corresponding end tag that includes a forward slash (/ before the tag name).
The names of the tags can, in theory, be any arbitrary string. In order for two devices using XML to agree upon what tags should be present and what type of data is expected between those tags, an XML schema is defined. An XML schema describes in painstaking detail not only the names of the tags, but also what order they should appear, what kind of data can be enclosed between the tags (for example a string, an integer, or some other sequence of tags), whether specific tags are mandatory, or if a particular tag can repeat more than once. Let's take a look at one of the simpler objects that can be configured on CUCM, a Partition. The following is a piece of the schema definition for a partition (called a RoutePartition in the API):
You can see that the definition of a Partition includes a name, description, timeScheduleIdName, and timeZone. The type field tells you what kind of data is in that field. The values that are a string are self-explanatory, but what is a XFkType or XTimeZone ? To determine what these custom types are, you must find them in the schema definition, as they have their own set of rules. You will find that there will be many references to other parts of a schema and those other parts can further reference other parts.
XML schemas define how to describe an object or API call using XML. For example, you can describe a phone or a partition by following an XML schema. In order to perform transactions using these objects, you need something like SOAP which describes how to send requests and receive responses using XML messages.
The following diagram shows you the structure of a SOAP message:
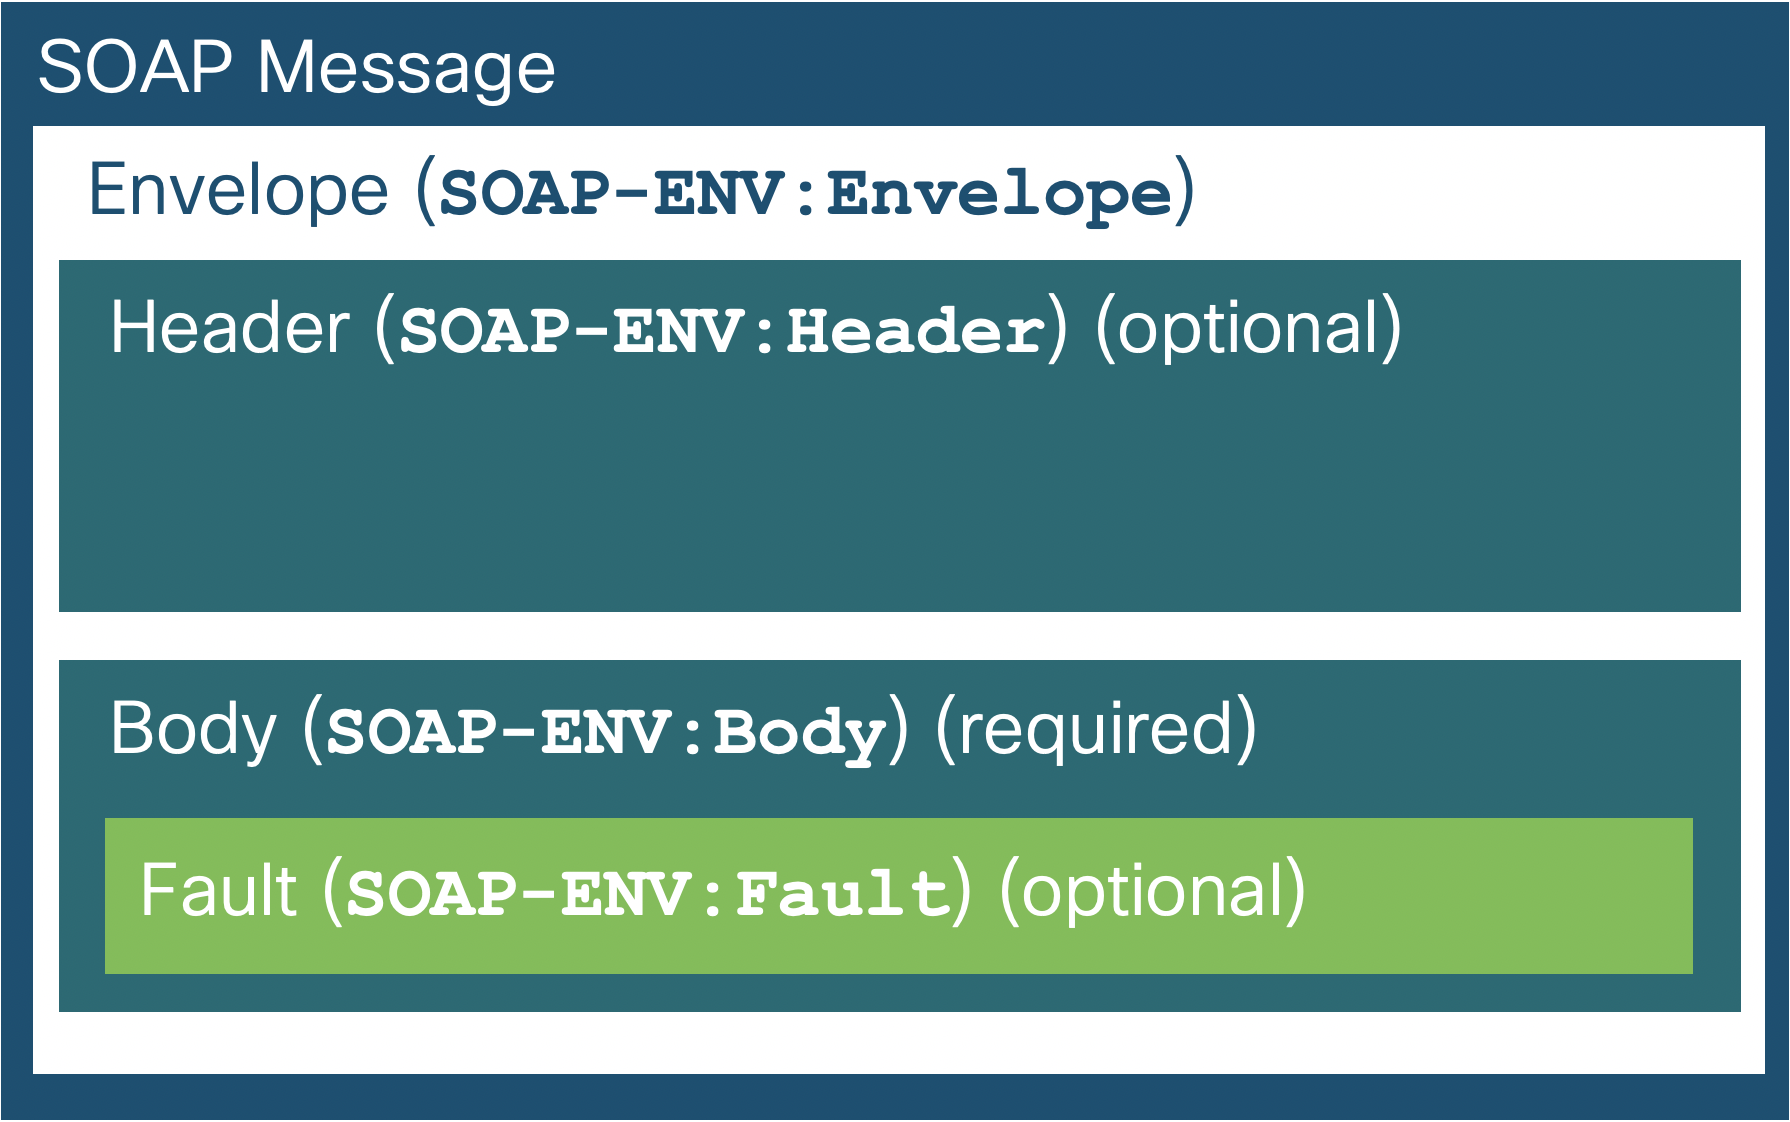
What does this look like when encoded in XML?
The SOAP message above is a very basic request for the CUCM version. You can see that the getCCMVersion request has no parameters as evidenced by lack of any tags inside the getCCMVersion tag. The SOAP standard describes the above structure for a SOAP message. If you are thinking to yourself that this is getting complicated, you can relax. We are showing you what is happening behind the scenes, but as you will see shortly, there are many tools that will abstract this structure from you so that you don't have to deal with it.
If an XML schema describes the messages and objects that can be defined using XML, then how do you know what types of requests you are allowed to make, what types of data those requests require, and what type of response you expect to receive? This is where the Web Services Description Language (WSDL) comes into play. A WSDL file (along with associated XML schema files) can be used to fully describe the capabilities of a SOAP API including all requests and responses that can be made and the data types that are expected.
A WSDL file defines four pieces of data:
- Publicly available methods; interface description, formats
- Data type information for requests and responses
- Binding; which transport protocol to use
- Address information – where to find the service
CUCM provides a WSDL file for each of the SOAP-based APIs it supports. When trying to use these SOAP based APIs, interpreting the WSDL files and then attempting to cross-reference all the types in the schema files can be a daunting task. Fortunately, there are tools to read WSDL files and then make the SOAP API service methods available easily. The eventual goal is to leverage a programing language such as Python to interface with the various SOAP API's, but it helps to manually explore the API using a visual tool that can understand the WSDL file to get a better appreciation for what is happening when interacting with SOAP APIs. One of these tools is SoapUI which has been installed on your workstation.
The first API you will explore is the Administrative XML Layer (AXL) API. The AXL API is a provisioning API for CUCM described in much greater detail in the next section. AXL allows you to configure anything that you would be able to configure from the CUCM Admin web page.
Perform the following steps to get started with SoapUI.
Step 1 - Download the Cisco AXL Toolkit
The WSDL and XML schema files for the AXL API are published on the CUCM server itself, as part of the Cisco AXL Toolkit plugin. You will need these for SoapUI to be able to interact CUCM's AXL web service.
- Access your CUCM server at: https://cucm1a.pod22.col.lab
- Login in with username admin and password C1sco.123
- Navigate to Application → Plugins and click Find
- Next to Cisco AXL Toolkit , click Download . The file axlsqltoolkit.zip is downloaded.
- From your Downloads folder, extract this downloaded file (right-click Extract All... ) to the default location (should be in the Downloads\axlsqltoolkit folder)
- Once extracted, in the schema folder you will notice there are a number of folders. These are for various older CUCM versions. For this lab, we are interested in the folder named current . That folder contains the current CUCM's AXL WSDL (AXLAPI.wsdl) and schema (.xsd) files.
Step 2 - Start SoapUI
Now you can load this WSDL into SoapUI, get things configured, and start sending queries. Follow these steps to load the WSDL into SoapUI.
- From the Desktop of your laptop, launch the SoapUI application (if prompted to update the app, ignore the update to continue using the app).
- Close any open Endpoint Explorer or other windows that may show up when launching SoapUI.
-
Click
File
→
New SOAP Project
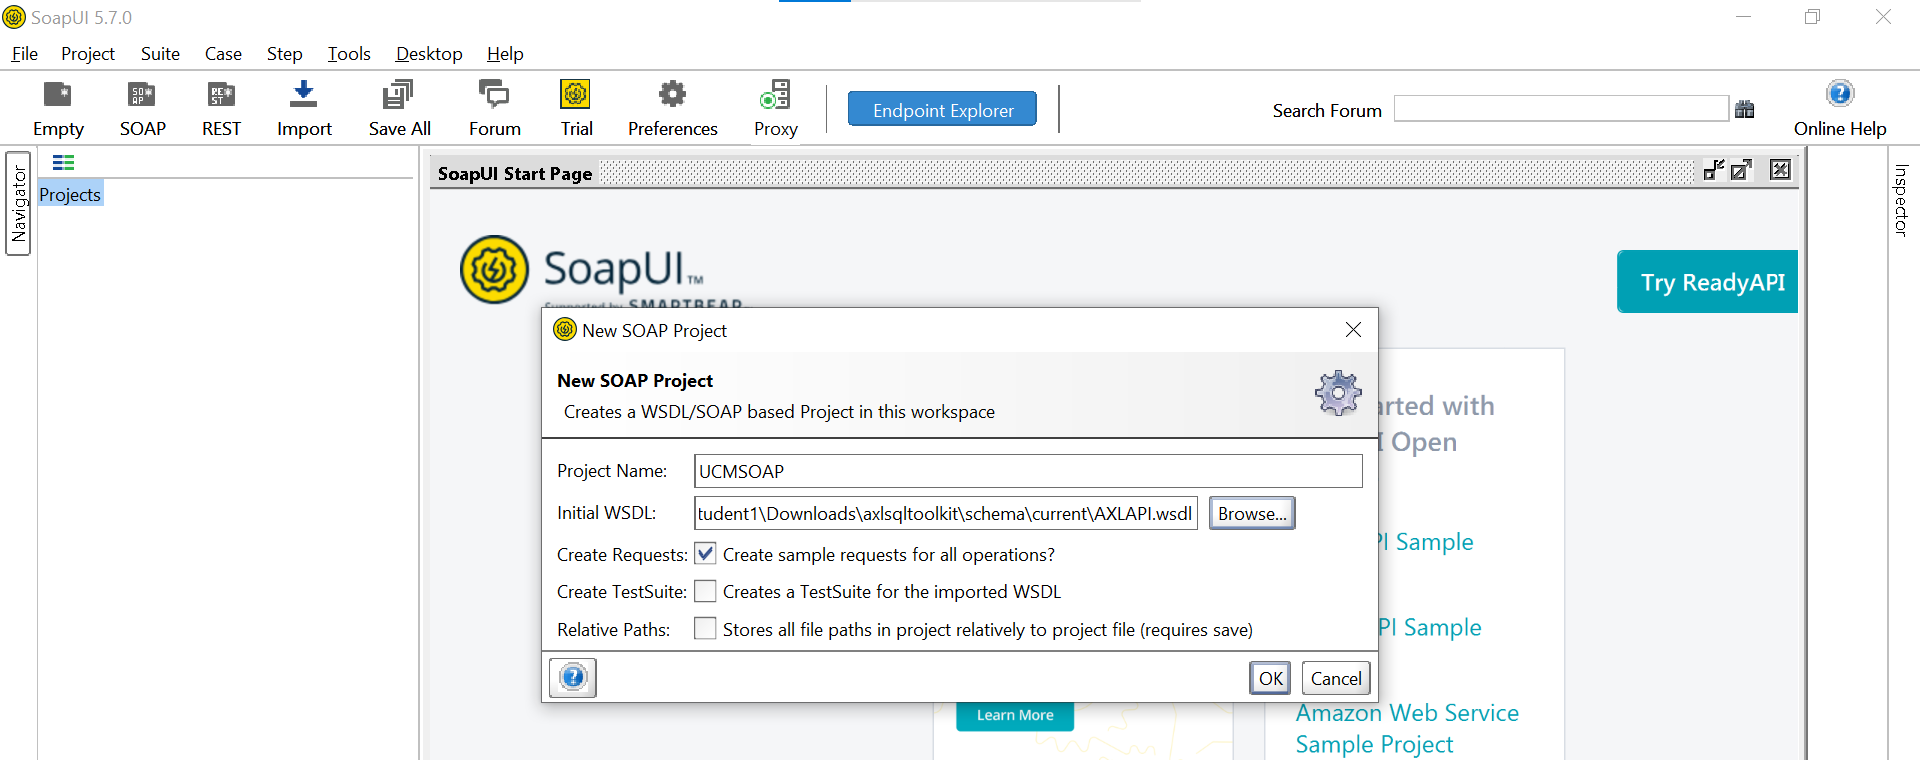
- For the Project Name enter UCMSOAP
-
Below that field, for the
Initial WSDL
file, click
Browse
.
Navigate to your current AXL WSDL file extracted earlier:
Click on button the get to the Desktop, then enter or navigate to the location of the file
C:\Users\student1\Downloads\axlsqltoolkit\schema\current\AXLAPI.wsdl
button the get to the Desktop, then enter or navigate to the location of the file
C:\Users\student1\Downloads\axlsqltoolkit\schema\current\AXLAPI.wsdl
- Make sure Create sample requests for all operations is checked and click Ok to open the new project.
Step 3 - Run an AXL Request from SoapUI
Once the API is loaded, you must set some of the default parameters, specifically the CUCM hostname or IP address and the credentials so that they don't have to be re-entered for every query.
-
In SoapUI, in the Navigator pane on the left, you'll see the new project folder named
UCMSOAP
and the
AXLAPIBinding
object.
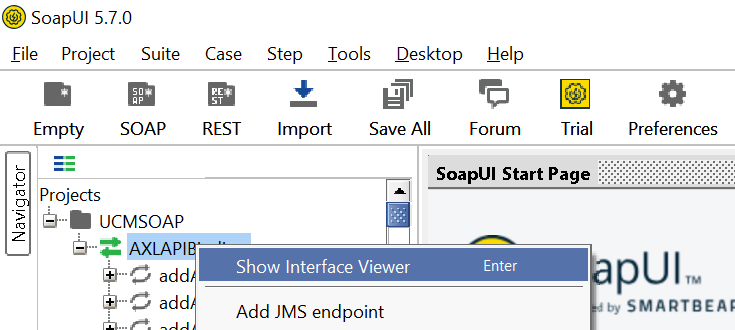
Right-click on the
AXLAPIBinding
and click
Show Interface Viewer
(same as double-clicking or pressing Enter).
-
In the AXLAPIBinding properties, select the
Service Endpoints
tab.
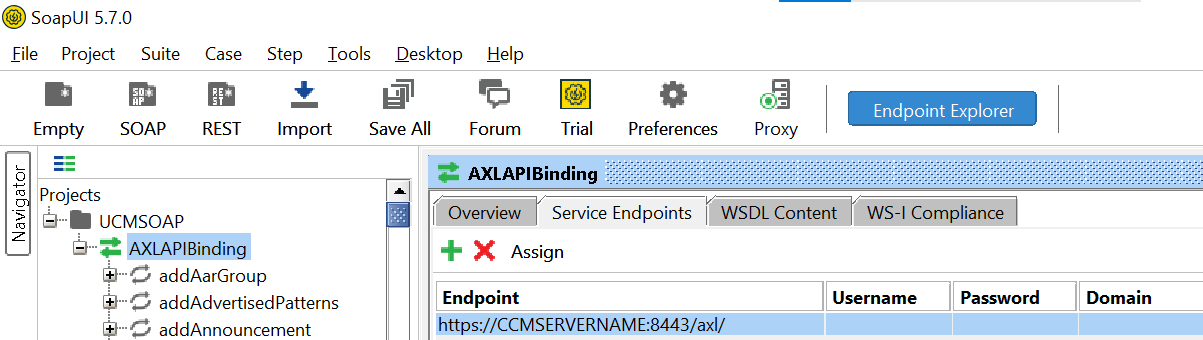
- Notice the Endpoint is set to https://CCMSERVERNAME:8443/axl/ (with blank username and password). Double-click on CCMSERVERNAME so it can be edited.
- Replace it with the hostname of your CUCM: cucm1a.pod22.col.lab so the complete endpoint URL is https://cucm1a.pod22.col.lab:8443/axl/ and press Enter
- Double-click on the Username field and enter admin . Be sure to press Enter for the field to be saved.
- Double-click on the Password field and enter C1sco.123 .
- Be sure to press Enter to save the value.
- Close the AXLAPIBinding window by clicking the X in the right of its blue title bar .
SoapUI is now all set up for issuing queries. When you opened the WSDL file in SoapUI, SoapUI parsed the contents of the file in addition to the XML schema files that are referenced in the WSDL to provide you with a list of all the actions you can take using the AXL API. You will notice that the Navigator pane on the left contains a list of all the AXL API methods available in the API. Just as all these methods are now available to you at the click of a button, you will see later how certain libraries can perform a similar action in Python to read the WSDL file and make all of these methods available to you programmatically. To perform your first AXL SOAP API call, follow the steps below:
- Scroll down to find the getCCMVersion method.
- Expand (usually the + sign) the getCCMVersion operation, so you can see Request 1
-
Double-click on
Request 1
to open it.
Note:
You can always right click on a SOAP operation/service and create a New request with the default SOAP XML payload.
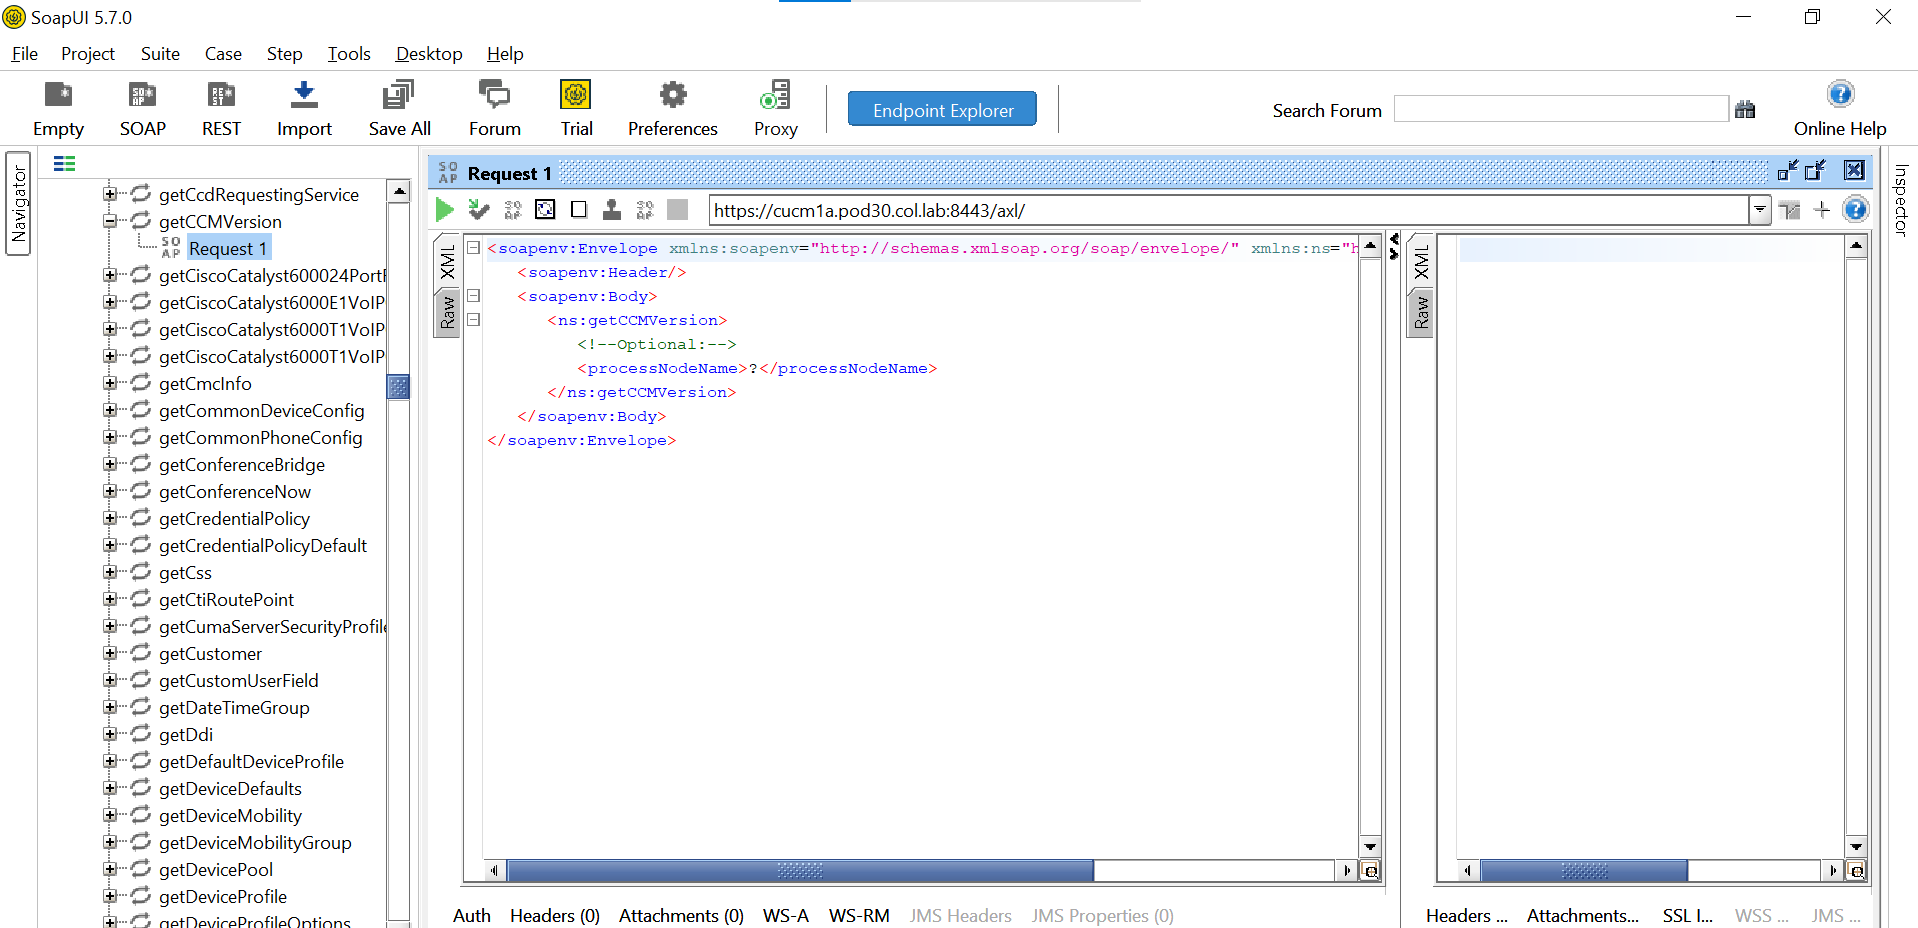
- You should see your CUCM server listed in the URL at top. The XML request will look like this:
-
Click the green "play" button
 to send this request. Observe that the response is filled in at right. In this case, it indicates
an error
to send this request. Observe that the response is filled in at right. In this case, it indicates
an error
- The reason for this error is you supplied the optional processNodeName with a name of ? . When a new request is created for an operation in SoapUI, all available options are presented, so there are often many that either need to be removed or filled in with valid data (instead of the default ? placeholder).
- Remove the processNodeName line and the comment above it or just copy the text below and replace the entire request with this:
- Click Run and observe the response which should contain:
You have successfully sent an AXL/SOAP request to CUCM and received a valid response. This request was fairly basic as you did not have to provide any parameters in the request. Even with only one piece of information in the response, the version of CUCM, the response seems fairly complex. Having to manually parse and extract the data from the XML-based response may seem daunting. You will see later when you perform similar actions using Python that the SOAP library you will be using will greatly simplify the process of extracting the data from the response.
In the next section, you will explore the AXL API in more detail and construct some more complex requests.
Administrative XML Web Service (AXL) is an XML/SOAP based API that provides a mechanism for inserting, retrieving, updating and removing data from the CUCM configuration database. The AXL API provides you with access to the entire CUCM database. The AXL API is purely for provisioning and does not provide access to run-time or performance data. There are several other APIs we will discuss later that are used to provide this type of information.
Before exploring more of the AXL API using SoapUI, here are a few things you should know about the API:
AXL Authentication
AXL API utilizes HTTPS Basic Authentication. Any CUCM User (Application or EndUser) will have read/write access via AXL if they are members of the Standard CCM Super Users access control group or any group with the Standard AXL API Access role assigned to it. This means that all super user accounts implicitly already have access to the AXL API. To create an account dedicated for AXL API use, you must first create an access control group and assign the Standard AXL API Access role to it, then associate the application user with the newly created group.
To provide read-only AXL API access you can create a separate Access Control Group and assign only the Standard AXL Read Only API Access role to it.
In the interests of simplicity in this lab, you will use the admin account which is a member of the Standard CCM Super Users group. However, the best-practice in a production environment is to use a separate account dedicated for each AXL API application.
AXL Method Types
AXL has two distinct method types which operate in very different ways.
- Thick AXL : Provides (operations) that allow you to perform certain tasks against the CUCM database in a very structured format that has been built around each type of object available in the CUCM database. For example, there are methods for things like phones, route lists, route patterns, and calling search spaces, just to name a few. If the object can be configured from the CUCM Administration page, there is a Thick AXL method that lets you list, add, remove, and update that object. For example, for phones the following Thick AXL methods exist: listPhone, addPhone, removePhone, updatePhone. In this lab you will only utilize Thick AXL API Methods.
- Thin AXL : Provides only two methods, executeSQLQuery and executeSQLUpdate, that give you direct access to the CUCM Structured Query Language (SQL) database through the use of SQL queries (e.g. SELECT, INSERT, DELETE, etc...). Using Thin AXL requires in-depth understanding of the database schema and is subject to breaking across CUCM releases because the database schema is not guaranteed to be backwards compatible across releases.
AXL Versioning
AXL API only supports versioning for Thick AXL API requests. Thick AXL API requests can specify the AXL schema version in the request header SOAPAction: CUCM:DB ver=15.0 as well as in the XML namespace URI for the the SOAP Envelope element within body of the request xmlns:ns="http://www.cisco.com/AXL/API/15.0" . Both SOAPAction header and the XML namespace URI should indicate the same version. The SOAPAction request header is optional but if supplied it supersedes the version specified in the XML namespace URI. The AXL schema version in the XML namespace URI is always required.
The version specified in the AXL API request indicates which AXL schema version the request payload will follow and the response should follow.
CUCM maintains backwards compatibility with the running release minus 2 major versions. For example, applications written with CUCM 12.5 schema will still be supported through CUCM version 15 (because there was no version 13, so the next two versions are 14 and 15).
Although not recommended for schema dependant Thick AXL methods such as addPhone or updatePhone, if an AXL API client wishes not to specify a specific schema version, for example, when using the getCCMVersion method, we can omit the SOAPAction header and include a particular schema version 1.0 in the AXL XML namespace URI. In this case, CUCM will attempt to apply the lowest schema version supported by that CUCM release. For example: The AXL Developer Guide - Versioning on developer.cisco.com has more information including supported schema versions per CUCM major release as well as backward compatibility best practices and more.AXL Performance
The AXL SOAP Service has dynamic throttling to protect system resources. When receiving an AXL write request, the CUCM publisher node via Cisco Database Layer Monitor service dynamically evaluates all database change notification queues across all nodes in the cluster and if any one node has more than 1500 change notification messages pending in its database queues, the AXL write requests will be rejected with a "503 Service Unavailable" response code. Even if the CUCM Cluster is keeping up with change notification processing and DB queues are NOT exceeding a depth of 1500, only 1500 AXL Write requests per minute are allowed .
The database change notifications queue can be monitored via the following CUCM Performance Counter on each node ( \\cucm\DB Change Notification Server\QueuedRequestsInDB ). This counter can be viewed using the Real Time Monitoring Tool (RTMT), but we will also show you how to retrieve CUCM Perfmon Counter values programmatically as well in the next section.
AXL read requests are NOT throttled even while write requests are being throttled.
In addition to AXL requests throttling, the following AXL query limits are always enforced: A single request is limited to returning under 8MB of data. Concurrent requests are limited to under 16MB of data.
The Data Throttling and Performance page on developer.cisco.com has more information on this topic.
AXL Schema
As mentioned earlier, XML objects are defined in an XML schema file. The latest CUCM AXL Schema Reference (CUCM 15) can be found at https://developer.cisco.com/docs/axl-schema-reference/ . This guide shows you the detailed structure of hundreds of methods available as part of the AXL API.
To reference an older version of the AXL schema, refer to https://developer.cisco.com/docs/axl/#archived-references .
You may refer to the AXL Operations by Release Matrix located at
https://developer.cisco.com/docs/axl/#!operations-by-release
to identify changes between Releases.
Now, with a background on the AXL API, you can use the SoapUI application to perform a common task via the API - adding a Phone to CUCM. At this point you are using the SoapUI application to construct the raw XML messages that will be transmitted to CUCM. Later you will do this in an easier, more programmatic way.
Add a Phone
- Open SoapUI with the UCMSOAP project that you created in the previous section of this lab. If for some reason you closed the file, follow the steps on the previous page to open the AXLAPI.wsdl in SoapUI and add the CUCM CUCM hostname or IP address and credentials.
- In the Navigator, under AXLAPIBinding , scroll down to the addPhone method and expand the node by clicking the '+'.
- Double-click on Request 1 under addPhone.
-
In the previous example you executed the getCCMVersion method, which required no additional parameters. In this case, the addPhone method requires many more elements.
Some of the input elements are optional and can be removed. In default SoapUI request payloads, these are prefixed by a line containing the following:
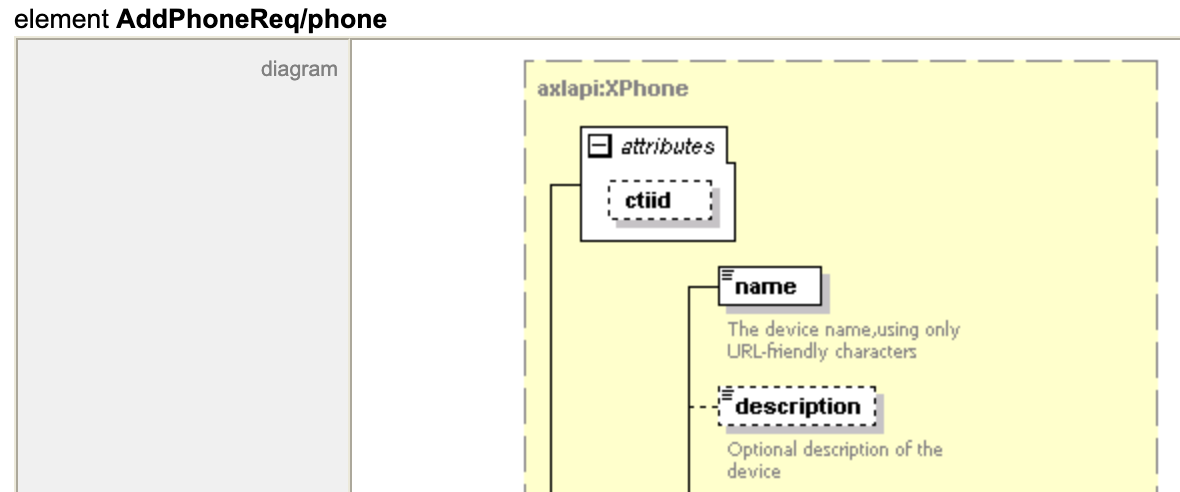
For example, description element is optional as shown below:
The same optional input element is documented in the AXL Schema for AddPhoneReq/phone element as shown below. Notice how the box around the word description has a dotted line. This indicates that parameter is optional:
-
Do not enter the information provided in this step yet - this is just for your information. Here is a list of elements to use in the addPhone request:
- name: CSFPOD22UCMUSER
- description: Cisco Live LTRCOL-2574 - pod22ucmuser
- product: Cisco Unified Client Services Framework
- class: Phone
- protocol: SIP
- protocolSide: User
- devicePoolName: Default
- The Phone should also have a line associated with it. The required information for a line looks like this for the phone you are adding:
- You can try to enter all the above information into the existing template request that SoapUI provides, but to avoid typing errors, it is easier to just copy the whole request below and paste it into SoapUI. Notice there are far less parameters provided here than what is listed in the template because many of the template parameters are optional. Click the Copy button below and paste the text into the SoapUI request, replacing the existing text.
-
Click the green
Run
button to execute the request.
You should receive a valid response similar as the following (the UUID value in the curly brackets will be different):
The response data above contains the UUID (Universally Unique IDentifier) for this Phone device just added to the CUCM database, which uniquely identifies this device in the database. It may be useful for modifying or removing this device. Within the CUCM Database, this is how this phone device will always be referenced. You can actually see this same ID if you log into the CUCM admin and, from the Device > Phone page, hover over the link to this phone. The URL would be something like: https://cucm1a.pod22.col.lab/ccmadmin/gendeviceEdit.do?key= 06ea28c2-18ef-ecce-9ad1-e47f41c7e46f . In practice, if you are using Thick AXL, you should not need the UUID because you can always reference the device by the device name for any additional queries on the device.
-
If an error is encountered, AXL will return a SOAP Fault. To see this in action, click the green
Run
button
again to execute the request a second time.
You should see a response like this:
The response contains a SOAP Fault message indicating that the phone device could not be added because a device with the same name already exists in the CUCM database. In this case the error is expected because you are trying to add the same device twice, so you can ignore this error.
-
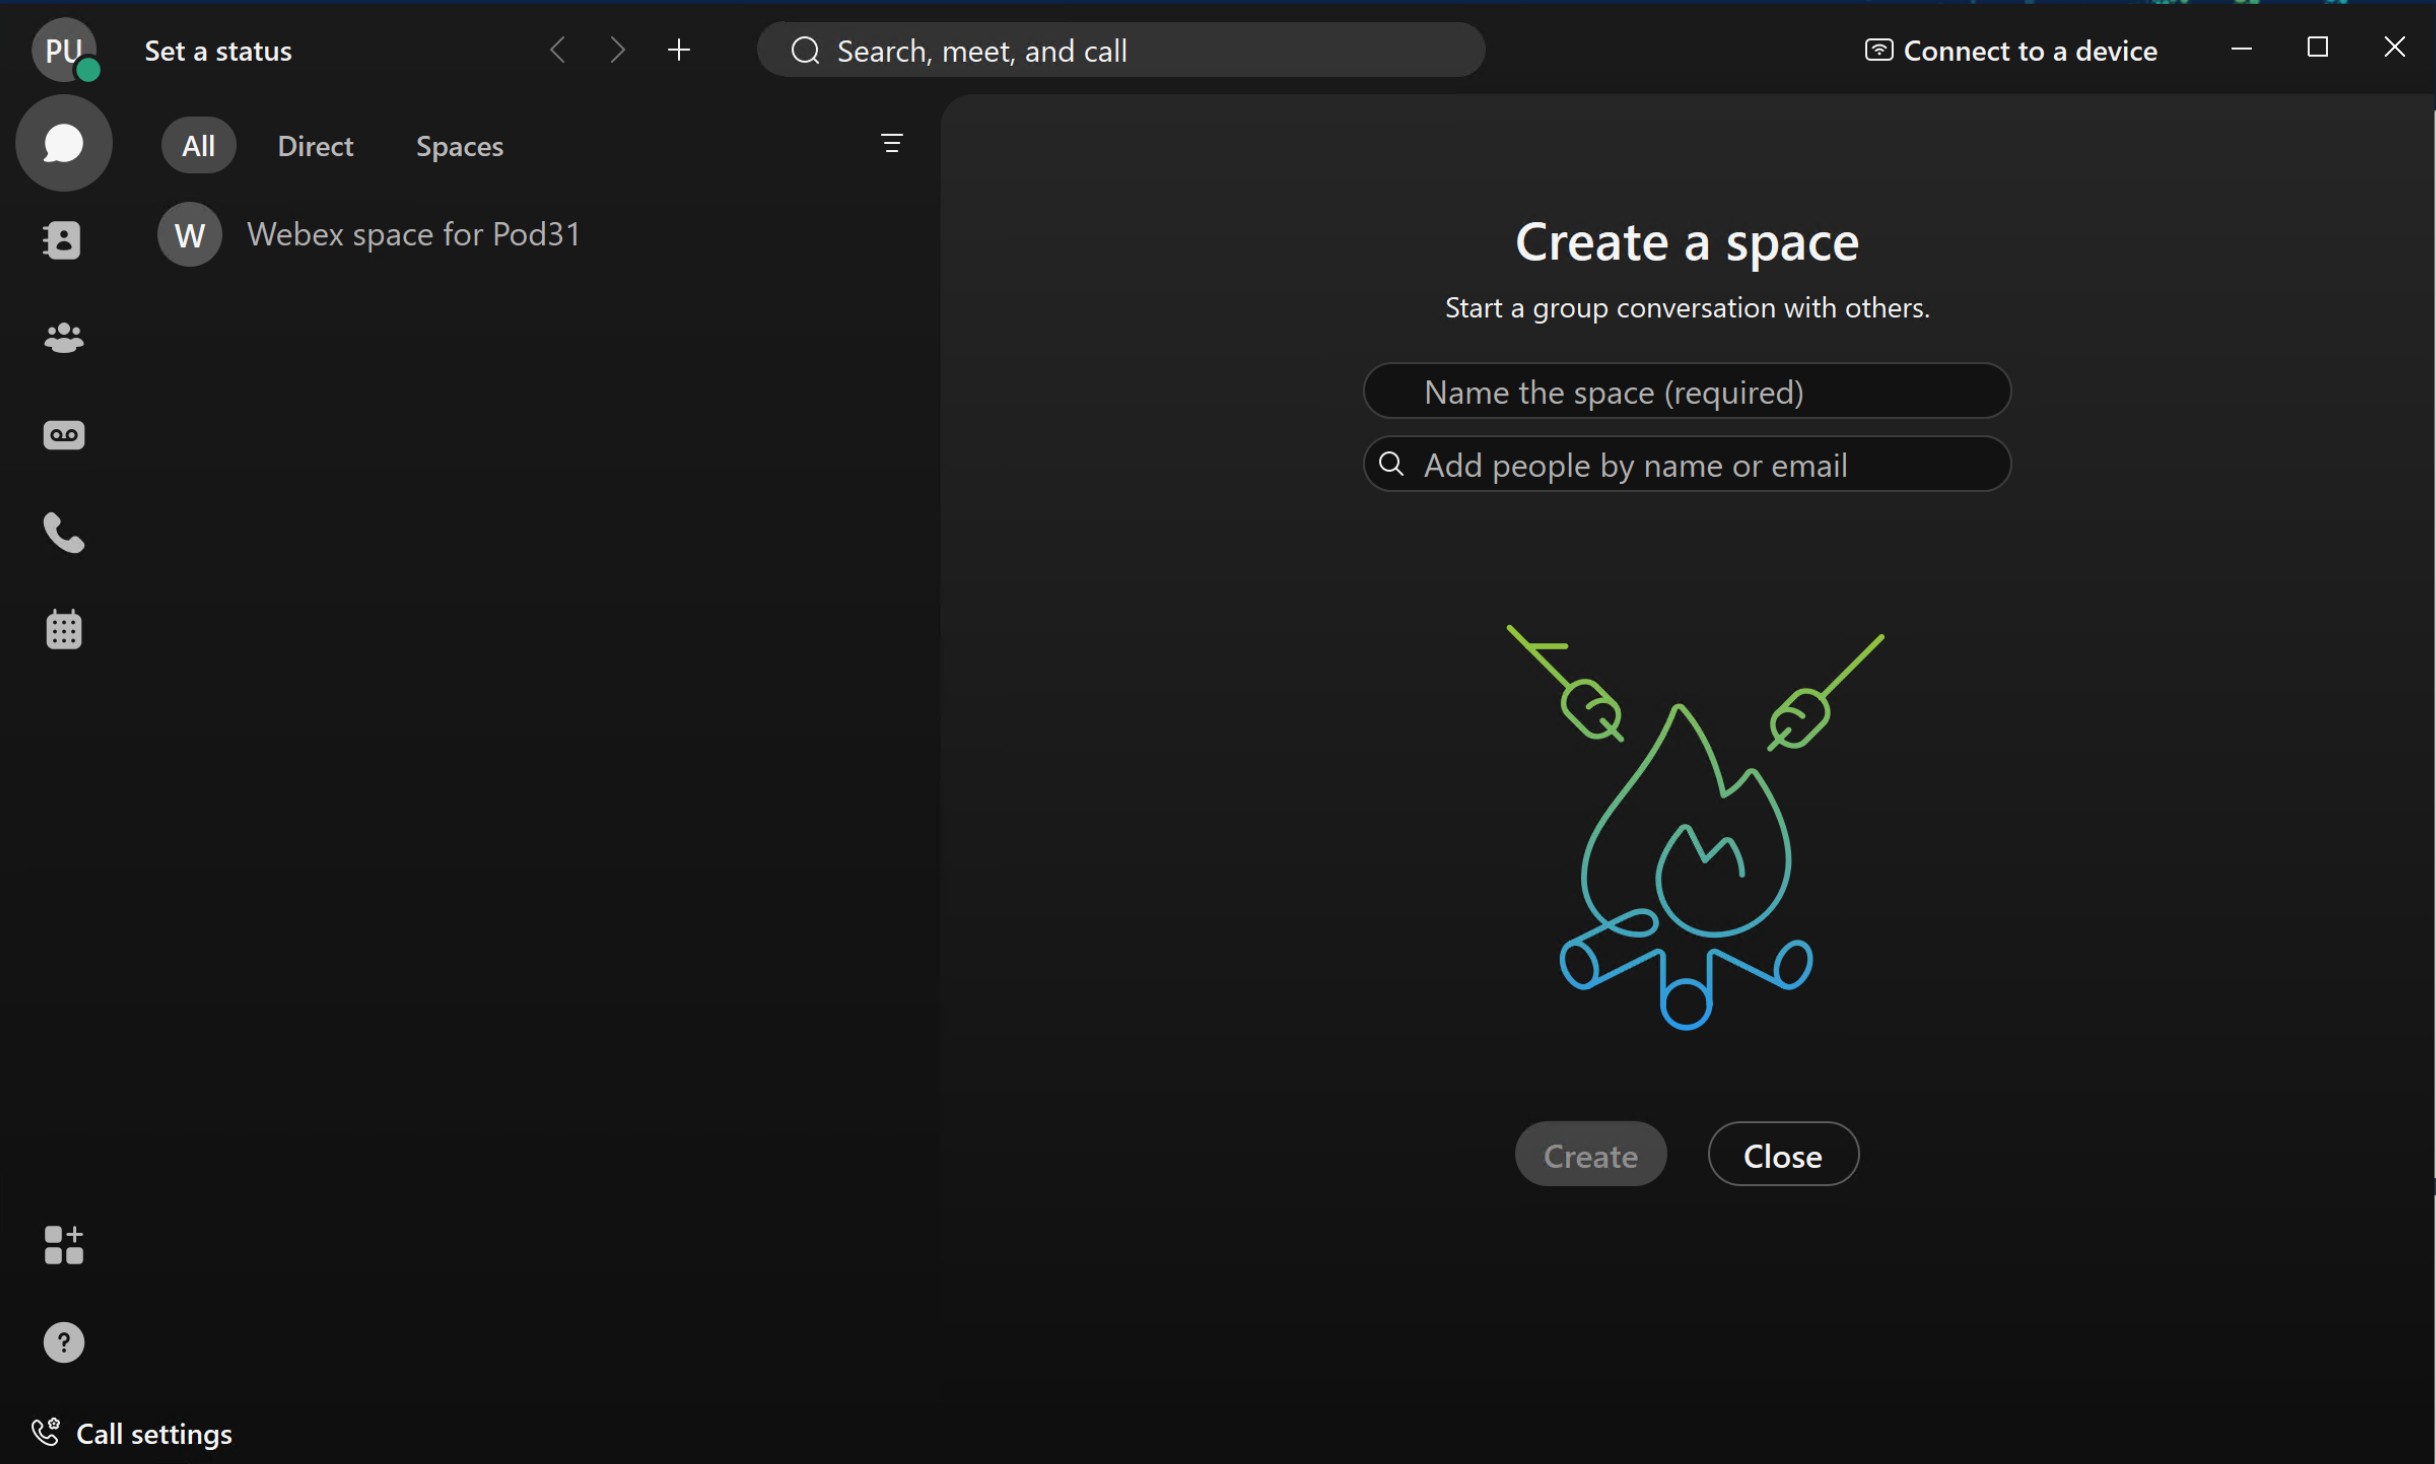
Now that you have added the device to CUCM, From the Desktop or the taskbar of your PC, launch the Webex application and proceed to sign in.
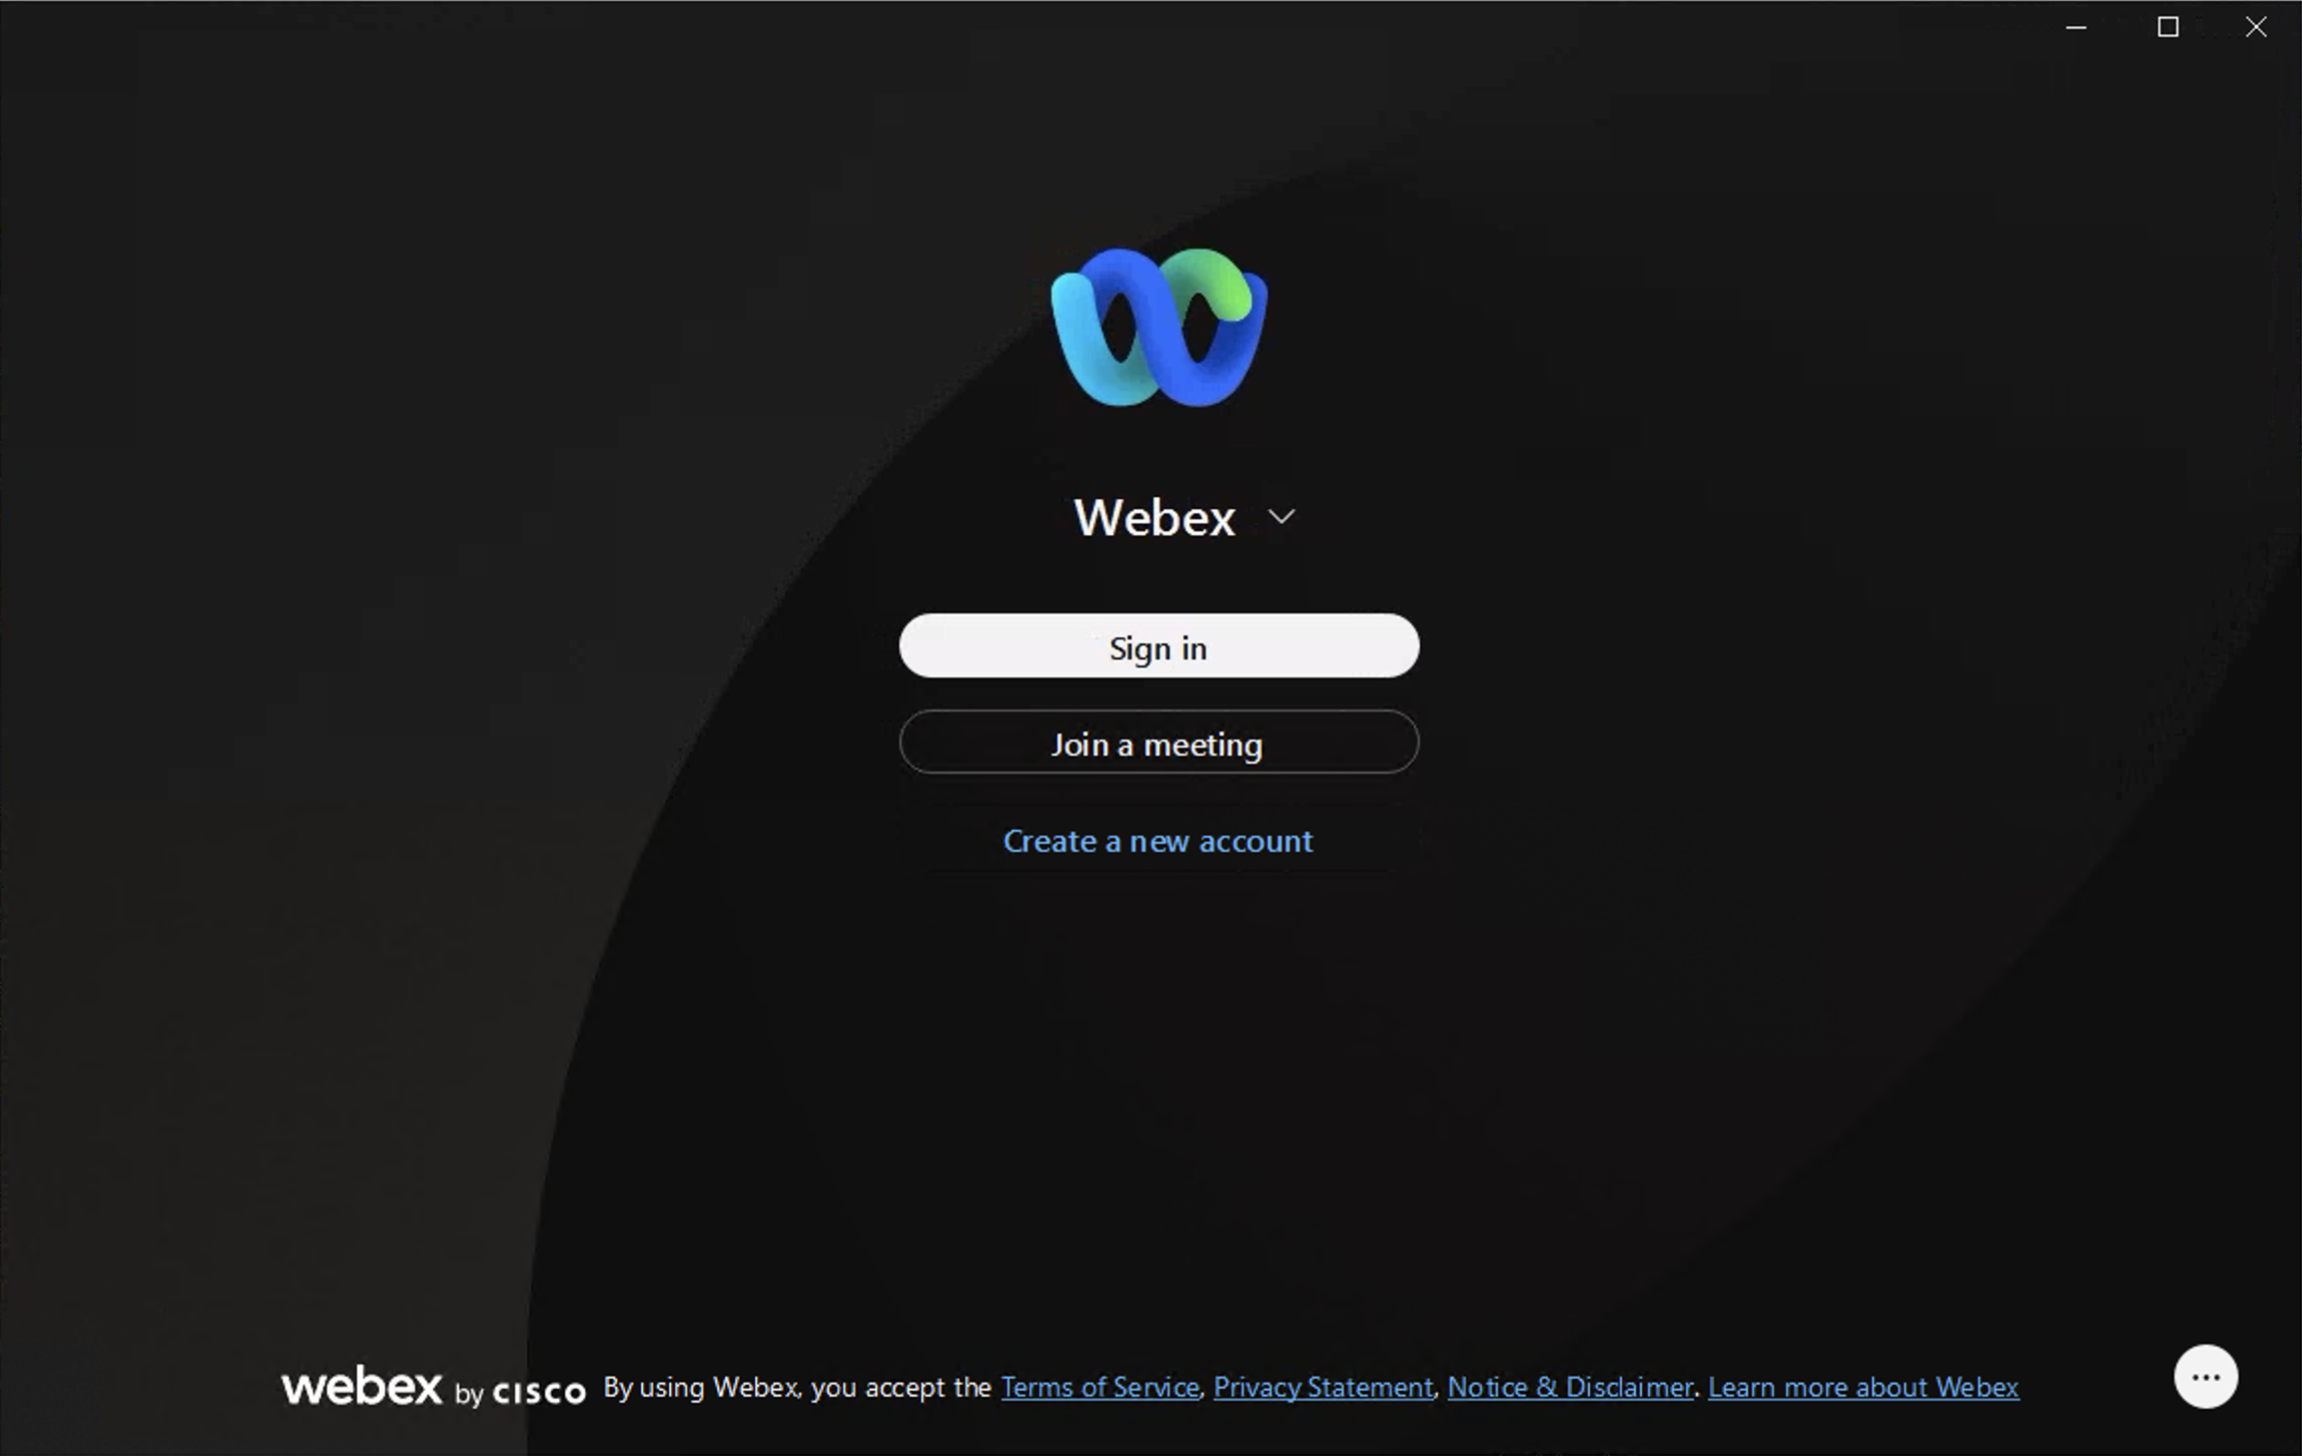
- Enter your email address pod22ucmuser@collab-api.com and click Next
- Enter your password C1sco.123 and click Sign In
-
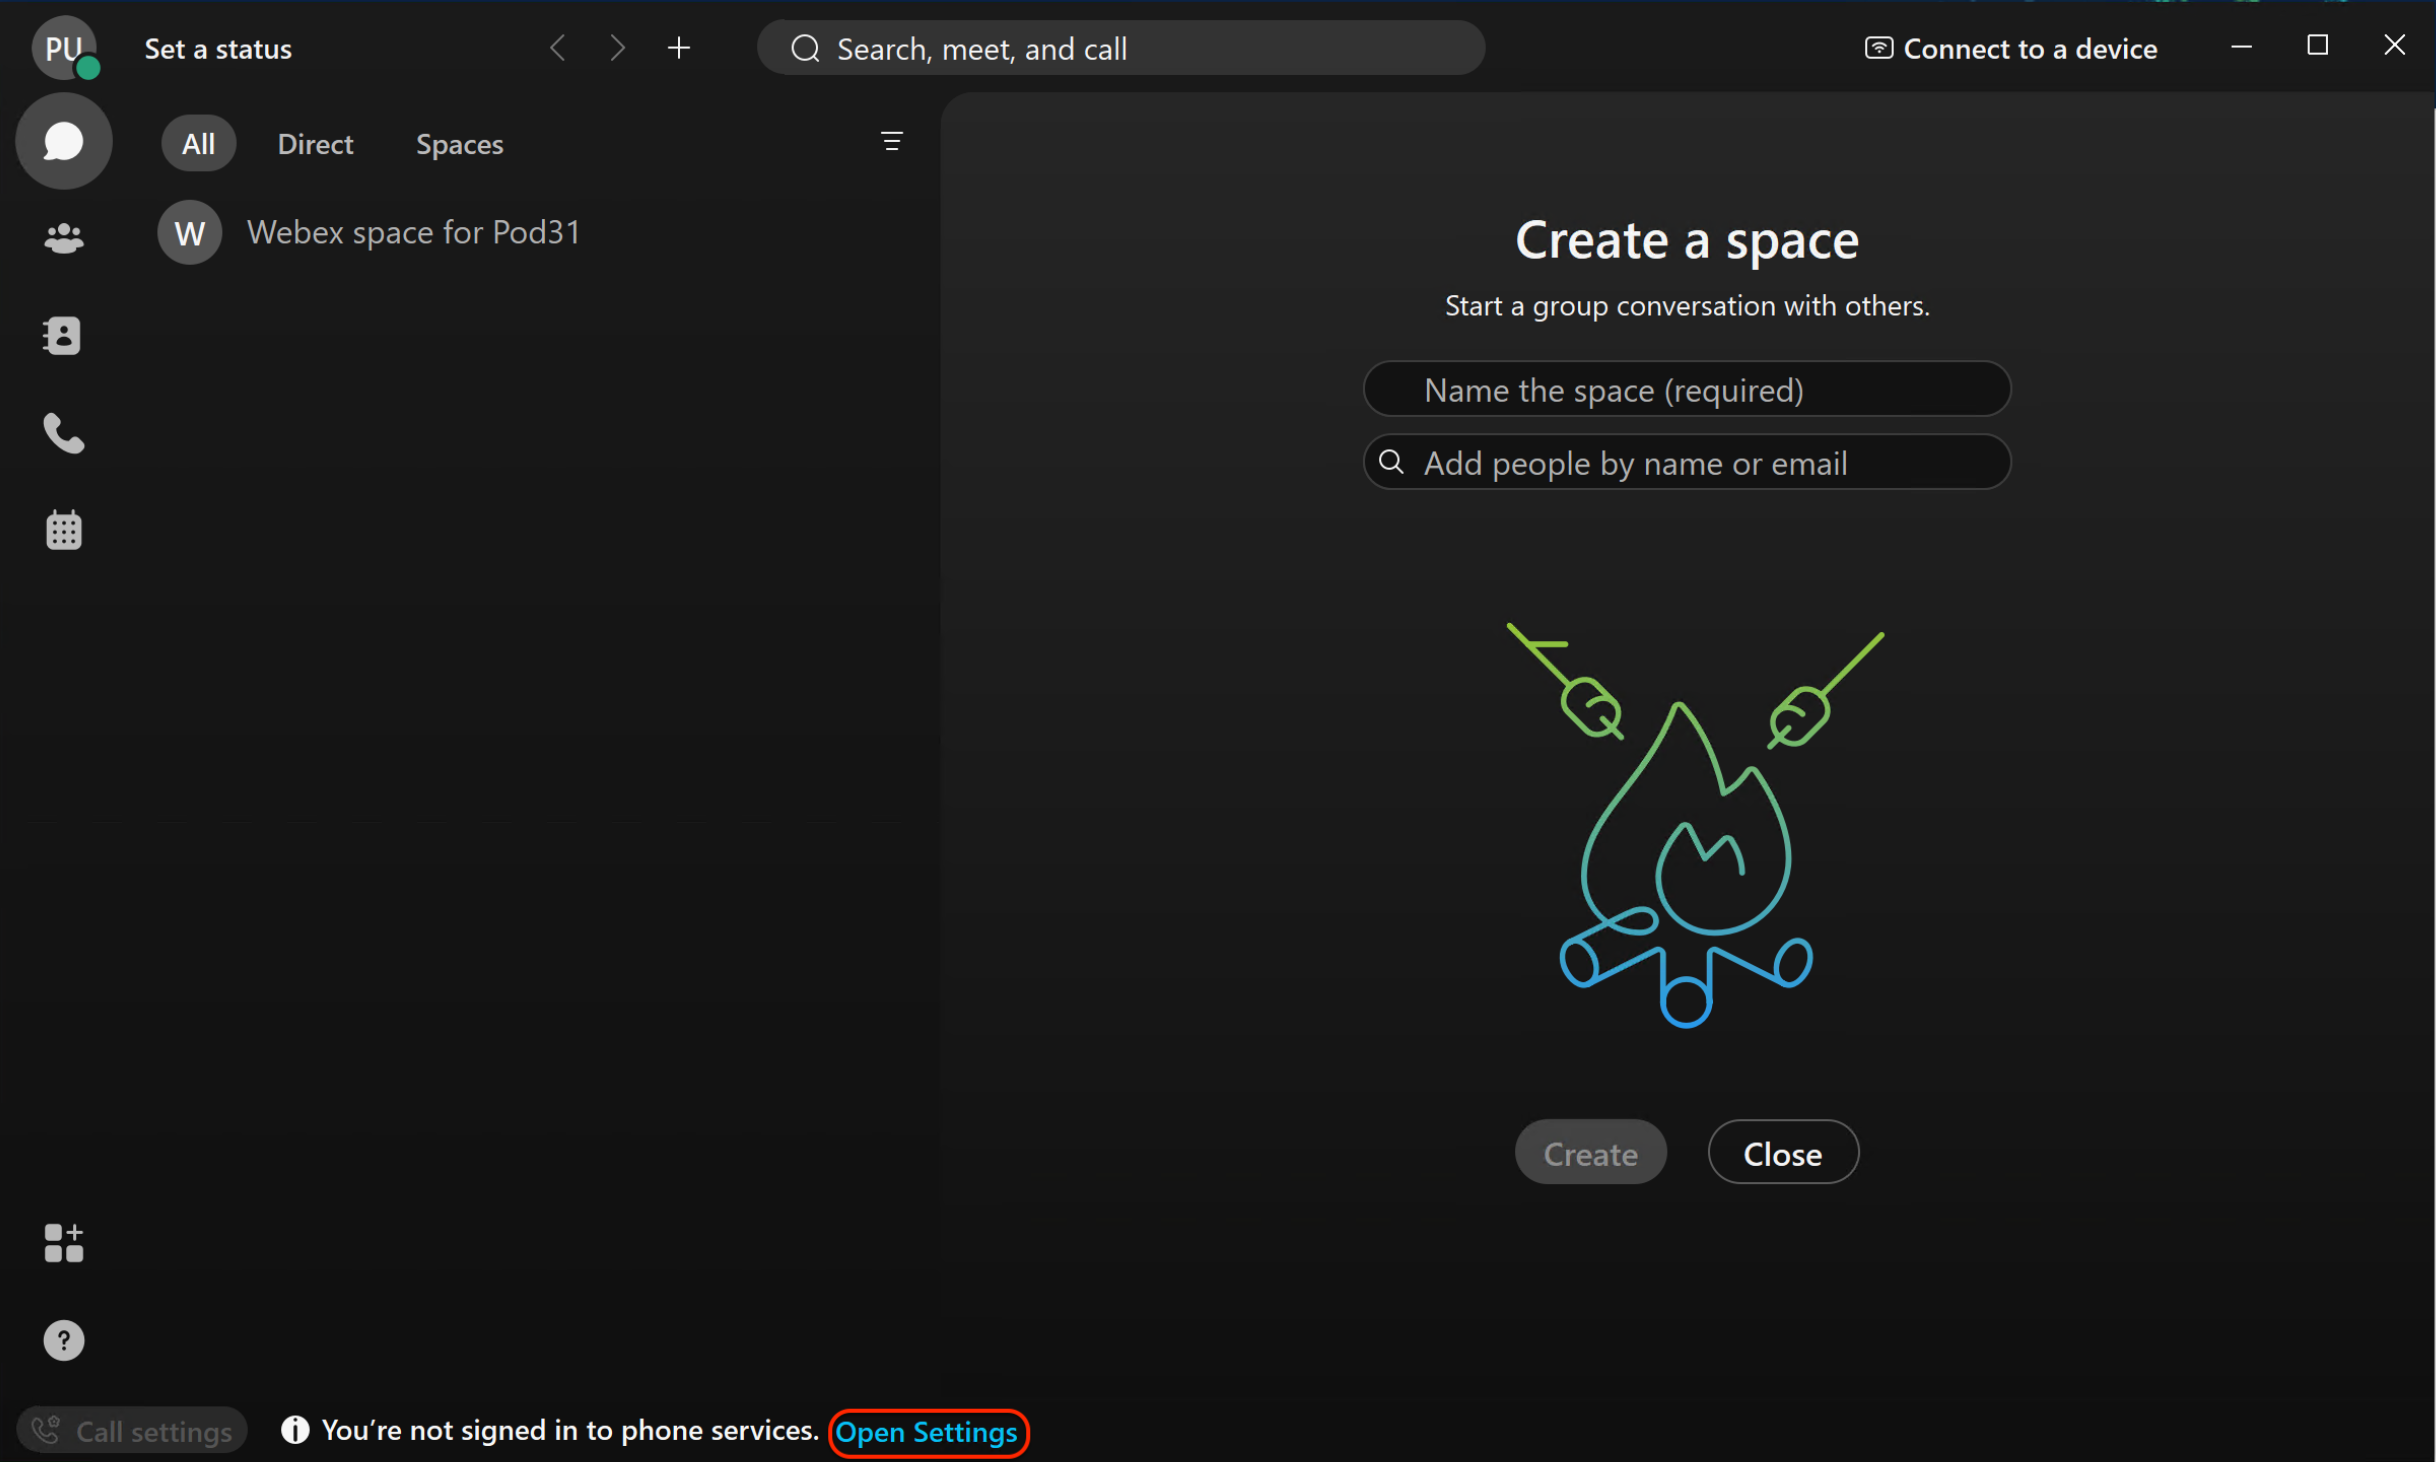
You have now logged in your pod22ucmuser@collab-api.com to Webex. If instead of the
Call Settings
indicator at the bottom, you're notified that you need to sign in to phone services, click
Open Settings
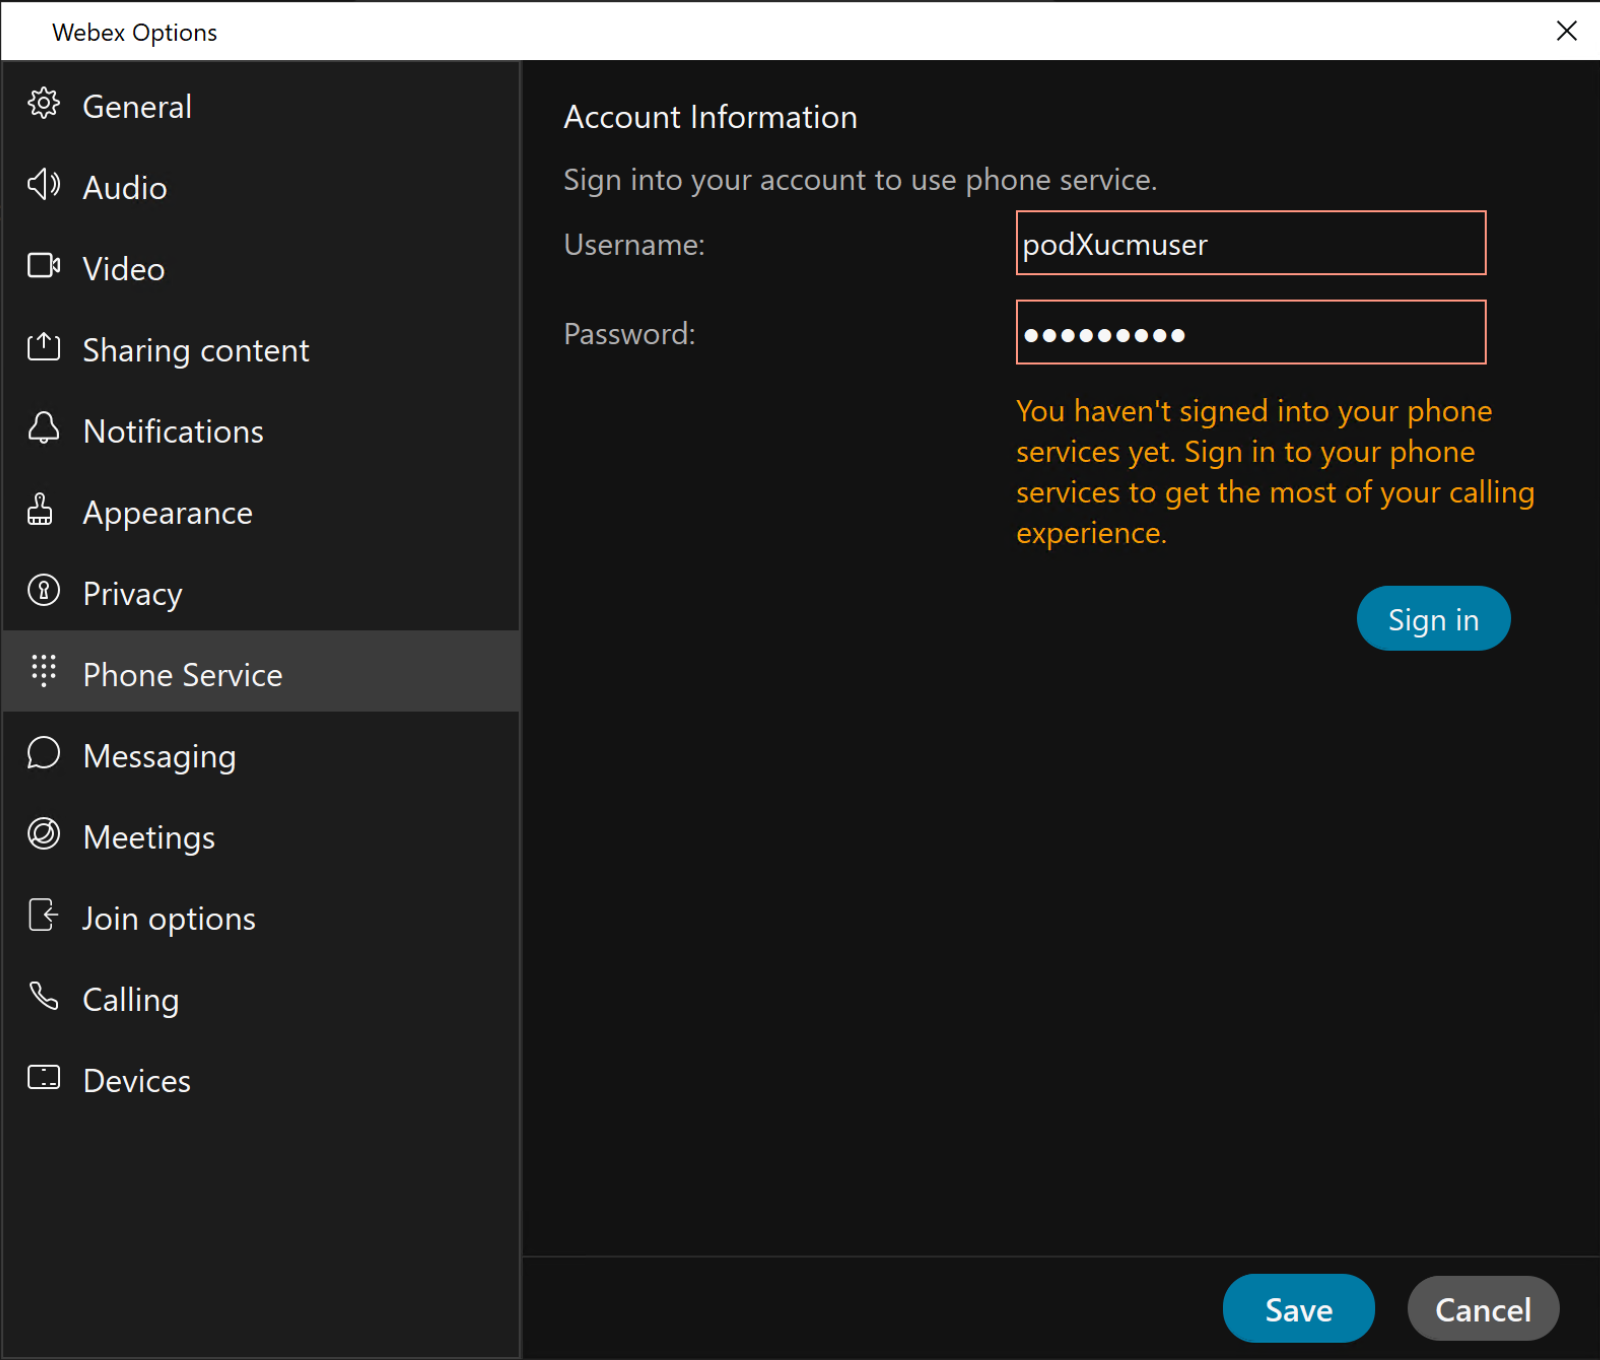
-
Enter your UCM User account name
pod22ucmuser
and password
C1sco.123
and click
Sign in
to complete phone services login
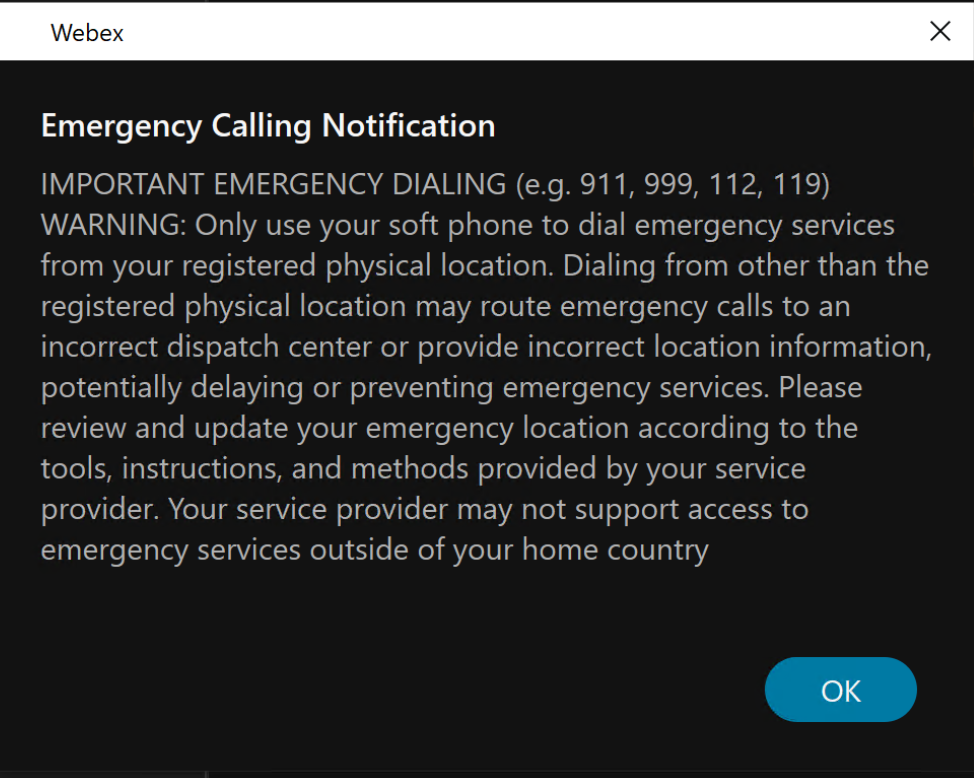
-
Click on to acknowledge the Emergency Calling Notification, if necessary.
-
You now have your Webex Client's Phone Services connected to your CUCM. Click
Save
to close the Webex Options window
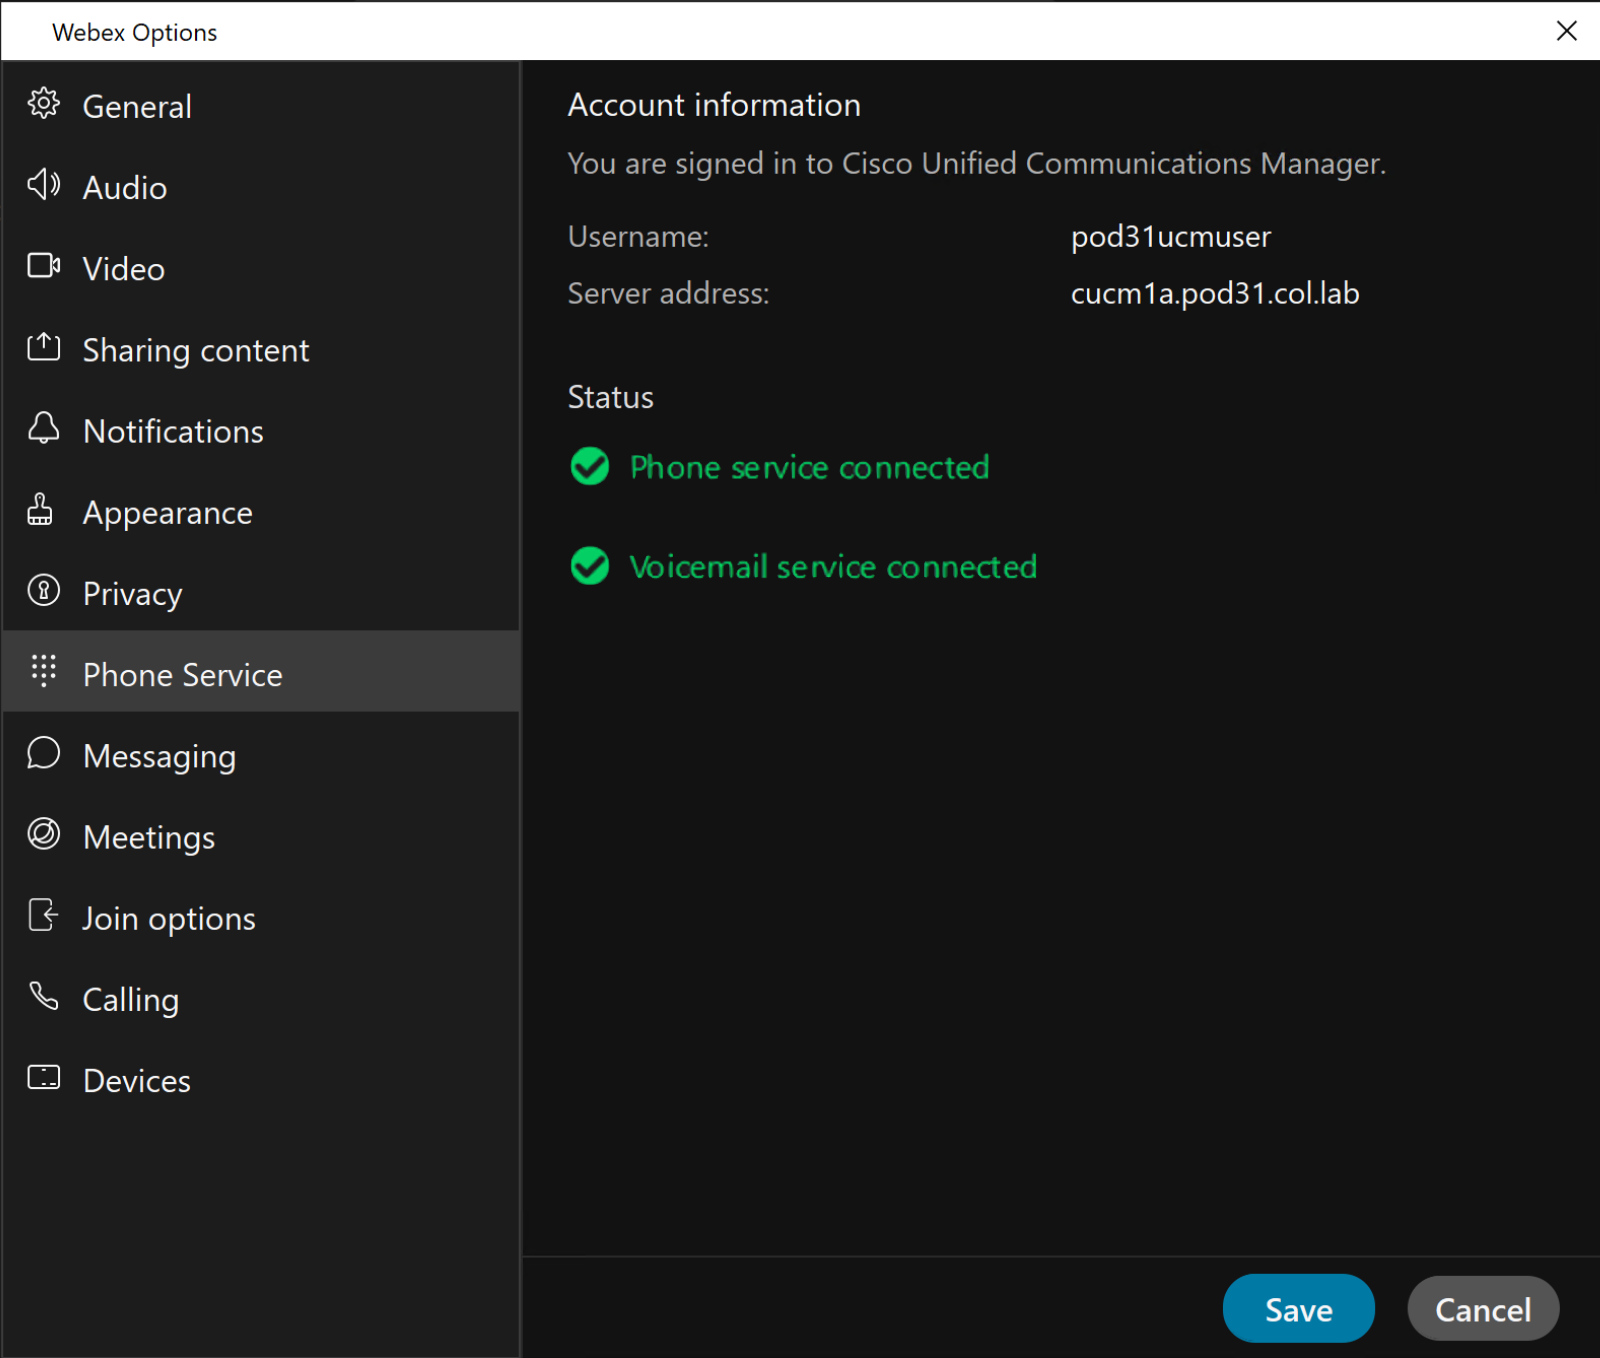
-
Your Webex client is now ready to place calls via your pod's CUCM
-
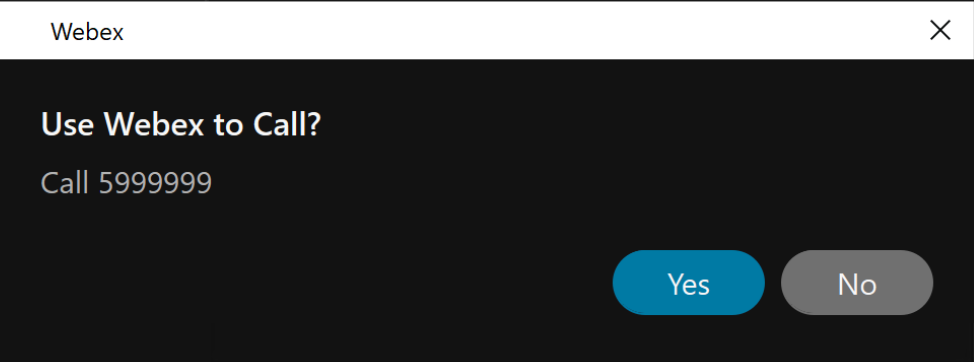
Test calling from the laptop by clicking/dialing
5999999
.
This is your pod's Unity Connection Voice Mail Pilot number. Open Webex and click Yes to place your call. (
NOTE: The call will FAIL!
)
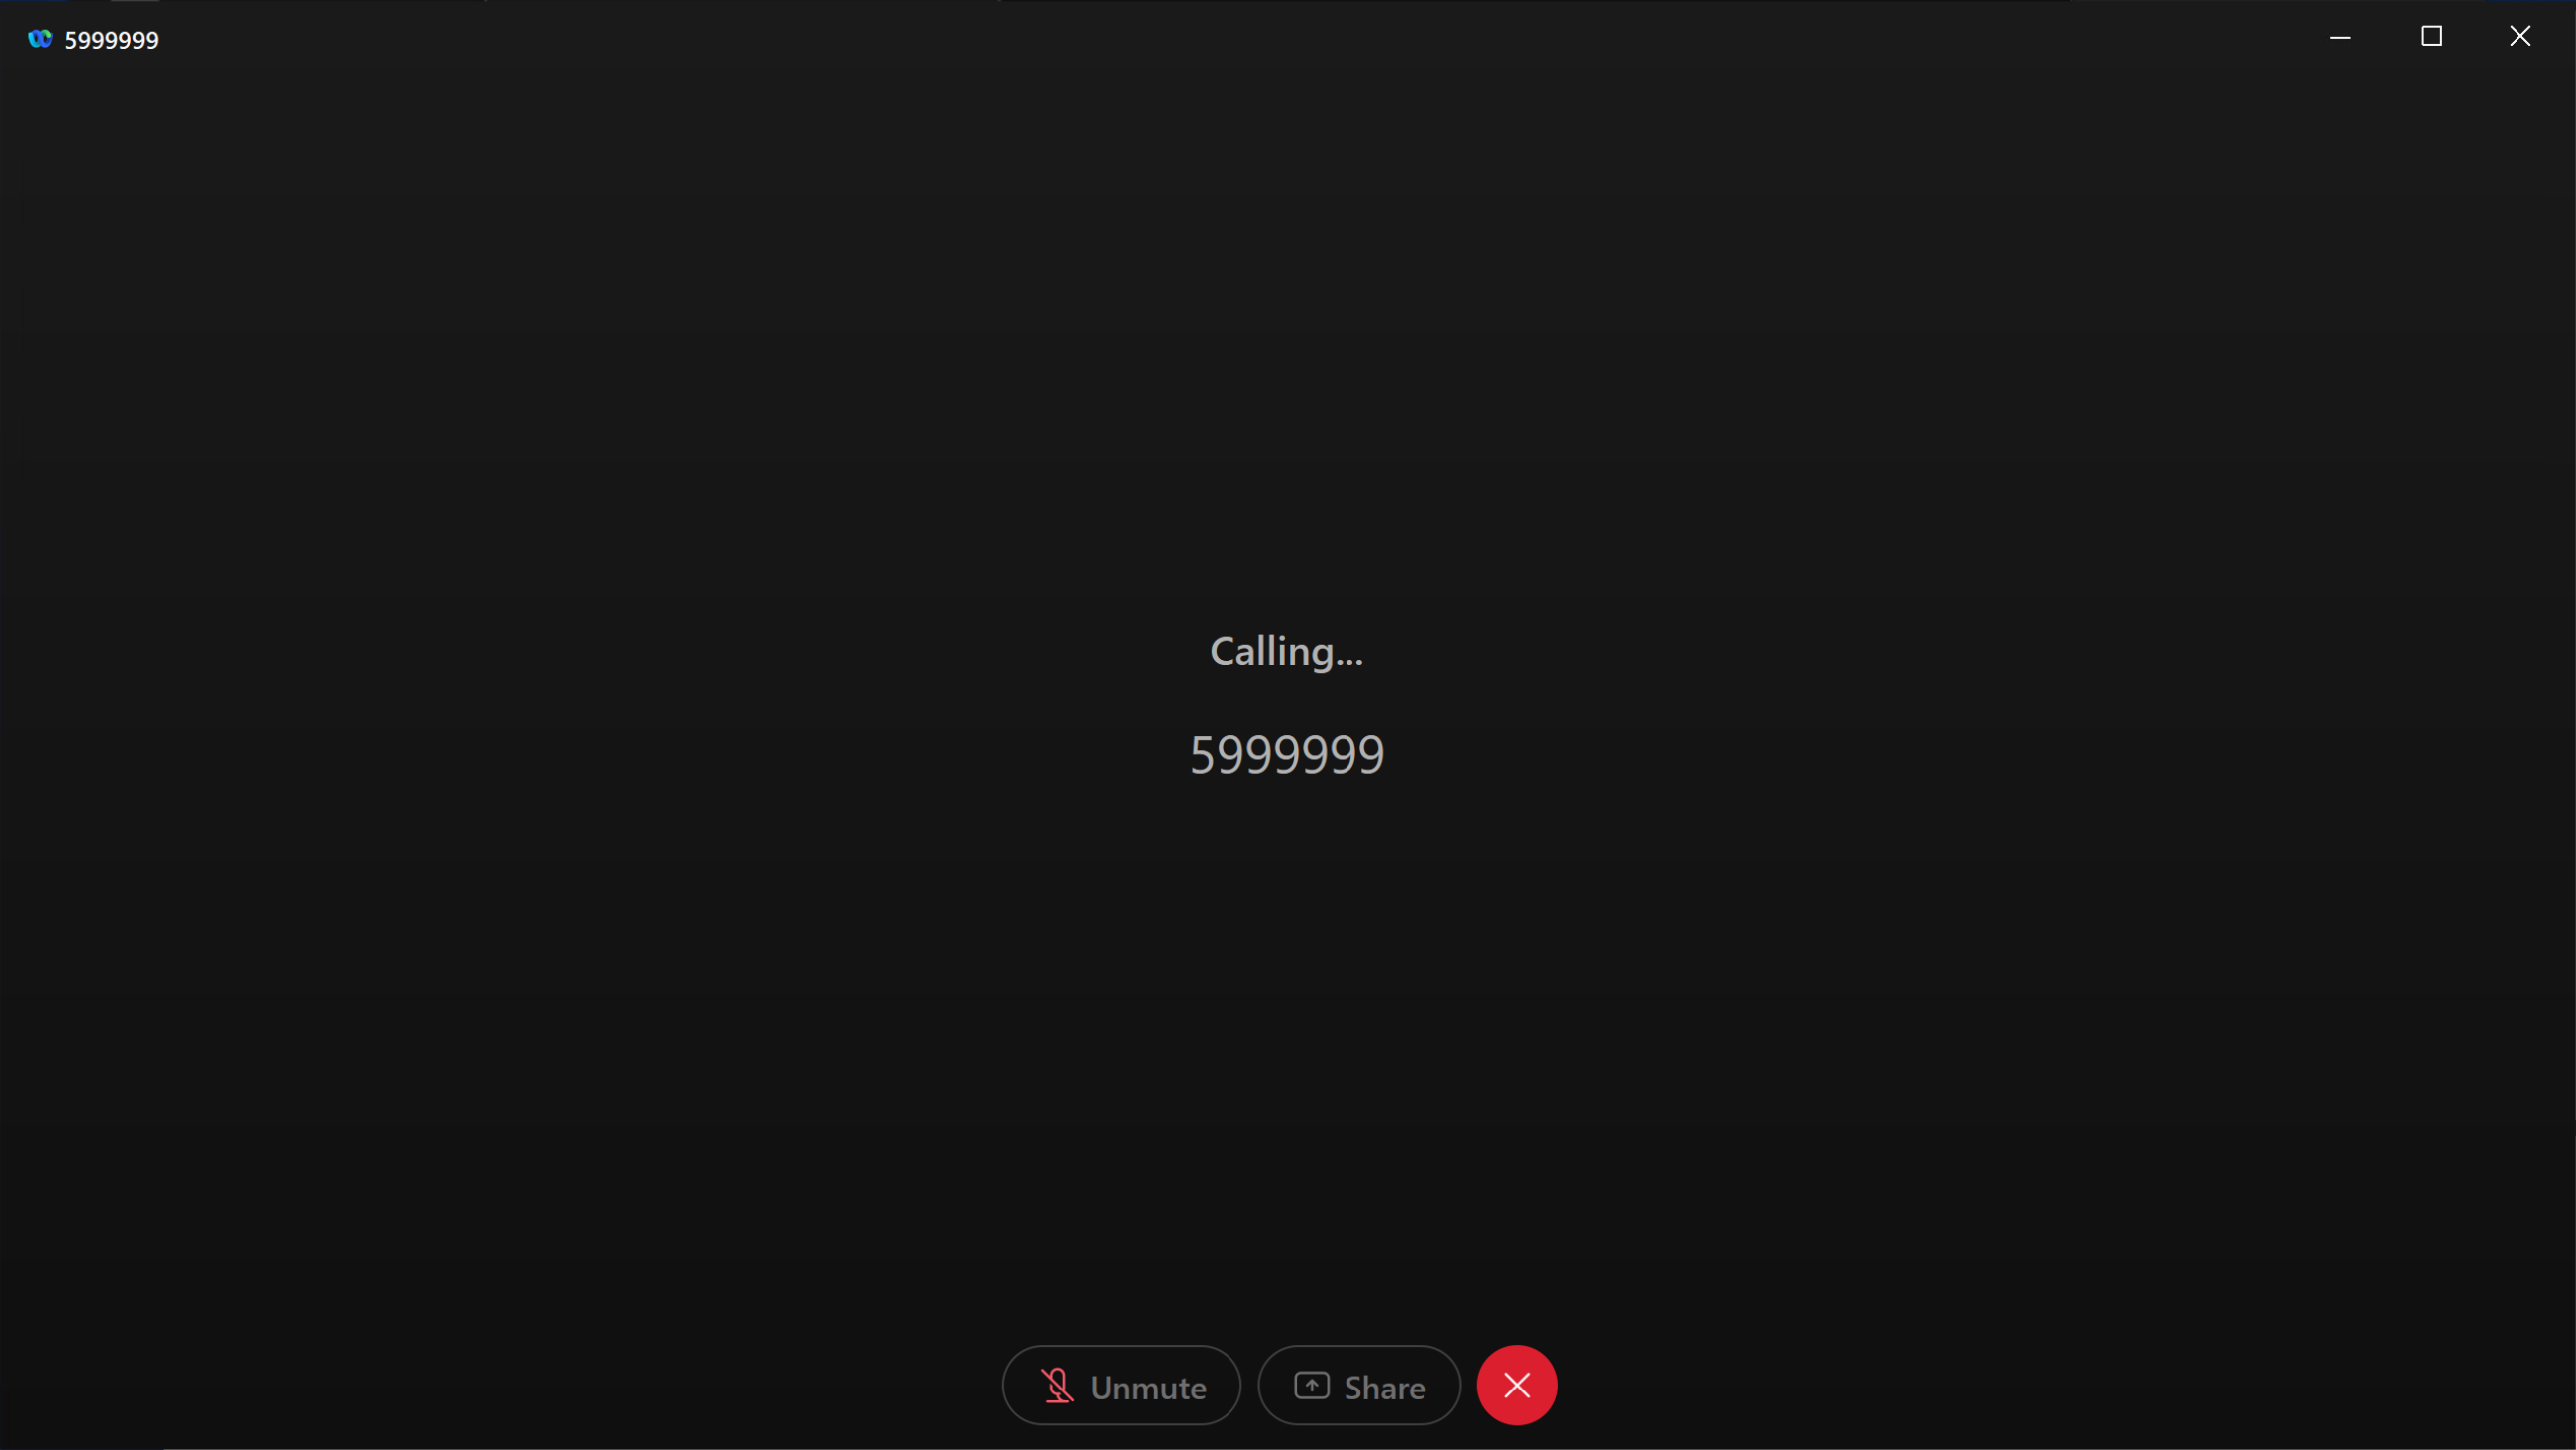 Why are you hearing re-order tone? Because the Calling Search Space on the newly inserted phone device
was not set. You will fix that later when you explore how to modify a device.
Why are you hearing re-order tone? Because the Calling Search Space on the newly inserted phone device
was not set. You will fix that later when you explore how to modify a device.
Now that you have your phone registered to CUCM using AXL Methods with the SoapUI tool, let's look into a few more AXL Methods but in a programmatic way using Python.
Now that you have discovered how to interact with the AXL API by using SoapUI to execute against the WSDL-defined API methods, you may be wondering how to overcome the challenge of programmatically building these requests' payloads and parsing their responses. Good news: this is where a Python library named zeep comes to our aid. The Zeep library, which can be downloaded from https://pypi.org/project/zeep/ , itself depends on a few more Python libraries, such as lxml and requests to list a few. Collectively these Python libraries make our automation development efforts much easier. We will gently introduce you to these Python libraries before diving deep into them as you build the provisioning portal.
You will now navigate to your development environment where a web-based VS Code is running. You will start with executing the listPhone AXL method using Python code. The six tasks you will accomplish in this section are:
- AXL client setup
- List Phones
- Update a Phone
- Apply Phone Configuration
- Get Phone Details
- Add a Phone
Follow these steps to perform the above listed tasks:
Step 1 - AXL Client Setup
- Access your VS Code instance: https://dev1.pod22.col.lab:8443
-
Click the
Explorer
icon
at left, and you see a list of folders and files.
-
Navigate to expand the
examples
folder and click to open
soap_axl.py
. You now have the file open for editing.
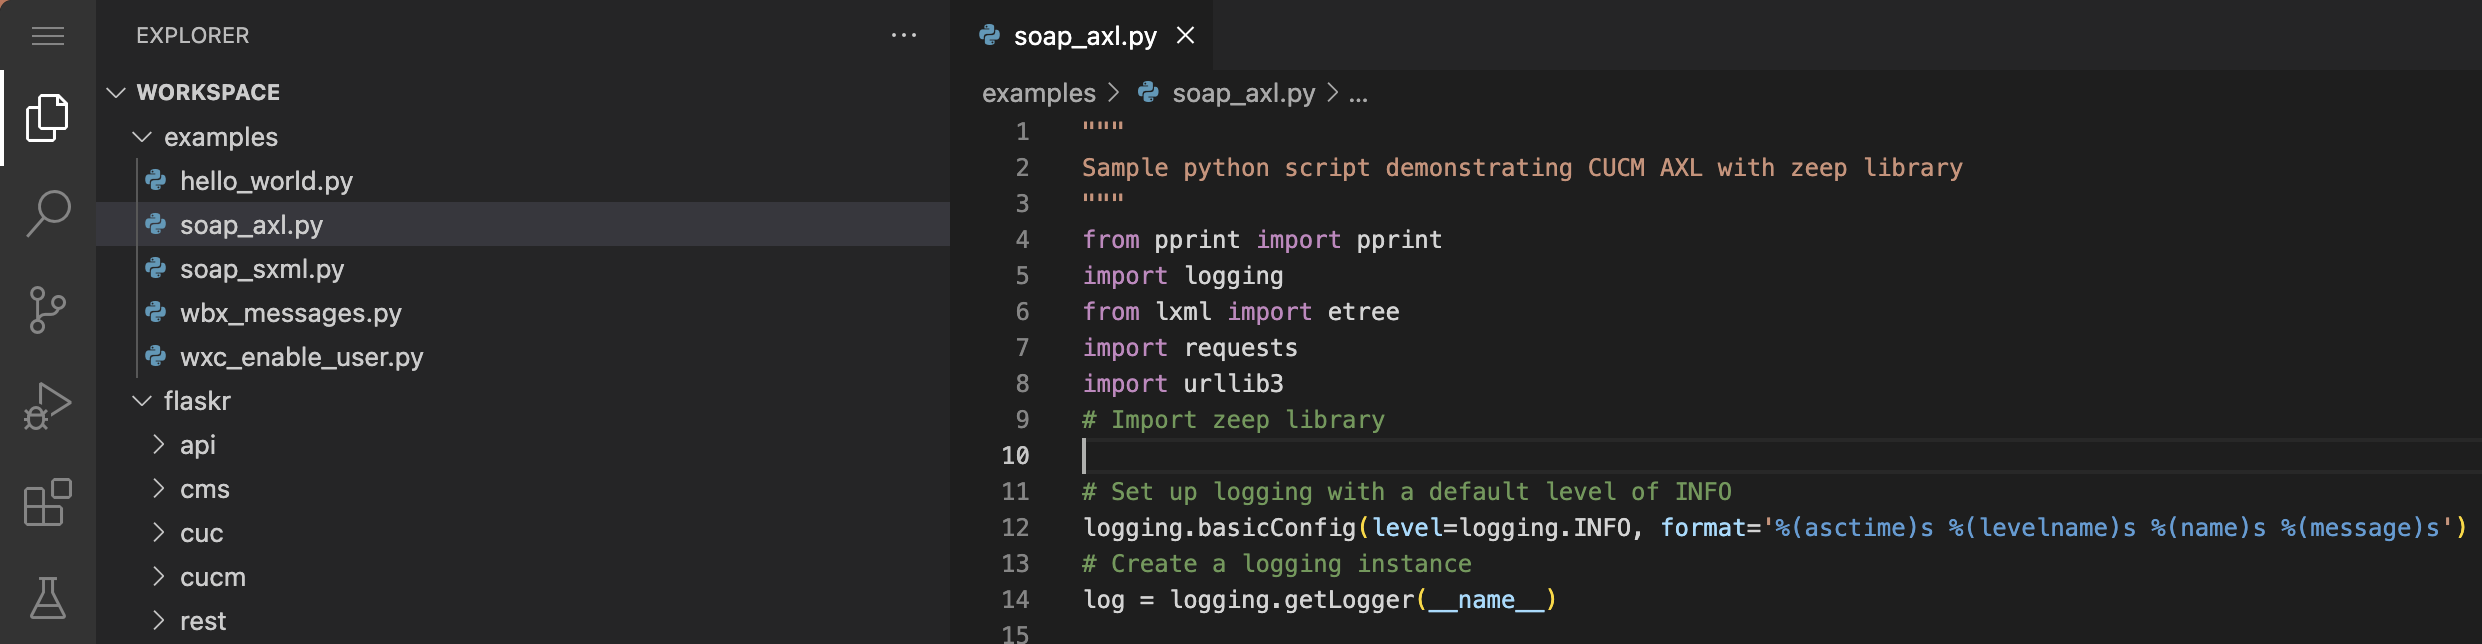
-
Here is a basic Python script skeleton that you will use to execute SOAP AXL API requests using the
zeep
library. The Python environment on your development server has
zeep
and all other
required libraries installed using the
pip
tool. Throughtout this lab you will find examples like what
is shown below that indicates the file you must edit, the surrounding lines in the file you should add code, and the code you should
add. You can (and should) use the Copy button on the right to copy the selected line or lines and then paste them
into your VS Code editor window in the correct location.
Start with importing the zeep library to the sample Python script. Click the Copy button next to the highlighted line and paste it into your file after the line that has the comment saying "Import zeep library". -
You'll notice several lines of code already present in the file that are used to configure logging and create a 'log' object
that you will use to generate log files.
Next, create a few constant variables that you will use to connect and authenticate to your Pod's CUCM AXL API. NOTE that this is just an example for learning purposes. In a production environment, you would not hard code these values into your script.
Copy and paste your Pod's CUCM hostname, admin username and password into your file. -
In your development workspace, we have already downloaded the AXL WSDL files for you. Create another constant variable
for the AXL_WSDL_File. You will use this WSDL file location variable to initialize the zeep client. Paste the following highlighted
line it into the file.
-
You will use the session object from the requests Python library to handle authentication,
certificate validation (or not), and persist cookie caching across API requests.
In this lab environment we are not using CA signed (valid) certificates on the CUCM server. In order to allow the Python script to establish SSL connection you need to disable SSL certificate verification for the sessions. Disabling SSL certificate validation is not recommended in production environments, hence there will be a warning printed in your console every time an insecure request is made. You will disable this warning as well.
Finally you will configure the authentication type and credentials that will be used throughout the session. The script will utilize the HTTP Basic authentication method and the CUCM_USERNAME and CUCM_PASSWORD variables that you have created earlier.
The following block of code will first create the session instance, then disable SSL Certificate verification and configure basic authentication. Paste the following highlighted lines it into your file: -
For debugging and troubleshooting purposes, you may need to inspect the SOAP envelope content
that is being sent to CUCM and the corresponding responses. The zeep library
comes with a built-in History plugin that makes it easier for you to inspect the payloads.
Create an instance of zeep HistoryPlugin to achieve this. Paste the following into your file:
-
You are now ready to create the zeep.Client instance that will greatly simplify sending and
receiving AXL methods to/from CUCM. You will use the AXL_WSDL_FILE variable, session object,
and the history plugin object to create the client instance. Paste the following into your file:
-
The final step before you can use the zeep client is to create a new ServiceProxy object named
service
.
The AXL WSDL file you downloaded from CUCM defaults the endpoint url to https://CCMSERVICENAME:8443/axl/
and needs to be updated to reflect your Pod's CUCM_ADDRESS. This configuration is the
same as what you did with SoapUI under AXLAPIBinding -> Service Endpoints configuration.
As you create a new service object using the zeep.client create_service method, insert the CUCM_ADDRESS
variable into the full URI string. This will set the AXLAPIBinding endpoint url to
https://cucm1a.pod22.col.lab:8443/axl/
.
Paste the following into your file:
Step 2 - List Phones with Python
Now that you have created this service object you can use it to access any of the methods defined in the WSDL file such as the listPhones method. Follow these steps to execute the listPhones method to retrieve a list of phones.
-
SoapUI can be useful just to explore the parameters needed to pass to an API method like listPhones.
Don't worry about using SoapUI right now, but if you were to open the listPhones in SoapUI,
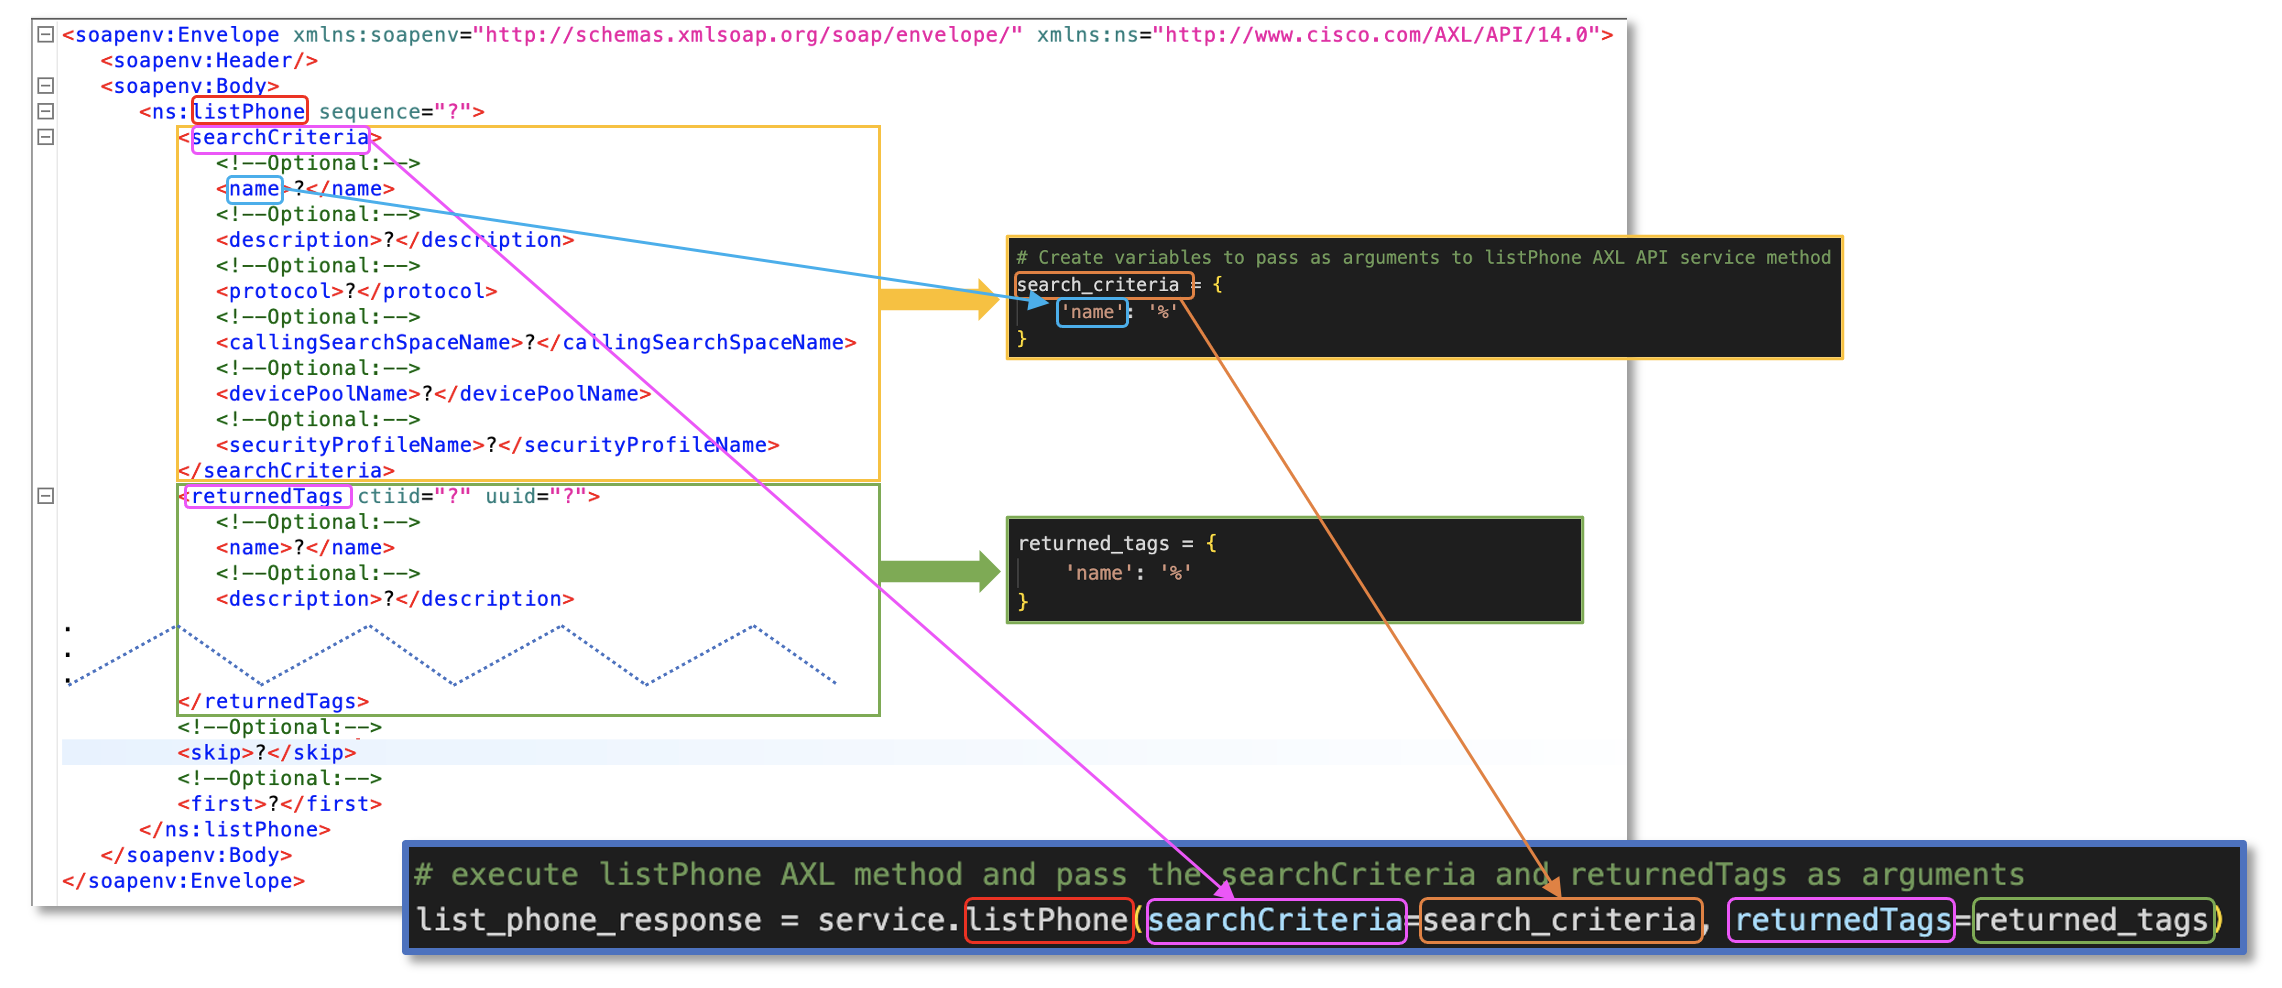
you would see the request payload that looks like this:
The listPhone method requires the following arguments: searchCriteria and returnedTags . The methods you call on the Zeep service object have the same names as what you see in SoapUI, so if you want to call the listPhones method, you would call service.listPhone with the appropriate arguments. The sample request from SoapUI helps you understand what parameters to pass without having to read through the detailed documentation.
When using Zeep, you do not need to worry about the XML structure of the SOAP request. Zeep will take care of that for you. Instead, you will pass basic Python data types such as numbers, strings, or dictionaries to the service.listPhone method depending on what is needed and Zeep will convert them to the appropriate XML structure. In this case, these two parameters require dictionaries because they are complex data structures that have key value parameters. Create the following variables that you will pass as arguments to the listPhones method. Paste the following into your file: -
You now have everything you need to execute the listPhone method via Python. Before proceeding, take a look at
how to identify the arguments and the data structures that must be passed to the service.listPhone method. The left
side shows the XML as you would see it in SoapUI and the other boxes show how those pieces correspond to the
various parts of the Python code. You can derive this same information by looking at the AXL refrence guide as well,
but we find it easier to use SoapUI as a reference. This same process can be used to determine what to pass in to
any of the Thick AXL methods.
-
Execute the listPhone AXL method with the searchCriteria and returnedTags arguments and assign the parsed
response to a variable named list_phone_response. The zeep library will take care of mapping the SOAP response
to a Python dictionary by understanding the AXL Schema defined in its WSDL file. Paste the following into your file:
This line is where all the magic happens. You never created a method called listPhone yet the service object has a method called listPhone because it was defined in the WSDL file. The zeep library created this method automatically and understands what parameters it needs based on the schema files.
-
Before running the sample script, add a few logging commands
that will simply log the structured output to the console for debugging purposes.
The first log will print the raw request payload that is sent to the CUCM while executing the service.listPhone method.
The next log will print the raw response payload that is received from the CUCM in response to the listPhone request
The last log will print the parsed response by zeep library. Paste the following into your file. -
You are now ready to run the sample Python script that will execute the AXL listPhone method. Run the
soap_axl.py
script similar to how you ran the hello_world.py in the introduction to your Development Environment.
In the VS Code navigation bar on the left, click the Run and Debug button.
Once you click anywhere in list of "RUN AND DEBUG" configurations, You should see a predefined configuration for running a python script named Python: soap_axl.py in the list. Make sure it is selected:

Click the green start arrow next to the RUN AND DEBUG text
Upon running the soap_axl.py Python script a new Python Debug Console terminal window will open at the bottom where the output of our script will be displayed. The screenshot below only covers the outbound SOAP payload sent to CUCM; there should be more logging output below.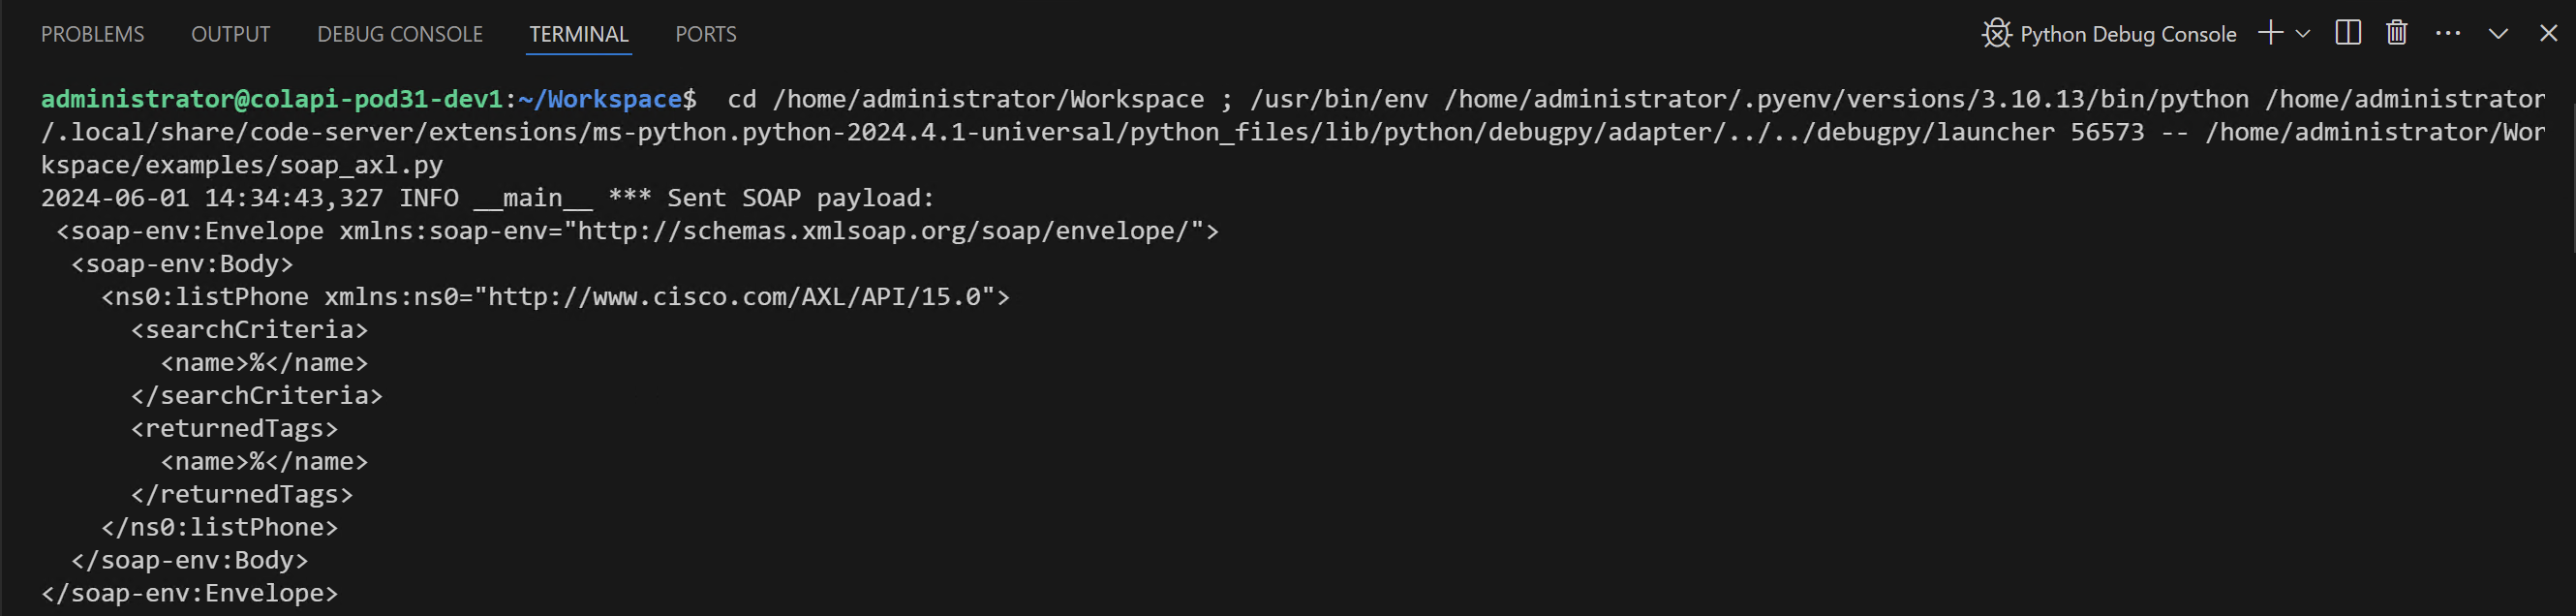
You will notice the list_phone_response variable content is significantly larger then the response SOAP payload received from CUCM. This is a function of the zeep library parsing the response against the AXL schema. As the code requested, only the name and the uuid keys will have a value assigned to them. The rest of the optional returnedTags will have a None value assigned to them. You will utilize this behavior to your advantage later when using AXL methods that require complex data structures to be passed in, such as updatePhone or addPhone for example.
Step 3 - Update a Phone with Python
Earlier you added a phone and registered it with CUCM, but the test call failed when you attempted to dial to voicemail because no Calling Search Space was configured when the phone was added. In this step you will create a request to update the existing phone and add the Calling Search Space.
- Make sure you still have the soap_axl.py Python file open in your VS Code editor.
-
Inspect an example updatePhone request payload from SoapUI.
This payload should look very similar to what you saw when you performed an addPhone with SoapUI, with the exception that nearly every parameter is now optional. Notice that you are given a choice of providing either a name or a uuid to identify the device you wish to modify. The one parameter that is present here which is not present for adding a phone is the newName parameter. This would be used if you want to rename the device. Any parameter that is not sent in the request will retain whatever setting was present for that parameter before the update call. This helps you distinguish between setting a parameter to an empty string versus keeping the existing value. For example, if you were to send <description></description> as one of the fields, this would clear the description, but if you do not send a description tag in the request at all, the description would not be modified. -
The parameter you want to modify to fix the calling search space is called
callingSearchSpaceName
which you can find just below the description. The only arguments you need to provide are the phone device
name
and the
callingSearchSpaceName
.
Create a new variable that will supply the required arguments to the updatePhone method. The correct calling search space for your phone is Unrestricted_CSS .
-
Next you will call the updatePhone AXL method with the arguments and assign the parsed
response to a variable named
update_phone_response
. Paste the following into your file:
You may notice you are not passing update_phone_data directly to the updatePhone method. This method expects name and the callingSearchSpaceName as arguments. You can achieve this by unpacking the update_phone_data dictionary to its key,value pairs with the ** unpack operator.In other words, instead of service.updatePhone(**update_phone_data) with the name and callingSearchSpaceName specified in the update_phone_data dictionary, you could have just as well entered service.updatePhone(name='CSFPOD22UCMUSER', callingSearchSpaceName='Unrestricted_CSS') . When passing in a small number of parameters, this might be more convenient, but if you are updating a large number of parameters, the method we show above is typically easier to manage.
For debugging purposes, the three log statements log the outgoing and incoming request payloads as well as the parsed response data.
-
Re-run the
Python: soap_axl.py
by clicking the green start arrow next to the
RUN AND DEBUG
text
If the end of the console output looks as following, you have successfully updated the CSFPOD22UCMUSER device's Calling Search Space.
Step 4 - Apply Phone Configuration with Python
Modifying a CUCM Phone device configuration is pretty straightforward, but if you have worked on or administered Unified CM before, you might recall that device setting changes require either a device reset or restart. Normally from Unified CM Administration you would click the Apply Config button to trigger the phone to download its latest configuration and let it decide if it needs to go through a full on reset or a quick restart depending on the configuration update. You can perform this same procedure by using the AXL API as shown below.
- Make sure you still have the soap_axl.py Python file open in your VS Code editor.
-
Execute the applyPhone AXL method which only expects the
name
argument and assign the parsed
response to a variable named
apply_phone_response
.
For debugging purposes you will again log the outgoing and incoming request payloads as well as the parsed
response data. Paste the following into your file.
-
Re-run the
Python: soap_axl.py
by clicking the green start arrow next to the
RUN AND DEBUG
text
If the end of the console output looks like the following, you have successfully applied your config update to the CSFPOD22UCMUSER device.
- Now test to see if the change of configuration worked by calling from your laptop to your pod's Voicemail pilot again 5999999 .
Step 5 - Get Phone Details with Python
As you gain experience with the AXL API, you will often find that the easiest way to add a complex configuration such as adding a phone is to first retrieve the existing configuration for the object you are trying to add, modify it, and then use the add method to add the device. For example, to add a phone you would first use the getPhone method to get the details of a phone that is already configured, modify the returned data structure to your needs, and then use the addPhone method to add the new phone.
The next AXL method you will use is the getPhone method. You will use its response to help craft the Python arguments for the addPhone operation you will perform next, where you may recall from SoapUI could take quite large and complicated arguments. The getPhone AXL method will retrieve the full phone configuration details.Here is a sample getPhone request that SoapUI generated. As a learning exercise, you will retrieve all the possible returnedTags. Basically, you will query for the complete phone configuration by not requesting any returnedTags.
- Make sure you still have the soap_axl.py Python file open in your VS Code editor.
-
Execute the getPhone AXL method with only the
name
argument without supplying any returnedTags
and register the response to a variable named
get_phone_response
.
For debugging purposes we will again log the outgoing and incoming request payloads as well as the parsed
response data. Paste the following into your file.
-
Re-run the
Python: soap_axl.py
by clicking the green start arrow next to the
RUN AND DEBUG
text
If your last console output looks like the following trimmed output, you have successfully retrieved all of your Phone device configuration for CSFPOD22UCMUSER . Both the SOAP response payload and the parsed response is quite large.
Step 6 - Add Phone with Python
The final AXL method you will execute is addPhone. You will use the previous getPhone response's parsed output to craft the variables that you will pass as arguments to addPhone method. The required parameters for the addPhone method are name , product , class , protocol , protocolSide plus any optional parameters you would like to configure.
-
Before you create a new variable to use as an argument with the addPhone AXL method, let's recall how the first part of the get_phone_response
was structured.
If you take a closer look at the callingSearchSpaceName key, it's value is yet another dictionary with two keys _value_1 and uuid . You are not required to supply both of these keys to configure the new phone's callingSearchSpaceName. As you create a new variable named add_phone_data, you will simply set the callingSearchSpaceName key's value to the name of the calling search space which is found in the _value_1 key's value as seen above. For example:
You will find many other parameters returned from the various "get" methods return both the name and the UUID for your convenience, but when doing an add or update, you only specify one.
-
Make sure you still have the soap_axl.py Python file open in your VS Code editor.
-
Create a new variable that will supply all the required arguments to the addPhone method. Paste the following into your file.
-
Execute the addPhone AXL method which only requires the
phone
argument.
Register the response to a variable named
add_phone_response
.
For debugging purposes we will again log the outgoing and incoming request payloads as well as the parsed
response data. Paste the following into your file.
-
Re-run the
Python: soap_axl.py
by clicking the green start arrow next to the
RUN AND DEBUG
text
If your last console output looks like the following output, you have successfully add a new phone.
Now that you have added a new test phone named CSFPOD22USER2 , you can check that it is in actually inserted in the CUCM database.
- Access your CUCM server at: https://cucm1a.pod22.col.lab
- Login in with username admin and password C1sco.123
- Navigate to Device → Phone and click Find
- Ensure CSFPOD22USER2 is present in the device list
The next series of CUCM APIs you will experiment with in Python are all part of a collection of APIs known as the UC Serviceability XML API that expose multiple capabilities for CUCM administrators to automate management and monitoring tasks.
For your reference, the family of UC Serviceability XML APIs consist of the following 5 APIs:
- Real-Time Information (RiSPort) → API Reference
- Call Detail Records (CDRonDemand) → API Reference
- Performance Monitoring (PerfMon) → API Reference
- Service Control (ControlCenter) → API Reference
- Log Collection (Log Collection, DimeGetFile) → API Reference
Each of these APIs has its own dedicated WSDL file that describes its unique methods (service endpoints) and unlike AXL (AXLAPI.wsdl) they are available to download directly from a given CUCM server. Note that all methods (service endpoints) are NOT available in all CUCM releases. See https://developer.cisco.com/site/sxml/discover/overview/ for more information.
Let's take a closer look at the RisPort70 and Perfmon APIs with a sample Python script.
The tasks you will accomplish in this section are:
- SXML RisPort client setup
- Query Phones with selectCmDeviceExt
- Query Perfmon Counters with perfmonCollectCounterData
Follow these steps to perform the above listed tasks:
Step 1 - SXML RisPort Client Setup
- Access your VS Code instance: https://dev1.pod22.col.lab:8443
-
Click the
Explorer
icon
at left, and you see a list of folders and files.
-
Navigate to expand the
examples
folder and click to open
soap_sxml.py
. You now have the file open for editing.
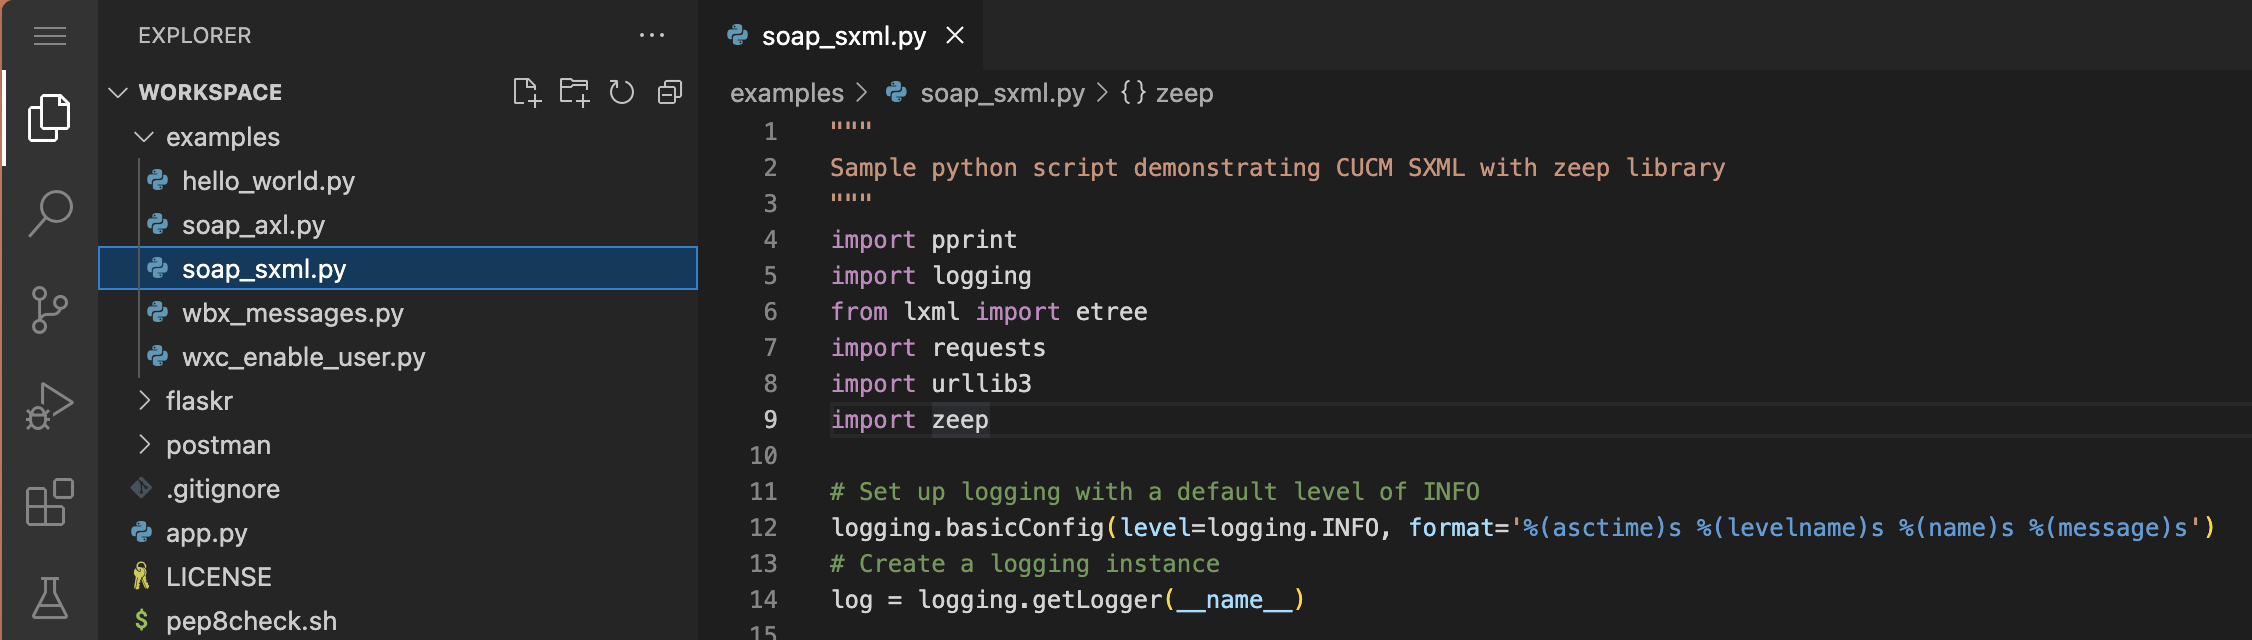
- Here you will find another basic Python script skeleton that you will use to execute SOAP SXML RisPort API requests again utilizing the zeep library.
-
Start by creating a few constant variables that you will use to connect and authenticate to your Pod's CUCM SXML RisPort API.
Copy and paste your Pod's CUCM hostname, admin username and password into your file. -
Unlike the AXL API, you have not downloaded the SXML WSDL files to your development workspace in order to use them.
This time you will use a URL to download the WSDL file directly from your CUCM. To do this, create another constant variable
for the RISPORT_WSDL_FILE. You will use this RISPORT_WSDL_FILE variable to initialize the zeep client at which time it will
download the WSDL file.
Each SXML api (RisPort, PerfMon, Control Center Services, etc.) has its own WSDL download URL which is documented
here
Paste the following highlighted
line it into your file.
- As you did for the AXL API, you will use the session object from the requests Python library to handle authentication, certificate validation (or not), persist cookie caching across API requests, create logging configuration and utilize the zeep HistoryPlugin. Since you are already familiar with these steps, they are already pre-populated in your soap_sxml.py file.
-
You are now ready to create the zeep.Client instance that will greatly simplify sending and
receiving RisPort70 methods to/from CUCM. You will use the RISPORT_WSDL_FILE variable, session object,
and the history plugin object to create the client instance. Paste the following into your file.
Zeep client will authenticate and download the WSDL file.
-
The final step before you can utilize the zeep client is to create a new ServiceProxy object named
service
.
The RisPort WSDL file zeep client downloaded from CUCM defaults the endpoint url to https://localhost:8443/realtimeservice2/services/RISService70
and needs to be updated to reflect your Pod's CUCM_ADDRESS.
Create a new service object using the zeep.client create_service method. Again, you will utilize the CUCM_ADDRESS variable you defined
earlier to set
https://cucm1a.pod22.col.lab:8443/realtimeservice2/services/RISService70/
as the RisBinding endpoint url.
Paste the following into your file.
Step 2 - Query Phones with selectCmDevice
The RisPort API allows you to query CUCM for the real-time state of registered devices. This is different than AXL which provides you with the static database configuration of devices. With the RisPort API you can retrieve information such as registration status, IP address, running firmware load, and more. To retrieve this data you will use the selectCmDevice method of the RisPort API as shown below.
-
The
selectCmDevice
method requires the following arguments:
StateInfo
and
CmSelectionCriteria
.
The
selectCmDevice documentation
can help identify the arguments and the data structure we need to supply to the
service.selectCmDevice method. For the purposes of this sample script, you will only use the
CmSelectionCriteria
argument and pass a blank value for
StateInfo
.
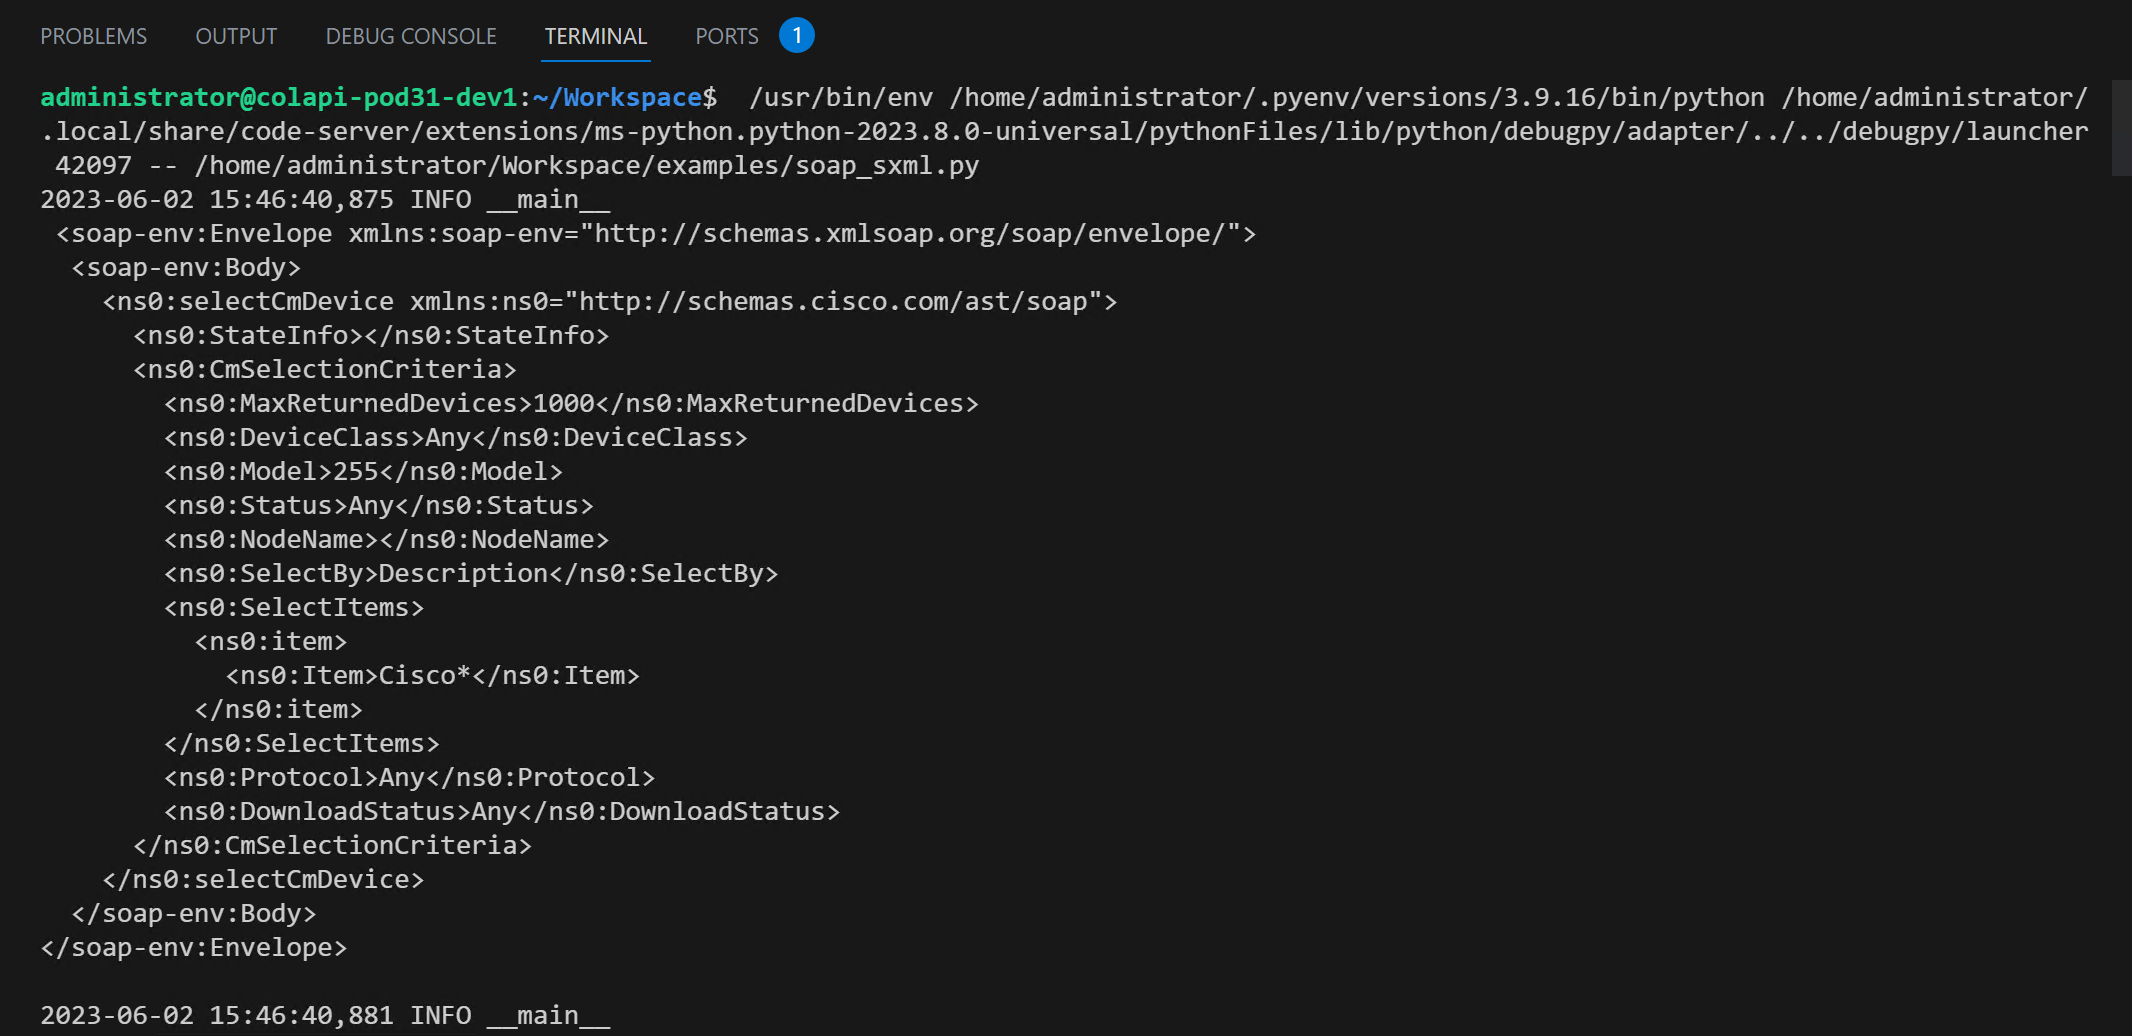
To select any device whose description begins with "Cisco", you must provide the following values as part of the CmSelectionCriteria data in the selectCmDevice request:- DeviceClass: Any
- Model: 255 (Any Model)
- Status: Any
- NodeName: None/Blank (Any)
- SelectBy: Description contains 'Cisco*'
- Protocol: Any
- DownloadStatus: Any
The values above indicate that you want to retrieve any kind of device, any model of device (255 means any model), devices that are in any status (Registered, Unregistered, etc...), registered to any node in the cluster, registered using any protocol (SCCP or SIP), and select the devices whose description starts with the word "Cisco".
The XML below shows what the expected SOAP request to CUCM should look like. As before, you do not have to manually create this XML body. Zeep will take care of doing this for you.
To pass the selection criteria to the RisPort API, first create the following variable that you will use to pass as an argument to selectCmDevice method. Paste the following into your file. -
Now you can execute the selectCmDevice method via Python.
Execute the selectCmDevice RisPort70 method with the StateInfo and CmSelectionCriteria arguments and assign the parsed
response to a variable named phone_query_response. The zeep library will take care of mapping the SOAP response
to a Python dictionary through its understanding of the RisPort70 WSDL file.
For debugging purposes you will again log the outgoing and incoming request payloads as well as the parsed
response data. Paste the following into your file.
-
Try running the soap_sxml.py script similar to the way you ran the soap_axl.py in the previous section by following these steps:
In VS Code navigation bar on the left, click the Run and Debug button.
Once you click anywhere in list of "RUN AND DEBUG" configurations, You should see a predefined Configuration for running a python script named Python: soap_sxml.py in the list. Make sure it is selected:

Click the green start arrow next to the RUN AND DEBUG text
.
Upon running the soap_sxml.py Python script a new Python Debug Console terminal window will open at the bottom
where the output of the script will be displayed. The screenshot below only covers the outbound SOAP payload sent to CUCM.
There should be more logging output than what is shown in the screenshot below.
The selectCmDevice response parsed by the zeep library looks as follows. The output is quite large since you are retrieving all device details from the RIS DB. For your reference please find a trimmed output of phone_query_response below. Your console output should look slightly different but should show the CSFPOD22UCMUSER device in a registered state.
Step 3 - Query Perfmon Counters with perfmonCollectCounterData
In the previous step, you used the RisPort70 serviceability API to query the RIS DB for devices that matched a specific selection criteria. Next you will use the PerfMon API to query a simple set of CUCM Performance counters. If you are unfamiliar with PerfMon, it is a service available on all CUCM servers to provide real-time counters for the various services running on the server. These metrics include everything from CPU and memory utilization to number of registered devices and active calls. PerfMon has a series of objects which are logical groupings of related counters. Counters provide a single metric related to the object. For example, the Cisco CallManager object contains a variety of counters related to the Cisco CallManager service such as registered phones, active calls, and the uptime of the service. An easy way to browse the various objects and counters available is by using the Real Time Monitoring Tool (RTMT).
- Make sure you still have the soap_sxml.py Python file open in your VS Code editor.
-
First, initialize a new zeep client for the PerfMon API using its WSDL file. Like the RisPort API, you will download
it directly from the CUCM server when initializing the zeep client.
You will reuse the session object you created for the RisPort and the logging settings, but will create a new zeep client
for the PerfMon Api. Paste the following highlighted lines it into your file.
-
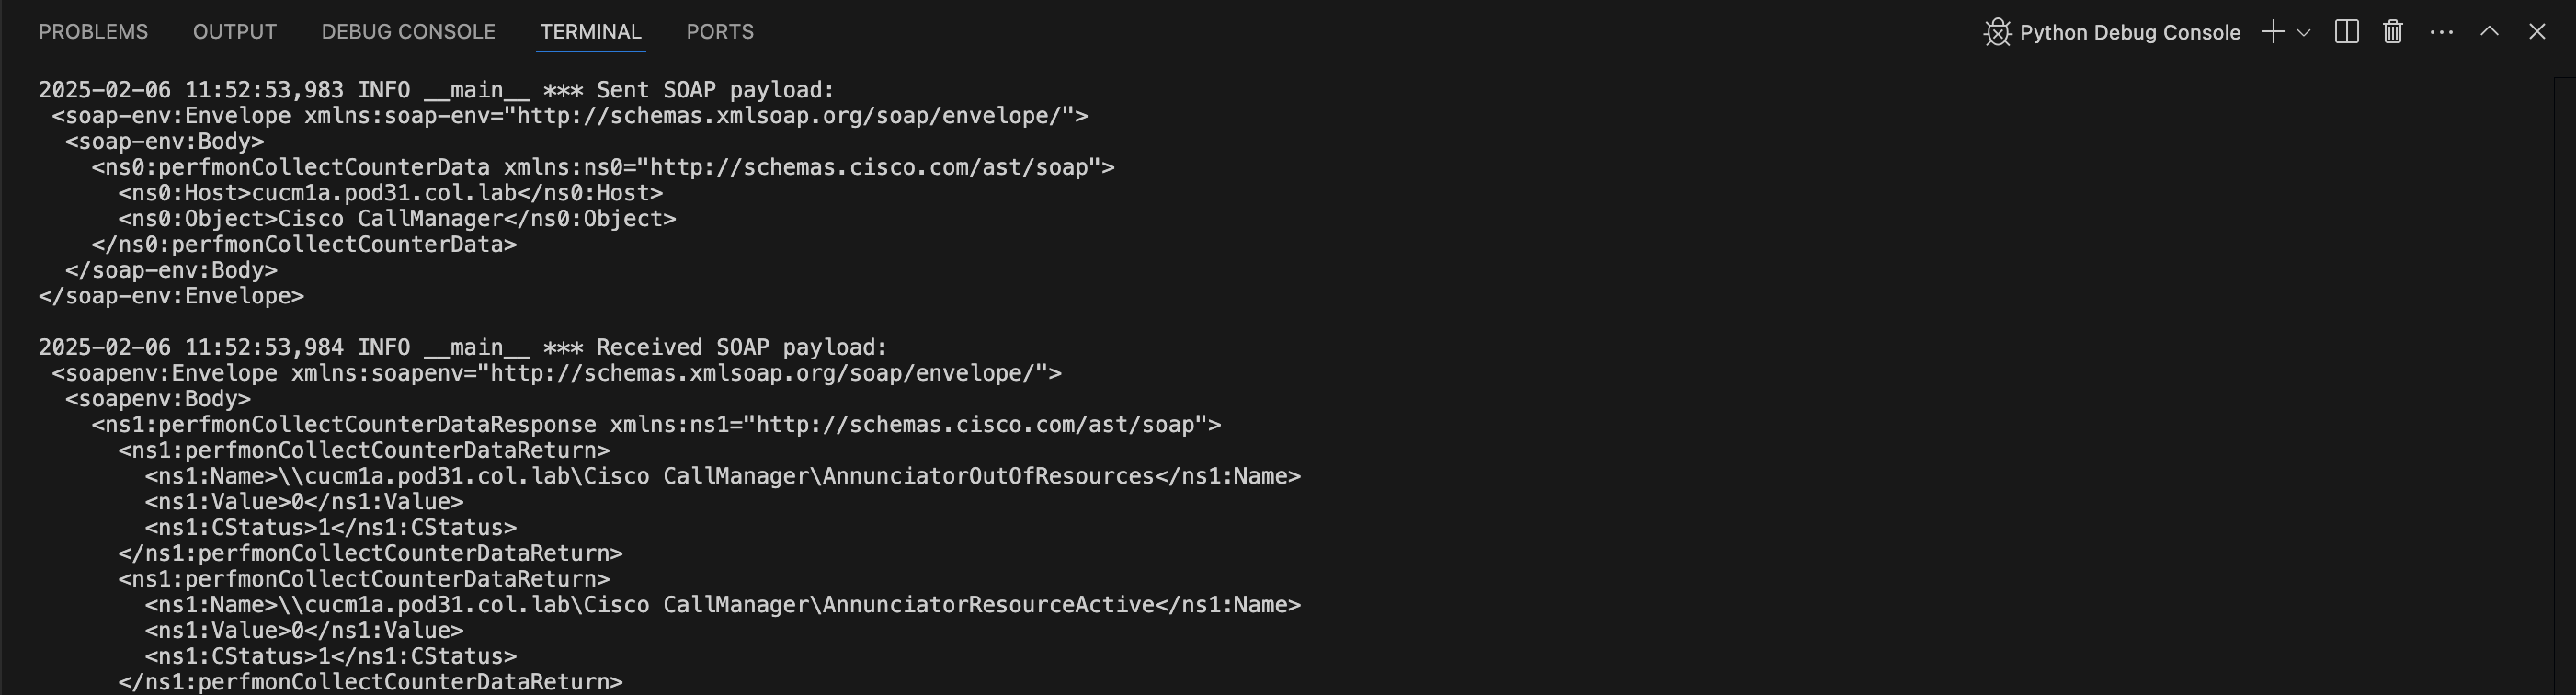
Here is a sample perfmonCollectCounterData request payload that you will craft in Python that queries all the counters in
the "Cisco CallManager" perfmon object:
The perfmonCollectCounterData method requires the following arguments: Host and Object . The perfmonCollectCounterData documentation https://developer.cisco.com/docs/sxml/perfmon-api/#perfmoncollectcounterdata can help identify the arguments and the data structure you must provide to the service.perfmonCollectCounterData method. -
Execute the perfmonCollectCounterData method while passing
Host="cucm1a.pod22.col.lab"
and
Object="Cisco CallManager"
.
Register the response to a variable named
perfmon_query_response
.
For debugging purposes you will again log the outgoing and incoming request payloads as well as the parsed
response data. Paste the following into your file.
-
Try running the soap_sxml.py script again.
In VS Code navigation bar on the left, click the Run and Debug button.
Once you click anywhere in list of "RUN AND DEBUG" configurations, You should see a predefined Configuration for running a python script named Python: soap_sxml.py in the list. Make sure it is selected:
Click the green start arrow next to the RUN AND DEBUG text
.
Upon running the soap_sxml.py Python script a new Python Debug Console terminal window will open at the bottom
where the output of the script will be displayed. The screenshot below only covers the outbound SOAP payload sent to CUCM
for the perfmonCollectCounterData request, there should be a lot more logging output than what is shown in the screenshot below.
The perfmon_query_response response parsed by the zeep library should look similar to the output below. The output is quite large since you are retrieving all PerfMon Counters for the "Cisco CallManager" class. For your reference please find a trimmed output of perfmon_query_response.
The method of using the PerfMon API highlighted above is the simplest use of the API. Most use cases involve continuously querying the same performance counters at a certain time interval and storing them, perhaps as a time-series in a database of some kind. To do this, the PerfMon API provides a mechanism by which you open a session, add counters to that session, then periodically collect session data for those counters. For more information on the more advanced usage, reference the PerfMon API Reference and look at how to use the perfMonOpenSession , perfMonAddCounter , and perfMonCollectSessionData methods.
You have now completed both the AXL and Serviceability XML APIs examples with Python. In the next section you will be introduced to REST-based APIs.
REST , which stands for RE presentational S tate T ransfer, is the primary type of API used in Cisco's Webex Suite products. Other collaboration products such as Unity Connection and Cisco Meeting Server also use REST APIs. Now that you have explored SOAP APIs, you will see that REST APIs are very different than SOAP APIs. Unlike SOAP, there is no "REST standard" per-se. While SOAP is a well-defined protocol, REST APIs are a style that leverage existing standards such as HTTP, JSON, XML, and others to provide a web service. As a result, you will notice differences in how different products implement REST APIs. This lab will expose you to how Webex implements REST APIs. The good news is that different features in Webex are generally consistent in how they implement their APIs, so once you learn how to use one Webex API, you will have a good idea of how to use others.
REST-compliant (RESTful) systems consist of a client and server that exchange stateless transactions. Although technically not mandatory, all REST-based APIs in Webex use HTTPS. In this model, a client sends a request to a server; the server processes the request and sends a response back to the client.
The type of request is called a verb and there are four that are covered in this lab:
- GET - retrieves some information from the server. This is what happens when you retrieve a web page using your browser with a URL.
- POST - creates something on the server, like a new user. The request typically includes some data, either in the form of parameters at the end of the URL, or often with a payload , or body , in the message in a format such as JSON or XML, depending on what the server supports.
- PUT - modifies an existing object. As before, some payload is often supplied.
- DELETE - deletes an object.
This request has a path to a resource , which is represented as a portion of the URI following some base URI that is common to all requests for a given API. It may also have query parameters after the URI, indicating some variable or setting. The ? character marks the end of the URI (the resource) and the start of these parameters. Each additional parameter is separated by the & character. For example:

In this example, all API requests to this API will start with https://host/api/v1/ followed by the resource (which can have additional path elements) and then any query parameters. This structure is no different than any other web request you might make in a browser when navigating to a web page so it should feel familiar to anyone who has paid attention to the URL in their browser.
Responses to a request include a status code and a body . The status code is a three-digit number that indicates the result of the request. The body is the data that is returned by the server. The body is typically in JSON or XML format, but can be any format that the server supports. The body of the response is typically the most important part of the response for a GET requests because it contains the data you requested. The status code is important because it tells you if the request was successful or not.
Like any other response from a web server, the status codes are divided into ranges. The most common status codes you will see are in the 200 range which indicate success. Responses in the 400 range indicate a client error - typically that the request was malformed or that the client does not have permission to access the resource. A 404 Not Found is a common example of a client error indicating that the resource you requested does not exist. Responses in the 500 range indicate a server error - typically that the server was unable to process the request for some reason.
A REST request will also include Headers , for things like authentication and defining the data format of the payload, if any. Headers play an important role in authentication in REST APIs - specifically the Authorization header. Following the Headers is the body of the request, if any. The body is typically used in POST and PUT requests to send data to the server. The body is typically in JSON or XML format, but can be any format that the server supports. For Webex APIs, these will typically be in JSON format.
REST API Authentication and Authorization
RESTful APIs may implement authentication and authorization in a variety of ways, or not at all. For example, the Cat Fact API at https://catfact.ninja/fact will return a JSON formatted body containing a random cat fact and doesn't require any authentication. Because no authentication is required and this particular API endpoint uses the GET verb, you can access it with a standard web browser. This is an example of a very simple REST API. As you will see, the APIs available in Webex are more complex than this, but they fundamentally work in the same way.
While different Cisco collaboration products that expose RESTful APIs may use different authentication mechanisms, Webex APIs consistently use one form of authentication - access tokens. Usernames and passwords are never used to authenticate to Webex APIs. This is not to say that you may not need a username and password to obtain an access token, but the access token itself is what is used to authenticate to the API.
Access Tokens
The REST APIs provided by Cisco Webex use access tokens for authenticating and authorizing API requests by leveraging the OAuth2 standard . Access tokens can come from a variety of sources, but they are all used in the same way: the HTTP Authorization header contains the word Bearer followed by a long string of characters that represents the access token. For example, the Authorization header for a request may look something like this:
Authorization: Bearer CDc4KmFjMzAtMDA9jjauYWUkKWExMeEtYmZ3MmZhMGNiN2VjYjab_AD92_039cfbf8-2732-8f82-0239-7283abef6612
The contents of the access token itself can vary from implementation to implementation. Some APIs use opaque tokens which means that the token itself is just an identifier and the system to which you pass the token must ask the authentication system whether the token is valid or not and what permissions the token has access to. Another token format is the JSON Web Token (JWT) format (pronounced "jot"). JWT tokens are self-contained and provide all the authentication information in the token itself and are cryptographically signed in a way that the server authenticating the request can validate that the token is valid without having to ask the authentication system. Webex APIs make use of both opaque tokens and JWT depending on the mechanism by which you obtain the token. The type of token is not of much importance to someone using an API because it is up to the service receiving the token to determine how to authorize the user based on the token; however, because JWT are self-contained, you can use a decoder like the one on jwt.io to give you the contents of the token. Be careful using online tools like this because your token is senstive like a password. Someone who has the token can access any resources granted to that token.
Access tokens also typically have a set of Scopes associated with the token. A scope is a way to define a specific permission in the API. Scopes are completely implementation dependent and each API you find that uses tokens will have different levels of granularity in their scopes. For example, one API may just have a "readonly" scope and a "read-write" scope while other APIs may have specific scopes for different levels of access to individual resources - for example a scope that allows for reading only user accounts.
Cisco Webex has a variety of different access tokens available for different needs. You will start here by using a Personal Access Token which is a token that represents your user account in Webex. A Personal Access Token is authorized to do anything you as an individual user are allowed to do. This means that if you are an administrator, the token can perform administrative tasks, but if the token belongs to a standard user, it can only access resources that a non-admin user would have access to. The token you will use in this lab is limited in scope, so in future sections you will explore how to obtain tokens with certain administrative scopes.
One key differences between traditional username / password based authentication and access tokens is that access tokens typically have a limited lifetime. In other words, they expire after a certain amount of time after being granted. Some tokens can expire within minutes or hours while others could be valid for years. Webex Personal Access Tokens are only valid for 12 hours, so after 12 hours, you must generate a new token to continue using the API. If tokens are only valid for a short period of time, how do you stay logged in to an application using access tokens or how can you continue to use an API that requires access tokens without having to provide new credentials? This is made possible through the use of refresh tokens which can be used to request a new access token. We will discuss refresh tokens in more detail in a later section when we dive into service apps and integrations. For now, let's see how you can use a personal access token to make some simple API calls to the Webex APIs.
Hands-on with Webex REST API
You can now explore some the features of a REST-based API by way of an example. While there are a number of tools that allow you to construct custom REST queries, such as Postman , the Cisco Webex documentation itself allows you to send API requests directly to Webex and examine the results. Let's take a look at querying a person.
- Access the Webex API documentation home page at: https://developer.webex.com
- Click Log in at top right.
-
Sign in using your Webex User account using the following credentials:
- Email address: pod22wbxuser@collab-api.com
- Password: C1sco.123
- Once logged in, at the top click the Documentation link.
-
You will see a list of all documentation categories. In this lab we will be focusing on APIs contained in
the Webex Suite (Calling, Meetings, and Messaging) and Webex Admin sections.
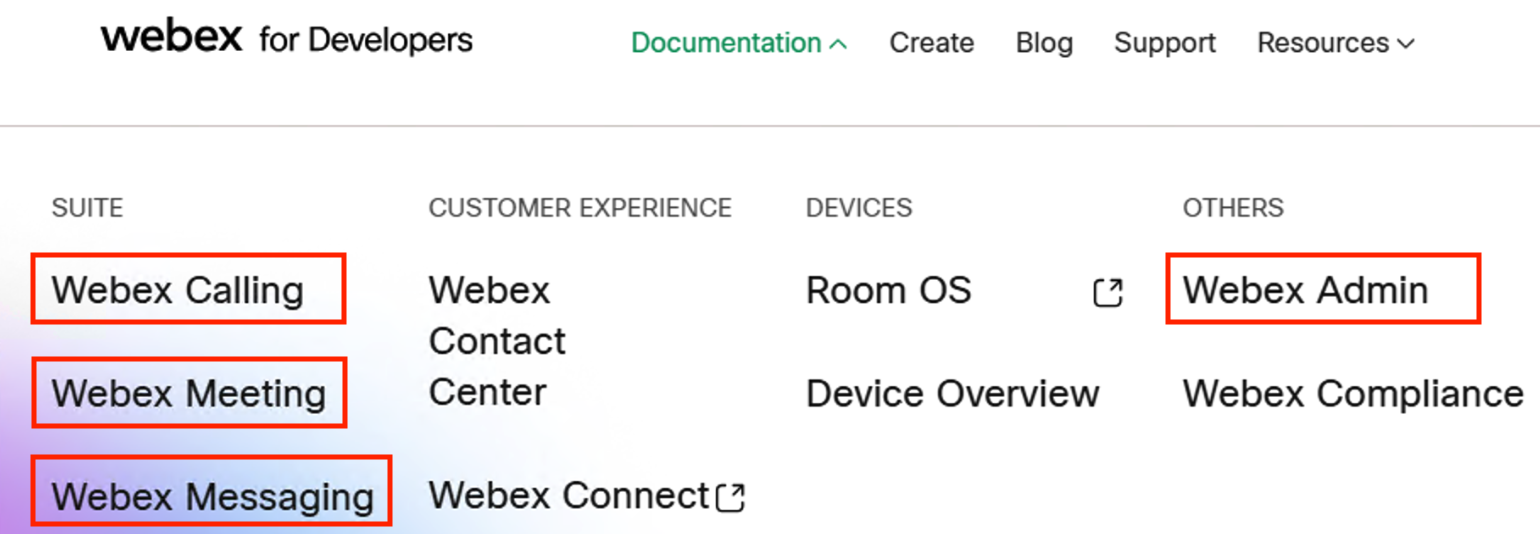
- Click on Webex Messaging under the SUITE heading.
- Under API REFERENCE , expand All APIs and finally expand People .
- You will see a variety of REST methods. Click List People
-
Now you have entered the portion of the documentation that includes a built-in tool for generating a
REST request. The middle column explains what the operation is used to perform, any available
Request Parameters
and what is returned as part of the response (the
Responses
section includes a normal return status code, as well as a Schema Definition of a reply, with an example.
Take a moment to scroll through the documentation for the List People API to get a feeling for
how the documentation is structured.
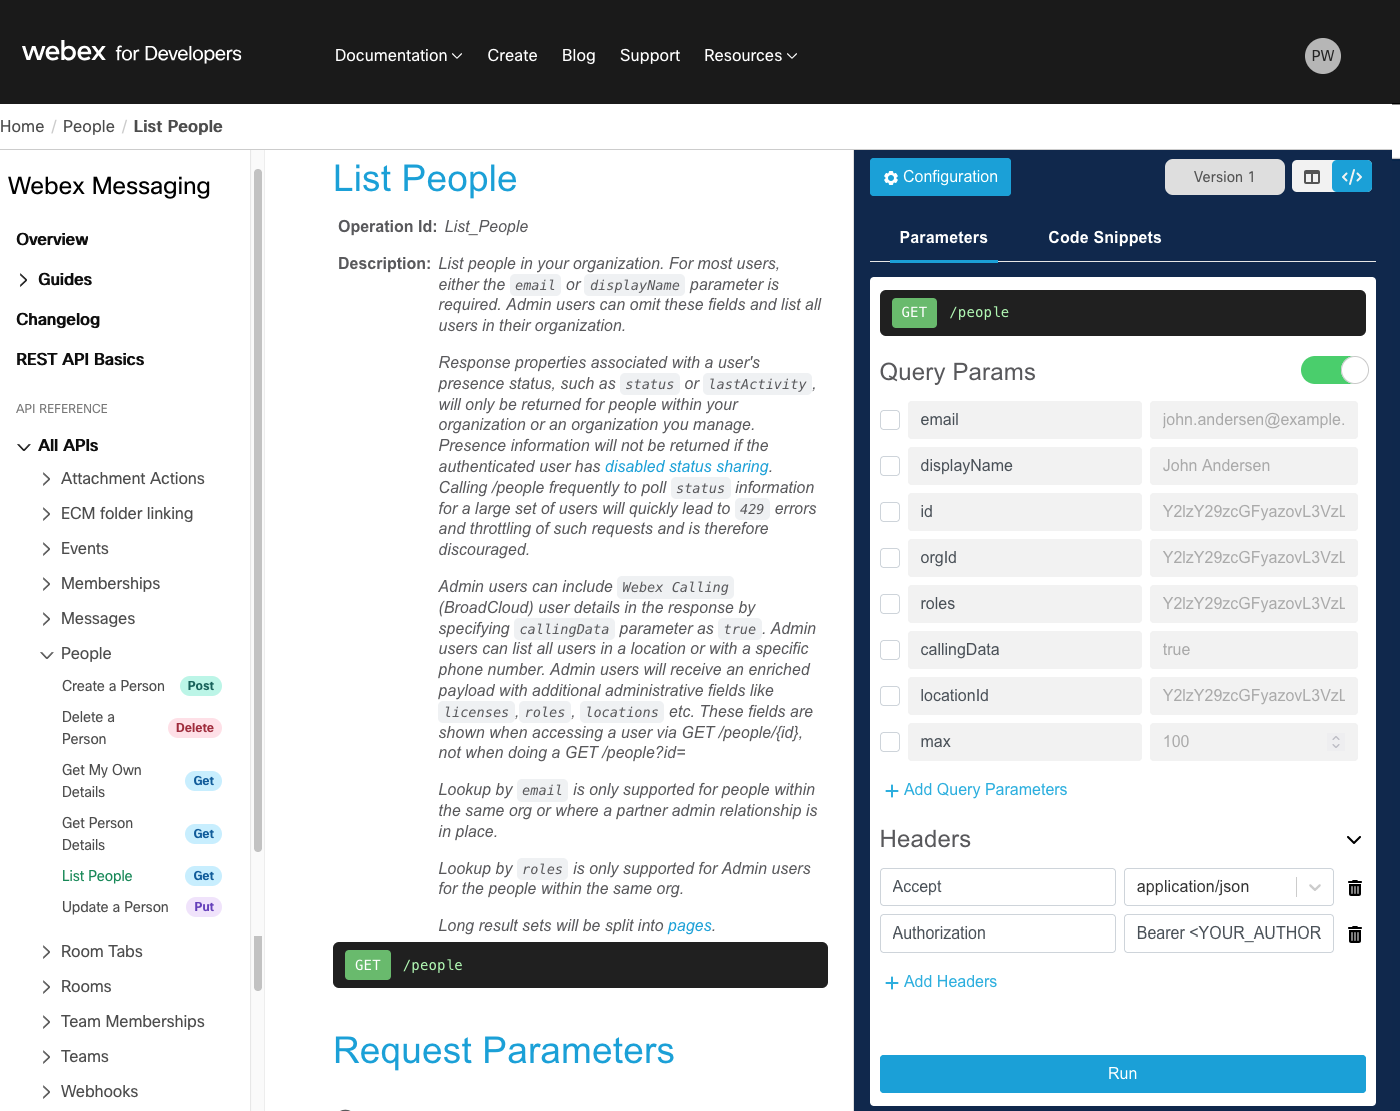
- Notice that the selection for Use Personal Access Token is selected in the Headers section. As long as you are logged in, the documentation site will use your personal access token for authentication. You can override this if necessary, for example if you need to use a bot token. For now, leave it as is.
-
The right column allows you to build and execute your own request. For this particular
List People
request, since we're not admins, we need to specify an
email
or
displayName
to search for. Check the box next to the
email
Query Parameter, then
enter enter
pod22wbxuser@collab-api.com
in the field next to it.
-
Click
Run
at the bottom of this column.
Keep in mind, this request and response is from the real Webex system, not a sandbox. Care must be taken when executing some requests, especially those that alter or delete data.
-
The response code should be
200
. Other response codes--
401
means you're not authorized, meaning your access token or the format entered in that field is not correct--can
indicate that required data was missing or any number of other errors. Keep in mind your output will look
slightly different than the example shown here, but you should see information about the user like their name,
email address, phone number, and other details.
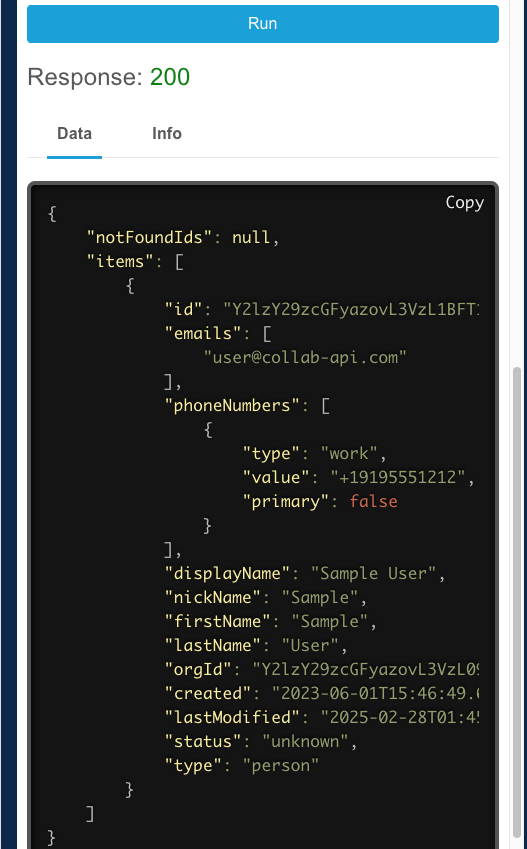
In this example, you see not only a response code, but also the Data or body of the response which contains the user data for the user with this email address (in some cases there is no data returned and the only thing returned is the status code indicating if the request was successful or not). This is a JSON payload, with some indenting to make it more readable. Similar to XML, it is a serialization format. That is, JSON is a way of representing structured data in the form of a textual string, so it can be sent
If you have some Python background, you might notice that it looks very much like a Python dictionary, but it is not exactly the same. Text data in JSON must be enclosed with double quotes (whereas in a Python string, single or double quotes would work), and while Python supports many data types, including custom ones, JSON supports very few (string, integer, array (list), a boolean, null, or another JSON object). Therefore, to change something into a JSON string, you often have to convert to these simpler types. Since this is such a common task, many Software Development Kits (SDKs), which are a set of tools that facilitates usages of specific APIs, will provide methods to export or convert their data in JSON format.
If you are unfamiliar with JSON and would like to learn more, you can find a good introduction here: https://www.digitalocean.com/community/tutorials/an-introduction-to-json or a bit of a more technical introduction here: https://www.json.org/json-en.html .
-
The actual request, in this case, was sent to:
https://webexapis.com/v1/people?email=pod22wbxuser%40collab-api.com
All Webex APIs will use the https://webexapis.com/v1 base URL, followed by the resource you are accessing, /people in this case. Query parameters are added to the end of the URL, starting with a ? character, followed by the parameter name and value. In some cases, characters must have a special encoding when sent in a URL, such as the '@' sign. This page lists the various characters that must be encoded.
If you were to construct an API request manually, you would need to know this URL, however as you will soon see, the Webex SDKs will handle this for you.
While sending individual requests to Webex APIs is straightforward, automating tasks programmatically requires careful consideration. Most automation requires multiple API requests in series (or maybe even in parallel and aggregating multiple parallel responses), often using information from one response to construct a new request on a different API endpoint. You must consider the logic necessary to handle a variety of responses including errors and also grant your application access to the APIs while maintaining security. Python offers convenient libraries, such as requests and urllib that allow you to construct and send HTTP(S) requests, but merely constructing requests is insufficient for robust automation. This is not to say that you cannot work with Webex APIs by using a simple HTTP library like these, but you are then forced to deal with challenges such as handling pagination for large datasets and managing response codes indicating congestion, which may warrant retries rather than immediate failure.
To address these complexities, this lab will show you how to use a Software Development Kit (SDK) named wxc_sdk , accessible at https://pypi.org/project/wxc-sdk/ . Initially designed for Webex Calling-specific APIs, this SDK has evolved to encompass the majority of Webex APIs, organized as individual 'packages' within the SDK.
To demonstrate the use of the SDK, start by performing the same user lookup you did earlier using the developer.webex.com documentation, but this time using Python. As with all Webex API interactions in this lab, you will use the wxc_sdk to simplify the task. Follow these steps to get started:
- Access your VS Code instance: https://dev1.pod22.col.lab:8443
-
Click the
Explorer
icon
at left, and you see a list of folders and files.
-
Navigate to expand the
examples
folder and click to open
wxc_enable_user.py
. You now have the file open for editing.
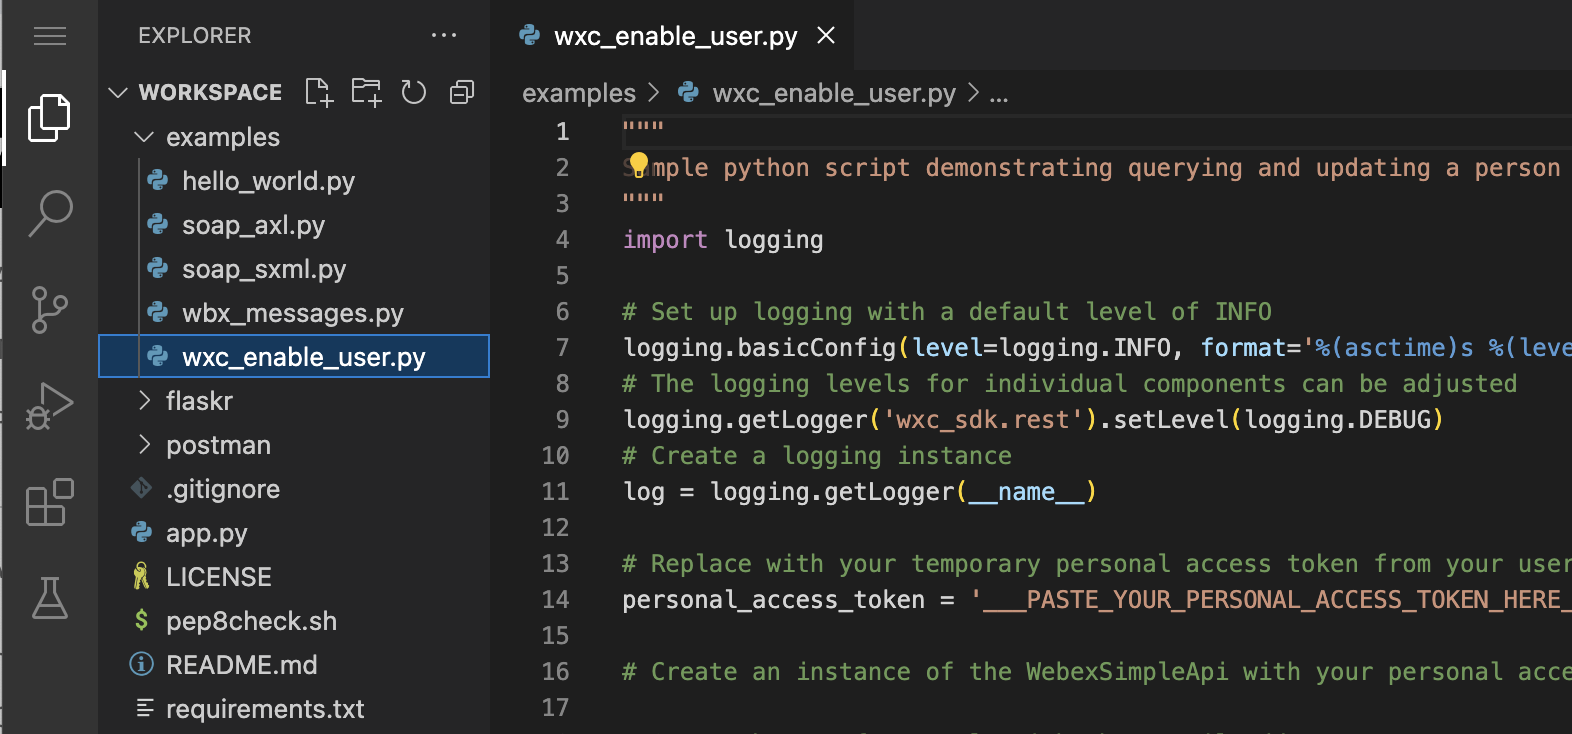
-
The file contains a basic Python skeleton that you will use to execute basic Webex API requests using the
wxc_sdk
. The Python environment has been installed, as well as the
wxc_sdk
using the
pip
tool. If you want to know more about virtual environments and pip, you can refer to the
Python Packaging
documentation.
The other code already present in the file performs supporting tasks like setting up the logging infrastructure and contains comments to guide you through the process. If you are unfamiliar with Python and don't understand what these lines do, you can ignore them for now as they are not essential to the task of interacting with the Webex APIs.
To use the SDK in this program, you must first import it by importing the WebexSimpleApi object from the wxc_sdk package. Throughtout this lab you will find examples like what is shown below that indicates the file you must edit, where in the file you should add code, and the code you should add. You can (and should) use the Copy button on the right to copy the selected line or lines and then paste them into your VS Code editor window in the correct location.
In this example, you are looking for the line that says import logging and then adding the import statement on the next line as shown below. Paste the following into your file: -
The
wxc_sdk
documentation
shows that the API is instantiated using the
WebexSimpleApi
class,
which can optionally take a
tokens
parameter to specify the access token that will be used for
accessing the Webex APIs. If the token is not specified here, then the SDK looks for a token in the local
environment variable
WEBEX_ACCESS_TOKEN
. For this lab, you will be using a personal access
token and passing it to the constructor for the class; however, in a production environment, you would likely
inject the token into the environment variable and let the SDK obtain it automatically from there.
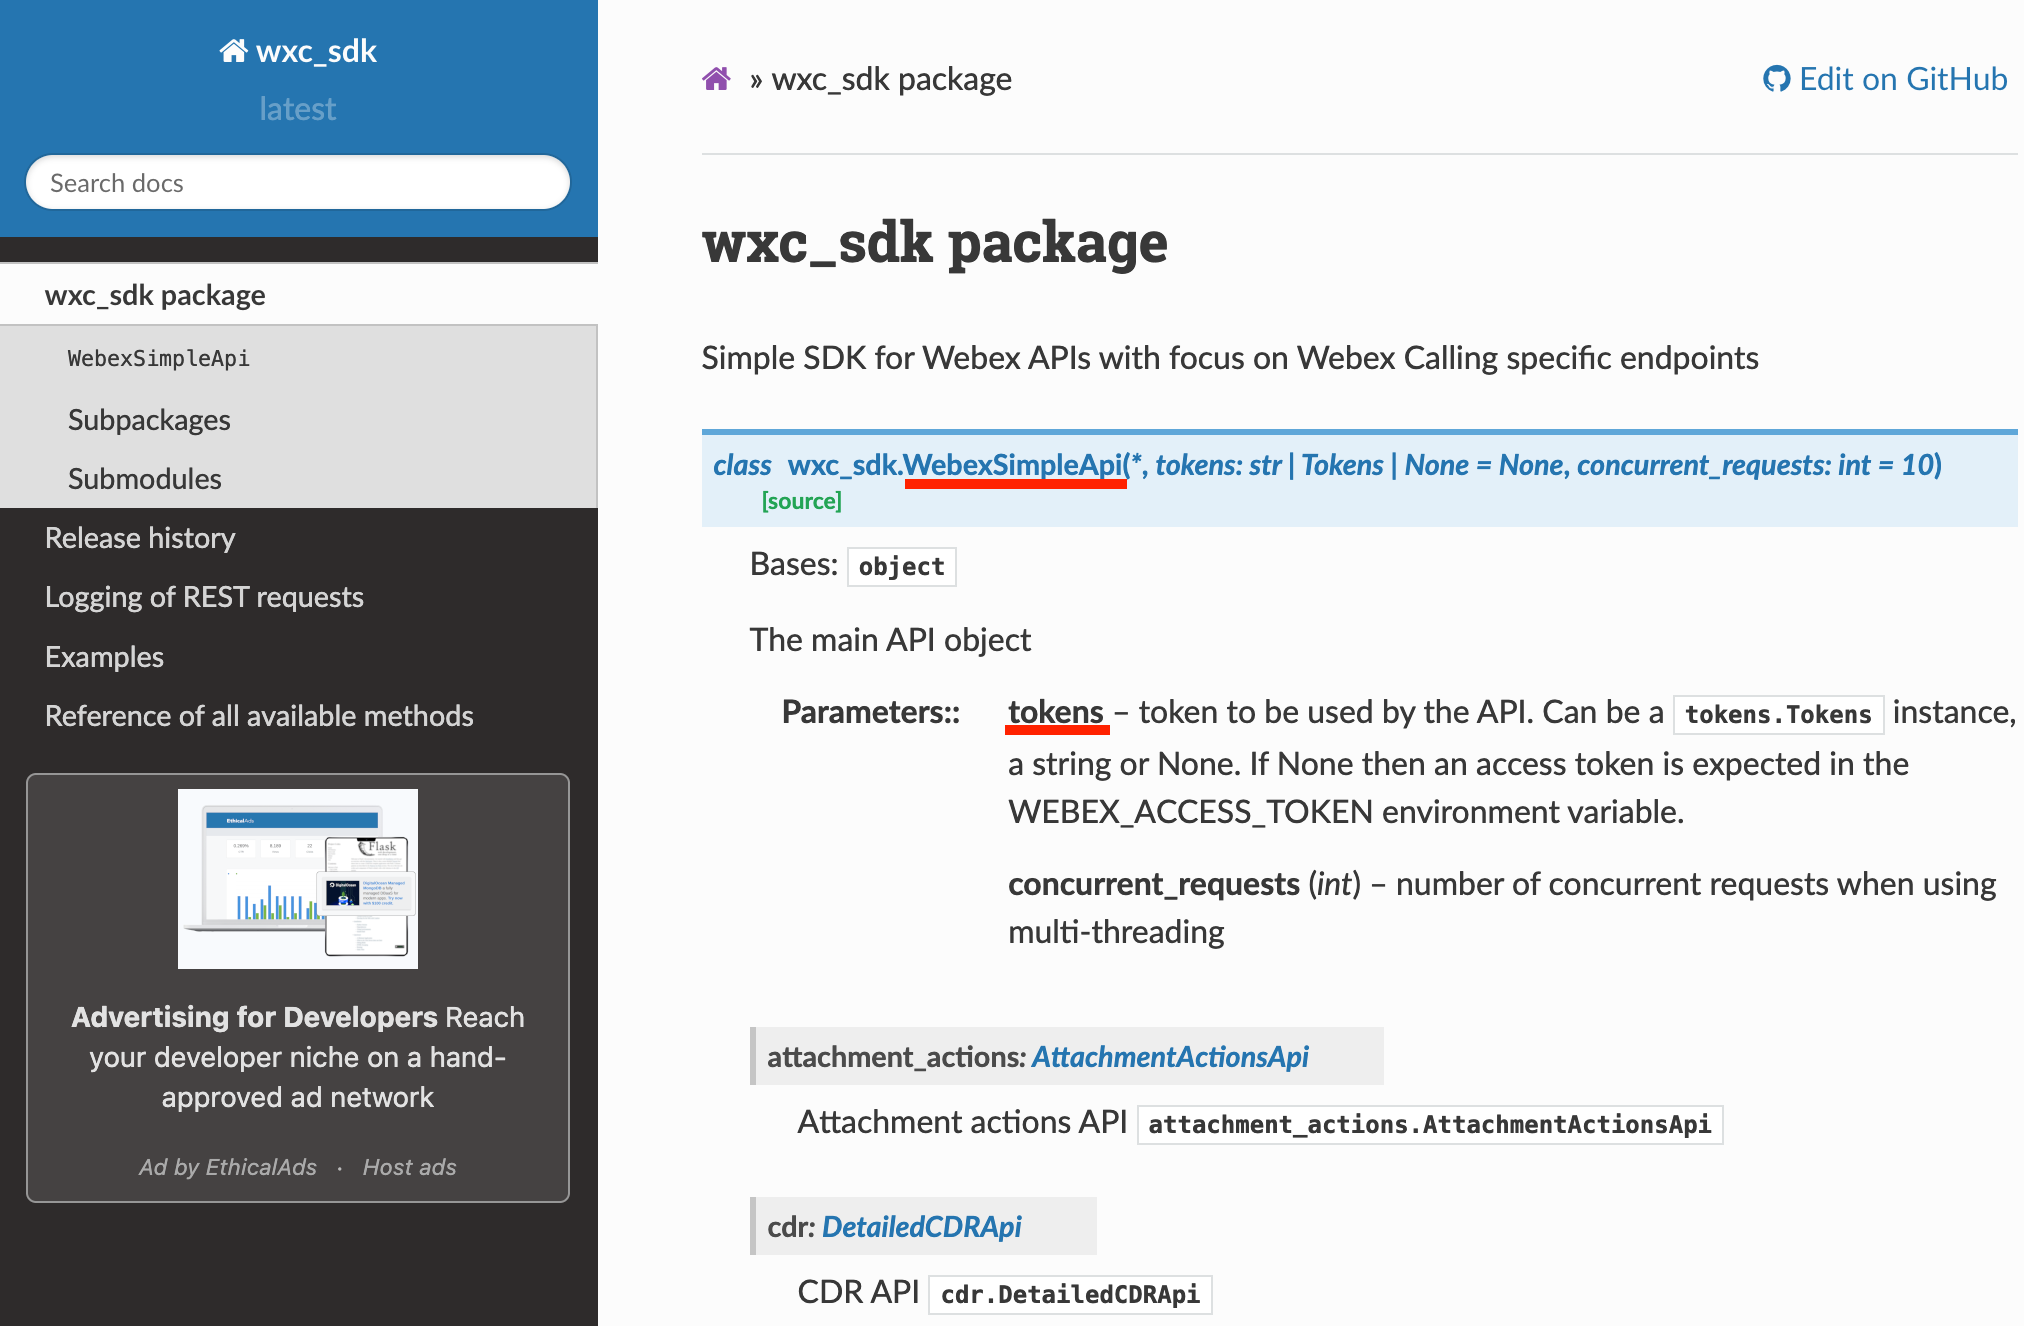
- Next you must obtain the personal access token. On every page on developer.webex.com, as a logged-in user, you can obtain your token by simply clicking your user icon on the top right. Navigate to the List People API documentation used previously. If at the top right it indicates to "Log in", sign in with pod22wbxuser@collab-api.com and password C1sco.123
- As before, click the copy icon on the Bearer line and OK to confirm the copy.
-
Switch back to
VS Code
and
paste the personal access token you just copied to the
personal_access_token
line
(replace ___PASTE_YOUR_PERSONAL_ACCESS_TOKEN_HERE___ and make sure it is still surrounded by the single quotes)
-
Add the following line to instantiate the WebexSimpleApi object as "api" with this access token.
-
You have an API object, but what can you do with it? In the
Webex Documentation
, you saw the
Full API Reference
section with all available APIs. Most of those will have a
direct mapping to an API subpackage and method implemented in the SDK.
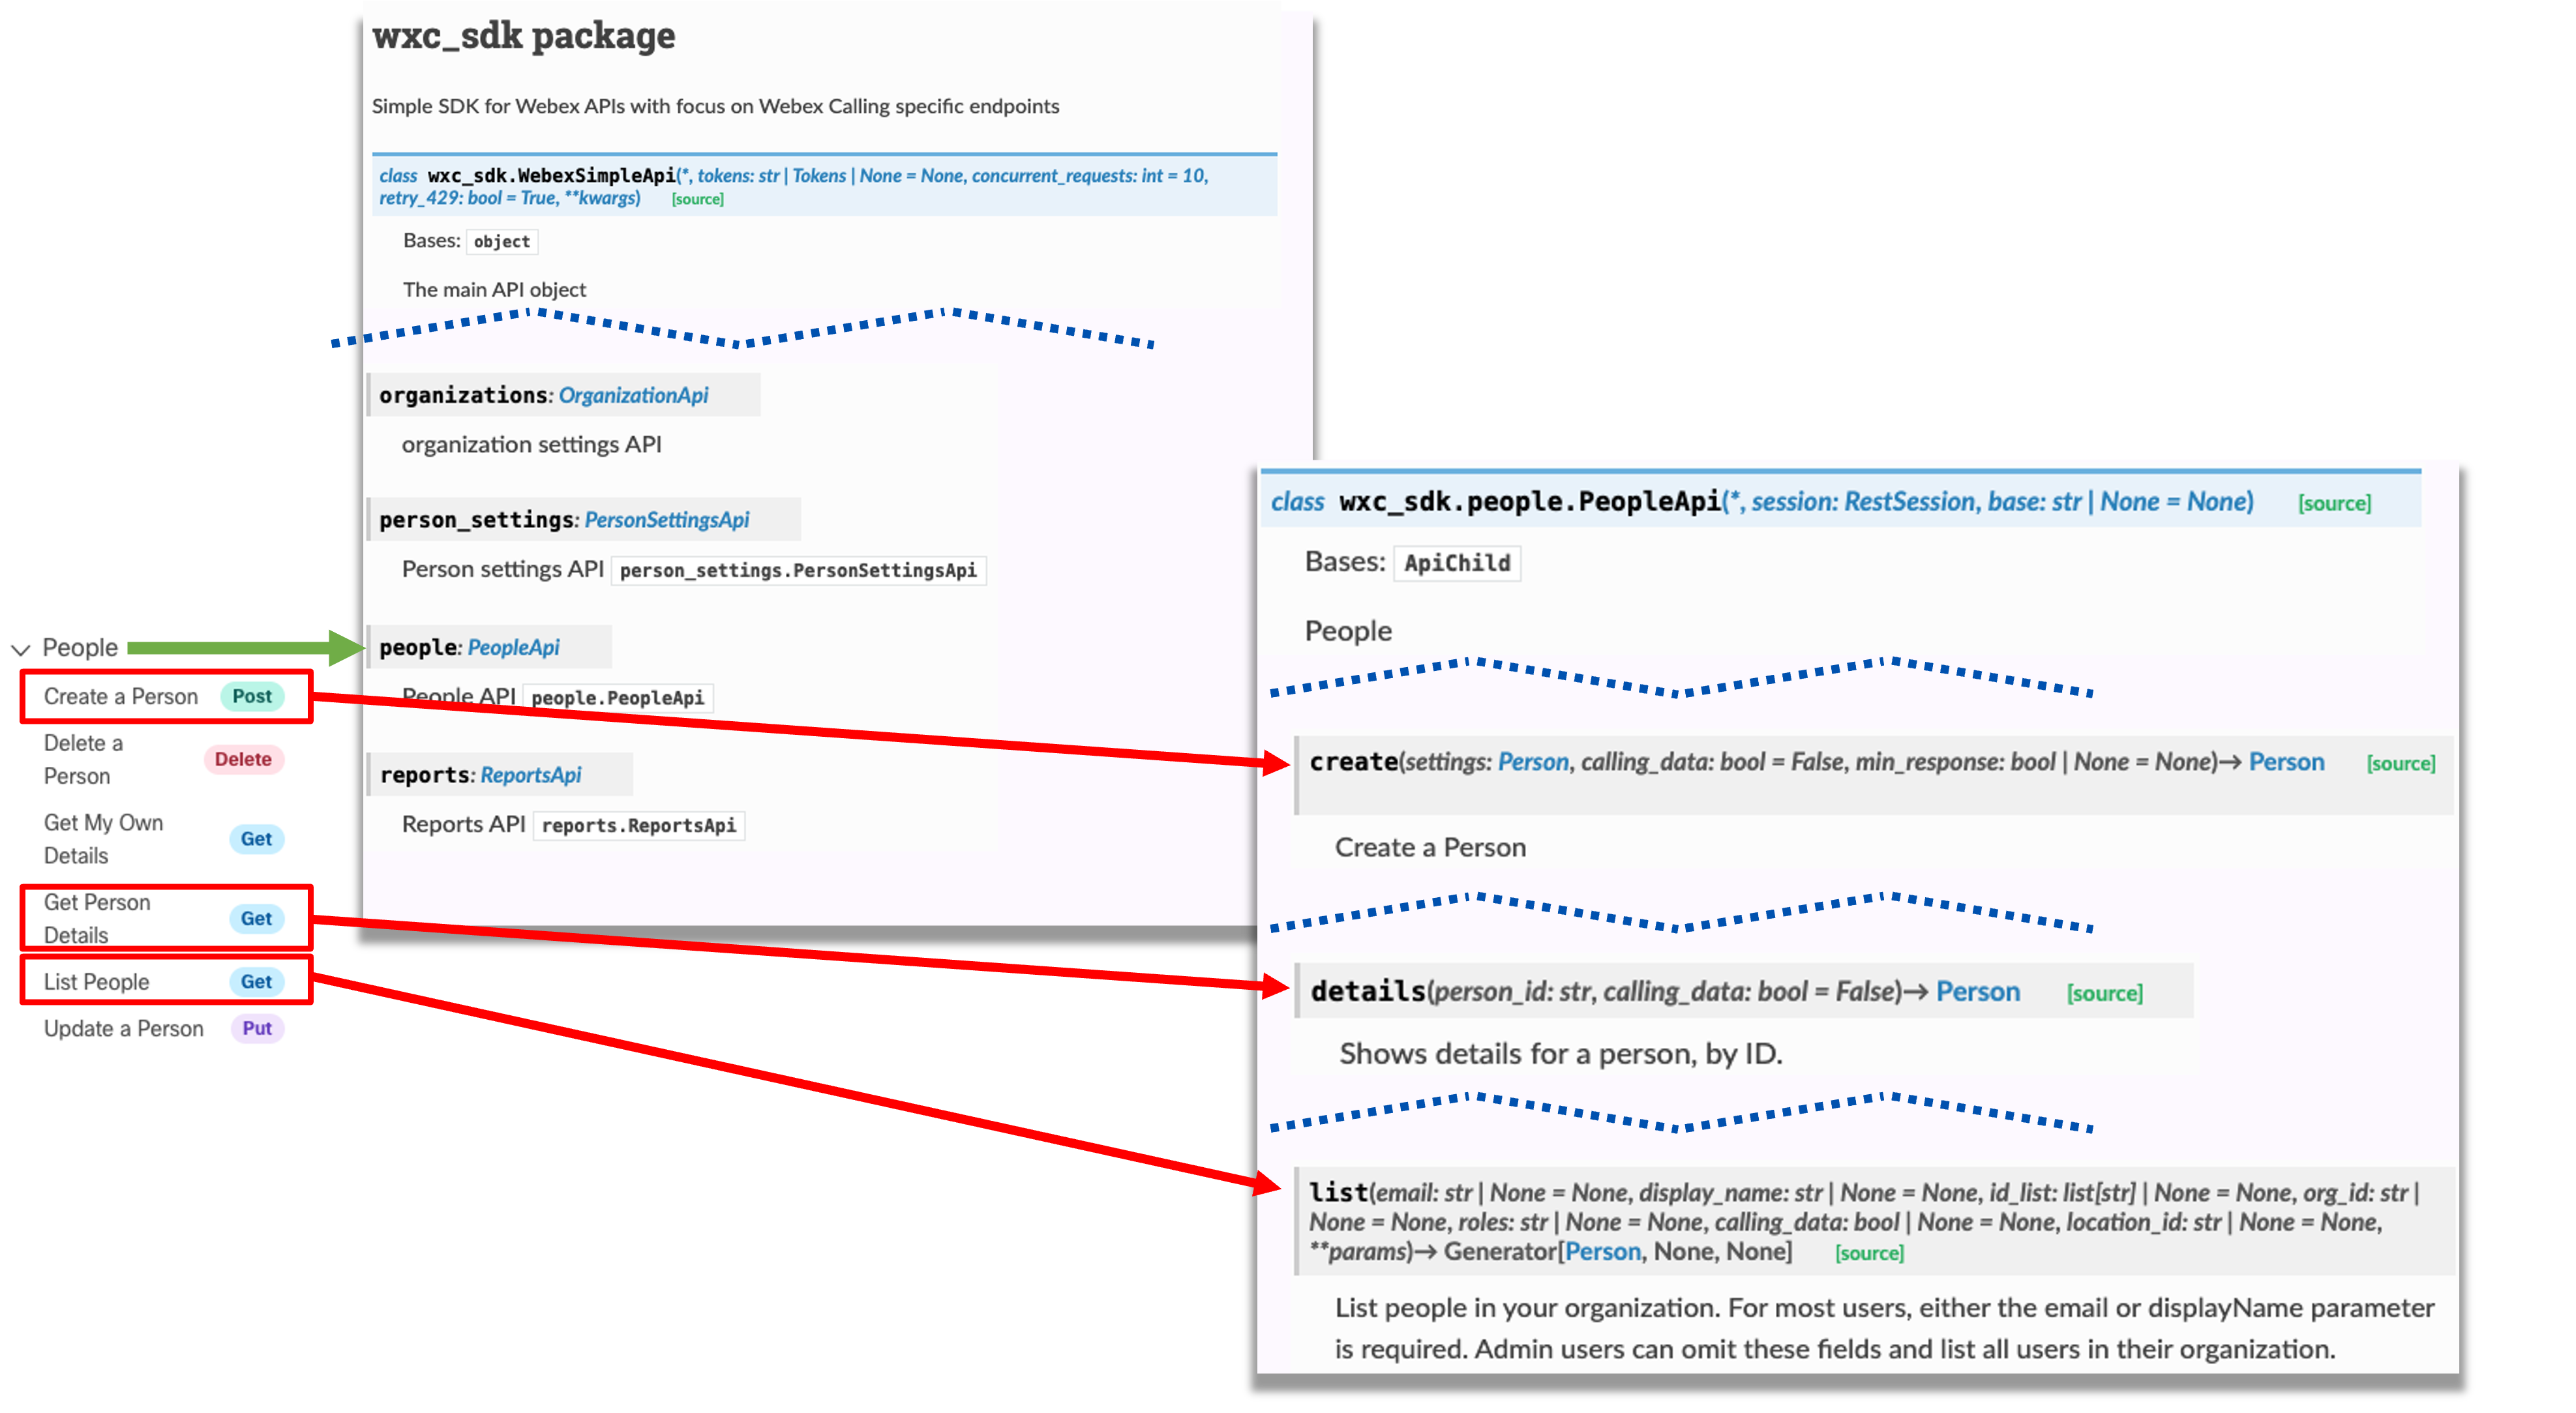
The People API section in the Webex documentation has a corresponding PeopleApi subpackage in the wxc_sdk . This class has the methods list() , create() , details() , delete_person , update() and me() , each one corresponding to a Webex API method.Now repeat the GET List People query to search for a user with a specific email address, but this time using the SDK instead of the developer.webex.com page. Since the SDK was initialized as api in the previous step, you can perform the exact same query with api.people.list() and pass the email address as a parameter.
Replace the email address in the email_to_search variable with pod22wbxuser@collab-api.com (make sure it is enclosed with quotes):
-
Add the following line to query the Webex API for people with that email address.
You can store the result in a list variable called
webex_user_list
. Even though
querying for a single email address should only yield at most a single result (because email addresses
in Webex must be unique), a list is always returned for list APIs.
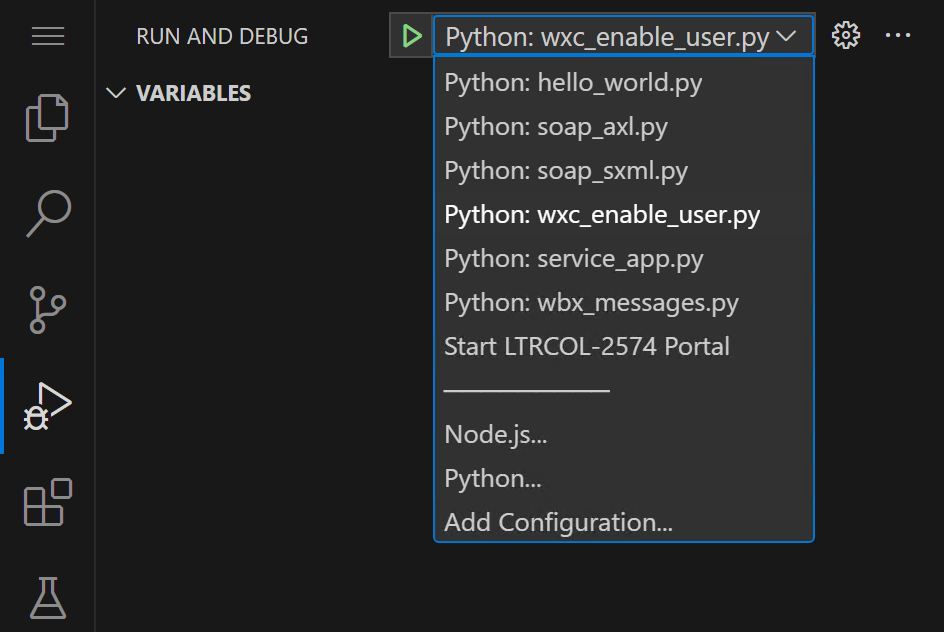 button left of the
Python: wxc_enable_user.py
text. Doing so launches a
Terminal
with the complete logging output at the bottom. If you scroll up a bit in that
Terminal (you may need to resize to make it more visible) you will notice the debug level output from the
SDK. The output shows you all the details of the request and response, including the verb, URI, and headers.
This particular request has no body, but if it did have one, it would be shown as well. The response shows
the status code (displayed at the top where it says
Request 200[OK]
) along with the headers
and response body. You can see that the content type is
application/json
and the body is a
JSON object with the user data. You were able to accomplish this with the single line of code you added to the
program -
api.people.list(email=email_to_search)
. This really shows the power of the SDK.
You did not have to specify the URL, the headers, the method, or the body of the request. You simply called
a method on the
api.people
object and passed the email address you wanted to search for and
got back the results in JSON format.
button left of the
Python: wxc_enable_user.py
text. Doing so launches a
Terminal
with the complete logging output at the bottom. If you scroll up a bit in that
Terminal (you may need to resize to make it more visible) you will notice the debug level output from the
SDK. The output shows you all the details of the request and response, including the verb, URI, and headers.
This particular request has no body, but if it did have one, it would be shown as well. The response shows
the status code (displayed at the top where it says
Request 200[OK]
) along with the headers
and response body. You can see that the content type is
application/json
and the body is a
JSON object with the user data. You were able to accomplish this with the single line of code you added to the
program -
api.people.list(email=email_to_search)
. This really shows the power of the SDK.
You did not have to specify the URL, the headers, the method, or the body of the request. You simply called
a method on the
api.people
object and passed the email address you wanted to search for and
got back the results in JSON format.
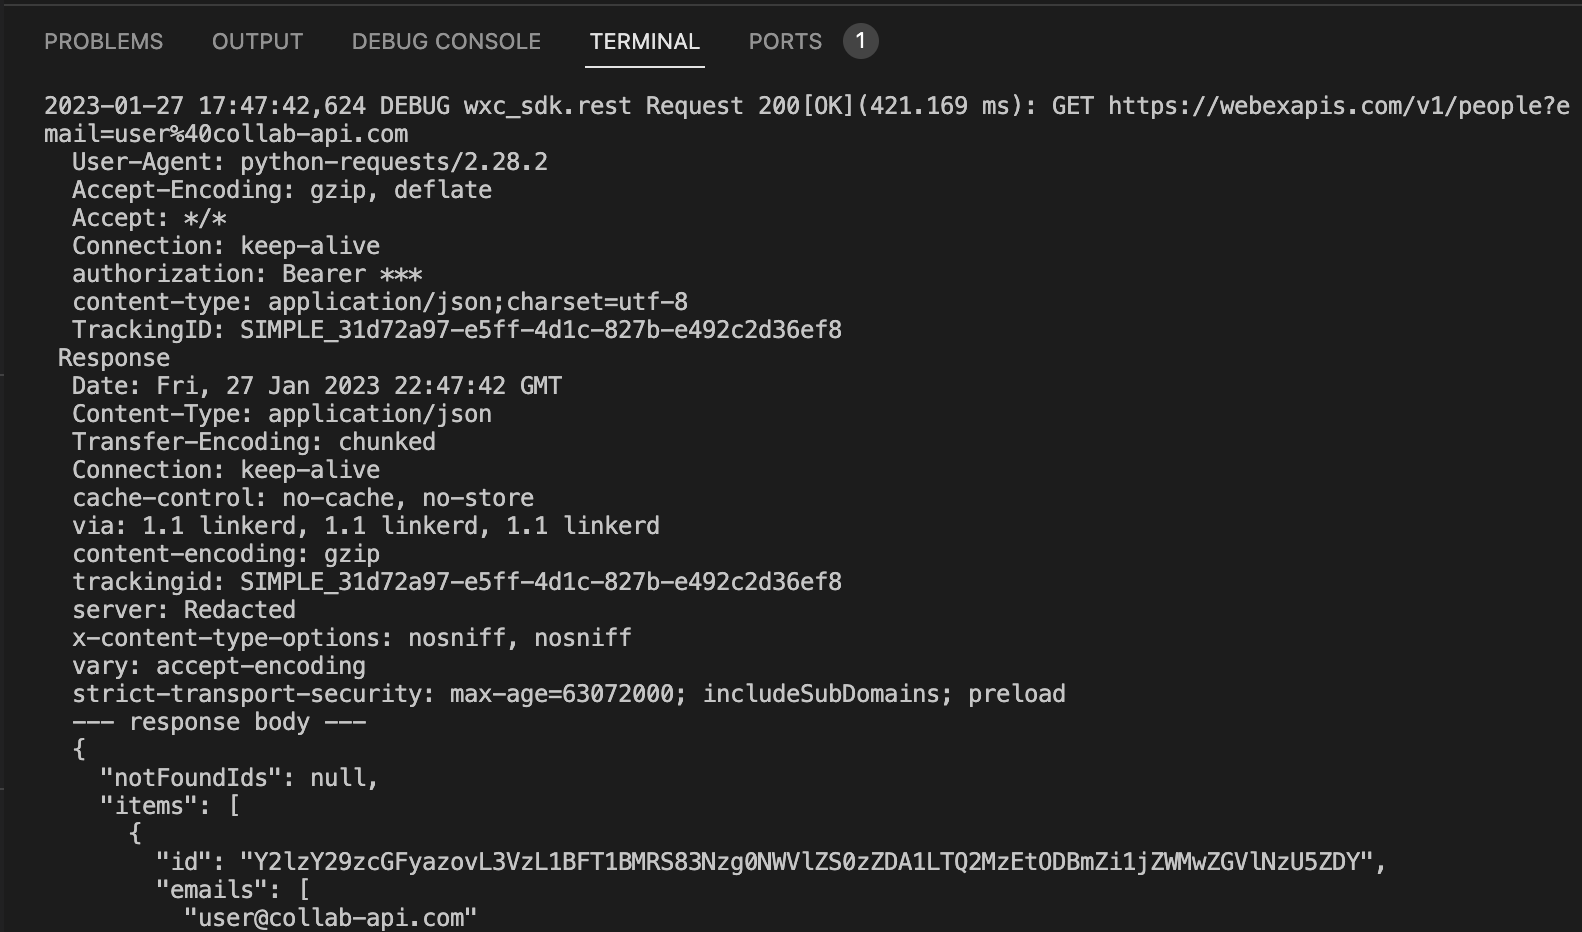
This for loop iterates through each item in the webex_user_list and assigns it to the variable webex_user . The log.info() function is then called with webex_user as the argument. This will output the contents of the webex_user object to the console.
The webex_user object which represents the single object returned by the SDK is not a simple Python data structure, but rather a custom one called Person in this case. This means you need to treat it differently than a simple Python dictionary as it is an object. If you are not familiar with the difference between the two, for the purposes of this lab you just need to remember that you access the attributes of an object using the dot operator (e.g. webex_user.display_name ) rather than the square bracket notation used for dictionaries (e.g. webex_user['display_name'] ).
You should see something that looks like this:

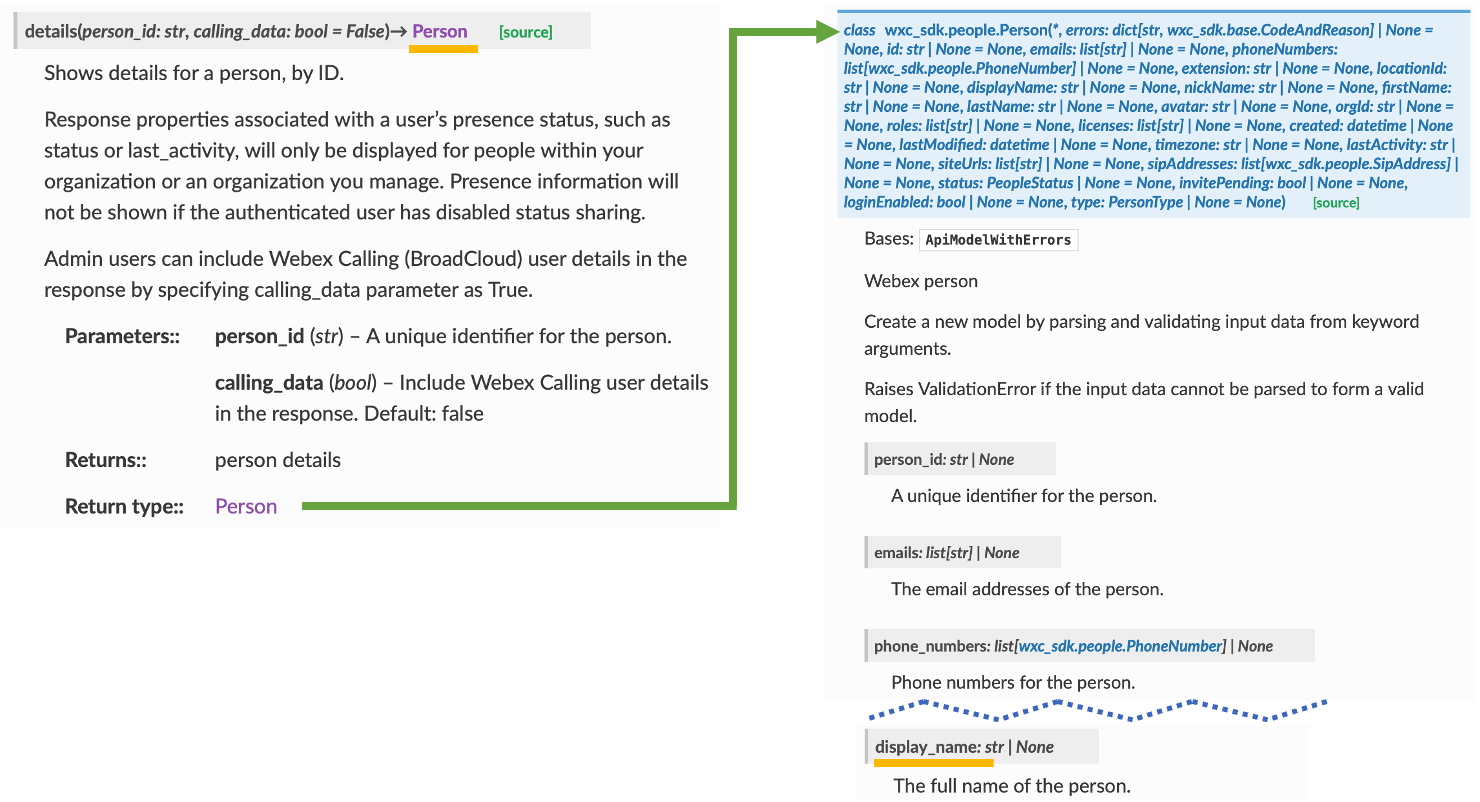
You should see a line with " INFO __main__ User information found for " with the display name of the user with the queried email address.
Once again replace the same line of code, but this time with the following:
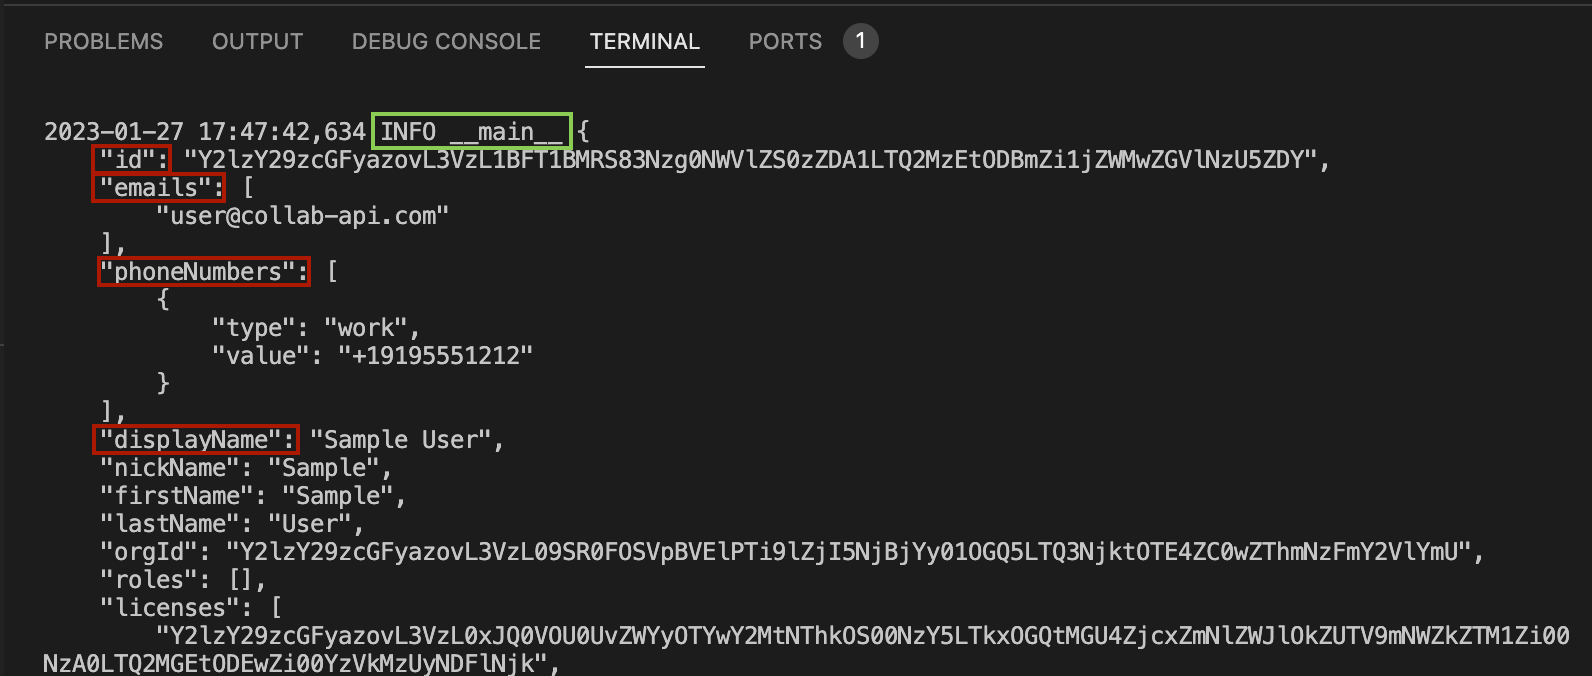
If you look carefully, the data structure printed matches the Response Properties from the List People method in the Webex API specification exactly (including the keys "id", "emails", "phoneNumbers", "displayName", etc.).
Pay attention to the output. Notice that the output is once again shown in camelCase, not the snake_case that the SDK's Python object uses. Keep this in mind if you ever decide to use the raw JSON returned by the model_dump_json() method. In this lab, we will use the Python object directly.
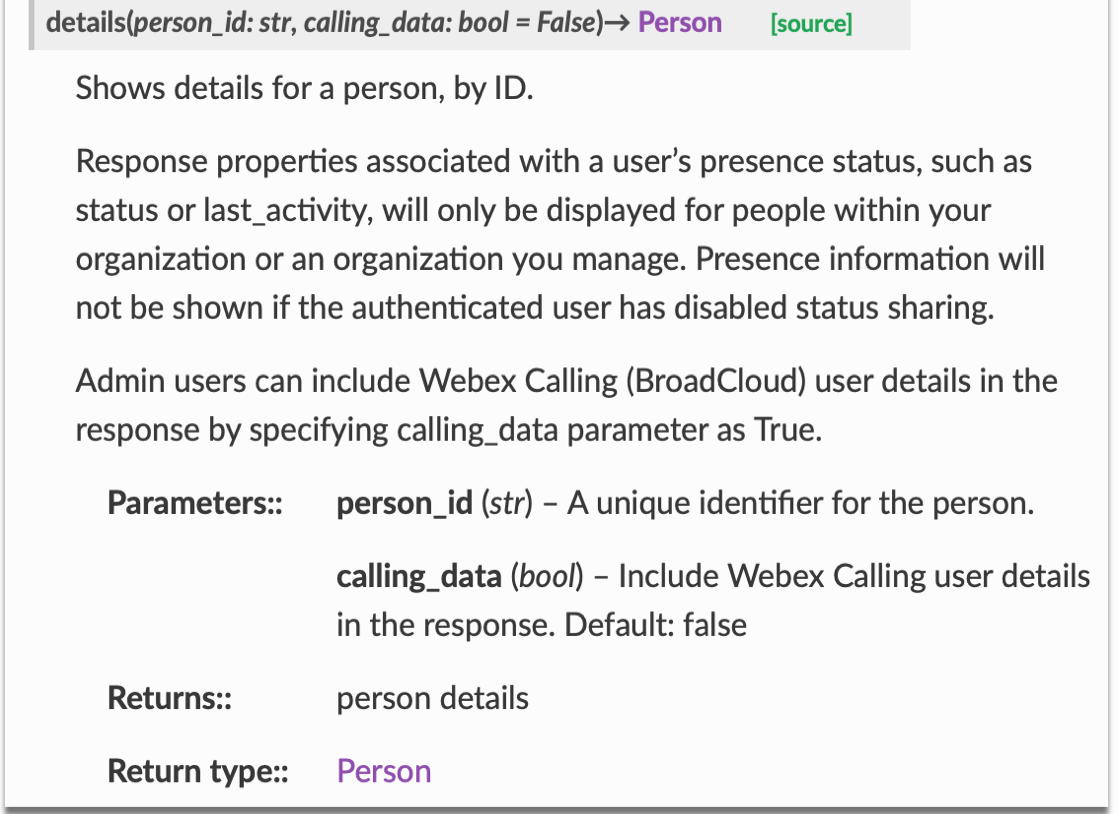
As seen in the documentation above, this method requires a person_id parameter. If you look at the output of your script, the webex_user that you populated earlier, being an instance of the Person class, has a person_id attribute. Therefore, you can pass the webex_user.person_id as the person_id parameter. Some additional information may be returned if you set the calling_data flag. To be sure, add this as follows:
The output will look basically the same as the previous user dump because, although you specified calling_data=True , there isn't any calling data at this time because calling is not enabled for this user yet. This time through you used the combination of the pformat method and the vars method to dump the object in a more readable format while preserving the snake_case names you must use if you want to access these properties. Printing a returned object in this way is a good way to understand what is being returned without having to look at the SDK documentation.
You might also notice that the phone_numbers attribute is a list of PhoneNumber objects which are also defined in the SDK documentation. This is common with the SDK where you will see objects appear as properties of other objects. While this might seem complicated, once you start working with the SDK, you will find that it is very intuitive and easy to use.
Now that you have completed this basic exmple of using the wxc_sdk to interact with the Webex APIs and retrieve user information, we will move on to leveraging other methods to obtain the access tokens needed to interact with the Webex APIs in a way that is more secure and allows you to use the tokens for a longer period of time. If you recall, the personal access token is only valid for 12 hours. Additionally, you have pasted the token into the Python code which is not a best practice and is not secure.
In previous examples, you used a Personal Access token for all Webex API access. These tokens are great for quick testing, but they are not suitable for production applications because they are only valid for 12 hours. There are several other ways to obtain tokens for use in a production application. Which one you use depends on whose identity and permissions you want to use when interfacing with the API. The following are the different token types available for use in Webex APIs:
- Personal Access Token: This is what you have been using up to now. It is a 12-hour time-limited token that inherits all the permissions of the user who generated the access token.
-
Bot Token:
A bot is an account that has its own independent identity and performs
actions on its own behalf. Bots are limited in the permissions granted to them. They can send and receive
messages in spaces like other users, but they cannot see messages in a space unless the message is directed
to the bot with an @mention of the bot or in a 1:1 conversation with the bot. Bots have no administrative
access and are only used for messaging as they have no calling or meeting permissions. You will create
a bot using a bot token later in this lab. Bot tokens are generated when you create a bot on developer.webex.com.
As of the time of this writing, bot tokens do not expire for all practical purposes (their expiry is 100 years). If you lose
a bot token, you must re-generate a new one which will invalidate the old bot token and provide you with a
new one.
The identity of a bot token is always a user id you create in the @webex.bot domain, not your own company's domain. This means that the namespace for bots is global to all of Webex, so if you want to create a bot named, for example, "mybot@webex.bot" you can only do so if no one else has already created a bot with that name. The display name, however, can be anything you want and may overlap with another bot much in the same way that you can have two people named Chuck Robbins as long as they have diferent user IDs. - Integration Token: An integration uses the OAuth2 Grant Flow to ask a user to grant your application permission to perform actions on their behalf. You have likely experienced an OAuth2 grant flow on websites that ask for permission to read data from another website - for example, a financial aggregation site wanting you to grant permissions to view your credit card balance from your banking site without giving the financial aggregation site your banking login information. When you create an integration, you specify the scopes that the integration is requesting and that list is presented to the end-user so they know what permissions they are granting your application. Following the above example, the financial aggregation site should only be requesting access to read your account balance and perhaps transaction history, but should not have access to make changes to your account in any way, so they would request scopes from your bank that limit what they can do. It is up to your bank to define what those scopes are and every bank could potentially define scopes differently. An integration gives your application both an access token and what is known as a refresh token . The refresh token allows the application to obtain a new access token and refresh token before the access token expires. Like access tokens, refresh tokens have a lifetime as well, but their expiry is typically longer then that of an access token. In many implementations, requesting a new access token by using a refresh token resets the expiry of the refresh token. This means that as long as you keep using the refresh token periodically, you can stay authenticated indefinitely, provided that the refresh token does not have an absolute expiry date set by the service.
- Service App Token: This token type is similar to an Integration in that you are granting the application permissions to perform actions defined through a set of scopes, but instead of impersonating a specific user, a service app token gives an applcation administrative access to a specific Webex organization after being granted permission by an administrative user in that organization. As long as a service app is authorized in a given organization, it continues to have access until revoked by an administrator. The access is not based on the specific person who granted the access, so its access is retained even if users leave the organiation. Behind the scenes, a service app creates a hidden machine account user associated with each organization who is granting access to the application and it is this hidden user's permissions that are being granted to the service app. Like an integration, a service app will obtain both an access token and a refresh token.
- Guest Token: There are some occasions where you want to interact with a user who does not have a Webex account, for example to provide a mechanism for users to send messages from a website or have a video call using Webex with an external user and have this integrated into a web portal of some kind. Webex previously had special tokens called Guest Issuer Tokens to facilitate these use-cases, but now, there are special scopes (guest-issuer:write and guest-issuer:read) that allow a service app to generate tokens for guests . Webex also has a special license type that allows service apps to generate guest to guest meetings where all participants in the meeting are guests. This can be used to facilitate use cases like connecting a patient to a doctor - neither of which are licensed Webex users.
The following table summarizes the differences between the various token types available in Webex.
| How to Get | Identity | Access Scope | Validity | |
|---|---|---|---|---|
| Personal Access Token | developer.webex.com | The user who generated the token | All permissions available to the user who generated the token | 12 hours |
| Integration | OAuth2 Grant Flow (requires web server) | A user who granted permissions to the integration application | Scopes that were requested by the app and granted by the user | 14 day access token + 90 day refresh token |
| Service App | developer.webex.com + Control Hub Admin | A machine account with access to a specific Webex org | Scopes that were requested by the app and approved by an org administrator | 14 day access token + 90 day refresh token |
| Bot | developer.webex.com | The bot’s own identity (<bot>@webex.bot) | Limited permissions specific to bots | 100 years |
| Guest | Generated by a Service App | Guest user | Limited to specific guest permissions | 18 days |
Given the various token generation methods available in Webex, the most appropriate one to use for an application that needs to perform administrative actions in an automated fashion is a Service App . This allows the application to perform administrative tasks without being tied to a specific administrator user in the organization. If you were using an integration or a personal access token, the tokens assigned to the application would be tied to a specific user, so if that user were to leave the company, your application would break. By using a Service App, you remove this depedency. It also allows administrators to delegate only specific permissions (scopes) to the application instead of giving it full administrative permissions. So for example, if you want to build an application that provisions users, you could grant the service app only access to the user provisioning scopes. Similarly, if you wanted to build an application that only uses reporting APIs to run analytics on your Webex data, you could grant the service app only the reporting scopes.
In this section, you will create a service app and use it to obtain tokens that you can use to perform actions your user account does not have access to. Once you have these tokens you can use this for a variety of functions later in the lab. To do this, you will perform the following tasks:
- Create a Service App
- Generate a new Access Token from the Refresh Token
Start by creating a Service App.
Step 1 - Create a Service App
- Access the Webex API documentation home page at: https://developer.webex.com
-
If necessary, click
Log in
at top right and sign in with the following credentials:
- Email address: pod22wbxuser@collab-api.com
- Password: C1sco.123
-
Once logged in, click on your
 icon at the top right.
- Click My Webex Apps (There should not be any existing Bots or Integrations, but if there are any Bots, feel free to delete them.)
- Click Create a Service App (If another app already exists, you would need to click Create a New App first.)
- For the App name , enter Pod22 Test Service App
- Click on one of the Icon images for your Service App so that it is selected.
- In the Description paste the following text: Cisco Live 2026 LTRCOL-2574 Service App for Pod 22 (https://collabapilab.ciscolive.com)
-
In the
Contact Email
field paste the following text:
pod22wbxuser@collab-api.com
. This email address is only used if submitting the Service App for approval in the Webex App Hub
so that others outside of your organization can use the app.
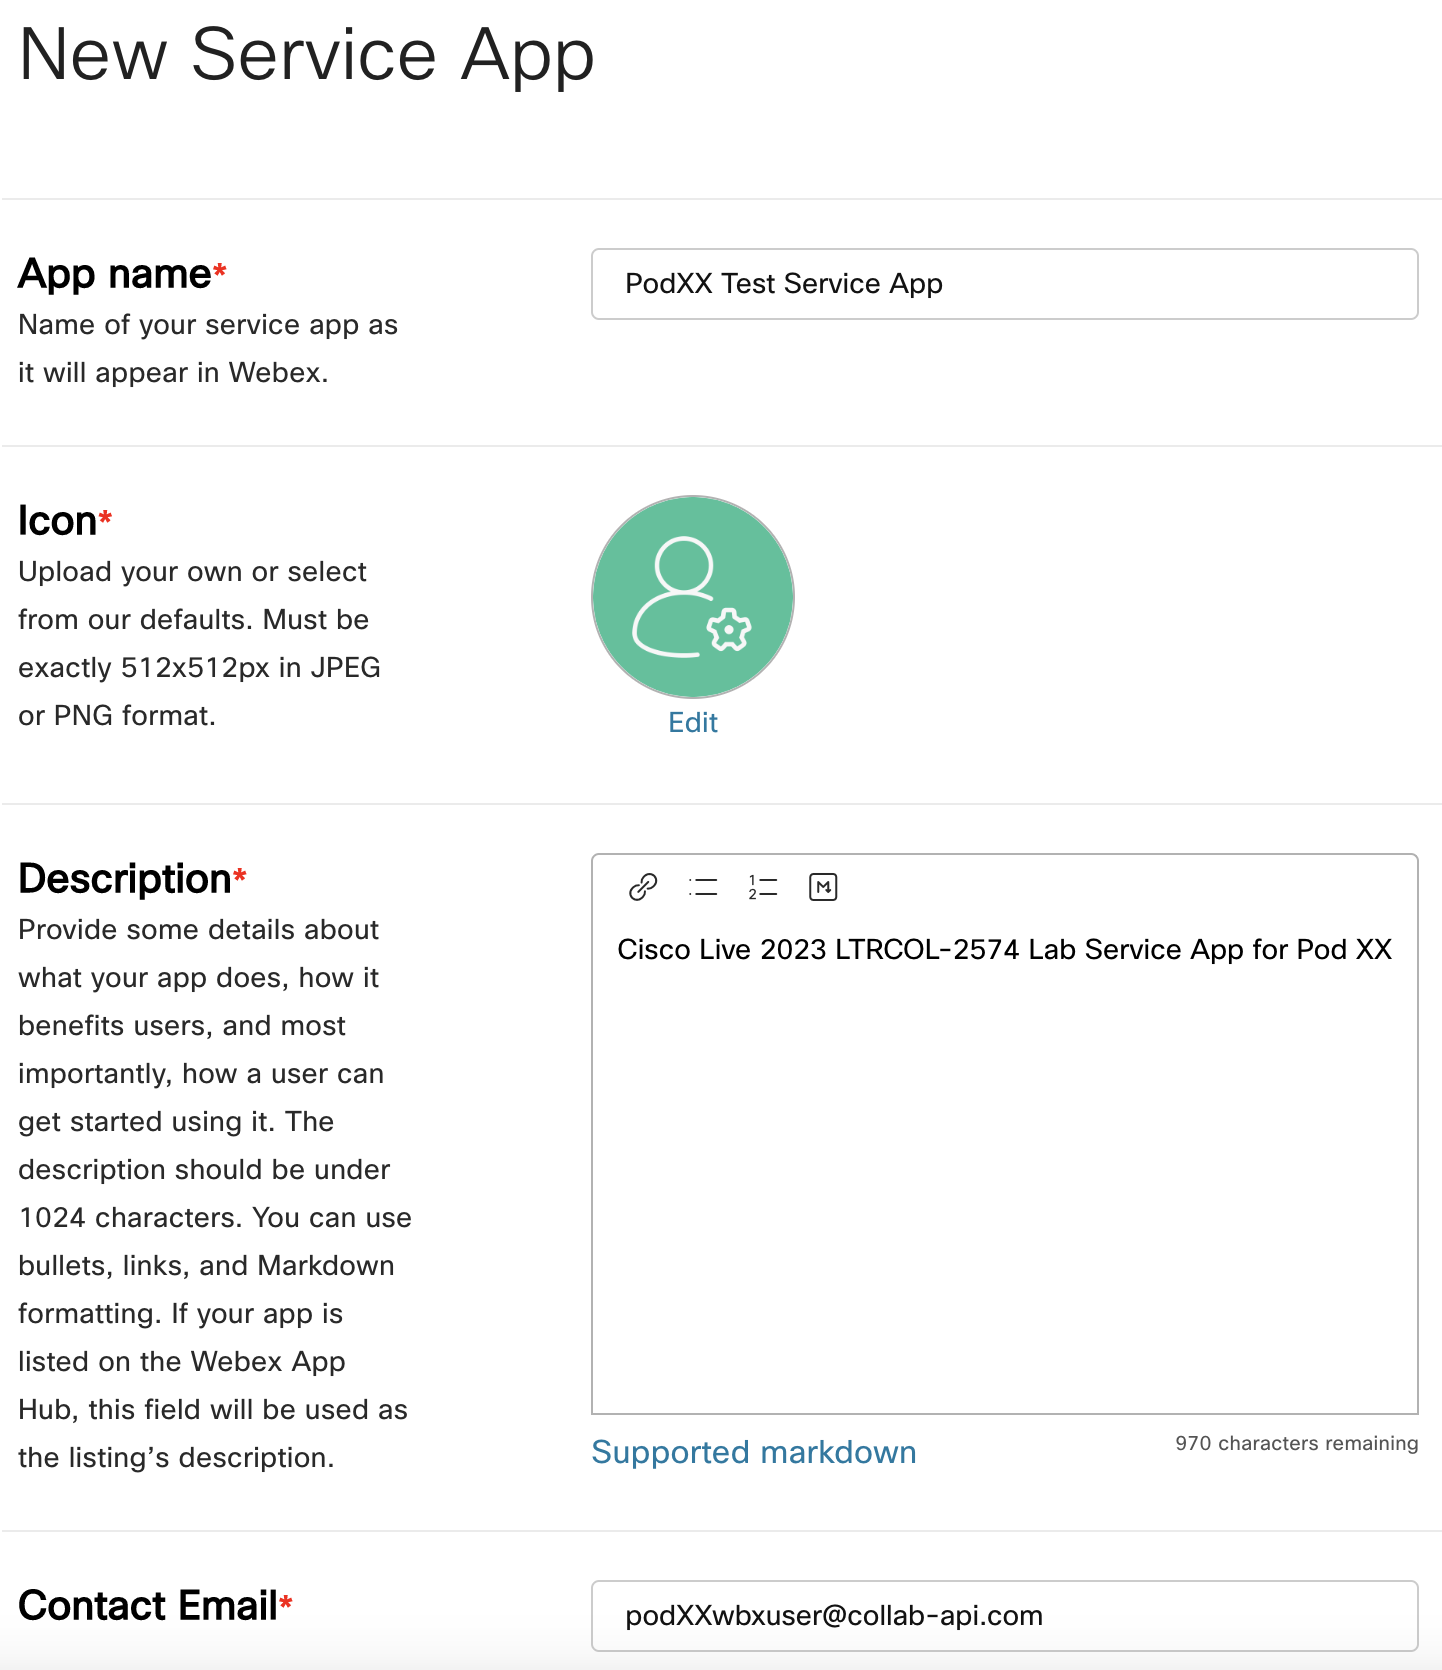
-
For
Scopes
check the following boxes. NOTE that many of the scope names are very similar. You can click to
copy each of these from the list and then use the Find function in the browser to search for each scope in the list. When
you are done, be sure to double-check that you have seven scopes selected and they match the ones on this list. Failure to
select the correct scopes will lead to issues later when you try to use the tokens.
- spark-admin:telephony_config_read
- spark:calls_read
- spark:people_read
- spark:people_write
- spark-admin:licenses_read
- spark-admin:people_read
- spark-admin:people_write
- At the bottom, click Add Service App .
-
You should now see a
Congratulations
message and some details about the App. Below that,
Click the button to
Request admin authorization
.
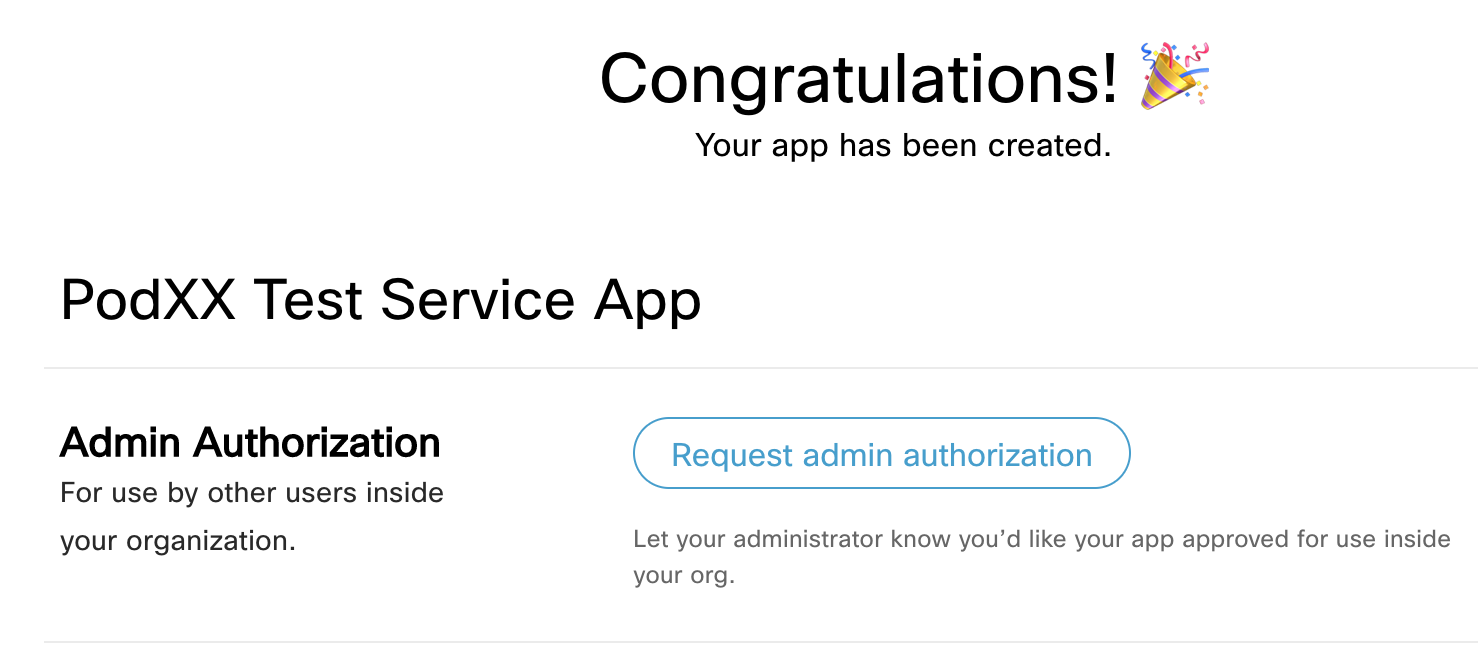 .
.
-
The Service has now been submitted for approval.
Notify one of the lab proctors
and they will approve the request with an administrator account.
 .
.
-
Since you are not an administrator you cannot approve yourself, but here are the steps that an administrator takes
to approve the request. First, an administrator logs into Webex Control Hub, navigates to the
Service Apps
tab of the
Management
>
Apps
section, selects the
request, reviews the scopes to ensure they approve of the app, and then selects "Authorized".
You will not perform this step in the lab as you do not have the right level of
permissions to approve service apps, but we are including it here as a reference.
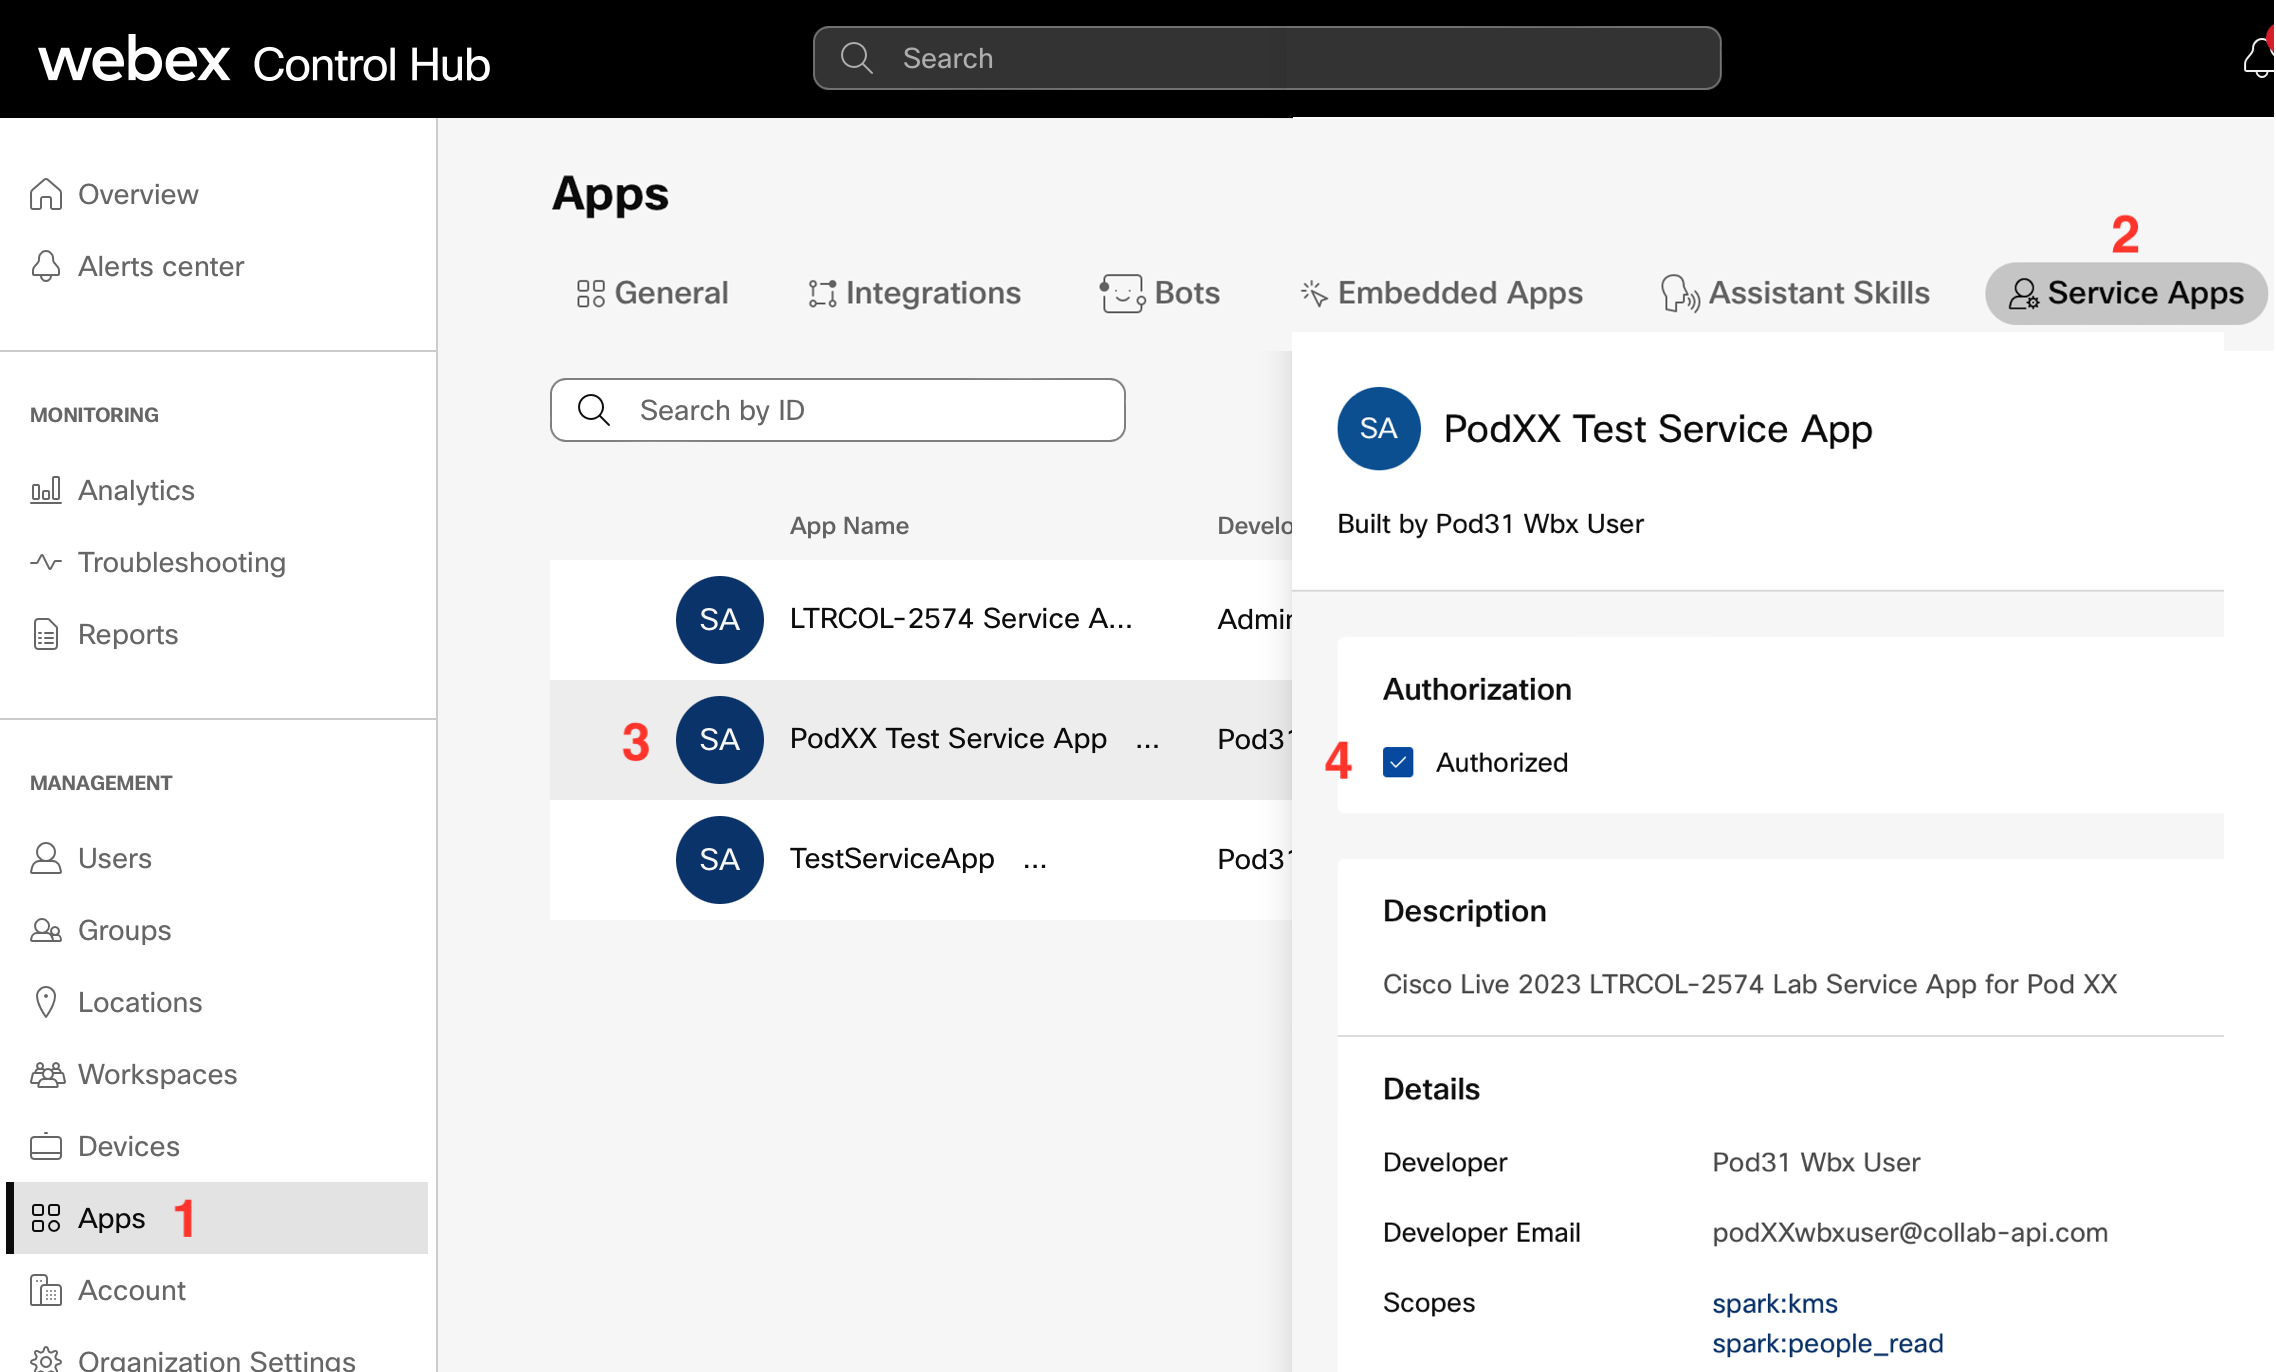 .
.
-
Once authorization is complete, click the
reload
button in your browser to obtain the
information needed to generate tokens in a test script in VS Code.
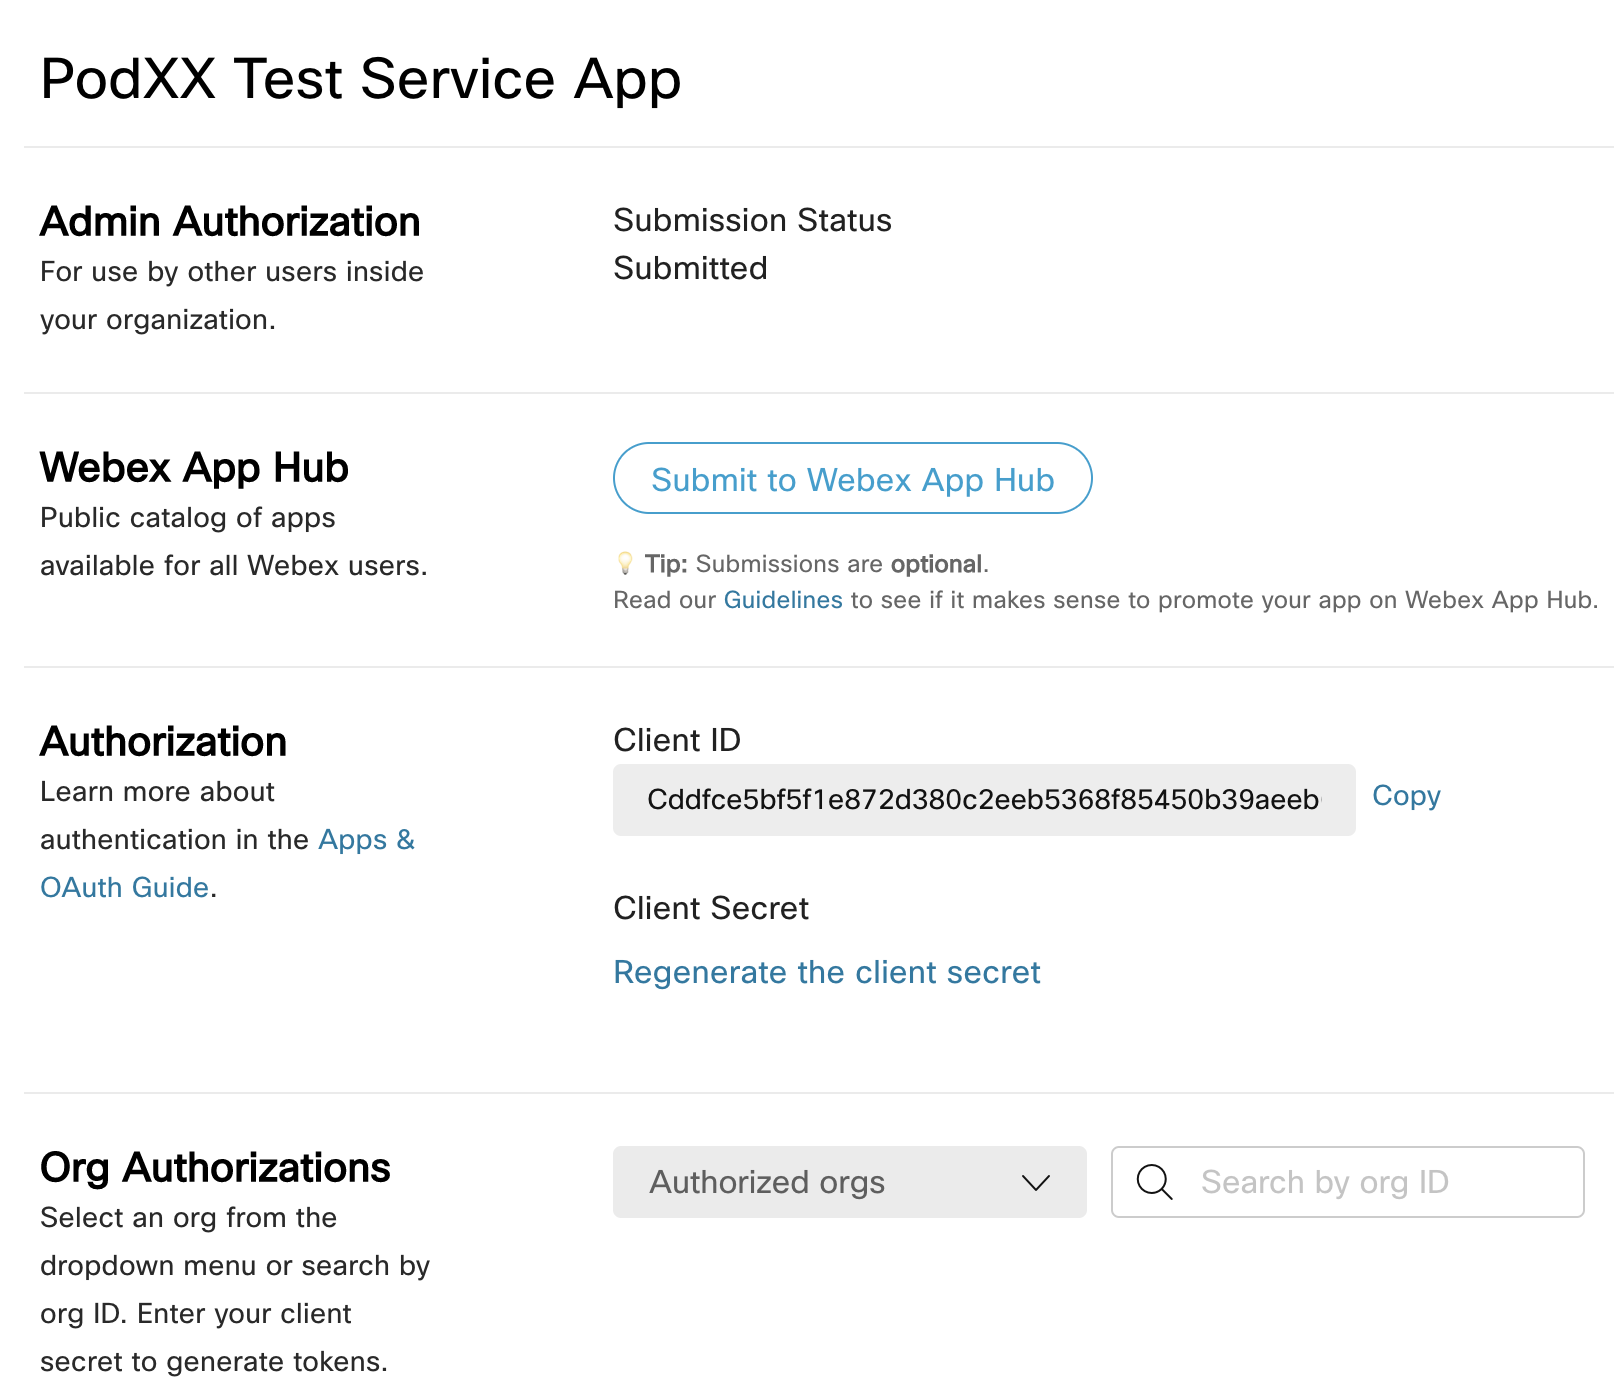 .
.
- Click the Copy button next to the Client ID .
- Access your VS Code instance: https://dev1.pod22.col.lab:8443 and from the Explorer open service_app.py .
-
Find and replace the
___PASTE_SERVICE_APP_CLIENT_ID___
text in between the quotes with
your Client ID that you just copied:
- Navigate back to the Service App page and click Regenerate the client secret . When prompted "By regenerating your secret you will revoke your current secret. Are you sure?", click Yes
- Click the Copy button next to the new Client Secret.
-
Access VS Code again and replace the
___PASTE_SERVICE_APP_CLIENT_SECRET___
text
in between the quotes with the new Client Secret that you just created and copied:
- On the Service App page, in the Org Authorizations section, click the Authorized orgs drop-down and select LTRCOL-2574_DND .
-
The
Enter Client Secret
box will appear and you can paste the previously copied client secret
into this box and click
Generate tokens
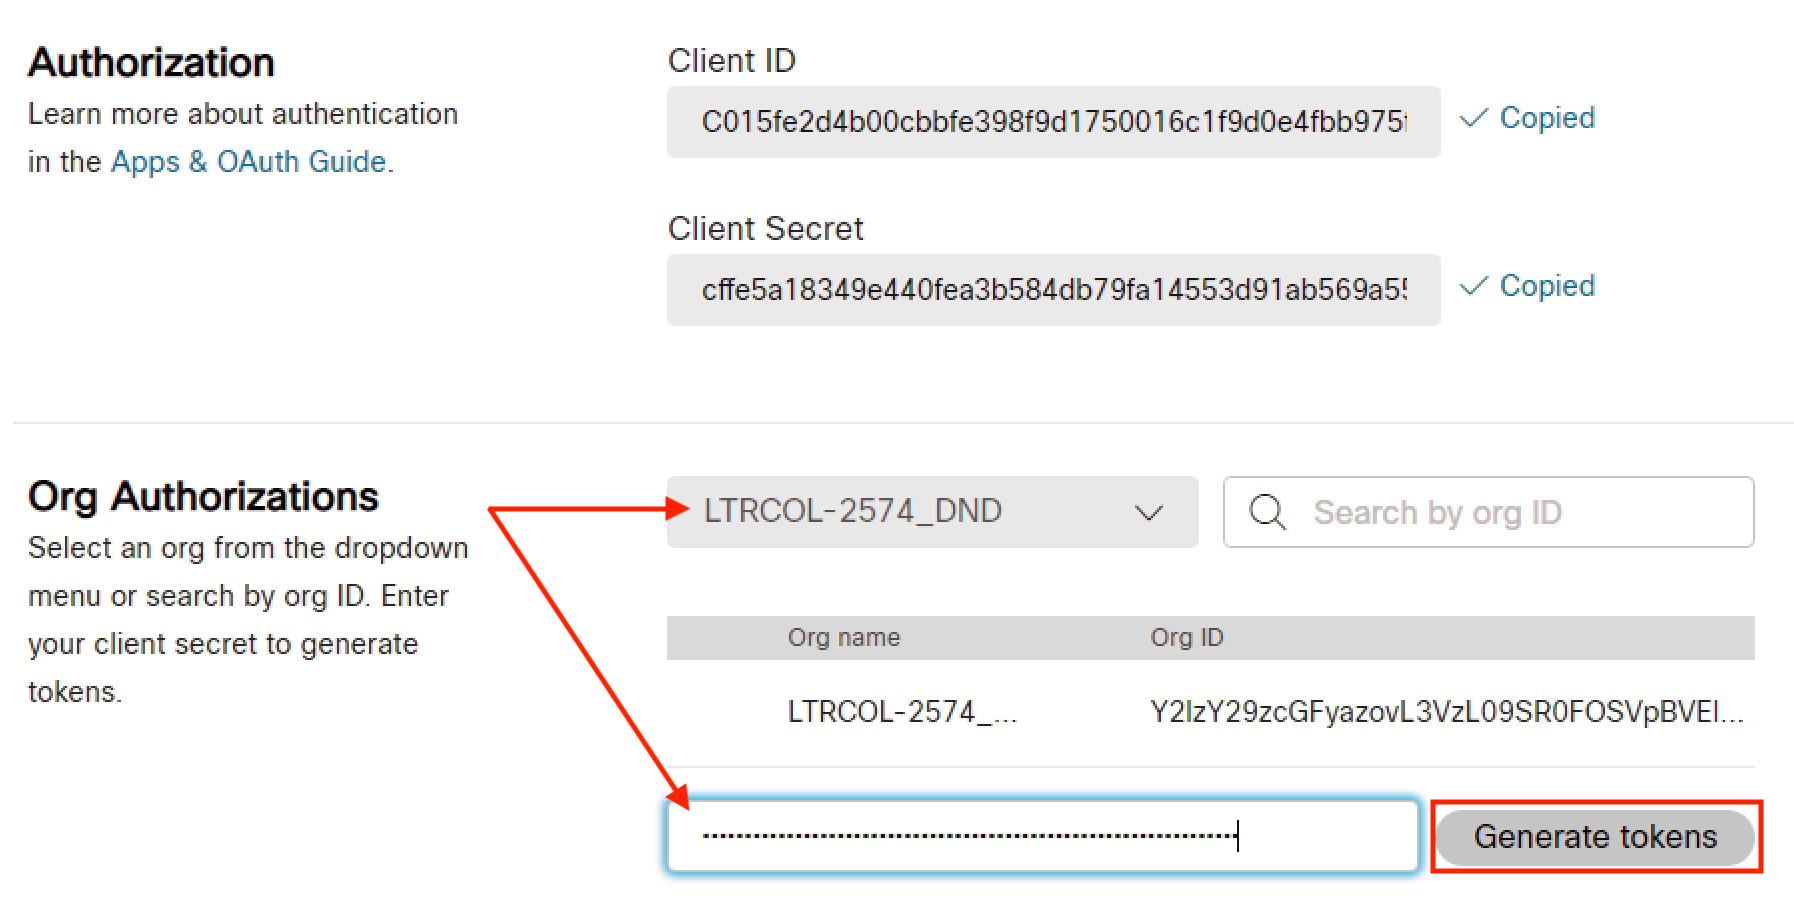 .
.
-
Two tokens are now displayed below, an
access_token
and a
refresh_token
.
Copy the
refresh_token
.
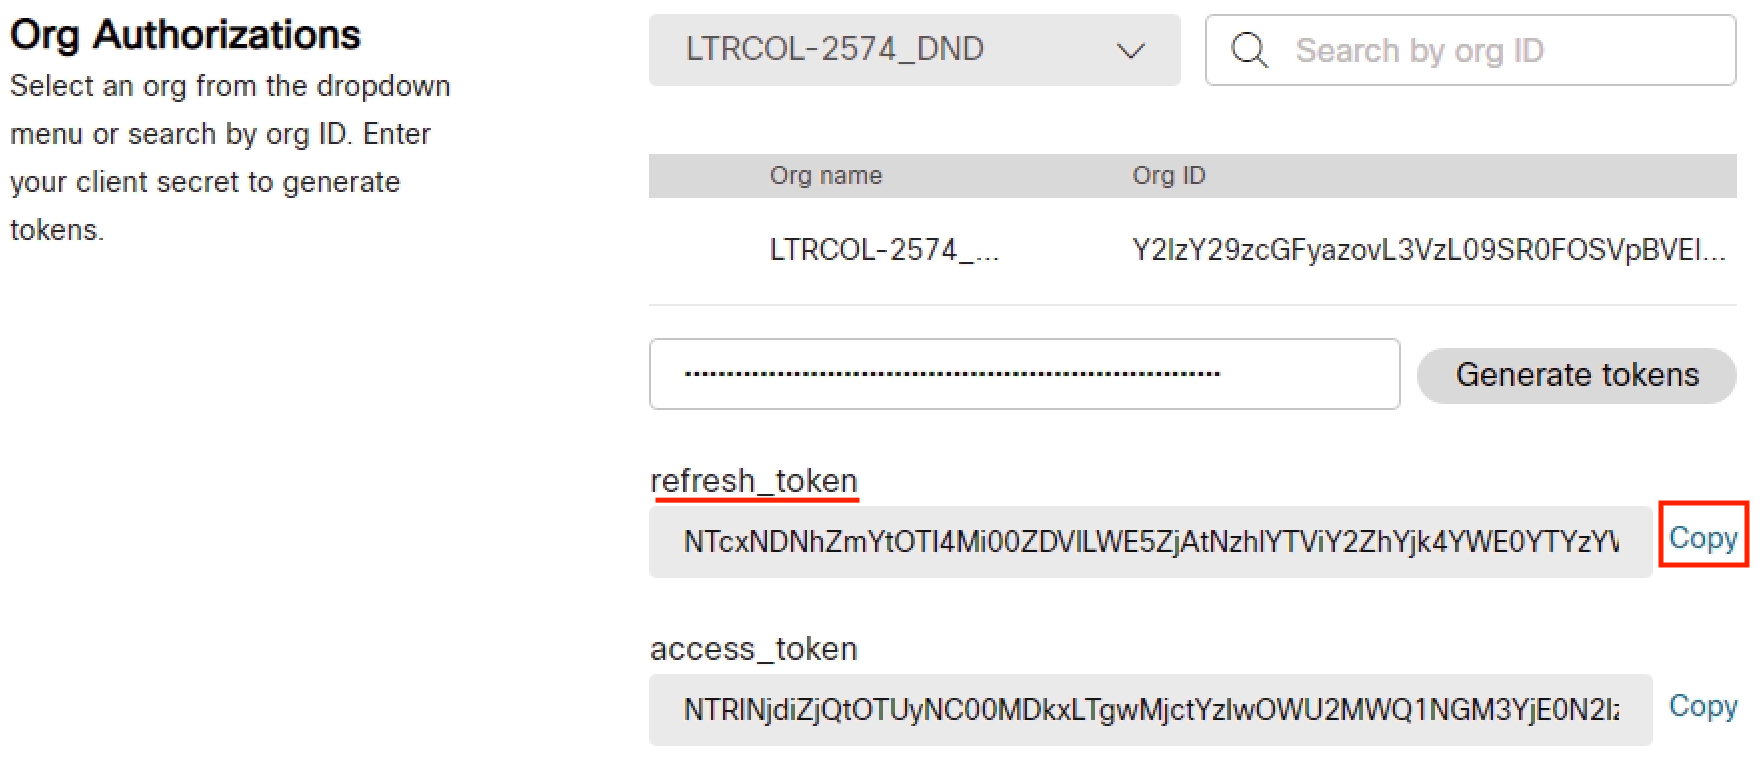 .
.
-
Switch back to VS Code and replace the
___PASTE_SERVICE_APP_REFRESH_TOKEN___
text with the refresh token.
That was all the information needed from the Service App. The access_token that was generated is valid, of course, but we do not know exactly for how long. The refresh_token, on the other hand, can be used to generate another access token, which you will do in the sample code.
Step 2 - Generate a new Access Token from the Refresh Token
When your application requests a new access token, Webex will return a new access token, including its expiration time, as well as a refresh token, which may or may not differ from the one used in the request, and its expiration time.
Knowing the exact expiration time of the tokens will allow you to request new ones before they expire, keeping the application up and running.
- Access your VS Code instance: https://dev1.pod22.col.lab:8443 and from the Explorer open service_app.py .
-
Add the following lines to construct the payload consisting of the previously supplied client_id, client_secret,
and refresh_token and send a POST request with the data to the Webex access_token request location:
-
The code following what you just pasted prints out the results and uses the new access token to query the
users in order to validate the token. You can just run this example. Click the
Run and Debug
button in the left column.
-
Once you click anywhere in list of "RUN AND DEBUG" configurations, You should see a predefined Configuration for running a python
script named
Python: service_app.py
in the list. Make sure it is selected:

-
Click the green
Start Debugging
button left of the
Python: service_app.py
text. Doing so launches a
Terminal
with the complete logging output at the bottom. You will see the new
access_token
; its
expires_in
value in seconds, so basically 14 days;
the
refresh_token
; and its
refresh_token_expires_in
in seconds, or 90 days.

The output includes that it was able to log in using the Service App access token and query users without encountering an authentication or permissions error
- Copy the entire access token under the Your new Service App access token is: text, as highlighted in the above picture.
- In VS Code, from the Explorer open wxc_enable_user.py in the examples folder, the file you began editing earlier.
-
Locate the position near the top where you previously pasted your personal access token and replace that
token with the Service app access token that you just copied. This new token will give your application
administrative rights to change users, which is essential for the tasks that will follow.
Now that you have an access token with administrative rights, you can continue with enabling a user for Webex Calling.
You have seen how a request to Cisco Webex can be performed using Python and have retrieved an administrative access token via a Service App. Now you can gain more experience by implementing a more substantial business task, such as enabling a user for Webex Calling. Minimally, this involves looking up a user, as you have already done, then updating them with a location, license, and phone number associated with Webex Calling. This will be accomplished by performing the following tasks:
- Look up Licenses
- Look up a Location
- Update a Person
- Verify User is Enabled for Webex Calling
Step 1 - Look up Licenses
To query for the licenses in your Webex organization, you need to use the List License API. The wxc_sdk has a LicenseAPI submodule so this is similar to looking up a user which you have already done using a similar list() method.
Webex Documentation: https://developer.webex.com/admin/docs/api/v1/licenses/list-licenseswxc_sdk Documentation: https://wxc-sdk.readthedocs.io/en/latest//apidoc/wxc_sdk.licenses.html#wxc_sdk.licenses.LicensesApi
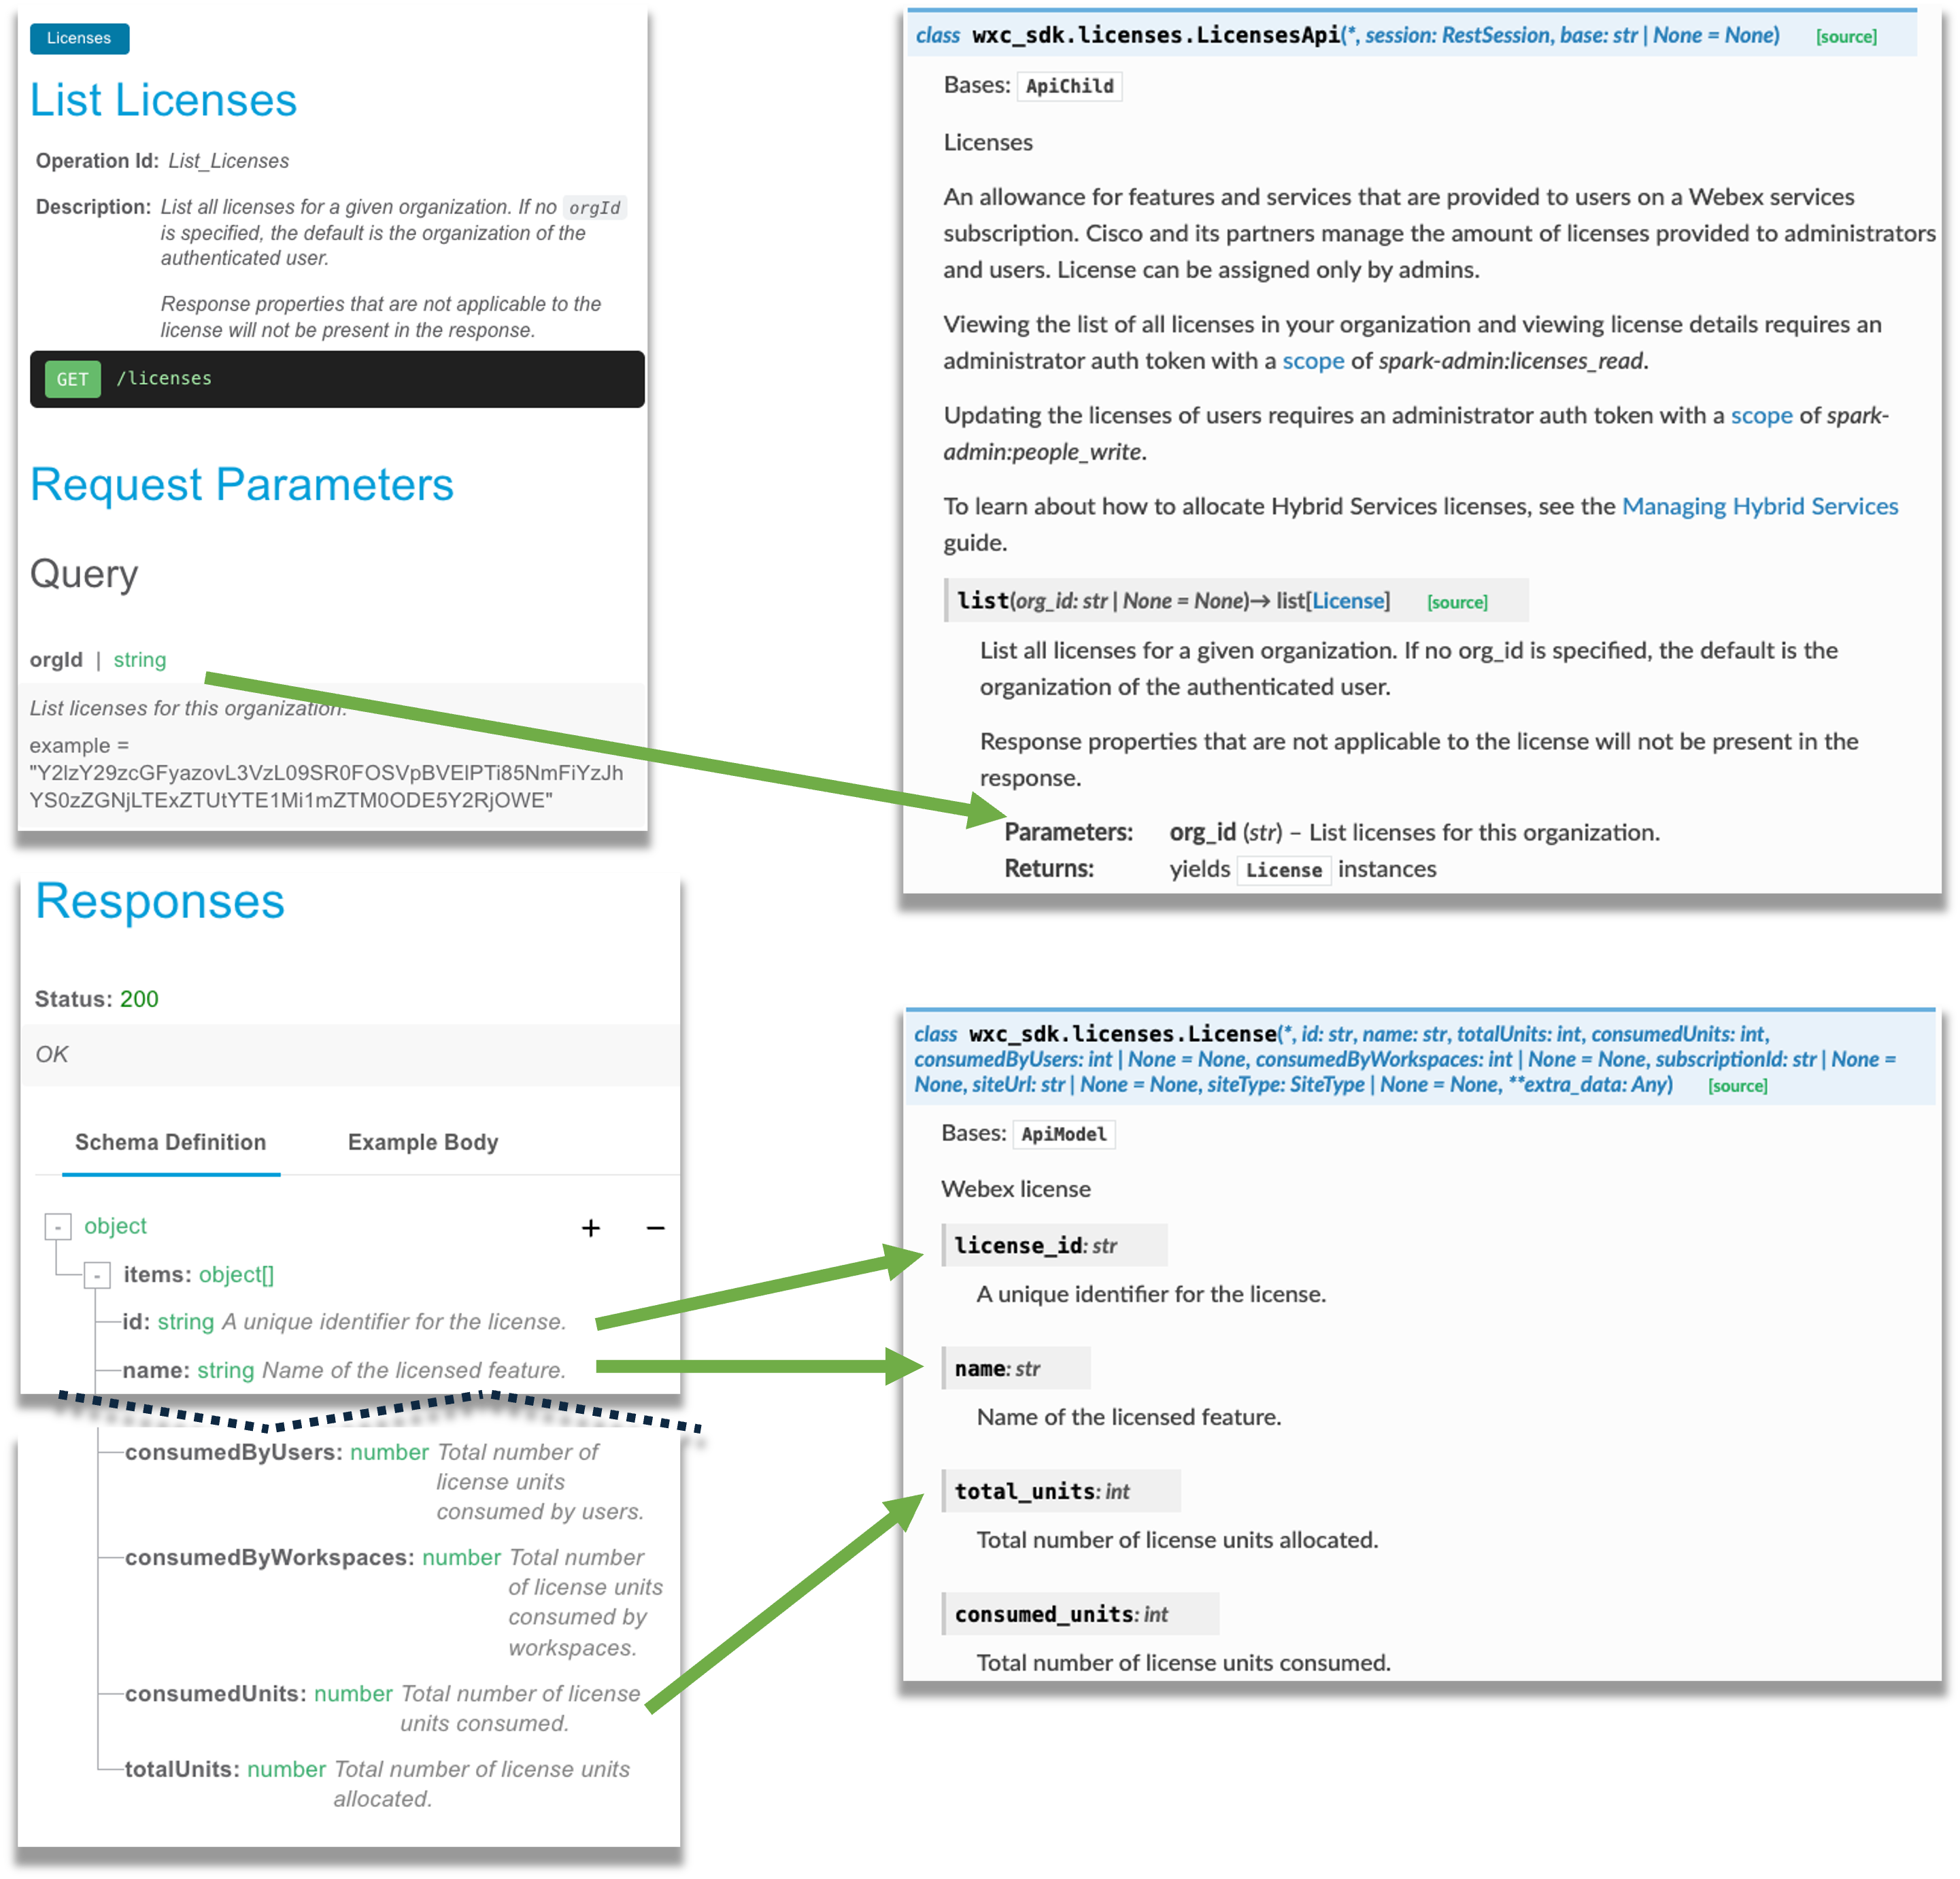
- Access your VS Code instance: https://dev1.pod22.col.lab:8443 and open wxc_enable_user.py in the examples directory. You have already completed the work in half of this file, so now that you have a token with the necessary scopes, you can proceed with the next steps.
-
The
org_id
parameter is not mandatory, so you can just call the method,
api.licenses.list()
and save it to a list variable. Like before, you can iterate through
the list and print out the license name and id. Unlike the previous "list" operation you performed to
list users, this query will return multiple results. Note that the
attributes in the SDK are "name" and "license_id". In this case, you will want to save both the license
for "Webex Calling - Professional" and "Unified Communication Manager (UCM)" because those will be used later. If found,
you can display the license name and ID to indicate that it was found.
Copy and Paste the following code in to your wxc_enable_user.py file :
-
Make sure the predefined configuration for running this script, called
Python: wxc_enable_user.py
is selected:
-
Click
Start Debugging
and examine the
Terminal
window output.
-
You see the license name and ID logged, because it was found.

=
Step 2 - Look up a Location
You have seen how much of the Webex API documentation maps directly to methods in the wxc_sdk. Another handy way to find a particular API endpoint exposed by the SDK is by using the Reference of all available methods in the SDK. If you look at this guide and search for "api.locations" you will find those methods. In this case, there is an additional method not present in the Webex API, by_name() . This will allow you to look up a location by name, instead of having to get a list of all locations followed by iterating through the list to find the desired location.
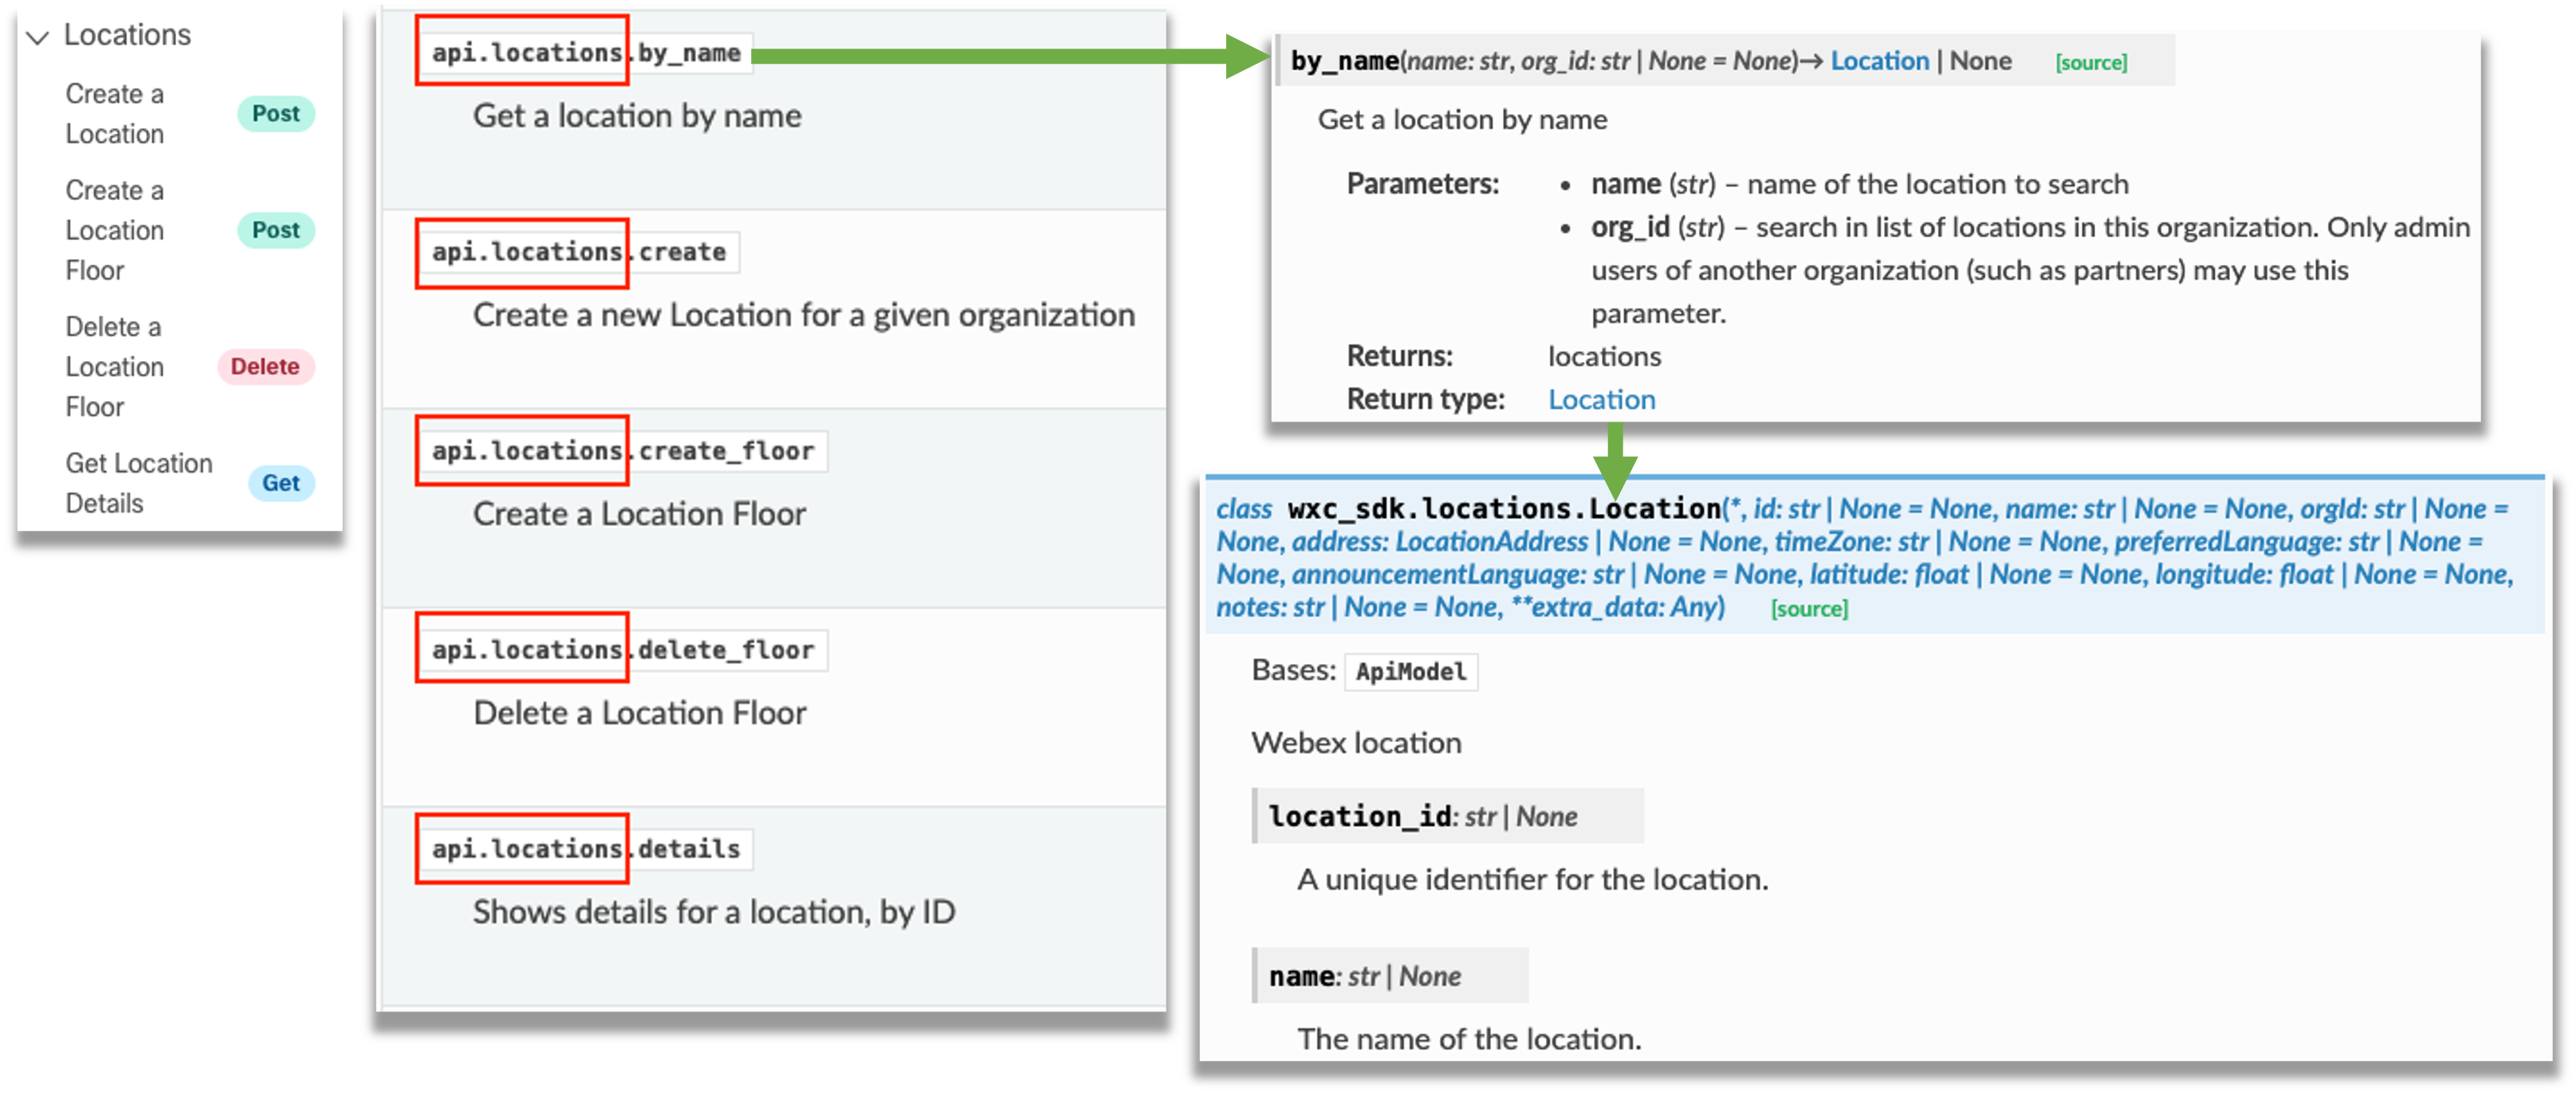
- Access your VS Code instance: https://dev1.pod22.col.lab:8443 and open wxc_enable_user.py .
-
Replace the
___REPLACE_WITH_LOCATION_NAME___
text in between the quotes with
Pod22
:
-
Use the
by_name()
method, passing it
pod_loc_name
.
Since you are now dealing with a
Location
object, you can directly print the
name
and
location_id
attributes:
-
Click
Start Debugging
and examine the
Terminal
window output.
-
You see the location name and ID logged.

Step 3 - Update a Person
Now you have all the data you need to update a person to enable Webex Calling. To do this, you need to take the existing user you retrieved earlier, add the license for Webex Calling, remove the on-prem registration license, modify the location for the user, and then update the user. In our example, you have a user that has their phone number already populated via Directory Connector when they were imported, so you do not have to set it, but if you were doing this in an environment where you don't have the phone number populated, you would have to populate this through the API call as well.
- Access your VS Code instance: https://dev1.pod22.col.lab:8443 and open wxc_enable_user.py .
-
You already have the
webex_user_det
from an earlier query that contains all the user
details. As mentioned, this is a
Person
. One of the properties of this object is
the
licenses
attribute that is a list of strings. Each string is a license ID.
Since you retrieved the licenses for the "Webex Calling - Professional" and "Unified Communication Manager (UCM)" licenses
earlier, you can simply add to the list using the
append()
method and remove the UCM
license using the
remove()
method. The code first checks to see if the UCM license is present
before attempting to remove it as well as checking to make sure the Webex Calling license is not present before
adding it. This is to avoid attempting to remove something that is not there or add something that is already in the
list. Add the following to your code:
-
Modifying the location for the
webex_user_det
user is fairly trivial. The
People
object has a
location_id
field that you can simply
assign the location ID you retrieved previously,
webex_location.location_id
.
Append the following:
-
Now you're ready to modify your user. Just like when requesting the person details, set
calling_data
to true, or the location ID won't show up in the output.
Append the following:
- Save this file
-
Click
Start Debugging
and examine the
Terminal
window output.
-
You see the complete user information returned and displayed.
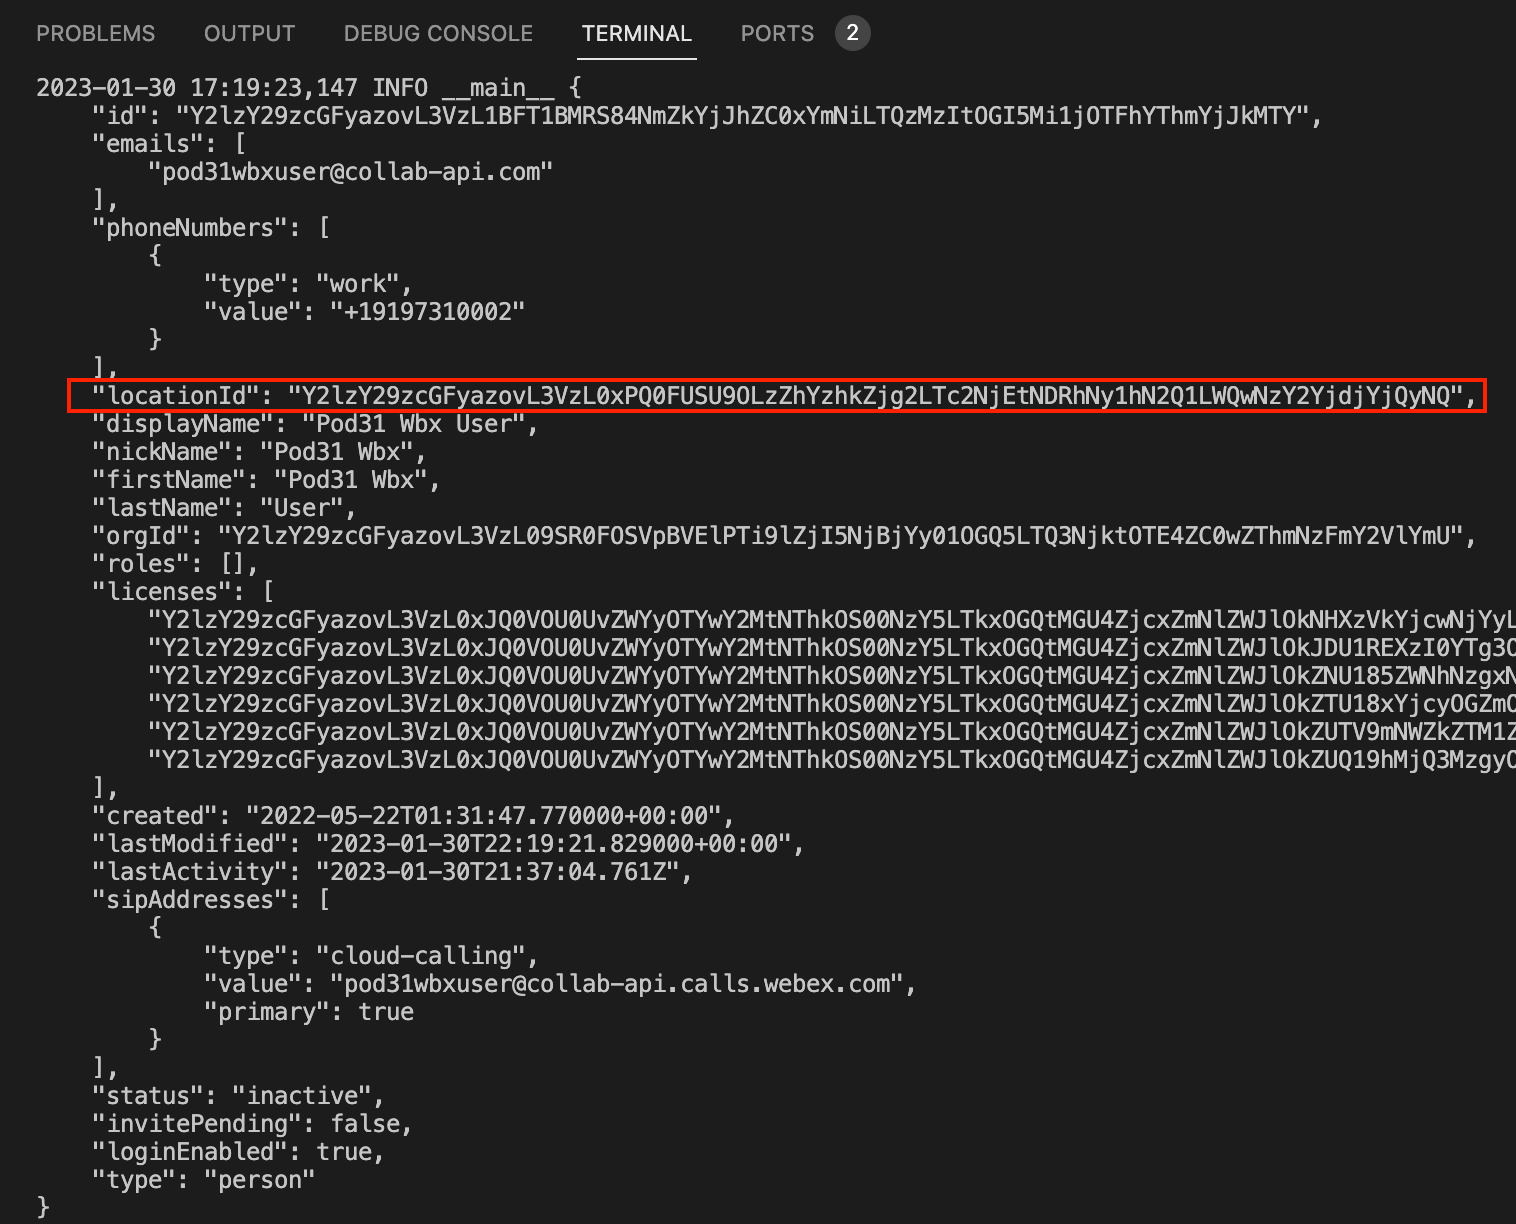
The data returned is all the user information. For Webex Calling, the locationId is the key component. You also see the phoneNumbers as well as a number of licenses licenses entries, although they are only indicated via their object IDs. If calling_data=True were not specified, you would not see any location ID field either.
Step 4 - Verify User is Enabled for Webex Calling
Now it is time to log into the Webex App with this user and make sure calling is provisioned.
-
The Webex app should be already installed and running on your PC. If a user is signed in already first sign
out by clicking on the logged in user's profile and settings on the top left of the Webex Client application
window and select
Sign Out
.
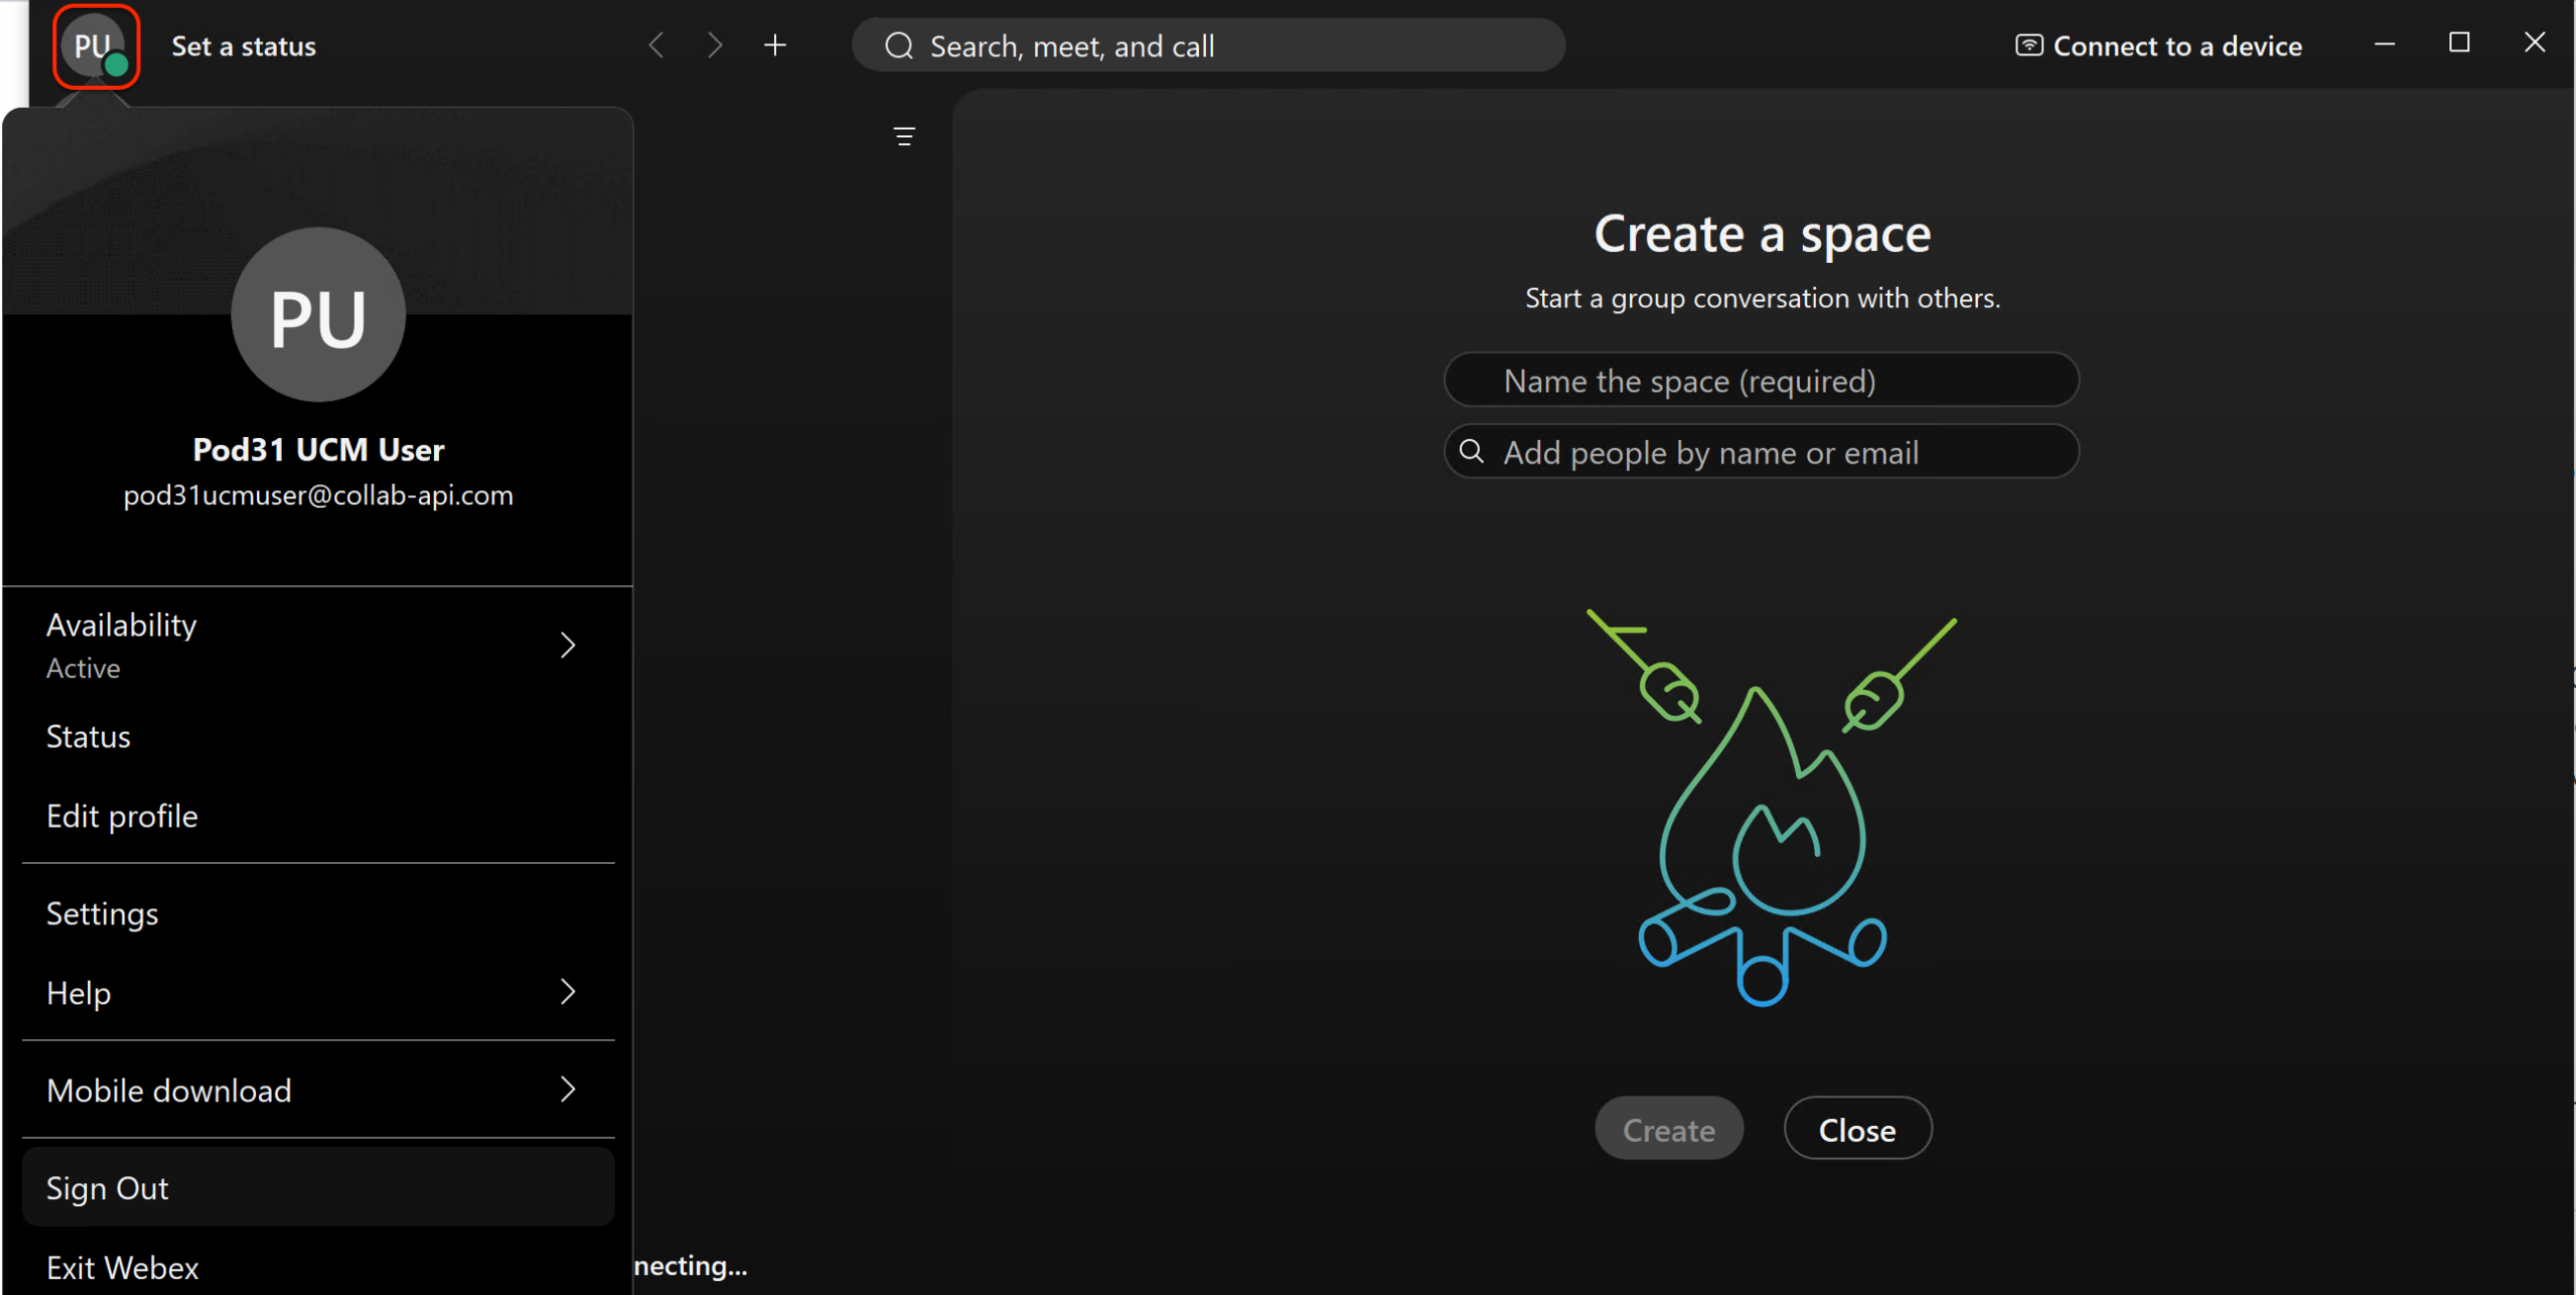
- Log in using email: pod22wbxuser@collab-api.com and password: C1sco.123
-
Once signed in, you should see the
Call Settings
in the bottom left corner. There should be no
"Phone services are disconnected" or similar errors.
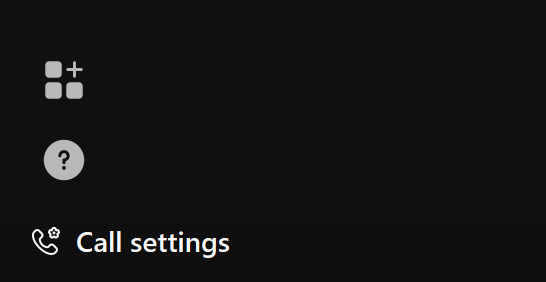
- Click the following to place a call: 2222 . If the call connects, you are successfully using Webex Calling
Now that you've worked with Calling-related APIs and the wxc_sdk Python library, it's time to look at the Webex Meetings APIs.
Now that you have explored the Webex Calling APIs, you can take the opportunity to examine the Webex Meetings APIs. Webex provides several APIs that allow you to automate and integrate Webex Meetings into your applications. Some of the things you can do with Webex Meeting APIs include:
- Creating and managing meetings
- Adding and managing meeting invitees
- Getting and updating meeting preferences, options, and other details
- Retrieving, listing, and deleting recordings, meeting chats, and transcripts
We will use this opportunity to also explore another method of obtaining an access token, by using an Integration . An Integration allows an application to implement an OAuth 2.0 flow to authenticate a user in Webex and then obtain an access token with a limited set of permissions, enabling the application to perform certain actions on behalf of a user. In this case, we will use an Integration to schedule a meeting on behalf of a user. This differs from using a Service App, which performs actions on behalf of the Service App itself.
In this example, you will first create an Integration in Webex, then build a simple web application that presents a login button that kicks off the OAuth flow to authenticate the user and obtain an access token. This will allow the web application to create a new meeting on behalf of the user using the Webex Meetings API. You will perform these steps:
- Create an Integration
- Implement OAuth2 Authentication
- Obtain an Access Token
- Create a new meeting
- Obtain the Join URL
- Join the meeting
Step 1 - Create an Integration
The first step to using an Integration is to create one on the Webex Developer Portal. Follow these steps to create an Integration:
- Access the Webex API documentation home page at: https://developer.webex.com
-
If necessary, click
Log in
at top right and sign in with the following credentials:
- Email address: pod22wbxuser@collab-api.com
- Password: C1sco.123
-
Once logged in, click on your
icon at the top right.
- Click My Webex Apps in the dropdown menu.
- Click Create a New App .
- Click Create an Integration .
- For the Integration name , enter Pod22 Test Integration
- Click on one of the Icon images for your Integration so that it is selected.
- In the Description paste the following text: Cisco Live 2026 LTRCOL-2574 Integration for Pod 22 (https://collabapilab.ciscolive.com)
-
In the
Redirect URI(s)
field paste in:
http://dev1.pod22.col.lab:5002/redirect
. This tells Webex where to redirect your user after they have authenticated
and authorized the Integration to access the requested scopes. This URL points to your development machine and the
port number (5002) that the script will be listening on for requests.
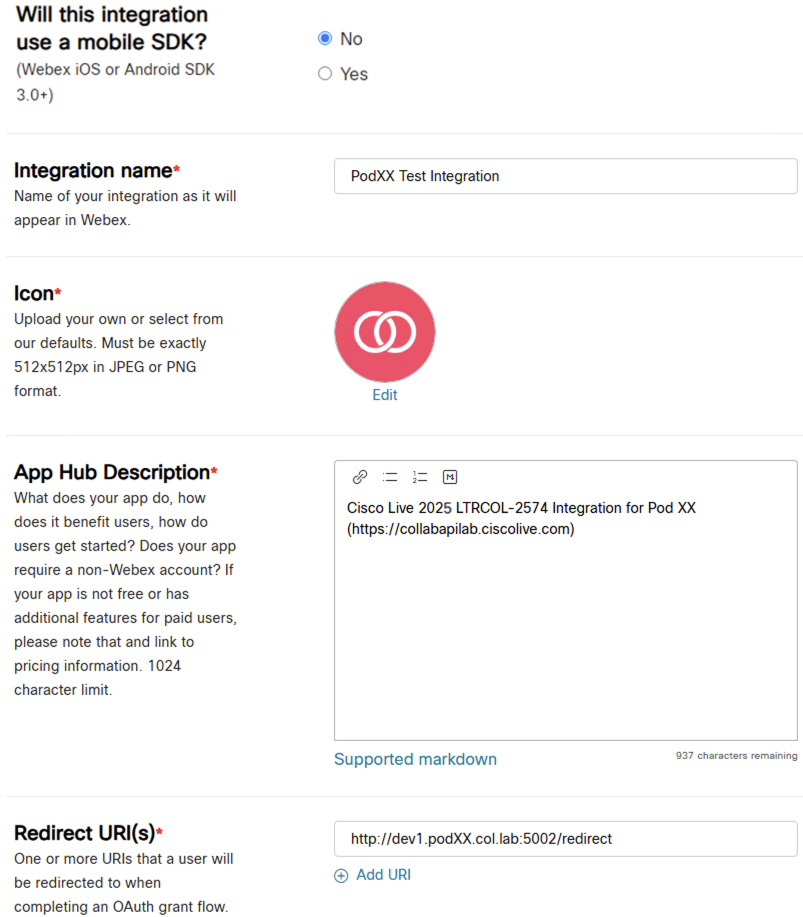
-
For
Scopes
check the following boxes. NOTE that many of the scope names are very similar. You can click to
copy each of these from the list and then use the Find function in the browser to search for each scope in the list. When
you are done, be sure to double-check that you have three scopes selected and they match the ones on this list. Failure to
select the correct scopes will lead to issues later when you try to use the tokens. In this case the Integration is only
asking the user to give permissions to read and write from their meeting schedule - which basically means the ability to
schedule and obtain their list of scheduled meetings - and to read the user's profile information.
- meeting:schedules_read
- meeting:schedules_write
- spark:people_read
- At the bottom, click Add Integration .
-
You should now see a
Congratulations
message and some details about the Integration. This contains three
important pieces of information you will need to use in your code: the
Client ID
, the
Client Secret
,
and the
OAuth Authorization URL
. Be sure to keep this page up until you are done copying the necessary Information
in the following steps.
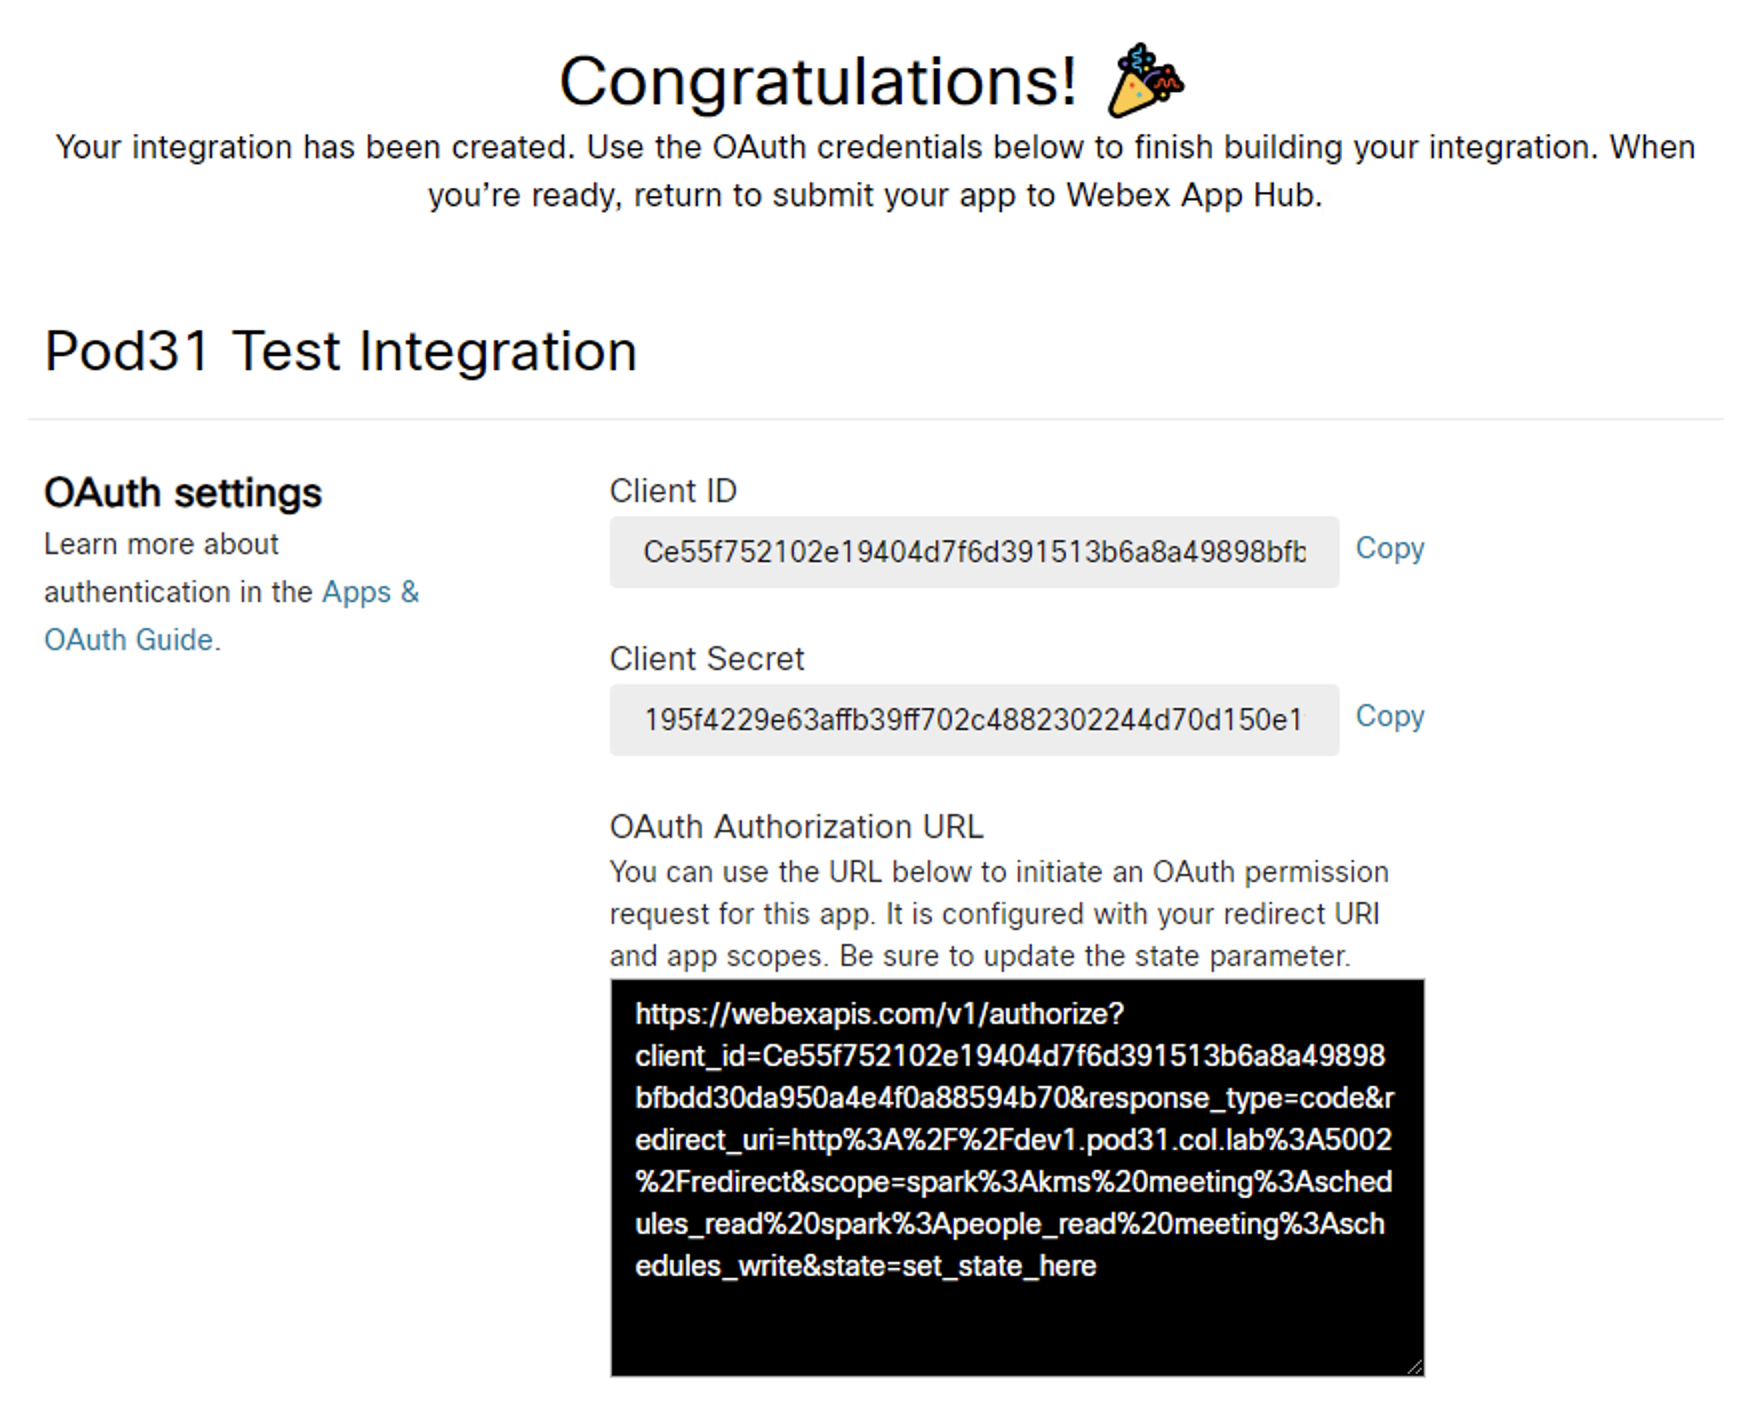 .
.
Step 2 - Implement OAuth2 Authentication
Now that you have created the Integration in Webex, you need to configure your code to use the Integration to obtain an access token. Before diving into the code, it helps to understand the process of obtaining an access token using OAuth2 authentication for a Webex Integration. This diagram shows the process at a high level:
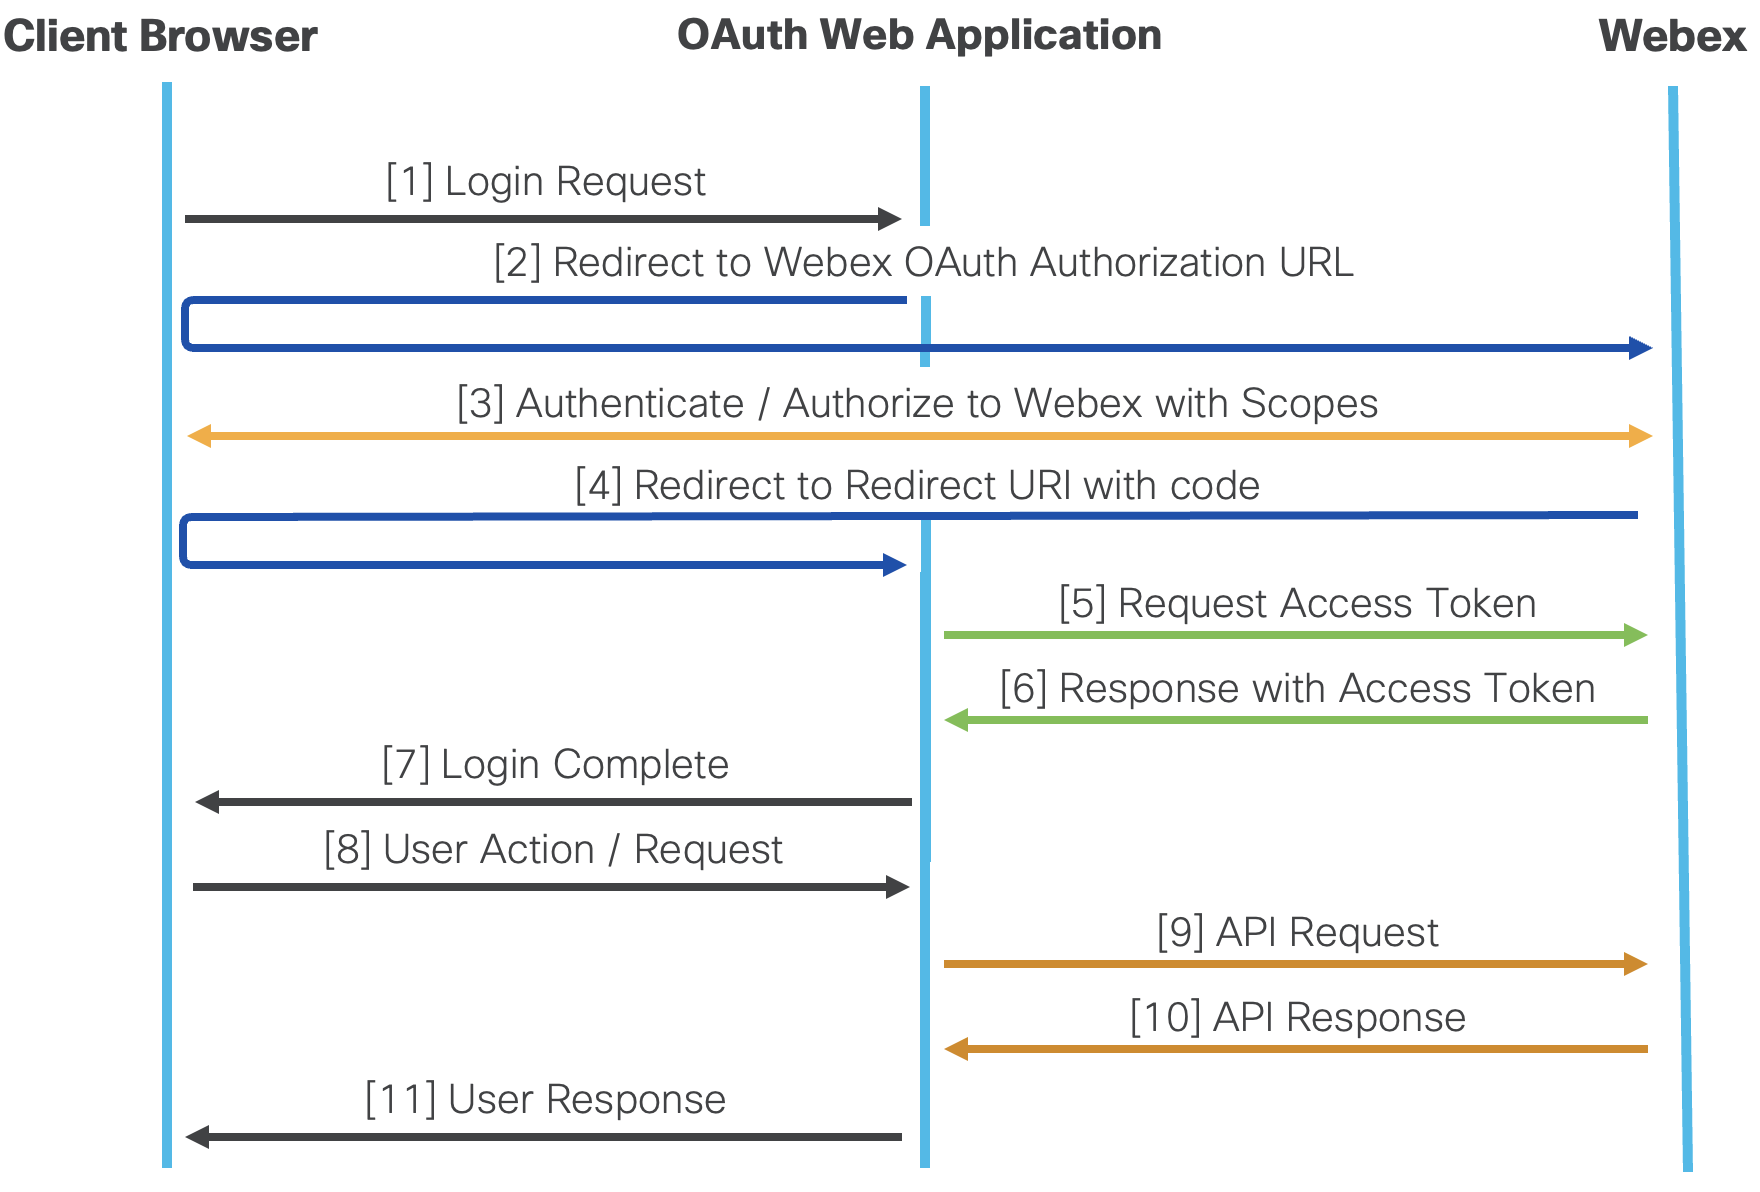 .
.
The process works like this:
- [1] You initiate a request to your web app that requires Webex access, such as clicking a "login" button.
-
[2] Your application redirects your browser to the Webex OAuth Authorization URL,
https://webexapis.com/v1/authorize
, which is populated with a variety of parameters:
- client_id - This is the Client ID you received when you created the Integration.
- response_type - This is the type of response you are expecting. In this case it is code which means you are expecting a code that you can use to obtain an access token.
- redirect_uri - This is the URL that Webex will redirect you to after they have authenticated and authorized the Integration. This must match the URL you entered when you created the Integration ( http://dev1.pod22.col.lab:5002/redirect ). Your web app will receive this redirect in order and use a code in this message to subsequently request an access token.
- scope - This is the list of scopes you are requesting. The user will be asked to authorize the Integration to access these scopes and the integration must have been created with these scopes. You do not need to request all the scopes the Integration was allowed access to, but you cannot request something that was not allowed.
- state - This is an optional random string that you generate and include in the request. It is used to prevent cross-site request forgery attacks.
- [3] You are presented with a Webex login page and asked to log in if not already. Any other multi-factor authentication would occur at this point. You are then asked to authorize the Integration to access the requested scopes.
- [4] If you authorize the Integration, Webex will redirect you to the redirect URI you provided when you created the Integration and included in the original request (these must match). The URL will contain a code parameter that you will later use to obtain an access token.
-
[5] When this redirect is received by your web app, you can now use the
code
supplied
to request an access token. This request is made to the
https://webexapis.com/v1/access_token
API.
Along with the previously discussed
client_id
,
client_secret
,
and
redirect_uri
, you will need to include the following parameters:
- grant_type - This is the type of grant you are requesting. In this case it is authorization_code .
- code - the code returned via the redirect.
- [6] - [11] Now that the server receives an access token it can make requests to the Webex API on behalf of the user. It may reply back with a web page that the login process is complete, or wait for the user to click something that requires Webex data to be requested. In this lab, you'll be providing a button to create a Webex Meeting. If the access token expires, the server can use the refresh token to obtain a new access token without requiring the user to re-authenticate, as was the case with the Service App.
- You should still have the Webex Developer Portal open to the page for the Integration you created. Click the Copy button next to the Client ID .
-
Access your VS Code
instance:
https://dev1.pod22.col.lab:8443
and from
the
Explorer
open
wxm_create_meeting.py
in the examples folder.
This file implements a simple web server using Python Flask. This server has a few pre-defined "routes", which define the URL paths that the server will respond to. These are: the root path (/), which will display a "Login with Webex" button, the /login path which will perform [2] the redirect to the Webex OAuth Authorization URL, the /redirect path which will receive the redirect initiate from Webex in [4] along with the subsequent access token retrieval in [5]. The /create_meeting path will create a new meeting in Webex using the access token obtained.
-
Find and replace the
___PASTE_INTEGRATION_CLIENT_ID___
text in between the quotes with
your Client ID that you just copied:
- Click the Copy button next to the Client Secret on the Webex Developer Portal for the integration you created.
-
Access VS Code again and replace the
___PASTE_SERVICE_APP_CLIENT_SECRET___
text
in between the quotes with the new Client Secret that you just created and copied:
-
Add the variables for the redirect URL and the scopes to the
wxm_create_meeting.py
file by pasting
in the following lines after the client ID and client secret lines. The redirect URL matches the one you
entered in the Webex Developer Portal. The scopes are the ones you selected when creating the Integration
and must match for the integration to work. One additional scope, "spark:kms" is always added for every
integration and permits interaction with encrypted content. In the code, we use the
quote
function
from
urllib.parse
module to encode the spaces and colons in the scopes since this will be used as
a parameter in a URL.
-
You are now ready to start up the OAuth script that will temporarily create a web server to facilitate the process
of obtaining an access token for your Integration. Click the
Run and Debug
button in the left column.
-
Make sure the predefined configuration for running this script, called
Python: wxm_create_meeting.py
is selected:

-
Click the green
Start Debugging
button left of the
Python: wxm_create_meeting.py
text. Doing so launches a
Terminal
with the complete logging output at the bottom. You should see the application
start up the web server listening on port 5002. Wait until you see the text "* Running on http://10.0.122.40:5002"
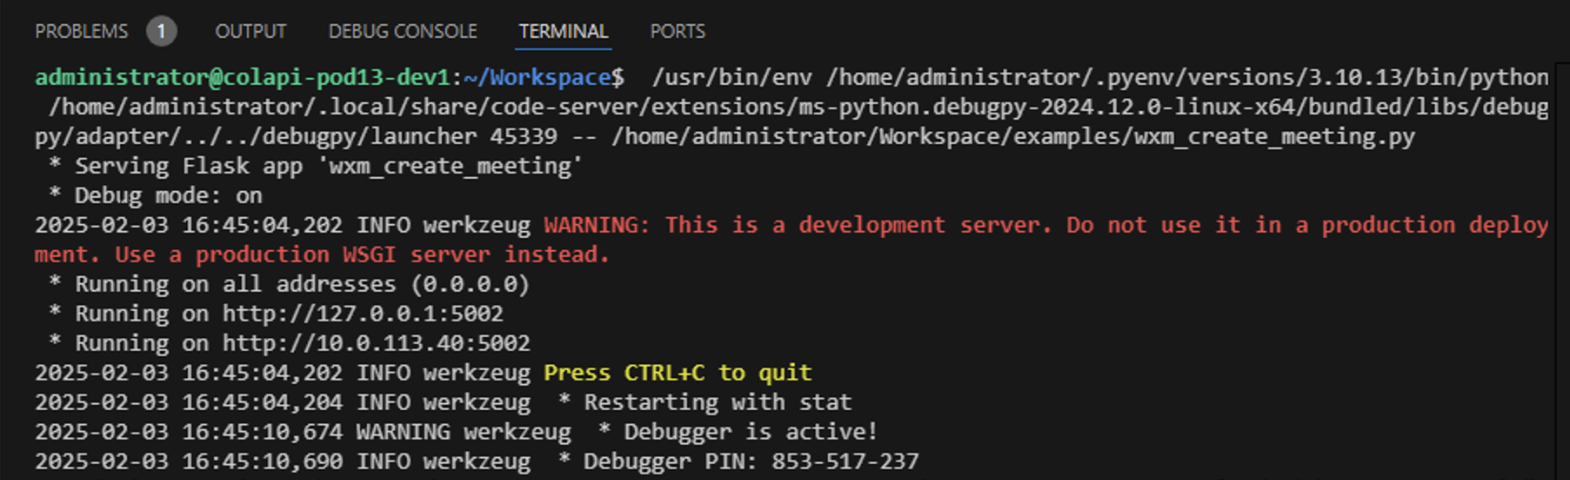
Now that your temporary web server is running, you can proceed to the next step to obtain the access token.
-
Now your web server is running and pointing your bowser to
http://dev1.pod22.col.lab:5002
where you should see a
page with a Login with Webex button. Clicking this will let you know that "Authorization redirect not yet implemented".
That is exactly what you will do next.

-
For now, stop the web service by clicking the red square in the control bar at the top of the VS Code window.

Step 3 - Obtain an Access Token
As you saw, the root web page on the web server you just created presents a simple "Login with Webex". This button redirects you to the /login route which you will implement next. This route needs to redirect the user to the Webex OAuth Authorization URL that you received when you created the Integration. To do this, we will construct the URL and then use the imported Flask redirect function to redirect the user to the URL.
-
Return to your VS Code instance:
https://dev1.pod22.col.lab:8443
with
wxm_create_meeting.py
opened in the
examples
directory.
Locate the existing line
return ("***** Authorization redirect not yet implemented!")
, remove
it and replace it with the following highlighted lines:
-
The rest of the authentication and authorization process is completely between the end user and Webex.
If successful, Webex will redirect the user's browser back to the redirect URI you provided when you
created the Integration. This URI points to this same web server to the /redirect route. You will
implement this next. The redirect posted will contain a
code
element that you will
use to construct a POST request similar to the Service App, but with a different grant type. The
response to this will be a valid access token.
Locate the existing line
return ("***** Access token request not yet implemented!")
, remove
it and replace it with the following highlighted lines:
-
Start the web server by clicking the green
Start Debugging
button left of the
Python: wxm_create_meeting.py
text. Wait until you see the
text "* Running on http://10.0.122.40:5002".
Open a new browser tab to http://dev1.pod22.col.lab:5002 and click the Login with Webex button. -
You may be prompted to authenticate with Webex. Enter the following credentials:
- Email address: pod22wbxuser@collab-api.com
- Password: C1sco.123
-
You should now be asked to accept the permissions that the Integration is requesting. You should see a list of the scopes
in a human-readable format. For example, the
meetings:schedules_write
scope is displayed as
"Create, manage, or cancel your scheduled Webex meetings".
Click
Accept
to authorize the Integration to access these scopes.
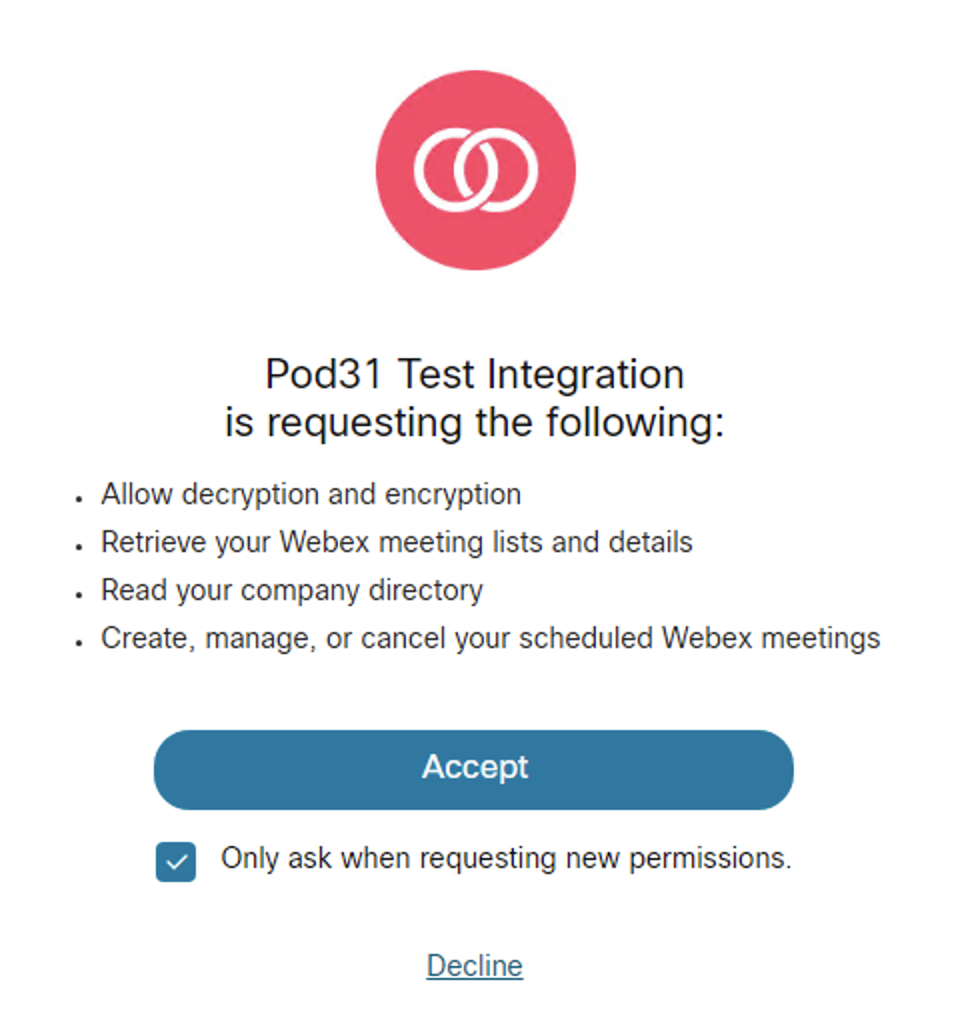
-
Webex will now redirect your browser back to your redirect URI which will obtain an access token. Following
the redirection to the redirect URI, the page again redirects to the /login URI. This time an access token is found, so
a query is made to Webex to retrieve the account's display name and present a "Create Meeting" link.
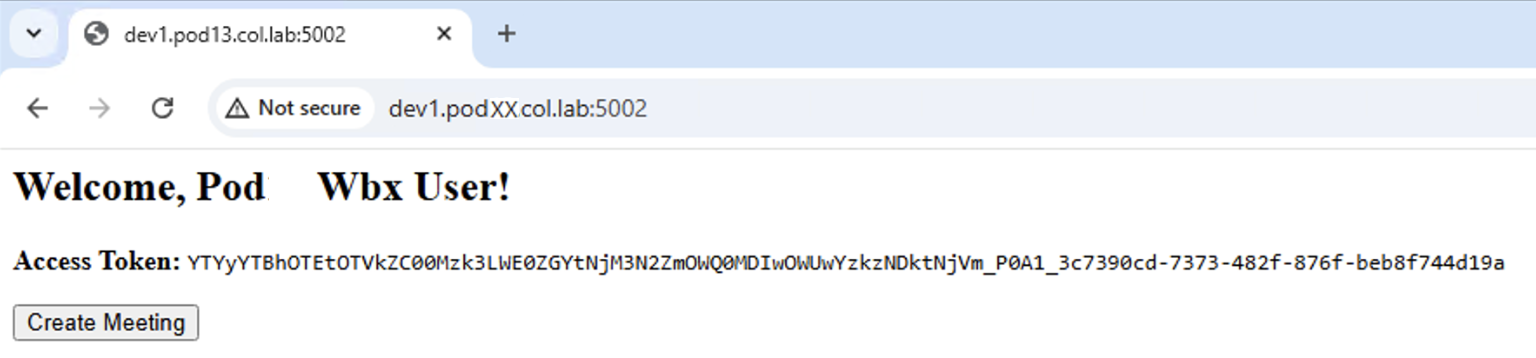
-
Stop the Web server again by clicking the red square in the control bar at the top of the VS Code window.
Step 4 - Create a new meeting
To create a new meeting, you need to use the Create a Meeting API. The wxc_sdk has a MeetingsAPI submodule that provides access to the various meetings APIs.
The Webex Documentation for the Meetings API object is located at: The wxc_sdk Documentation for the MeetingsApi submodule is located at: The Create a Meeting API is one of the more complex APIs because of the number of parameters it accepts. Most of the parameters are optional, but they provide a great amount of flexibility in how you can create a meeting if you need it. If you scroll down in the wxc_sdk link for the MeetingsApi above, you will find the create() method. As you can see, this method takes many parameters:

The required parameters to create a meeting are the title , start , and end parameters so in this example, you will create a simple meeting with just these parameters. The easier way to understand all the parameters required is through the Create a Meeting API documentation. Follow these steps to create a meeting:
- Return to your VS Code instance: https://dev1.pod22.col.lab:8443 with wxm_create_meeting.py opened in the examples directory.
-
As mentioned earlier, the three mandatory parameters to create a meeting are the
title
,
start
, and
end
parameters. The start and end parameters are timestamps in
ISO 8601
format.
You can use the
datetime
module to generate these timestamps and the wxc_sdk takes care of
converting the datetime object into an ISO 8601 string, however you must remove the microseconds from the timestamp
and you must be sure to include a time zone so the string is formatted properly.
The API imposes certain restrictions on the start and end times. The documentation states that start cannot be before the current date and time or after end . Duration between start and end cannot be shorter than 10 minutes or longer than 23 hours 59 minutes.
To create a meeting that starts 5 minutes from the time the script is run and ends 30 minutes later, we will use the datetime module to generate the timestamps. Add the following code to the script to create the start and end time variables as well as a variable for the meeting title: -
Now use the API to create the meeting, passing in the variables you just created. Copy the following into the
file:
-
You have now created a meeting and output the meeting ID, meeting number, and meeting link. You could use this meeting link
to join the meeting but a host would need to join to start the meeting. The Webex APIs allow you to generate a different link
that allows a user to join or start the meeting without having to log in. This is documented in the
Join a Meeting
API.
You can provide either the id, meeting number, or web link to the join API. In this case you will use the id.
Copy and paste the following code to the script to invoke the Join a Meeting API, generate the join links, and return the output to the user in the form of a web page with links: - Now run the script to create a meeting. Make sure the predefined configuration for running this script, called Python: wxm_create_meeting.py is selected.
-
Click
Start Debugging
and examine the
Terminal
window output.
-
Open a new browser tab to
http://dev1.pod22.col.lab:5002
and click the
Login with Webex
button.
If necessary, click Log in at top right and sign in with the following credentials:- Email address: pod22wbxuser@collab-api.com
- Password: C1sco.123
- Click Create Meeting
-
You should see a web page such as the one below. Clicking on the Join link should allow you to launch
Webex right into the meting. You will also receive a meeting reminder pop-up from the Webex App.
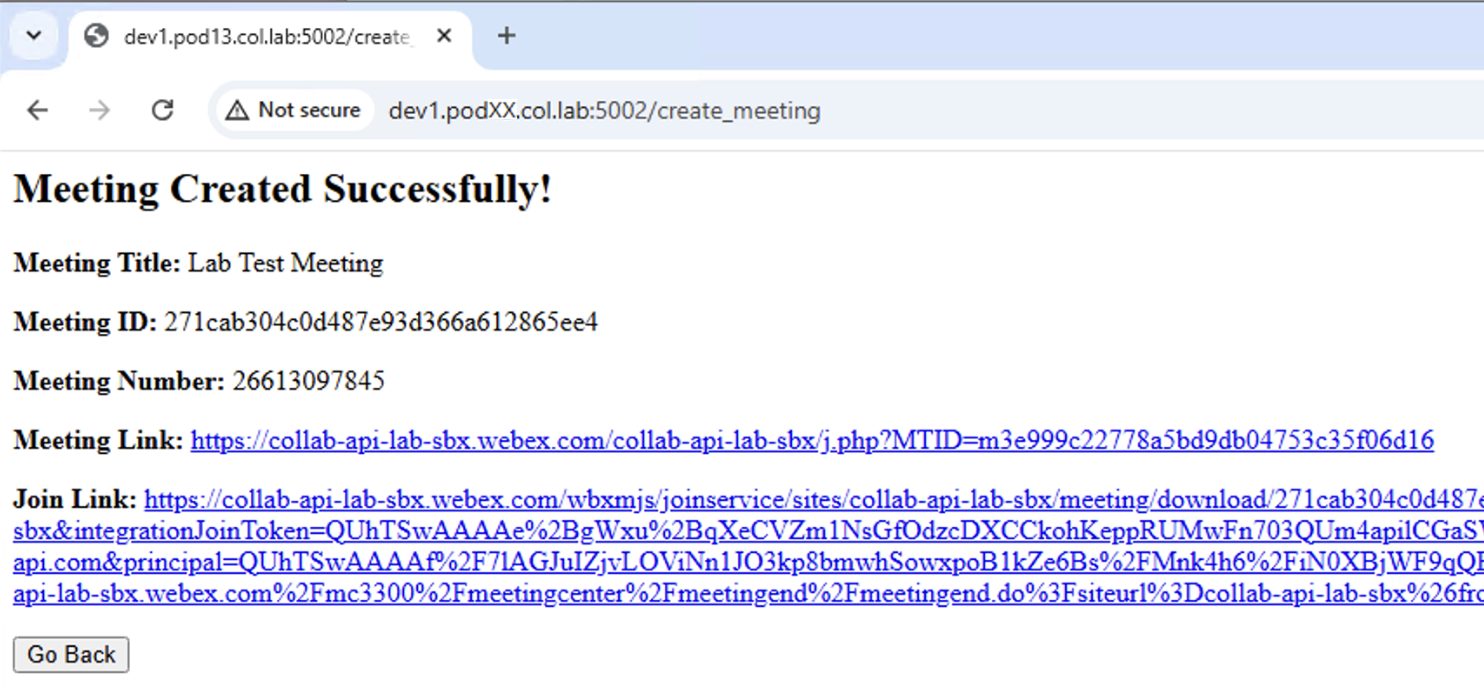
-
Stop the web service by clicking the red square in the control bar at the top of the VS Code window before moving on.
Now that you've worked with Calling and Meetings APIs, you can move on to messaging APIs.
Now that you have explored Calling and Meetings APIs, let's take a look at the Messaging APIs. You will use these APIs to create a mechanism by which you can send notifications to a space when some action occurs. This can be useful for notifying groups of people when some event occurs. Such an event can be an outage event or just a notification of a configuration change. For this type of application, it makes sense to use a Bot whose purpose is to send these notifications. This allows the Bot account and its access level to be limited to just this purpose. Because Bots have their own identity, users will see notifications coming from a specific Bot user as opposed to a personal account. You will create the Bot and get its access token in order to send messages on its behalf, then create a Webex Space and add the Bot to it.
In this section, you will perform the following tasks:
- Create a Bot
- Add Bot to a Webex Space
- Use Bot to find the Space using the API
- Send a Message to the Space using Bot
- Verify Message was Received
You will start by creating a notifications Bot.
Step 1 - Create a Bot
- Access the Webex API documentation home page at: https://developer.webex.com
-
If necessary, click
Log in
at top right and sign in with the following credentials:
- Email address: pod22wbxuser@collab-api.com
- Password: C1sco.123
-
Once logged in, click on your
icon at the top right.
- Click My Webex Apps (there should only be the Service App you created earlier)
- Click Create a New App
- Click Create a Bot on the Bot tile.
- For the Bot Name , enter Pod22 Test Bot
- For the Bot Username , enter cl2026-lab-pod22-bot , which will create a username of cl2026-lab-pod22-bot@webex.bot
- Click on one of the Icon images for your Bot, so that it is selected.
- In the Description paste the following text: Cisco Live 2026 LTRCOL-2574 Lab Bot for Pod 22 (https://collabapilab.ciscolive.com)
- At the bottom, click Add Bot .
-
You should now see a
Congratulations
message and some details about the Bot. Besides
the information you specified, you see the Bot's
Access Token
. This is the token you
will need to perform any actions, such as sending messages, on behalf of the Bot.
The Bot ID is not important for your purposes.
Click Copy next to the Bot Access Token.
- Access your VS Code instance: https://dev1.pod22.col.lab:8443 and from the Explorer open wbx_messages.py in the examples folder.
-
Find and replace the
___REPLACE_WITH_BOT_ACCESS_TOKEN___
text in between the quotes with
your Bot access token that you just copied:
Step 2 - Add Bot to a Webex Space
The next step is to add the Bot to a Space that will be used for the notifications. Note that this is only one possible way of performing notifications. You could write the bot so it has a list of users to notify and the Bot can send 1:1 notifications to each individual user. You could have also had the bot create this space automatically, but then you would need to create a mechansim to get the bot to add users to that space. For the sake of simplicity in this lab, you will create the space manually and have the Bot search for this space and post to it.
- Open up the Webex App. You should be signed in as pod22wbxuser@collab-api.com already. If not, sign out and sign in again using email: pod22wbxuser@collab-api.com and password: C1sco.123
-
To create a Space, click the
+
, then
Create a space
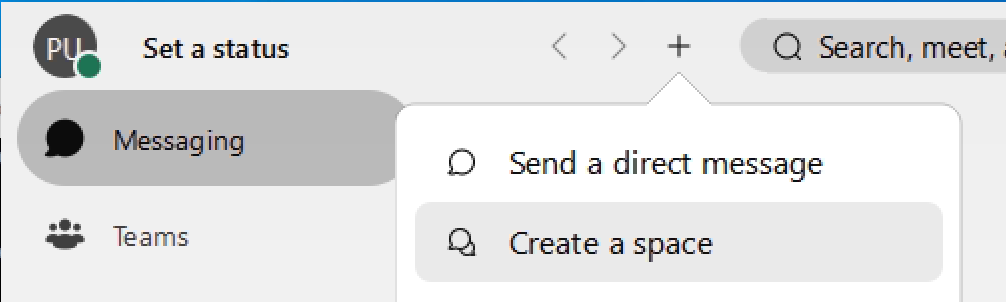
-
Name the Space
LTRCOL-2574 Space
and in the "Add people by name or email" field, enter
cl2026-lab-pod22-bot@webex.bot
. You may have to press Enter to make sure that email address is
added. If you click paste and it seems like nothing happened, pay attention to the area of the window below
the place where you pasted in the email address. If you see Pod22, then it was added.
- Click Create at bottom. The Space should be created and you should see 2 People in it (yourself and the Bot). If you get an error indicating that the bot could not be added, try going back to add the user again, but this time enter the name manually instead of pasting it in. If you see duplicate names for your bot name, it could indicate your app is still caching the name from a old bot with the same name. Try selecting the one with the icon color that matches the one you picked when you created the bot. If they are all the same, try selecting each one to see which one works.
Step 3 - Use Bot to find the Space using the API
Now that you have a Space with your Bot as a member, you can have the Bot send a message to it. You will use the API by way of the wxc_sdk in a sample script to accomplish this task.
- Access your VS Code instance: https://dev1.pod22.col.lab:8443 and from the Explorer open wbx_messages.py in the examples folder.
-
You already filled in the
wbx_bot_access_token
with the value for your bot. This
will now be used to send a message on behalf of the Bot.
Add the following line to instantiate the WebexSimpleApi object as "api" with this access token.
-
To send a message to a Space, you need to know the Room ID (Spaces were previously known as Rooms in Webex and to maintain
backwards compatibility in the API, all Space related endpoints are still referred to as Rooms). Similar to earlier actions, you can
get a list of Rooms that you have visibility to and then search through the list until you find the
one(s) you want. The Webex API for this is
List Rooms
. The
wxc_sdk has a corresponding
RoomsAPI
with a
list()
method. In examining it more carefully, you will notice that there are no
required parameters, and the return type is a list of
Room
, which contains all Room
attributes. Search for the room of type "group", which would be any Space that's not a direct 1:1 conversation.
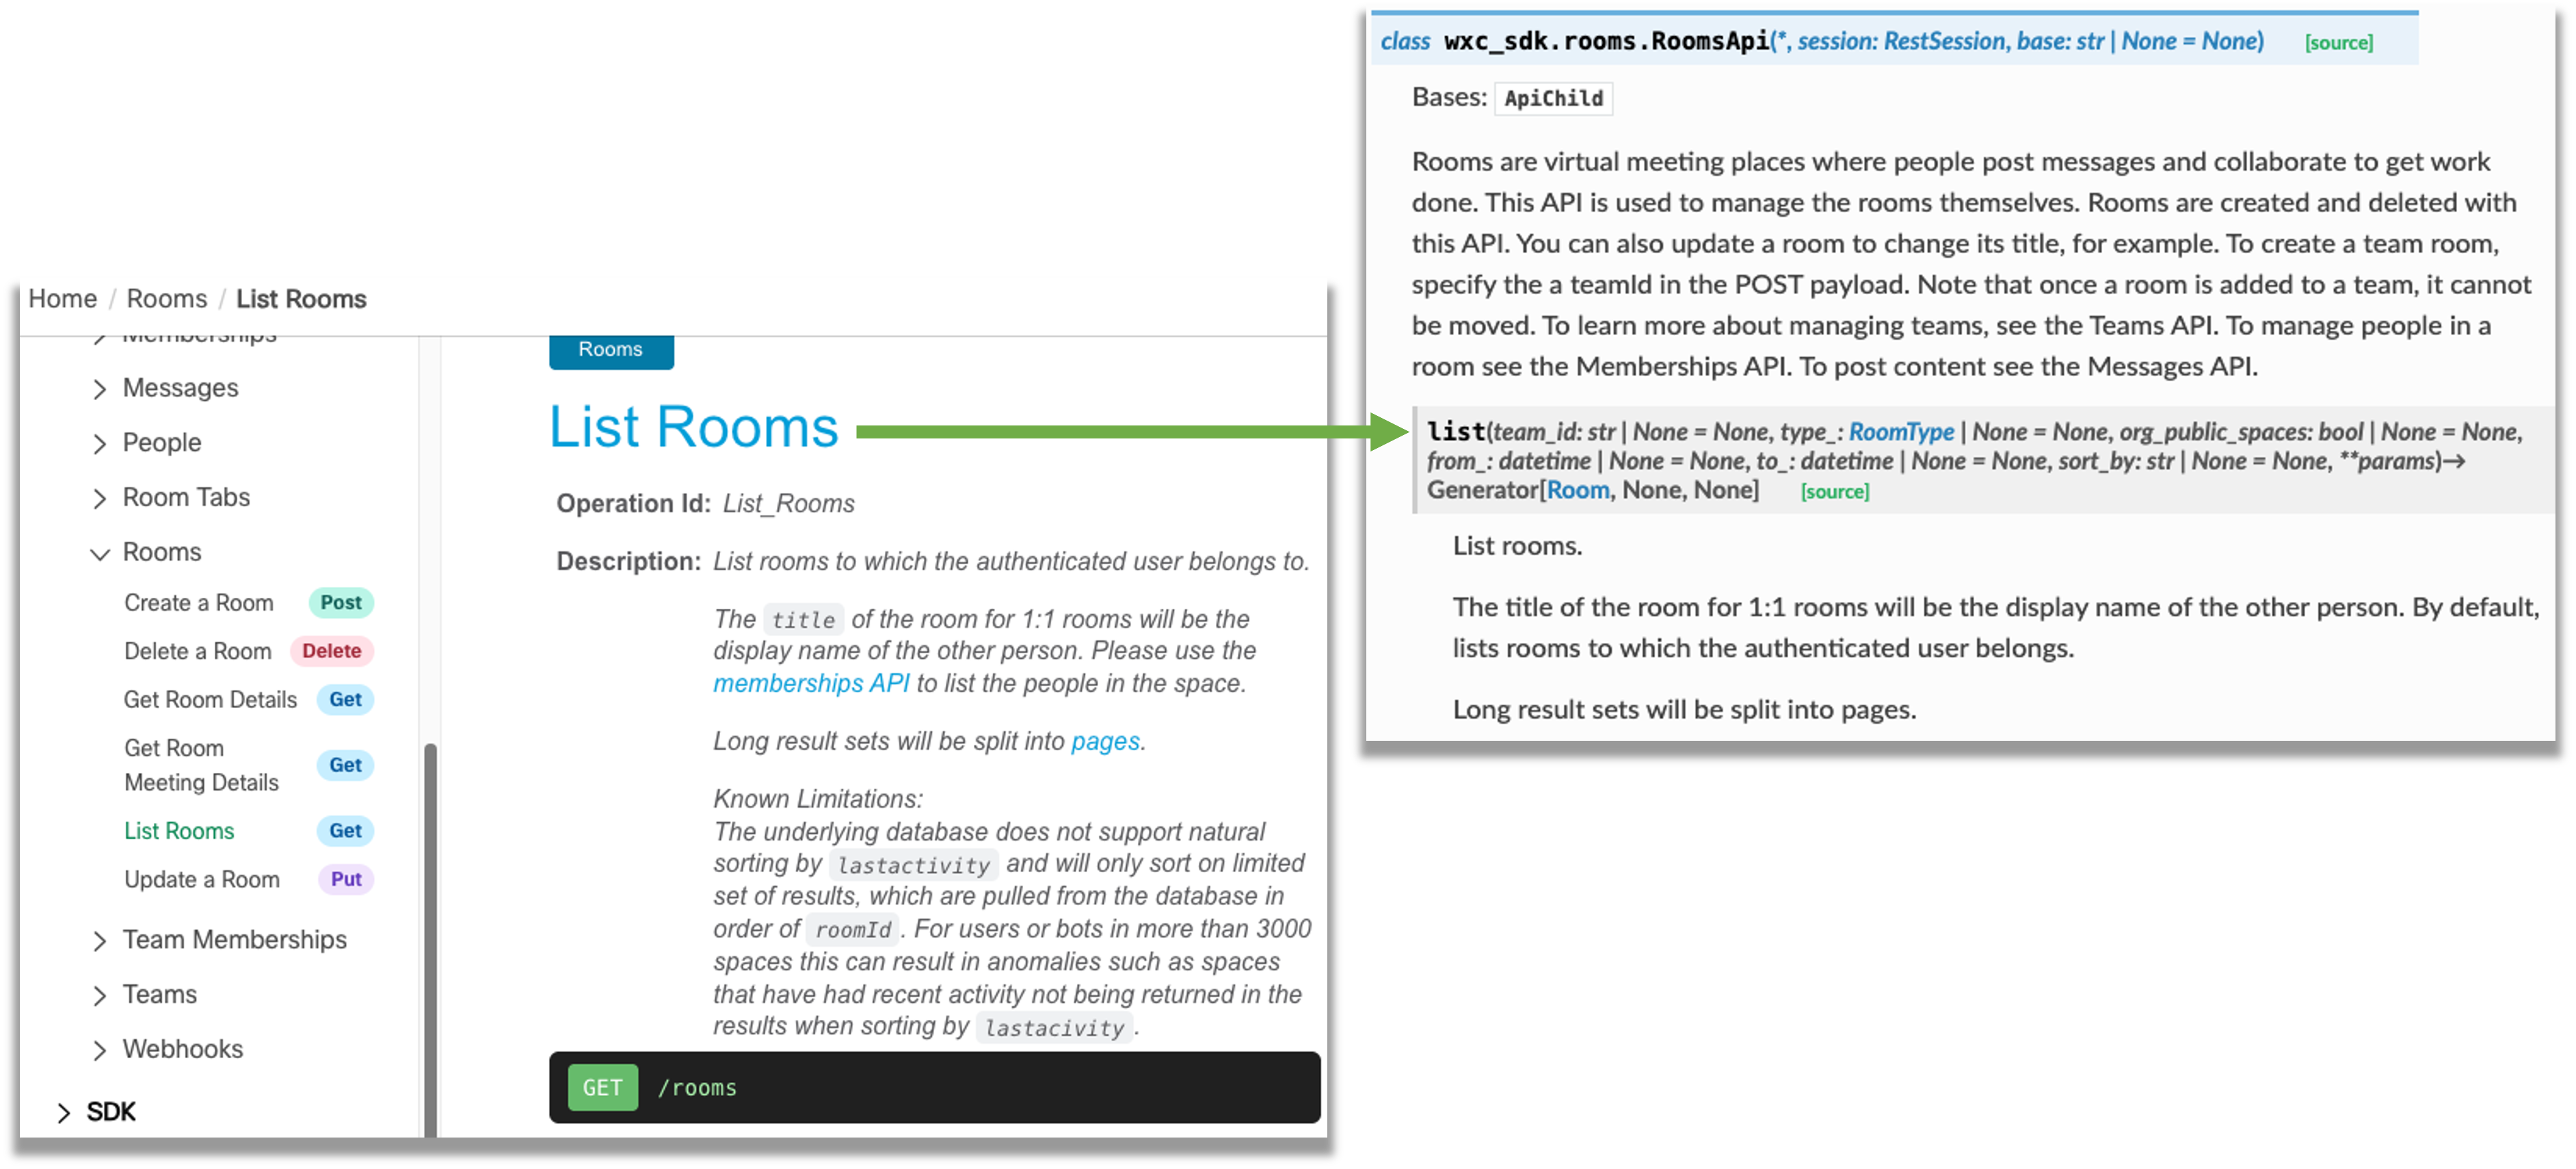
Add the following to your Python script:
This code calls the list() method of the RoomsApi object, filtered by type='group'. It then iterates through the list of rooms and prints out the JSON representation of each room. -
Click the
Run and Debug
button in the left column.
-
Make sure the predefined configuration for running this script, called
Python: wbx_messages.py
is selected:
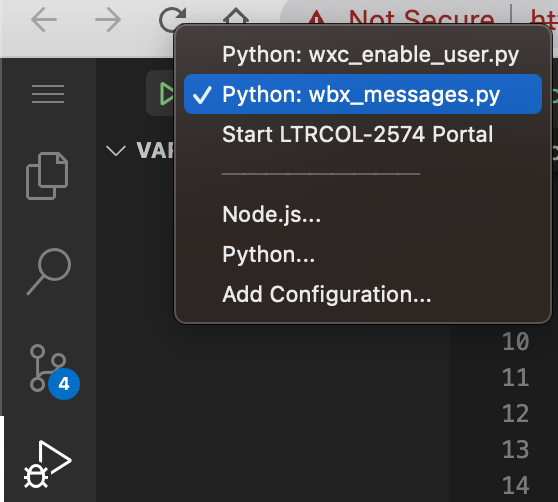
-
Click the green
Start Debugging
button to run the program in the
Terminal
window.
-
Since this Bot was just created, it likely is only a member of the Space you just created, the one titled
LTRCOL-2574 Space
.
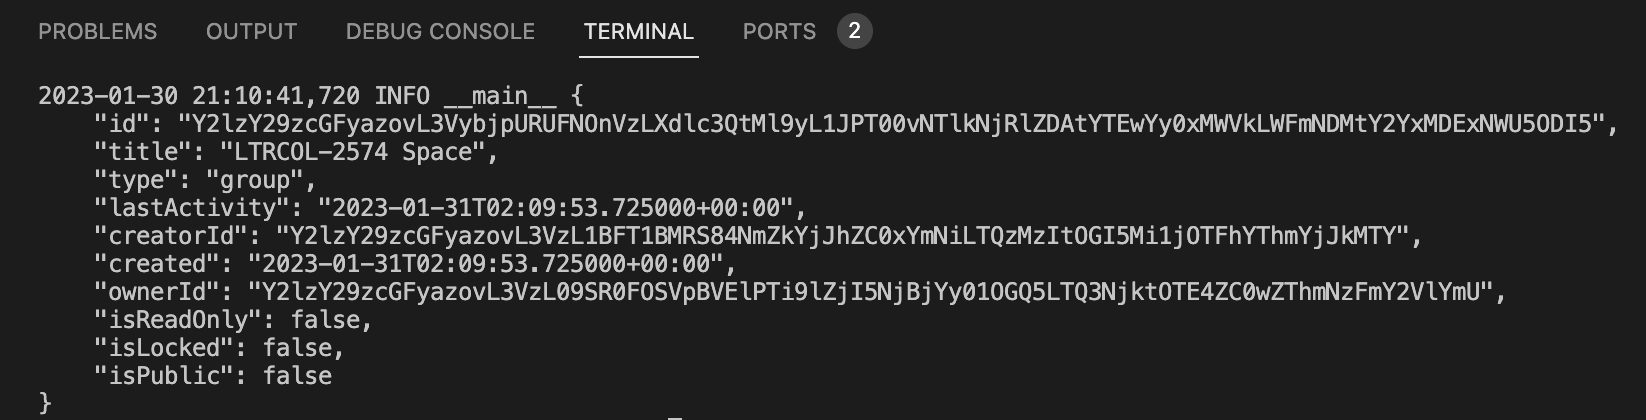 Now that you have found the Room ID, you will use this to send a message to that Space.
Step 4 - Send a Message to the Space using Bot
-
Sending a message is fairly trivial using the SDK. You can supply either a Room ID, or a person ID for whom
the message is to be sent. There are also a different formats, either plain text or markdown,
and even the ability to send Adaptive cards, which we will do later. All of this is done using the
Create a Message POST
. The wxc_sdk, in turn, has a
MessagesApi
and a
create()
method.
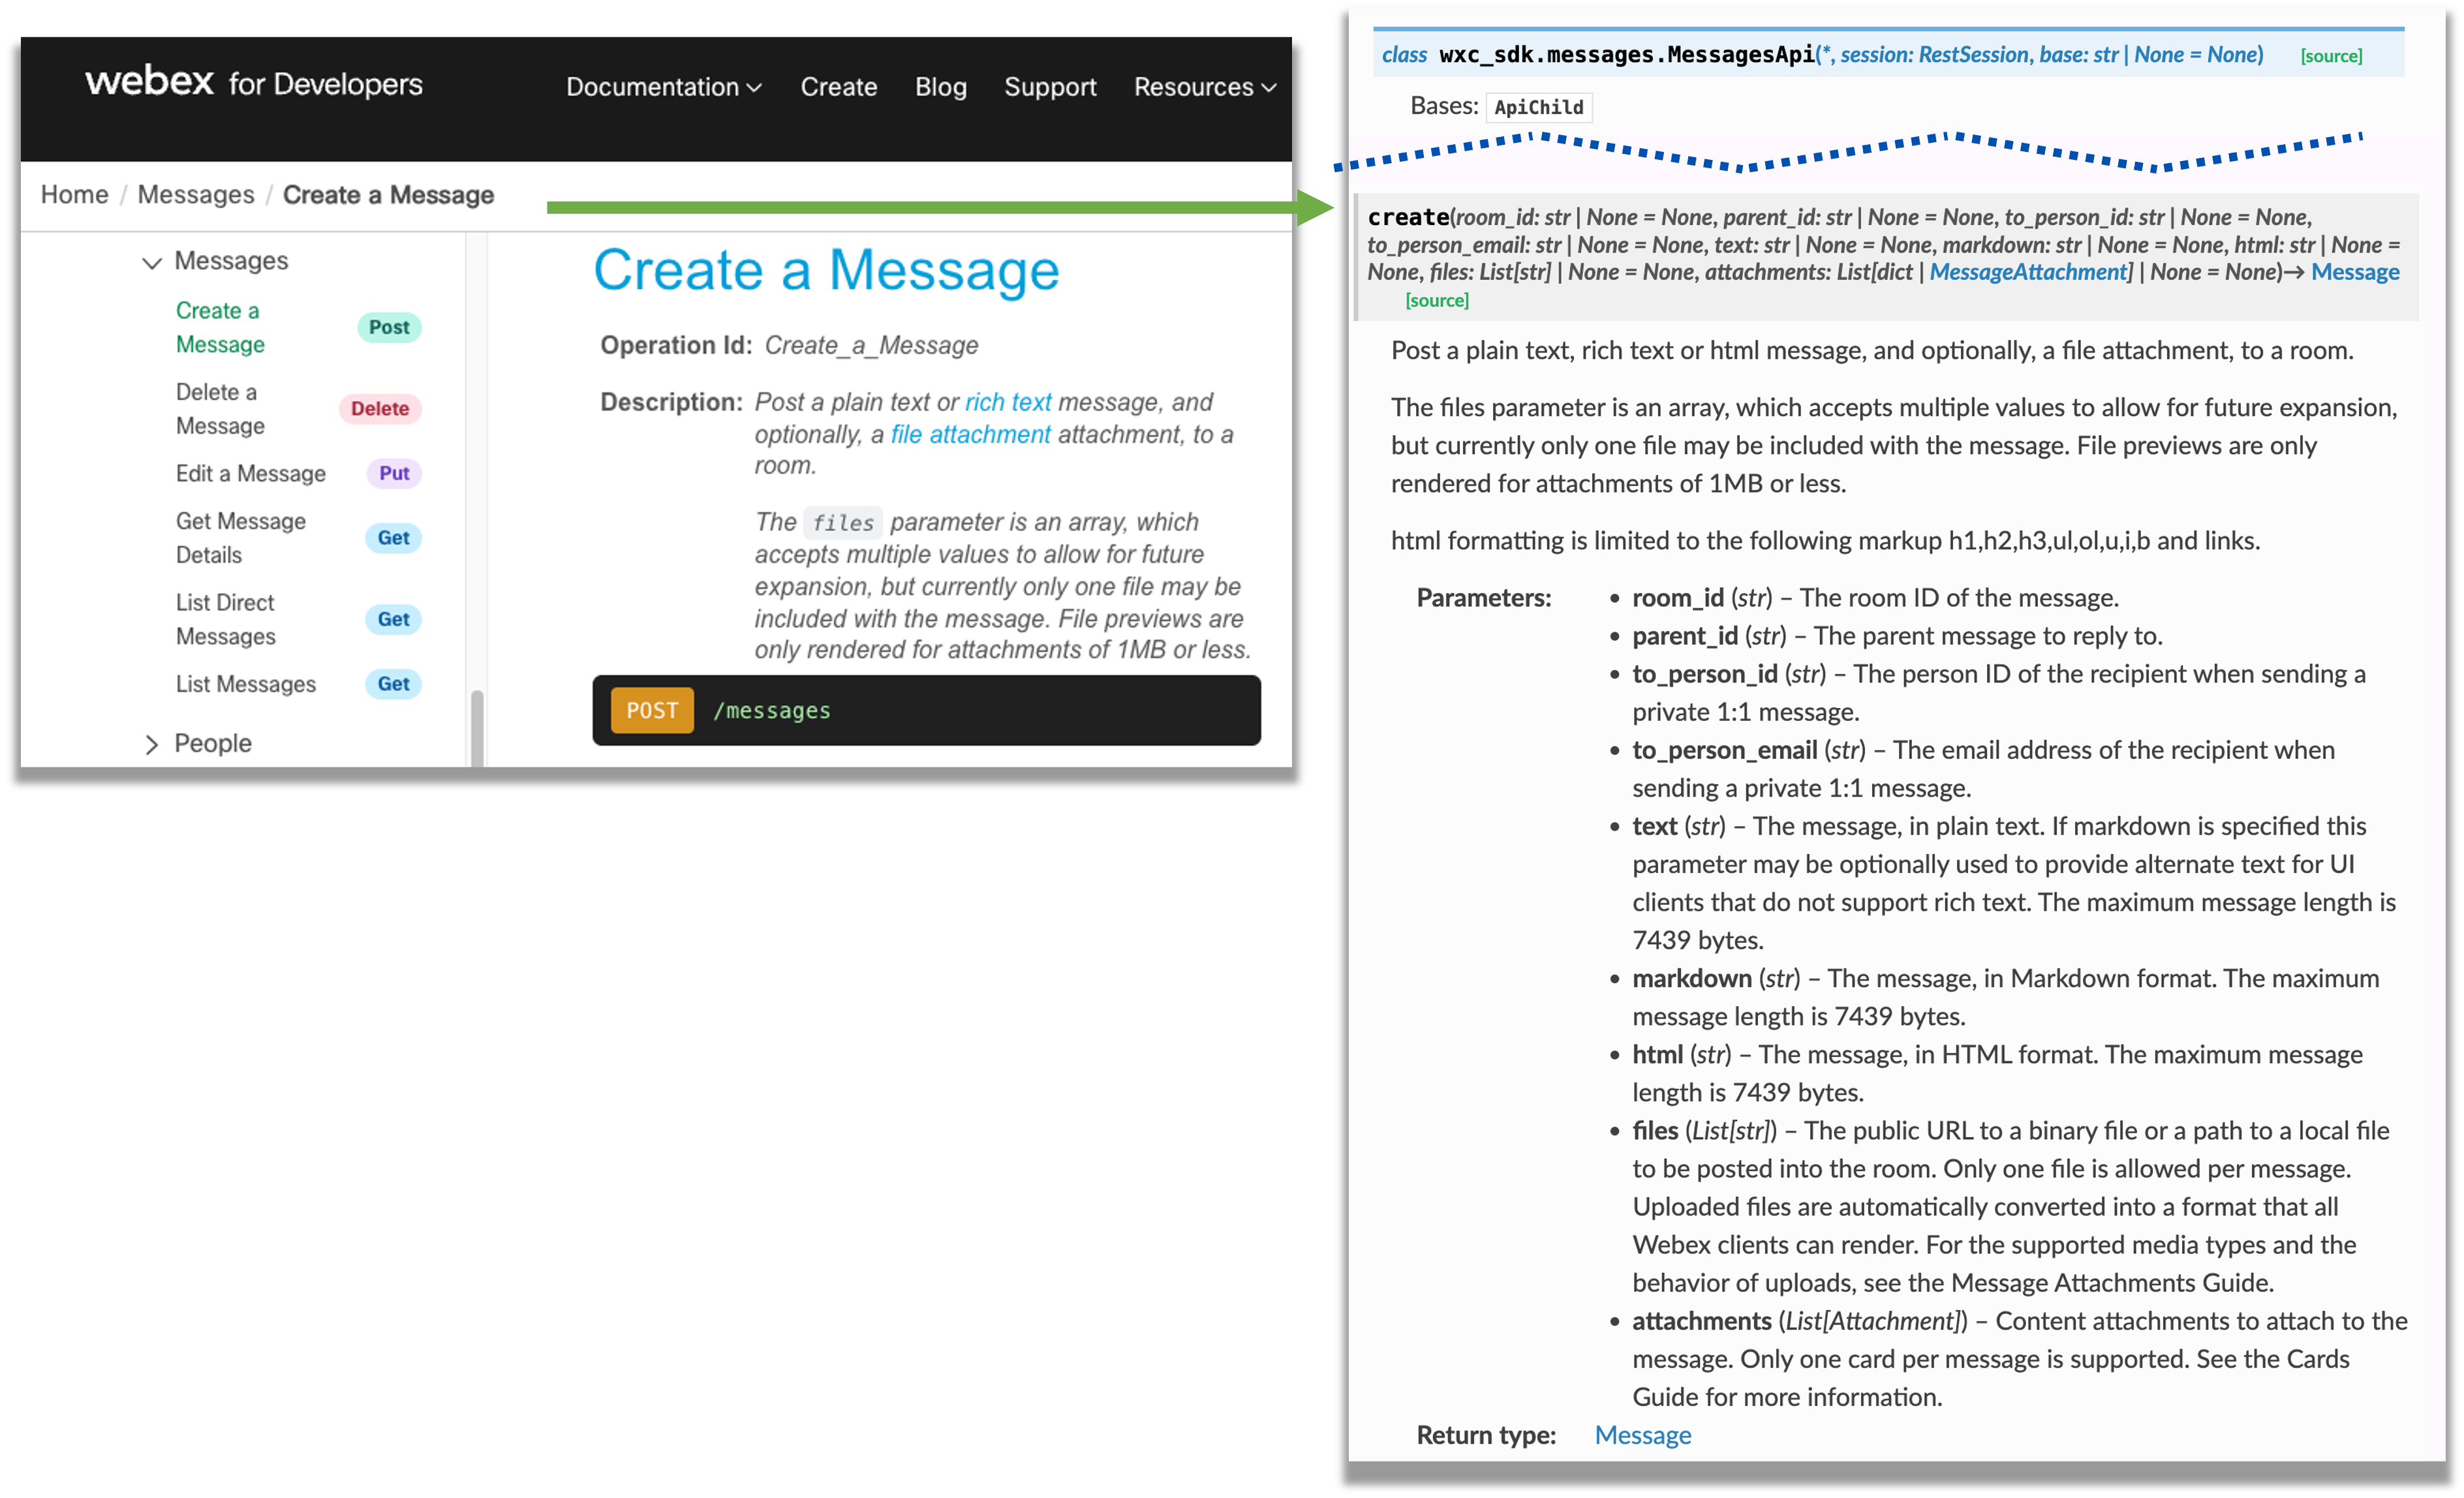
-
Add the following to your Python script. This will call the create() method of the MessagesApi object with the
room_id of the Space you found in the previous step and the text 'Hello!'. It then logs the response from the API.
-
Click the
Start Debugging
button to run the program.
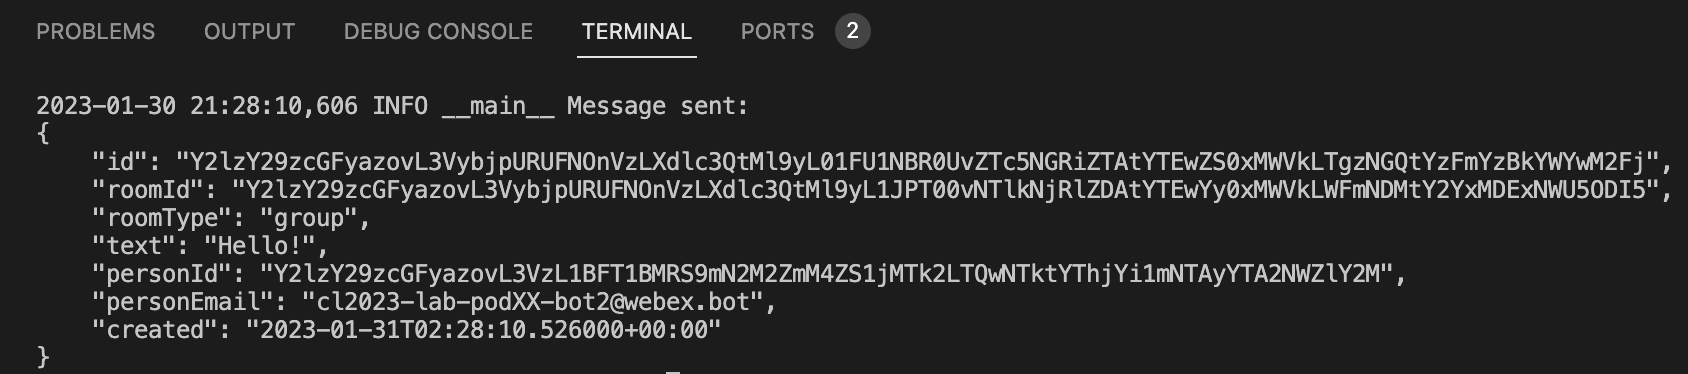
Step 5 - Verify Message was Received
- In case you didn't notice a pop-up notification, take a look at your Webex client. If need be, launch it and log in using email: pod22wbxuser@collab-api.com and password: C1sco.123 .
-
You should see a new
LTRCOL-2574 Space
Space where you should see the
Hello!
message from your
Pod22 Test Bot
.
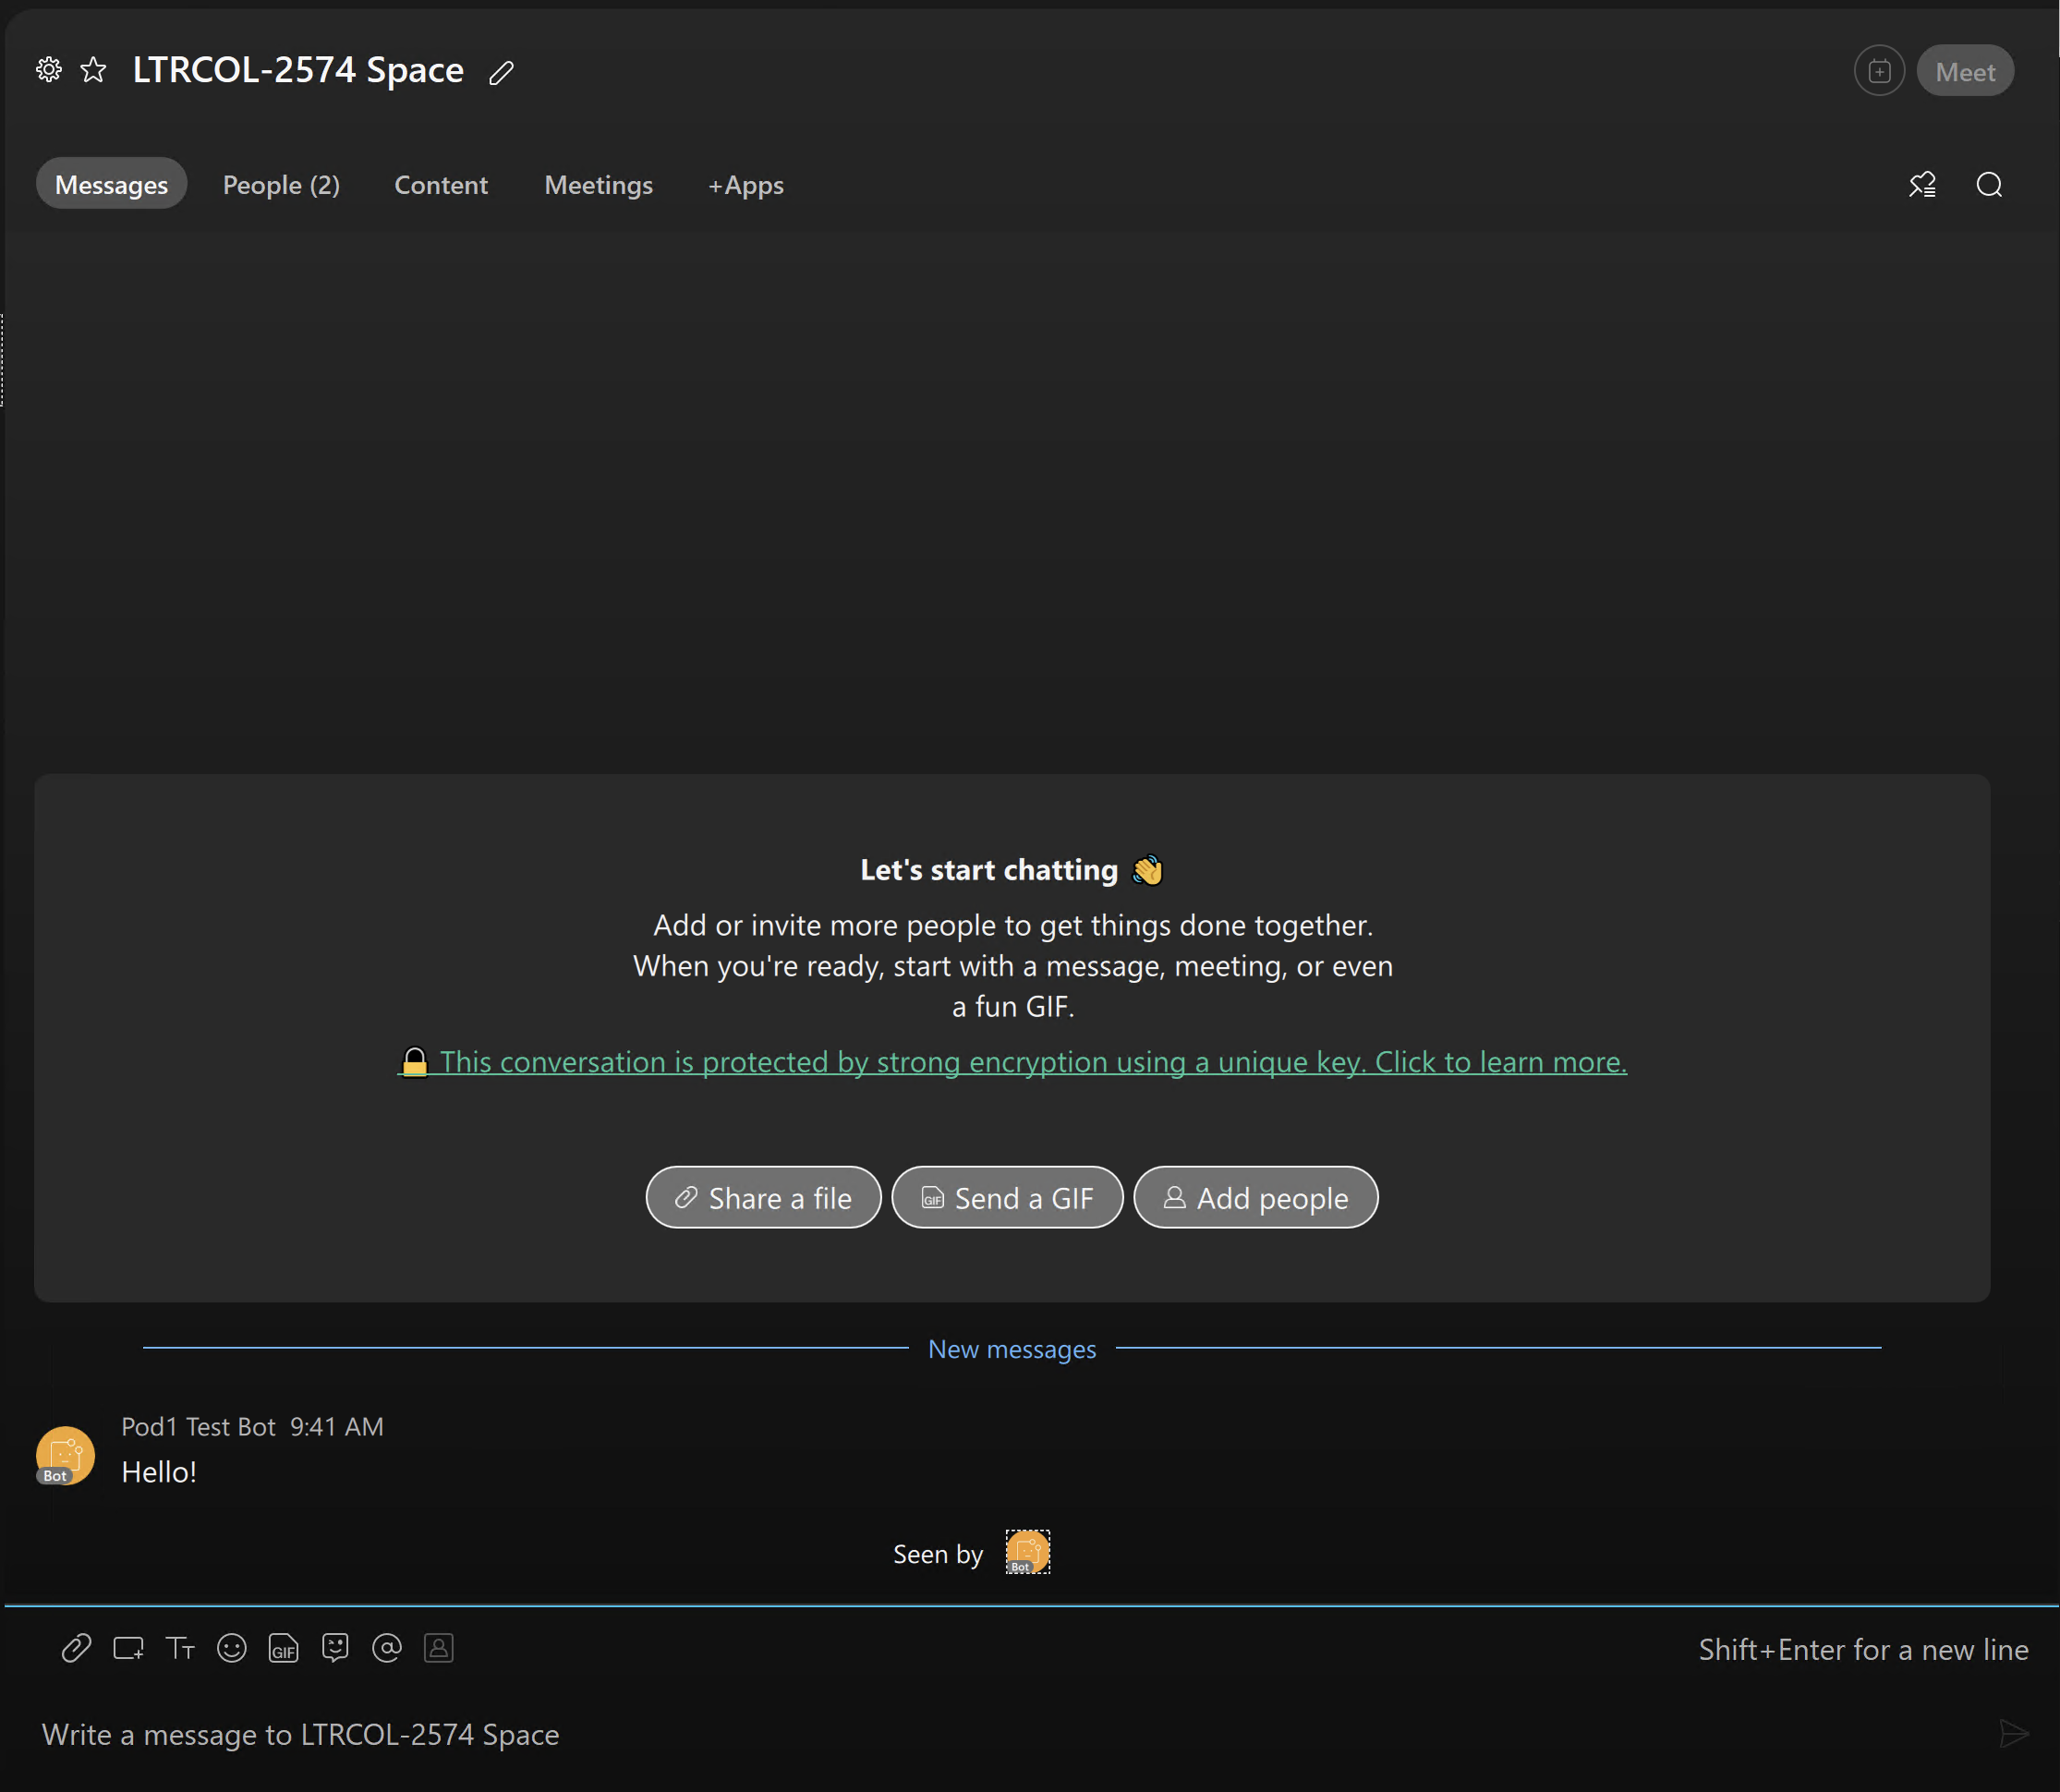
Now that you are able to send messages using a Bot, the next section will cover receiving messages and events.
Until now, your interactions with Webex APIs have involved sending instructions to Webex to perform actions, and receiving success or failure responses. What if you want your application to be notified when a specific event occurs within Webex, such as a message being sent to your bot? Webex utilizes webhooks for this purpose. A webhook is a mechanism for Webex to initiate an HTTP/HTTPS message to a pre-configured URL to notify your application that a specific event has occurred. Although we are going to explore webhooks in the context of Messaging APIs, webhooks can be used for other purposes like receiving events from Webex about Meetings or Calling.
A webhook involves the Webex Cloud initiating an outbound HTTPS request to your applicaiton. Since this traffic is initiated from the Internet (i.e. Webex Cloud), the additional security exposure must be considered. In most cases, a reverse proxy (such as nginx) is deployed on the Internet that forwards requests to your internal application in order to safeguard your internal servers. When Webex sends a message to this reverse proxy, the proxy decides if the request can be trusted and forwards it to an internal server, and that server's reply is sent back via the proxy. Webex also provides some shared secrets in the messages as an additional layer of protection to allow your application to authenticate that the requests were legitimately received from Webex.
In this lab, the reverse proxy portion won't be covered in detail, however you will have the ability to receive events from Webex, which you will need to process. Let's see what this looks like. In this section, you will examine the following key aspects:
- Webhook Message Events
- Adaptive Cards
- Register a Webhook for the Bot
Step 1 - Webhook Message Events
If a bot has been configured with a webhook to receive notifications when a message it sent to the bot, Webex sends a webhook notification immediately upon receiving that message, but what does the webhook actually look like? To illustrate this, we have a pre-configured Bot and web server that simply echos back the webhook data that it receives. This diagram shows how this Bot works. When you send a message to this Bot through the Webex App, Webex sends a webhook message as an HTTP POST to the Bot's configured webhook URL. The bot is configured to read the contents of that webhook notification and just echo it back to the person that sent it.
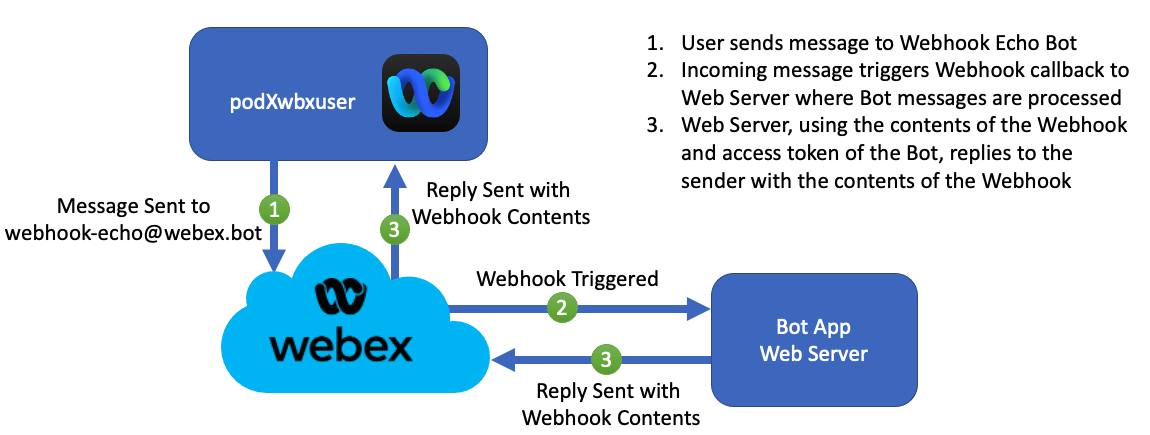
In subsequent sections of this lab, you will configure your own web server to receive and process webhook events in Python. Before creating your own webhook, it is helpful to understand the structure of the message sent from Webex to a webhook URL.
- If necessary, launch your Webex app. Sign in using email: pod22wbxuser@collab-api.com and password: C1sco.123
-
Click to
start a conversation with the Webhook Echo Bot
(webhook-echo@webex.bot)
. When prompted by Chrome to Open Webex, click
Open Webex
and when
Webex App asks if you want to create a space, say Yes.
- Type a message and press enter to send.
-
Inspect the response (or take a look at this sample response shown below). You will notice a few things:
- the resource type is messages
- the event is created
- the data portion has various components, such as an id and roomId , but they are all just object IDs. The actual message or even the Space name is never transmitted as part of the webhook POST notification. This provides an additional layer of security by ensuring that your application must go back to Webex to retrieve the message. Also, when you subscribe to a webhook, you can subscribe to specific resources and/or events that you are interested in. This example is a messages created event, but there are many others across different workloads in Webex.
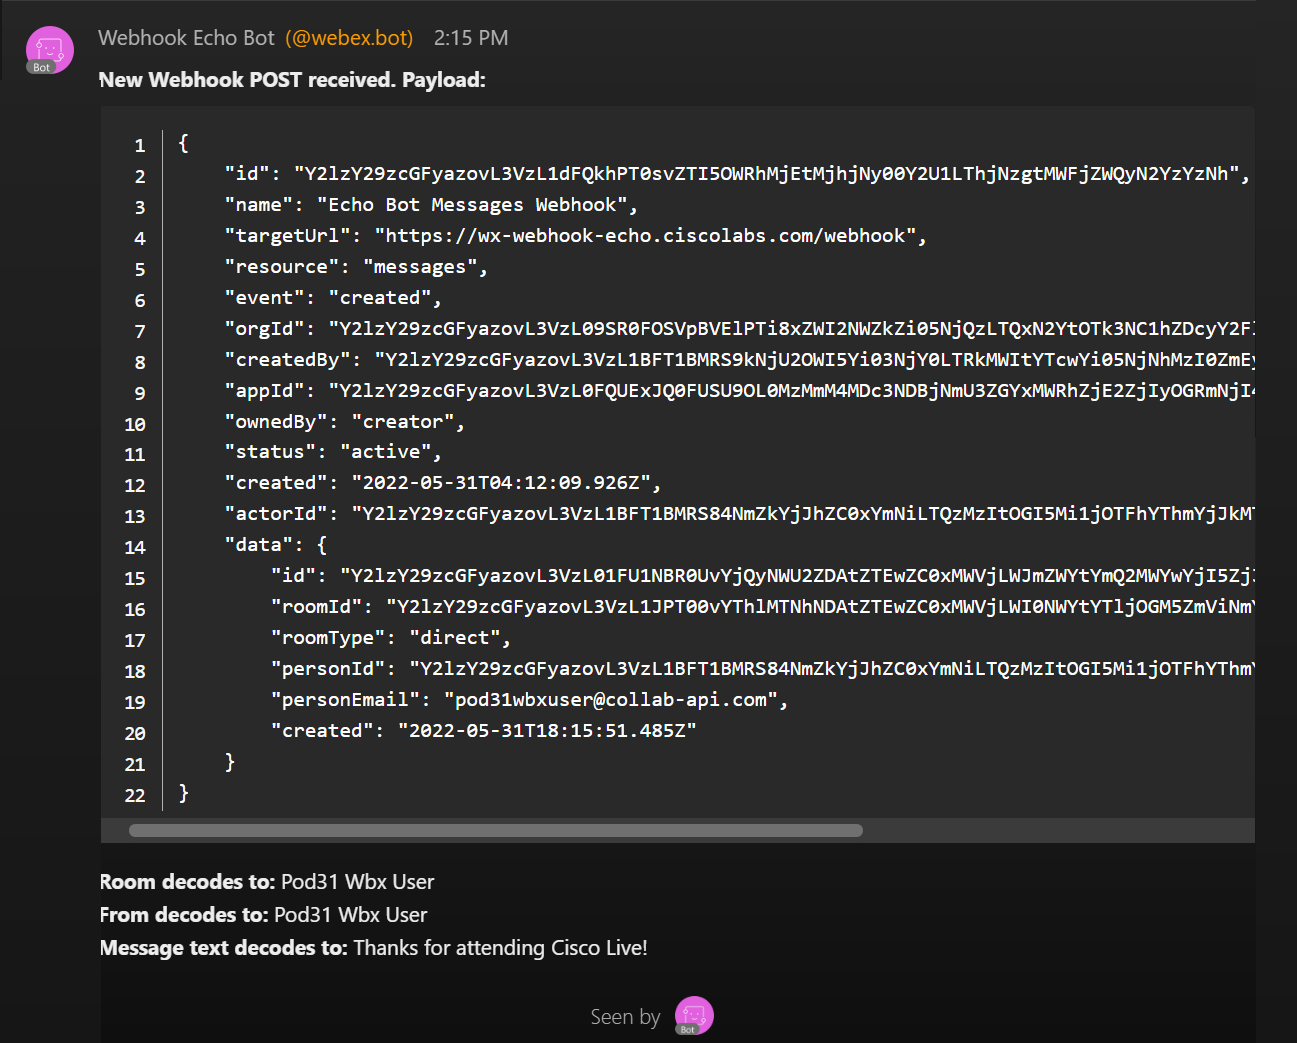
-
At the bottom of the Bot reply, you also see some decoded values for the Room/Space name, the sender,
and the message. But you cannot see those values in the message payload itself. Take the message text
for instance. To find its value, the Bot
used the data
id
(which is a Message ID) to perform a query using
Get Message Details
from the Webex API documentation.

If you take the id value in the data from the response and place it in the messageId field of the Get Message Details , while logged in as pod22wbxuser@collab-api.com (with password: C1sco.123 ), you should see the message as show below in the text field.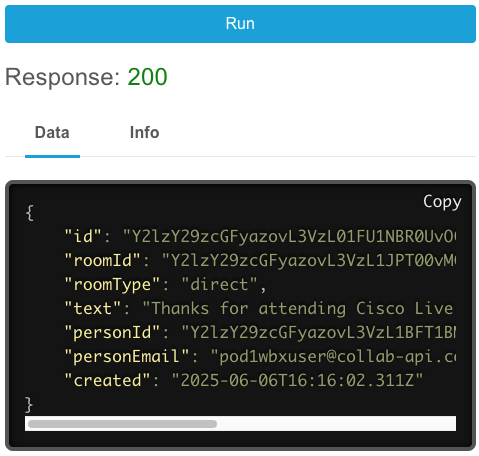
Step 2 - Adaptive Cards
Depending on your requirements, you can have a Bot that interacts with users purely using text-based messages. However, Webex also supports adaptive cards, which are a standard way to present a graphical response with features like buttons, check boxes, various input methods for text, numbers, and date/time elements. They are basically text-based content with JSON formatting that will be rendered by the Webex client as graphics and form items.
What this means is that the web server that handles webhook messages from Webex can reply with more than just text. It can also send an adaptive card, a form of JSON-formatted text, that the Webex client can use to display something graphical. It also means that when the user interacts with this interface, say they click a submit button, a different kind of webhook is triggered. Instead of a message , this will be an attachmentActions type of event. Therefore, on your web server, you may choose to send this kind of data and handle the events.
While this lab won't go into details on designing adaptive cards themselves, there are great resources from the Webex Adaptive Card Designer to the Microsoft Adaptive Card Designer (for the latter, make sure you select the correct Webex Adaptive Card version, currently 1.3). These tools provide a way to construct your card, and then simply copy out the JSON.
- Click to resume your conversation with the Webhook Echo Bot (webhook-echo@webex.bot) in your Webex app.
-
For your message, paste the following JSON string:
{ "type": "AdaptiveCard", "$schema": "http://adaptivecards.io/schemas/adaptive-card.json", "version": "1.2", "body": [ { "type": "TextBlock", "text": "My Adaptive Card", "wrap": true, "id": "text_block" }, { "type": "Input.Text", "placeholder": "Enter text", "id": "input_text" }, { "type": "Input.Toggle", "title": "Checkbox", "id": "input_toggle", "value": "true" }, { "type": "ActionSet", "actions": [ { "type": "Action.Submit", "title": "Submit", "id": "submit_button" } ] } ], "id": "adaptive_card" } - Click Send
-
The Bot, in this case, is simply sending back the JSON string that you sent it. Your Webex app renders this
exact content as an adaptive card.
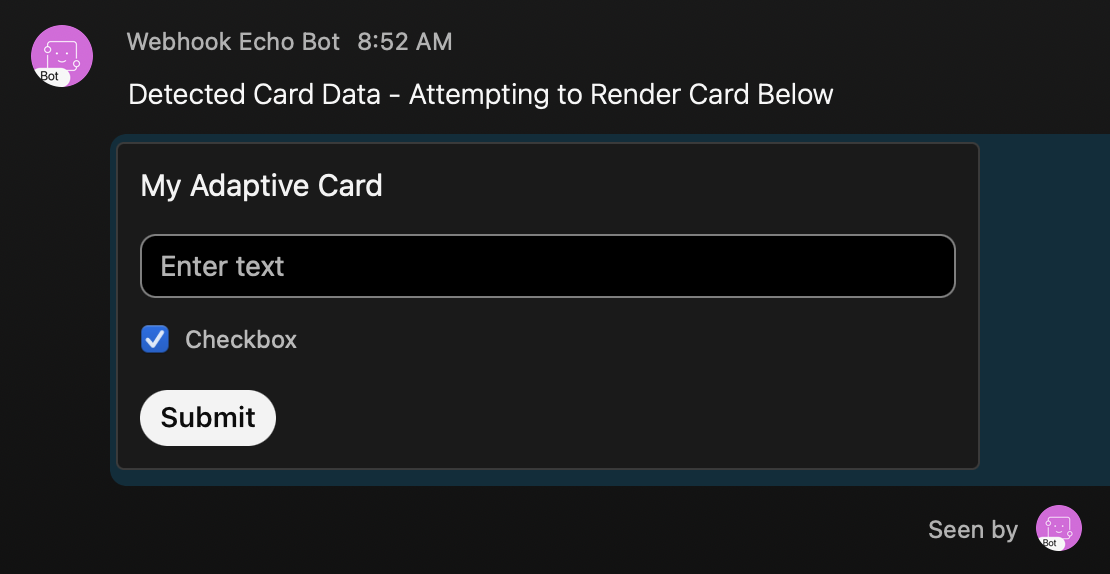
- Enter some text in the "Enter text" box and the card, then click Submit
-
You'll notice that in the response, the
resource
is
attachmentActions
That means that this time, under the data, the
id
is no longer referring to a
Message
ID, but rather an
Attachment Action
ID that can be retrieved
via the API, similar to a message:
https://developer.webex.com/messaging/docs/api/v1/attachment-actions/get-attachment-action-details
The bot has done that for you and supplied the output below.
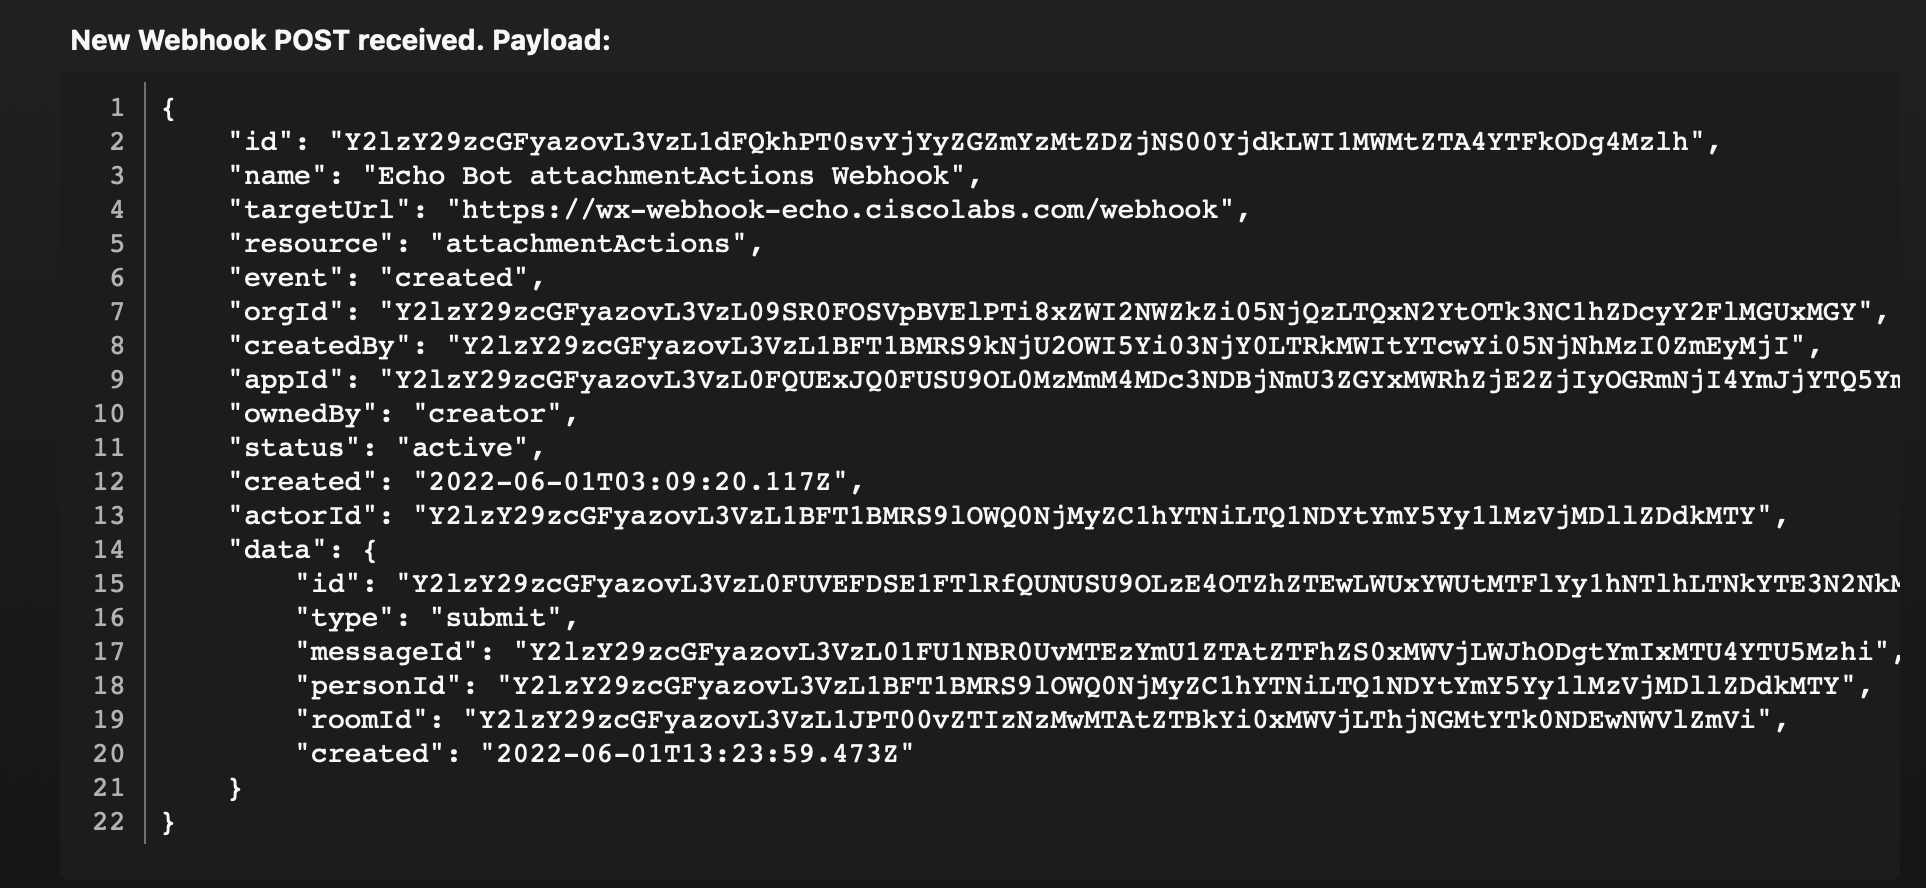
-
Retrieving the attachment allows you to get the data that was supplied via the card interaction. The
input_text
and
input_toggle
variables are defined in the card, but the
general construct is always the same.

Step 3 - Register a Webhook
Now that you have explored the data that is sent to a webhook, you can create a webhook for your Bot to receive these messages. Follow the steps below to create a webhook for your Bot.
- Access the Create a Webhook link under the Webhooks API section in the Full API Reference of the Webex API documentation: https://developer.webex.com/messaging/docs/api/v1/webhooks/create-a-webhook
-
On the right, you will see the request body as an HTML form, explaining all the parameters. To register
a webhook, you only need the mandatory
event
,
name
,
resource
, and
targetUrl
fields specified. One of the limitations of this
Request Body (Form)
view is that all fields (even non-mandatory ones) are shown and include sample data. Since you do not want
to send those fields at all, switch to the
Request Body (JSON)
view by clicking on
its tab.
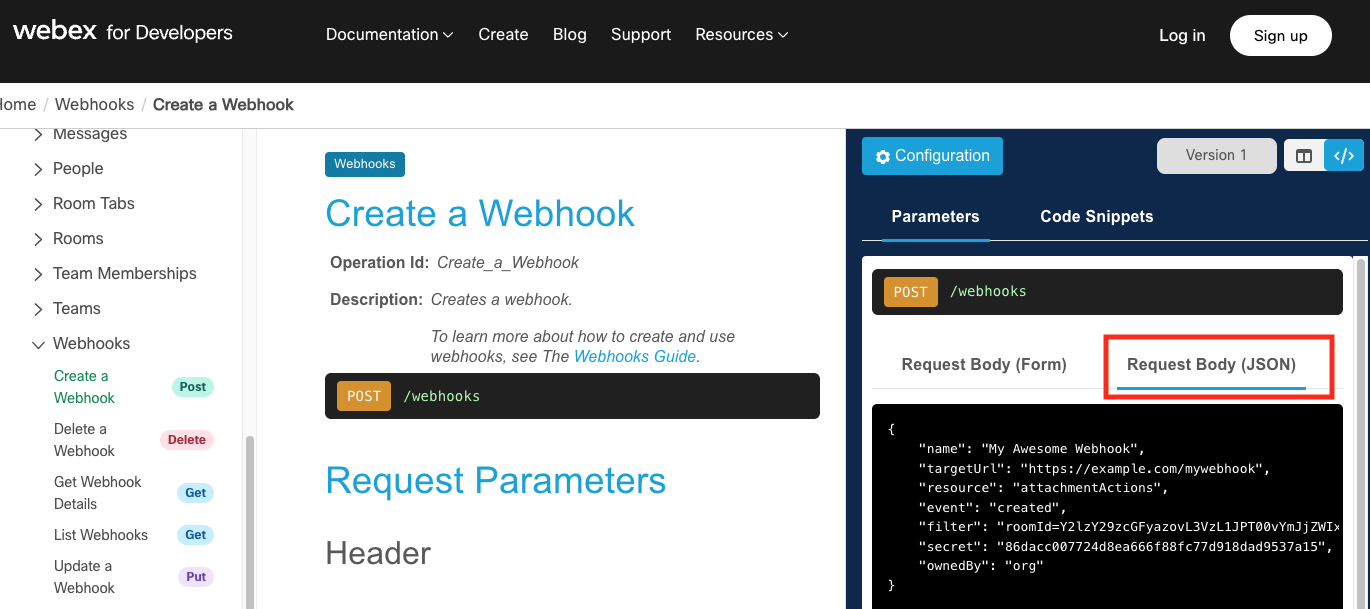
-
Now you can see the raw body that will be sent. As mentioned, you will require the following fields and values:
Parameter Value Description event created This is a kind of event action. created means any new Message or Attachment Action name Cisco Live LTRCOL-2574 Webhook Not visible, so only useful for admins to determine the use of a certain webhook resource messages Describes the type of event, either messages or attachmentActions for adaptive cards actions, or a number of other events. Note that you can only ever supply one. To receive webhook notifications for different kinds of events you must create a webhook for each event type. targetUrl http://collab-api-webhook.ciscolive.com:9022/api/v1/wbxt/events The "callback" location where Webex will POST webhook events to
To simplify entering this, you can paste the following into the Request Body (JSON) window, overwriting the previous contents: -
That takes care of the body of the request, but you still need to include an authorization token. In this case,
the request needs to be performed by the bot, so you will need to use the Bot's access token.
Retrieve your
Bot's access token
which you should have previously stored in the
wbx_messages.py
file in the
examples
directory as the variable
wbx_bot_access_token
.
Scroll down to the
Headers
section and find the
Authorization
header line and replace
<YOUR_AUTHORIZATION_TOKEN>
(but leaving the "
Bearer
" part of the line) with your Bot's token.
-
Click
Run
at the bottom.
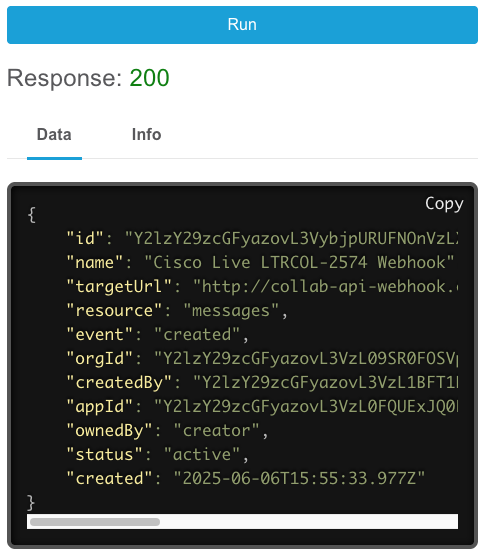
-
Since it is not possible to register a webhook for more than one resource at a time, repeat this API call
for the
attachmentActions
resource, which will be used when a user clicks on an adaptive
card.
Simply scroll up and paste attachmentActions in the resource line (overwriting the previous information in that row). The following is the exact same JSON as before, but with the resource changed to attachmentActions . Scroll up to the Request Body (JSON) and paste it over the previous data: -
Click
Run
.
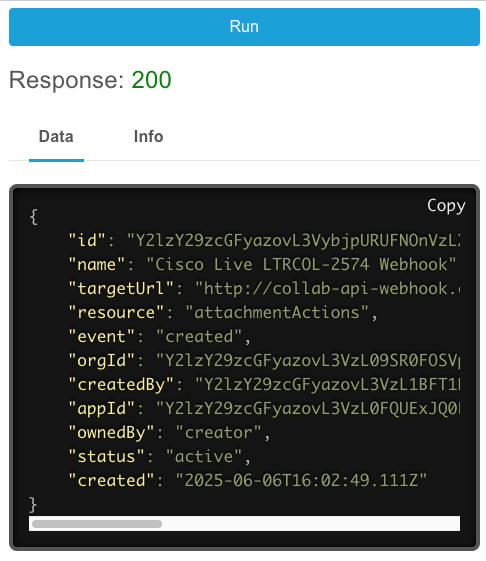
You've learned about different API types in the Cisco Collaboration portfolio and how to build queries to achieve common tasks using both tools and in Python with the help of SDKs. The next section will expand on this knowledge through a provisioning web portal example, covering error handling and Python interactions with webhook messages.
Up to this point, you have used tools like SoapUI, explored the Webex documentation, and completed various Python examples to interact with and understand several of the Cisco collaboration APIs. The final goal of this lab is to create a web portal that allows administrators to perform business functions using a simple interface. The goal of this section is to give you an appreciation for the kinds of things you can accomplish using the APIs you have learned about in this lab. This is by no means intended to show you how to create a full-featured and production-ready web portal, but it will give you a taste of what is possible.
If you put yourself in the shoes of a web developer responsible for building the interface for such a portal, you don't want to get bogged down in the details of SOAP, REST, and the complexities of various product-specific APIs. Instead, you ideally want a way to indicate the intent of the user of the web page and let someone else deal with the complexity. For example, a web developer might want to add a button to a web page that allows an administrator to migrate a user from UCM to Webex Calling.
Modern web development usually involves two groups of developers: front-end developers and back-end developers. Front-end developers typically focus on the user interface (UI), including HTML, CSS, and Javascript code that runs in the browser. Back-end developers, on the other hand, focus on the code running on the web server, databases and other data stores, and managing the business logic when a user interacts with the UI. In this lab, you will play the role of the back-end developer, building the framework that allows the web UI to request data for display and to invoke requests for specific actions, such as adding a new Phone to UCM or enabling a user for calling features in Webex.
In the upcoming sections, you will use Python code to extend a web server application to add support for Cisco UCM SOAP and Webex REST APIs. Your goal is to create a web server that can receive a request to perform an action and then invoke the appropriate API calls to perform that action, similar to those you performed using Python in previous sections.
Many modern websites use an API-based approach to development, where the front-end invokes a REST API provided by the back-end. In simple terms, when a user on a web page performs an action, such as pressing a button or submitting some data, the front-end Javascript code makes a REST API call to the back-end with the information that was submitted. The same is true if the front-end needs to retrieve information, for example, getting the list of phones associated with a user. The front-end would make an API call asking for the list, and the back-end would handle invoking whatever API calls are needed to retrieve the data. Typically, the front-end API is simple, indicating an action the user wants to perform. The business logic and complex API interactions are left to the back-end code. For example, when migrating a user from UCM calling to Webex calling, the front end may only need to provide the user ID of the user to migrate and the back-end code would handle the details of invoking the UCM and Webex APIs to perform the migration, handling any complex logic and error handling. When the back-end completes the task, it would return a response to the front-end to inform the user of the success or failure of the operation.
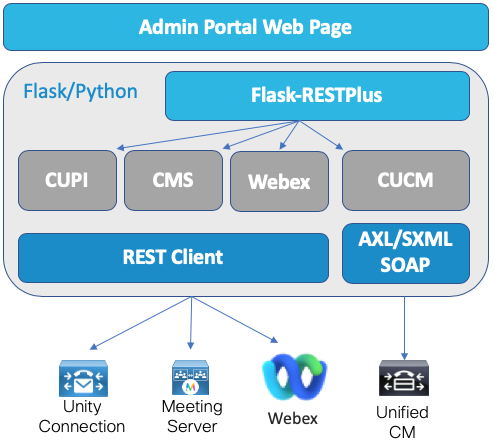
This lab is not intended to be a class on website development; therefore, the front-end code has been completed for you, and parts of the back-end as well. The lab structure allows you to focus on the actual work of programmatically interacting with the various collaboration APIs. The framework for the front-end API has already been created for you. You will be implementing the actions taken when these front-end API calls are received by your server. For example, when the front-end wants the list of active services or some specific performance counters, you will write the code to retrieve those counters and pass them back to the front-end code running in the web browser. The goal is to build capabilities that make it easy for a front-end web developer to invoke business functions, such as adding/removing user phones, provisioning users in Webex, or sending Webex notifications with minimal effort. For example, sending a notification to a Webex space requires values like the RoomID. When implementing a "send notification" function, the back-end can allow the user to just enter the name of the space and handle figuring out the RoomID and other API parameters needed to send the notification.
The diagram on the right shows the overall architecture of the web server. The web server you will develop this portal with will be a Flask application. Flask is a lightweight, extensible web application framework written in Python that allows you to create a web server. One of the extensions that you will be using in this lab is called the Flask-RESTX extension. This extension makes it easy to create a REST API of your own that will be used by the front-end code running in the web browser, similar to the capabilities in the Webex API documentation. This is what we have been referring to as the front-end API.
We have already defined the API endpoints you will be creating. We have also added documentation for the API that you will implement. This combination of the RESTX extension and the documentation in the code enable an interface called the SwaggerUI . These are web pages that are automatically created for you which allow you to easily test your newly created API from a web browser, similar to the way you used the Webex API documentation pages to test the Webex APIs. The built-in SwaggerUI interface gives you a simple web interface to test the front-end API and allows you to make sure it is working without having to write any of the front-end code. Basically you want to make sure the API works before you hand it over to the front-end developer to develop the GUI. As you add more code and documentation to the code, the SwaggerUI picks up those changes and generates new web pages you can use to test the API you built.
Once you have finished implementing the front-end API, you will explore how the front-end "Provisioning Portal" web page makes use of the API and invokes the Python code you have written to give you a good idea of what you could build using these APIs.
One important point to note is that in this lab, the API you are implementing does not require any form of authentication. In a production environment, you would want to create a user login mechanism and then use that to authenticate the API calls from the front-end to the back-end. This is outside the scope of this lab, so the portal you build will not authenticate any of the API calls.
Step 1 - Launch the Web Server
- Access your VS Code instance: https://dev1.pod22.col.lab:8443
-
In VS Code, click the Run and Debug button.
-
Once you click anywhere in list of "RUN AND DEBUG" configurations, You should see a predefined Configuration for running
this web application named
Start LTRCOL-2574 Portal
at the top of the column:

-
Click the green start arrow
.
Doing so launches the web server with output going to a
terminal
window at the bottom.

-
The important piece to note is that the output states:
* Running on http://10.0.122.40:5000/ (Press CTRL+C to quit) - This means that now you can access the server by browsing to http://dev1.pod22.col.lab:5000 . The portal will not function because you haven't implemented the backend code yet, but the web server is otherwise functional.
-
You now have a small run control box that pops up, which you can re-position as desired.

It contains options to pause, stop, and restart the server, which is sometimes necessary when changing core features of the Flask app. It also has debugging options for stepping over/into/out of a portion of code. - Now navigate to http://dev1.pod22.col.lab:5000/api/v1/ . This web page (Swagger UI) documents the framework for the front-end API that has been implemented for you. You can expand each of the sections to see the full list of API methods. Your job will be to create the back-end code that implements each of these API methods.
Your web portal is active! It doesn't do much yet, but that will soon follow. Let's get started with the CUCM SOAP API functions.
As discussed earlier, the Unified CM provisioning and serviceability APIs are SOAP based. To build the web portal, you will leverage the same Python modules you used previously in this lab in addition to some additional modules to implement the logic for your front-end APIs.
In this section, you will review the following:
- Core Python modules for CUCM SOAP APIs
- Portal connectivity and credentials to pod servers
- Instantiate core CUCM SOAP API classes
Step 1 - Introduction to Core Python Modules for CUCM SOAP APIs.
We are providing two Python modules, flaskr/cucm/v1/axltoolkit/__init__.py and flaskr/cucm/v1/cucm.py , in order to provide a common core framework allowing the portal server to make use of SOAP APIs. These modules use the Zeep Python library, which you have previously used in exercises. You may open these files as a reference via your VS Code Instance browser tab, using the Explorer . You will utilize several classes & methods from these modules in order to add functionality to your Web Portal. If you don't know what Python modules, classes, or methods are, don't worry. While understanding these concepts would help to understand the underlying code that we have provided for you, it is not necessary to be able to complete this lab.
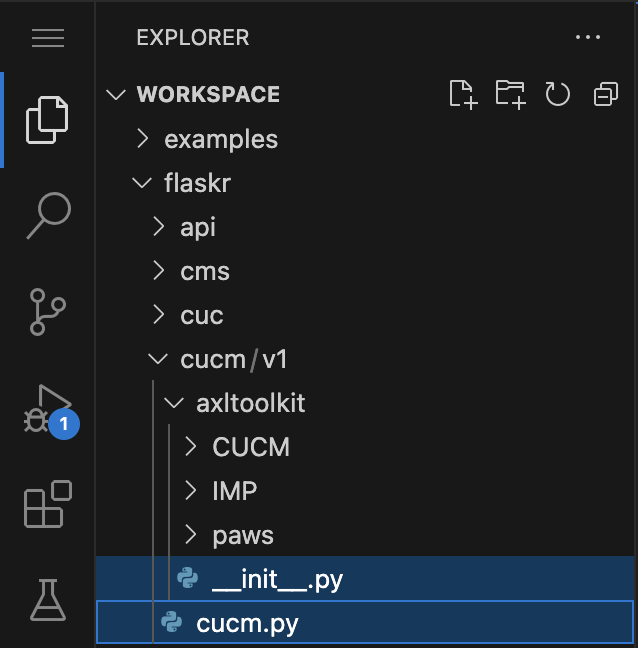
Not all of classes or methods provided in these pre-built modules will be utilized in the web portal but we are providing them to you for future use.
The following describes in more detail the capabilities provided by these two modules.
-
flaskr/cucm/v1/axltoolkit
: This module provides the following
Python classes
for various CUCM SOAP APIs
utilizing the
Zeep Python package
as the SOAP Client. The classes provide
the appropriate WSDL files to the Zeep package which in turn automatically generates functions that you can call in your code.
Additionally, it provides
persistent session settings (cookies, authentication) for all SOAP client requests, SOAP request fault detection and debug
logging for troubleshooting. The code in these classes is very similar to the code you explored during the example exercises, but just
packaged up into Python classes.
- AxlToolkit : The AxlToolkit common AXL SOAP API class. This parent class enables your application to connect and make common thin and thick AXL API calls to CUCM & IM&P. It initializes the requested AXL Version WSDL schema from the local file system, depending on which version you request when you create a new AxlToolkit instance.
-
CUCMAxlToolkit
: The CUCMAxlToolkit class is derived from the AxlToolkit class. This class takes the AxlToolkit
and extends it, enabling your application to connect and make CUCM AXL API requests utilizing the AXL
schema defined here:
https://developer.cisco.com/docs/axl-schema-reference/ -
PawsToolkit
: This class enables your application to connect and make Platform Administrator Web Services (PAWS)
API calls which is documented here:
https://developer.cisco.com/site/paws/documents/api-reference/ -
UcmServiceabilityToolkit
: This class enables your application to connect and make Control Center Services
API calls which is documented here:
https://developer.cisco.com/docs/sxml/#!control-center-services-api -
UcmRisPortToolkit
: This class enables your application to connect and make RisPort70 API calls which is
documented here:
https://developer.cisco.com/docs/sxml/#!risport70-api -
UcmPerfMonToolkit
: This class enables your application to connect and make PerfMon API calls which is
documented here:
https://developer.cisco.com/docs/sxml/#!perfmon-api
These classes are designed to be generic so that you can take them and use them for your own projects if you wish. The Reference section of this lab has pointers to all of this source code that you can make use of. Note that this code is being provided as-is and it is up to you to ensure it provides the level of security and functionality you might need in your environment.
-
flaskr/cucm/v1/cucm.py
: This module provides a wrapper/middle layer between the various AxlToolkit classes
and the web portal's API methods that you will implement.
It extends the basic SOAP Client functionality provided in AxlToolkit for various CUCM API interfaces with automated setup,
retry, and fault detection. We have the following major API classes implemented in this module:
- AXL : This wrapper class further extends the CUCMAXLToolkit class to provide automated setup, retry, and fault detection when making AXL API Calls to CUCM.
- PAWS : This wrapper class further extends the PawsToolkit class to provide automated setup, fault detection when making PAWS API Calls to CUCM. It requires a PAWS API Service name to be supplied because each Service has its own WSDL file. For example, you will only utilize the VersionService for the web portal.
- SXML : This wrapper class extends multiple serviceability API classes from the AxlToolkit module to provide automated setup, retry, and fault detection when making SXML API Calls to CUCM. Similar to PAWS class, you need to supply an SXML Service name. Currently we have implemented UcmRisPortToolkit, UcmServiceabilityToolkit, and UcmPerfMonToolkit.
Step 2 - Portal Connectivity & Credentials to Servers
In order for the portal to connect to your Unified CM cluster, you must supply host names, HTTPS port number, and username and password for authentication. We have pre-configured a file that will be used to populate environment variables which will be read by various portal APIs that you will be implementing.
- In your VS Code instance browser tab, open up .env in your project root folder using the Explorer and ensure the content is accurate for your pod. Although this lab only explores the APIs for CUCM, it also includes code for Unity Connection and Cisco Meeting Server which is why you will see credentials for those applications as well.
# Environment variables

# Participant pod number
POD_NUM='22'

# DEFAULT CUCM ACCESS INFO
CUCM_HOSTNAME=cucm1a.pod22.col.lab
CUCM_PORT=8443
CUCM_USERNAME=admin
CUCM_PASSWORD=C1sco.123

# DEFAULT CUC ACCESS INFO
CUC_HOSTNAME=cuc1a.pod22.col.lab
CUC_PORT=8443
CUC_USERNAME=admin
CUC_PASSWORD=C1sco.123

# DEFAULT CMS ACCESS INFO
CMS_HOSTNAME=cms1a.pod22.col.lab
CMS_PORT=8443
CMS_USERNAME=admin
CMS_PASSWORD=C1sco.123

# Service App settings (client_id, client_secret, and refresh_token)
Step 3 - Instantiate Core CUCM SOAP API Classes
In order to utilize the core CUCM SOAP API Python classes you need to instantiate them (AXL, PAWS, SXML) by providing the details of your CUCM server stored in environment variables which came from the .env file you just looked at. You will need to make use of the CUCM_HOSTNAME , CUCM_PORT , CUCM_USERNAME , and CUCM_PASSWORD variables.
When communicating with CUCM and other VOS-based UC applications (CUC, IM&P, etc) over web services based APIs (AXL, PAWS, SXML, REST), you must maintain a web connectivity session where the application can reuse the already established TLS connection as well as cache and re-use the JSESSIONID / JSESSIONIDSSO cookie(s) returned after a successful authentication. If you do not cache these authentication cookie(s) and do not send one with subsequent requests, each API request your provisioning portal makes will open a new session with the product. This may lead to large numbers of active sessions, which, in turn, can lead to overall system performance degradation. Although the Cisco Tomcat (the web server used on CUCM and other VOS-based products) web application sessions have a default timeout of 30 minutes, if the JSESSIONID & JSESSIONIDSSO cookies are not cached by the client and the request rate is high, Cisco Tomcat services will start to spike the CPU and deplete available memory, potentially leading to more serious issues on the server.
You can monitor Active Sessions on a per web application basis by monitoring the following CUCM performance counter:
\\cucm-host\Cisco Tomcat Web Application(axl)\SessionsActive
Performance degradation is also dependent on the request and response activity, but as a general rule active session count over a 100 is of concern. The Using JSESSIONIDSSO to improve performance page on developer.cisco.com has more information on this topic.
In Python you can easily achieve this persistent authentication cookie caching by utilizing the session object available within the Python Requests library https://requests.readthedocs.io/en/latest/user/advanced/#session-objects . The Python requests library is already utilized by the AxlToolkit module in the same way you did in the earlier exercises.
In order to maintain this persistent session object, you must instantiate the CUCM SOAP API Python classes globally in the flaskr/api/v1/cucm.py file. Follow these steps to create new variables and create new instances of the classes discussed earlier.
- In your VS Code tab, using the Explorer function, open up flaskr/api/v1/cucm.py
-
After the Comment Line "# Core CUCM SOAP API Python Class Instances" copy & paste the following highlighted lines.
api = Namespace('cucm', description='Cisco Unified Communications Manager APIs')

# Read environment variables
cucm_host = getenv('CUCM_HOSTNAME')
cucm_user = getenv('CUCM_USERNAME')
cucm_pass = getenv('CUCM_PASSWORD')

# Core CUCM SOAP API Python Class Instances
myAXL = AXL(cucm_host, cucm_user, cucm_pass)
myPAWSVersionService = PAWS(cucm_host, cucm_user, cucm_pass, 'VersionService')
mySXMLRisPort70Service = SXML(cucm_host, cucm_user, cucm_pass, 'realtimeservice2')
mySXMLControlCenterServicesService = SXML(cucm_host, cucm_user, cucm_pass, 'controlcenterservice2')
mySXMLPerfMonService = SXML(cucm_host, cucm_user, cucm_pass, 'perfmonservice2')
###########################################
This code creates five variables, one for each of the SOAP API classes. You will later be able to call these to issue commands through these APIs. Notice that the username, password, and hostname information passed into these classes comes from the variables declared immediately before the lines you pasted, retrieved from the environment variables using the Python getenv function. The strings passed into getenv directly map to the names defined in the .env file.
- Save this file by going to application menu → File → Save or by simply pressing Ctrl+S
-
Restart your Flask app by clicking the green restart button from the controller:
which you should always see along the top of the window while Flask is running.
If Flask is not started at all, click the Debug button on the left side
followed by
the green start/play button next to
Start LTRCOL-2574 Portal
-
If the terminal window at bottom right shows:
* Running on http://10.0.122.40.40:5000/ (Press CTRL+C to quit)
, then
your Flask app is running.
Any time you save a file that is used by your Flask app, you must restart it for the changes to take effect.
-
Access your portal's RESTPlus/Swagger UI page at
http://dev1.pod22.col.lab:5000/api/v1/
These are the APIs being exposed by the backend of your provisioning portal.
-
Expand the
cucm
section by clicking anywhere on the "cucm Cisco Unified Communications Manager APIs" line
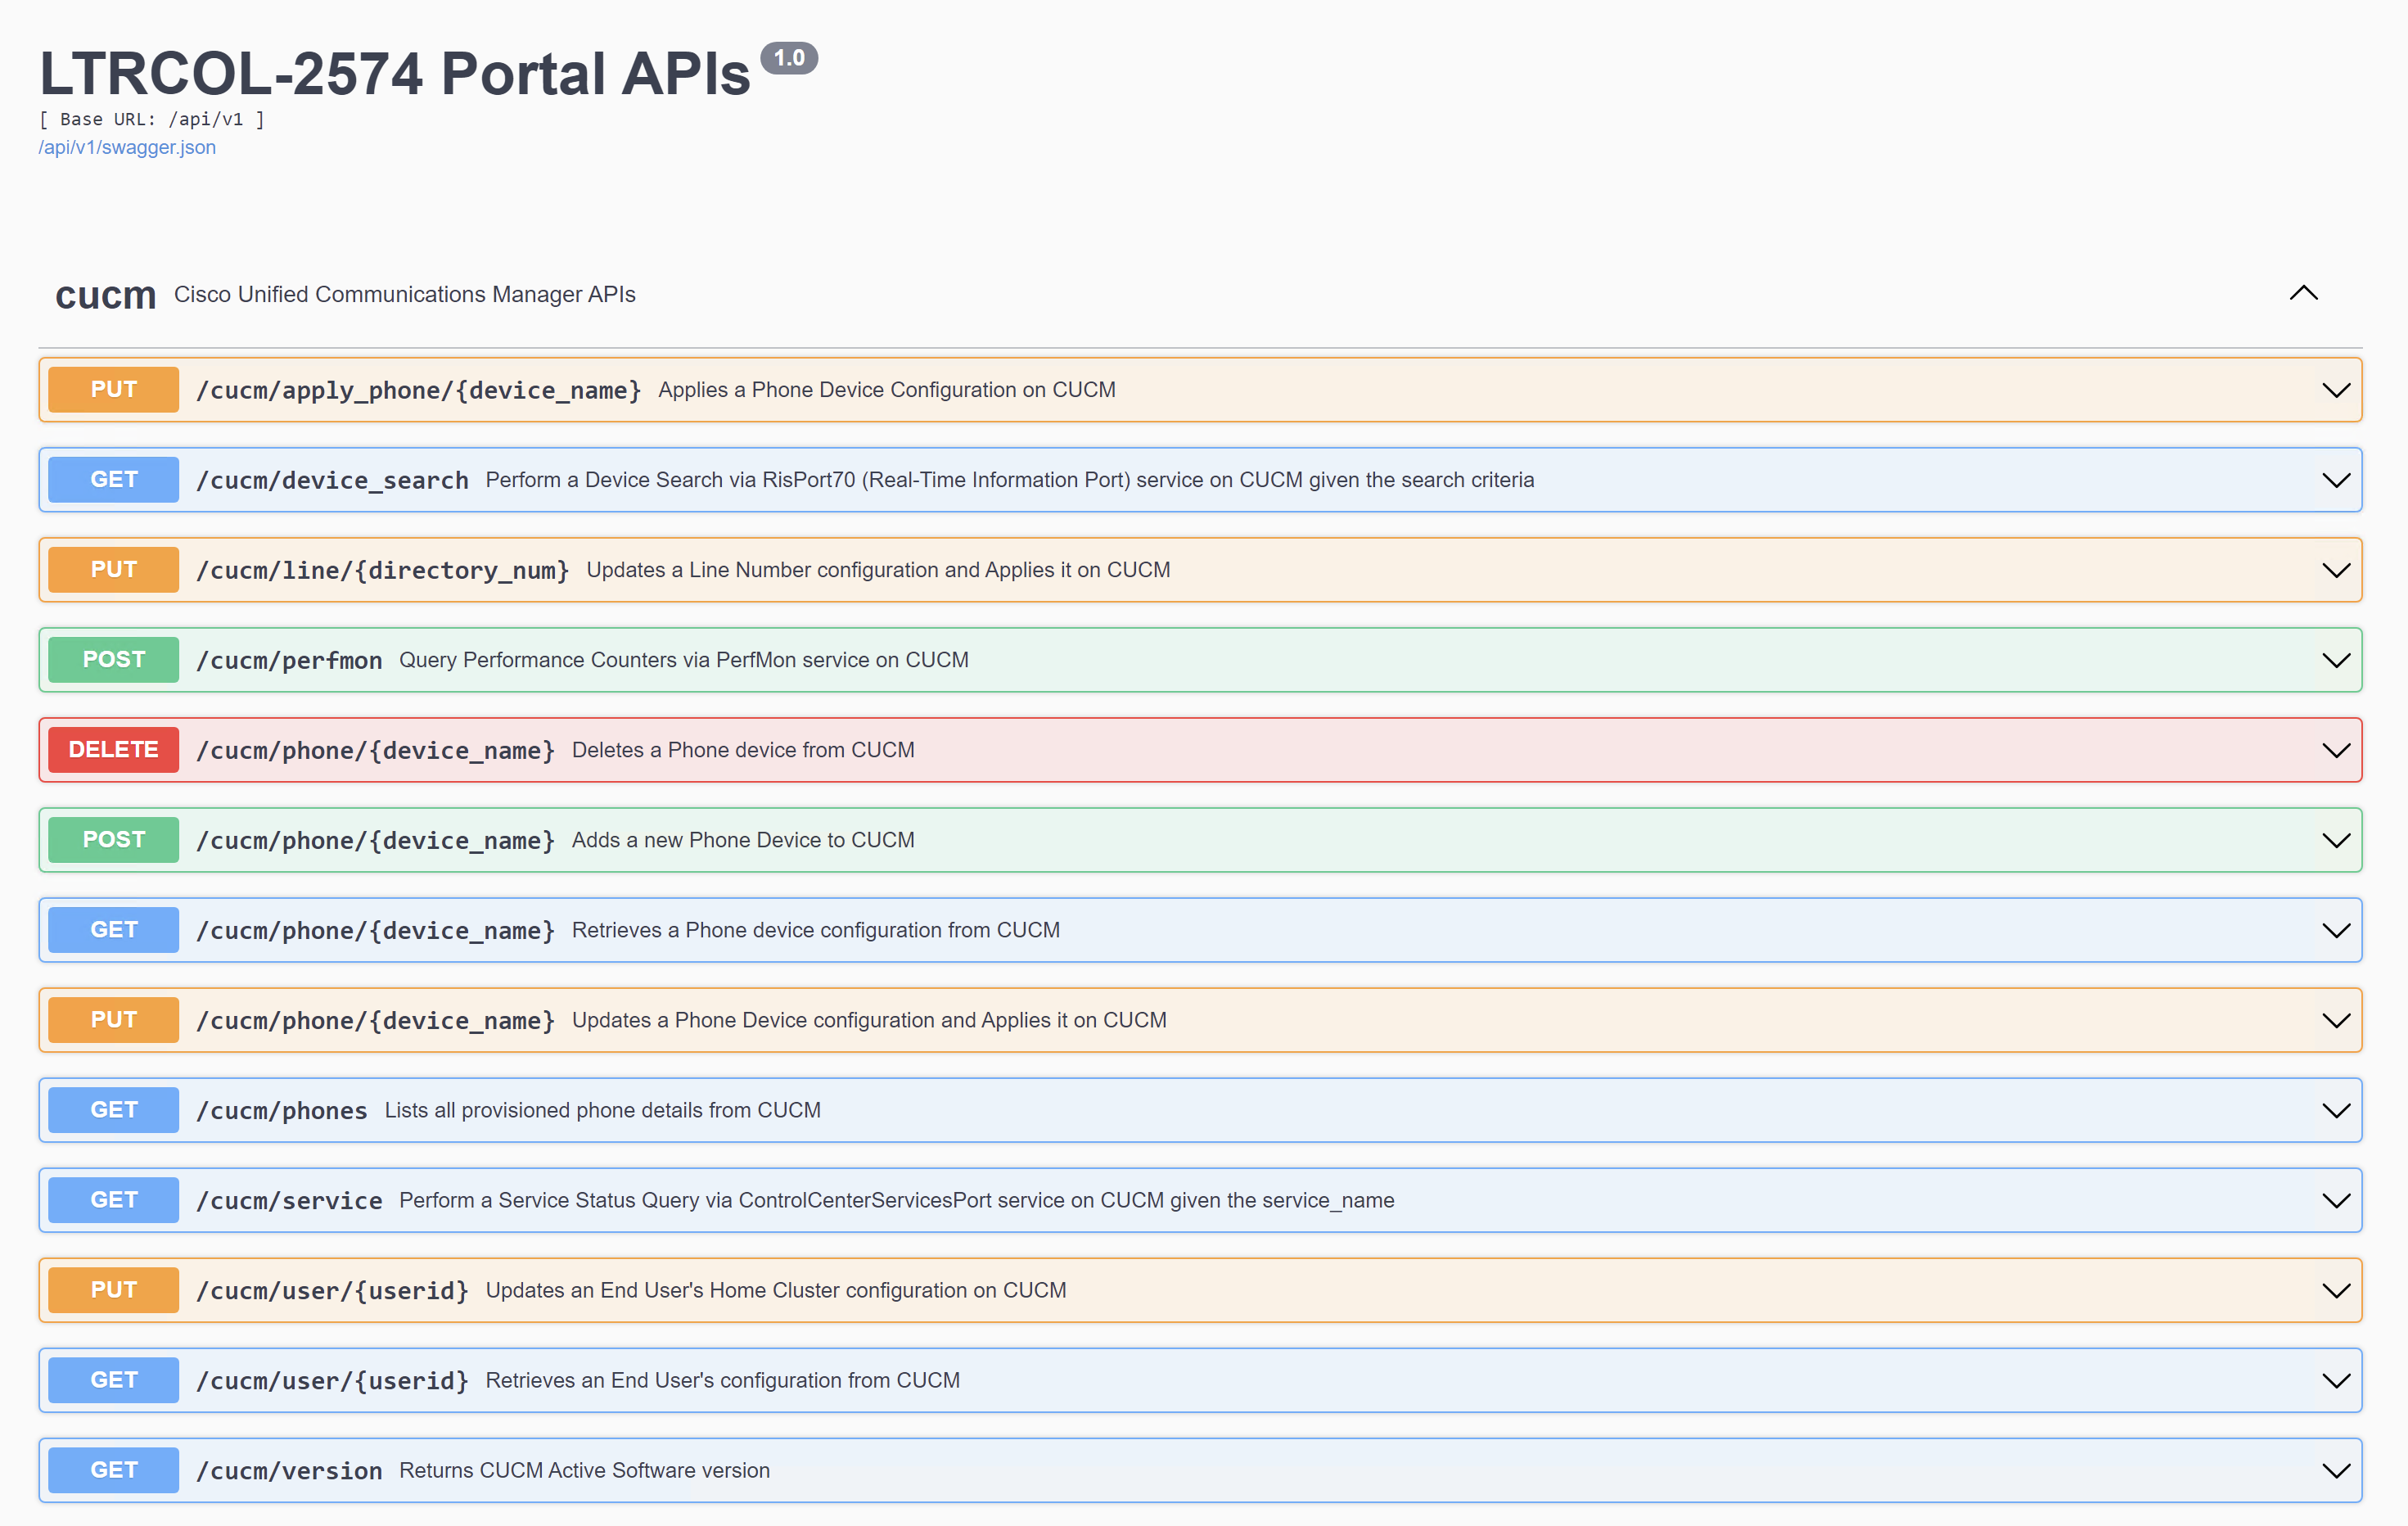
Each of the lines you see on this page is an API endpoint we have pre-configured for you. As mentioned previously, this page is generated automatically by SwaggerUI. To see where this all comes from, you can look at the flaskr/api/v1/__init__.py file. That file contains the following code:
from flaskr.api.v1.cucm import api as cucm
from flaskr.api.v1.cuc import api as cuc
from flaskr.api.v1.cms import api as cms
from flaskr.api.v1.wbxt import api as wbxt
from flaskr.api.v1.wbxc import api as wbxc
from flaskr.api.v1.core import api as core


v1_blueprint = Blueprint('api_v1', __name__,
                            template_folder='templates',
                            static_folder='static')

v1api = Api(v1_blueprint, title="Lab Portal APIs", version='1.0')

v1api.add_namespace(cucm)
v1api.add_namespace(cuc)
v1api.add_namespace(cms)
v1api.add_namespace(wbxt)
v1api.add_namespace(wbxc)
v1api.add_namespace(core)
The first part of the code with the import statements is importing the other Python files that are in the same directory as the __init__.py file. The content of those files is then added as a separate namespace to the API with the names provided. In this example, the cucm APIs are imported from the flaskr/api/v1/cucm.py file and added as a namespace to the API with the name cucm .
If you look at the flaskr/api/v1/cucm.py file, you will see lines like this example from the file:
@api.route("/line/The first line that starts with @api.route defines a new API endpoint. Because it's in the cucm.py file which was imported as the cucm namespace of the API, this endpoint is prefixed with /api/v1/cucm/, so this line defines the endpoint named /api/v1/cucm/line/ followed by a parameter containing the directory number field as a string.
The line @api.expect(cucm_update_line_query_args, validate=True) tells the API what kinds of parameters to expect. In this case, it says to expect the parameters defined in cucm_update_line_query_args which is defined in the file flaskr/api/v1/parsers.py . If you look in that file you will see this definition:
# CUCM Update Line Query arguments
cucm_update_line_query_args = reqparse.RequestParser()
cucm_update_line_query_args.add_argument('callforwardtovm', type=inputs.boolean, required=False,
                                         help='Enable Call Forward to Voicemail', default=True, location='args')
You can see how this line indicates the name of the argument, the type (boolean), whether it's required or optional, the help text which is displayed in SwaggerUI, and the default value which is needed if the argument is optional.
Finally, in the cucm.py example above you can see there is a function named put that tells the API that what follows is the code to execute if this API endpoint receives a request with the PUT verb. You will see this structure throughout the cucm.py file as well as the other files you will explore in the next few sections of this lab. These functions that define the portal / front-end API are all created for you which is why the SwaggerUI page is populated, but right now, most of the functions that define what the API actually does are empty. You will implement these functions in the next few sections.
If you click on the PUT /cucm/line/{directory_num} option on the Swagger UI page you will see this which is rendered from all the code you just explored above:
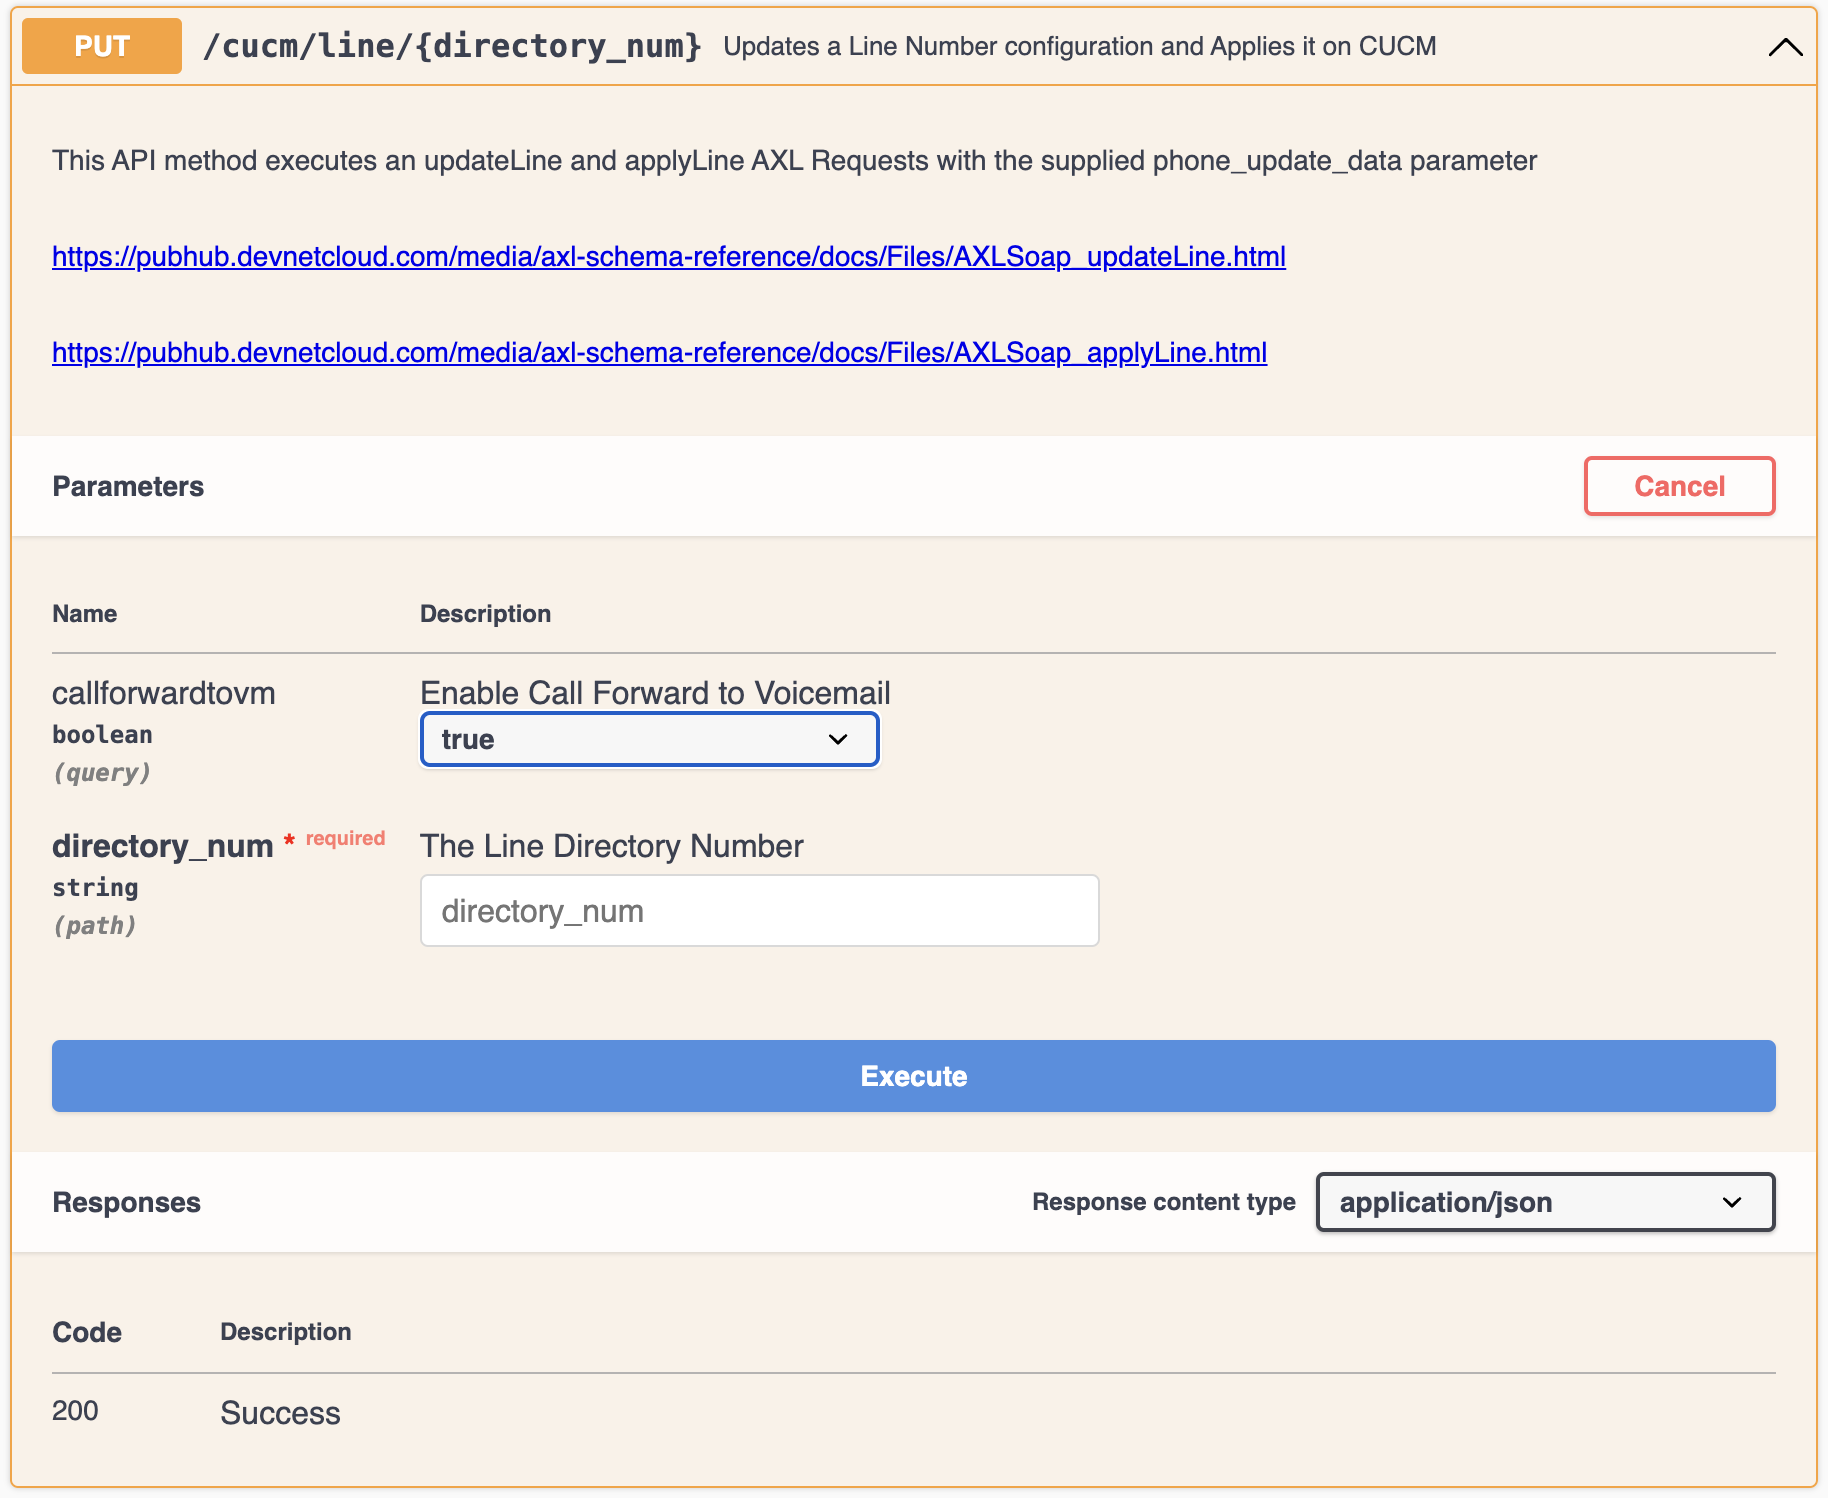
-
Let's look at an API endpoint that we have already implemented for you that leverages the PAWS API.
Click the
GET /cucm/version
operation.
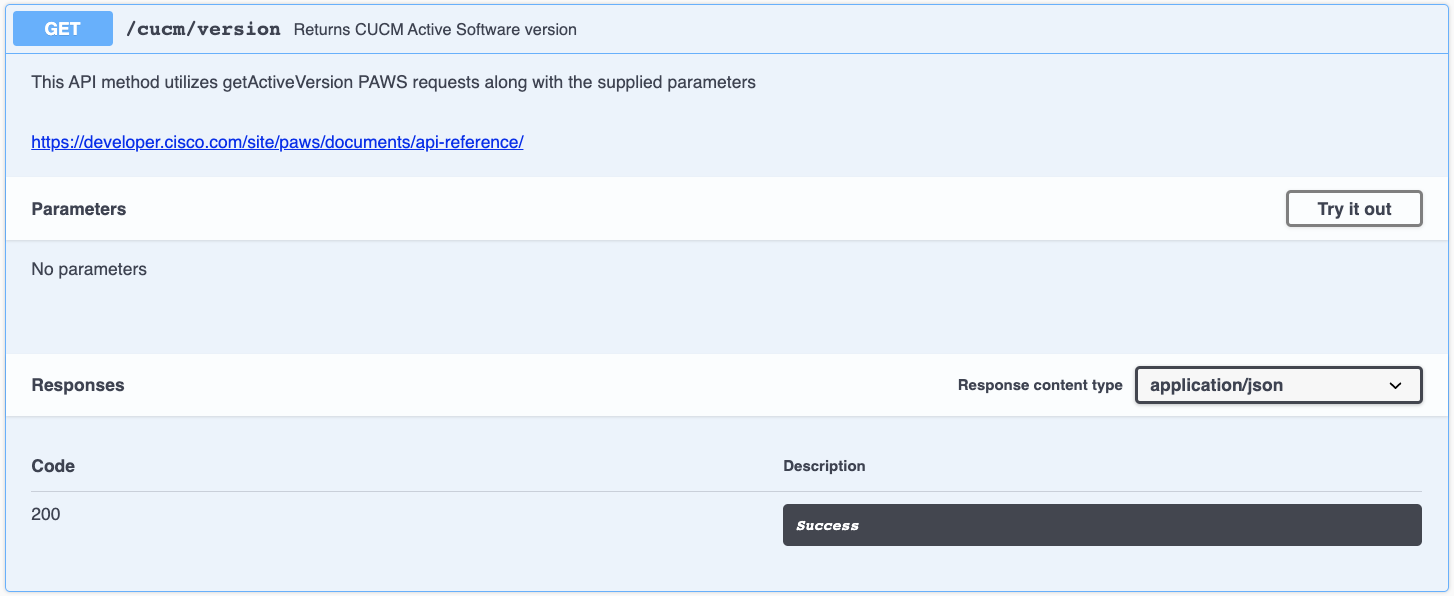
- On the right, click Try it out .
- In the expanded section, click Execute .
-
This should feel very familiar to the way you were able to execute Webex APIs from the developer.webex.com site.
Examine the response. You should note a Server response code of
200
and a response body with your CUCM's Active Software Version.
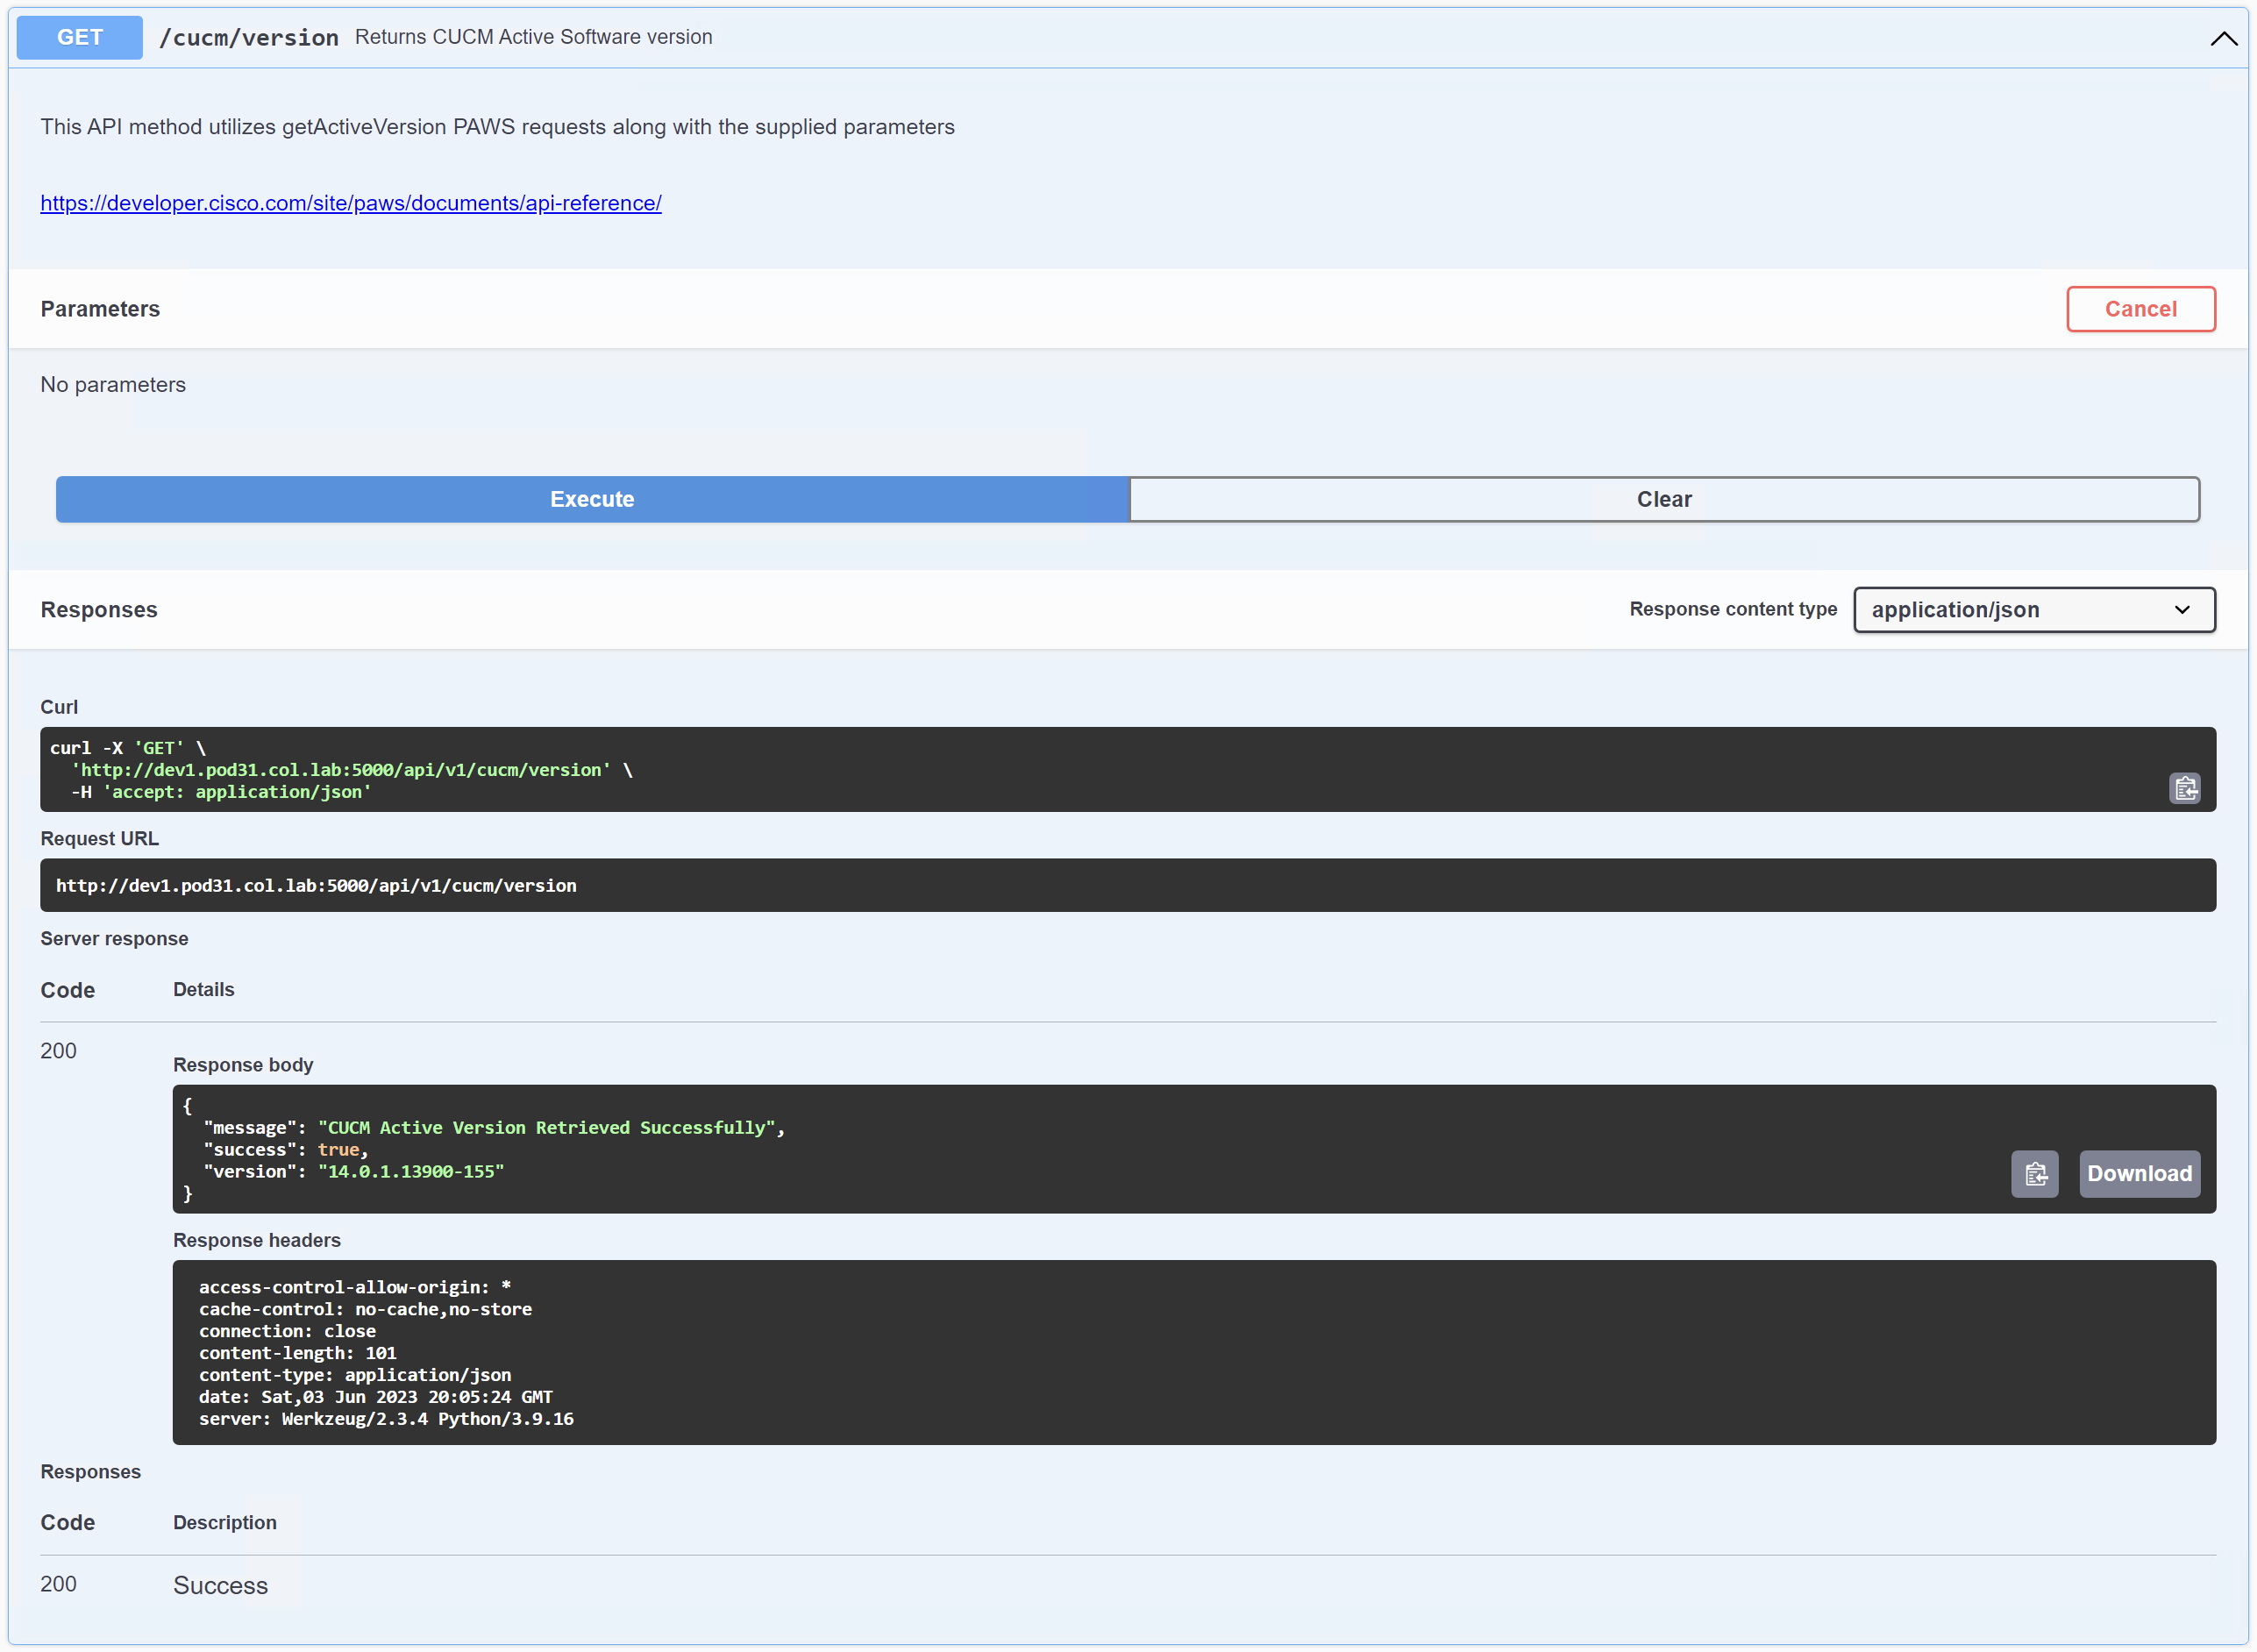
-
To understand what just happened, let's explore the code that was executed. In the cucm.py file, you will see the
@api.route
for the
/version
endpoint:
@api.route("/version")
class cucm_get_version_api(Resource):
    def get(self):
        """
        Returns CUCM Active Software version

        This API method utilizes getActiveVersion PAWS requests along with the supplied parameters


        https://developer.cisco.com/site/paws/documents/api-reference/
        """
        try:
            version_info = myPAWSVersionService.get_version()
        except Exception as e:
            result = {'success': False, 'message': str(e)}
            return jsonify(result)
        apiresult = {'success': True, 'message': "CUCM Active Version Retrieved Successfully", 'version': version_info['version']}
        return jsonify(apiresult)
The first line, @api.route("/version") , automatically ensures that a function in this class is called when your web server receives a request on the "/version" URI depending on the verb that was used in the HTTP request. In this case you sent a GET, so the get(self) method is the one that gets called. The meat of what this method is doing is calling myPAWSVersionService.get_version() and parsing the output.
So what does myPAWSVersionService.get_version() do?
myPAWSVersionService is an instance of the PAWS class that you had instantiated at the beginning of this page. The PAWS class has a method called get_version that uses the PAWS API to pull the version information from CUCM. To explore what is happening in the PAWS class, you can see the following function in the flaskr/cucm/v1/cucm.py file:@Decorators.paws_result_check @Decorators.paws_setup def get_version(self, Version='Active'): if (Version == 'Active'): return self.pawsclient.get_active_version() elif (Version == 'Inactive'): return self.pawsclient.get_inactive_version() else: raise Exception("get_version only accepts 'Active' or 'Inactive'")By default, the function returns the Active version and calls self.pawsclient.get_active_version() to obtain the version. So now what does get_active_version() do? This function comes from the AxlToolkit that has the following method:
    def get_active_version(self):
        active_version = self.service.getActiveVersion()
        return active_version
The get_active_version() method calls self.service.getActiveVersion() . The getActiveVersion() method is one that was automatically generated by Zeep by reading the PAWS API WSDL file. It is this function that takes care of creating a SOAP request and sending it to the server, parsing the response, and returning back the version information from the server.
Finishing up by going back to the first class you looked at above - cucm_get_version_api :
    try:
        version_info = myPAWSVersionService.get_version()
    except Exception as e:
        result = {'success': False, 'message': str(e)}
        return jsonify(result)
    apiresult = {'success': True, 'message': "CUCM Active Version Retrieved Successfully", 'version': version_info['version']}
    return jsonify(apiresult)
The last operation to explain here is return jsonify(apiresult) line. You may have noticed why we are using jsonify instead of just returning the apiresult which is a dictionary. The reason is that the jsonify function is useful in Flask apps because it automatically sets the correct response headers and content type for JSON responses, and allows you to easily return JSON-formatted data.
Notice that at no point in any of this code did you need to worry about the actual SOAP request being made. There is no XML to write, no SOAP envelope to construct, no HTTP headers to set. All of that is handled by the Zeep library and the classes you have instantiated. You will find that the majority of the code you need to write is to handle the data that comes back from the the APIs and extract the information you need.
For the rest of this lab, you will be focused on these final pieces where you implement the actual work to make the API calls and parse the results. In this case, getting the version was relatively straightforward, but as you will see, more complex interactions will require more code.
You have just executed your first API call via your portal which called the CUCM PAWS API Version Service (getActiveVersion) request. The code to invoke this API was already provided, but you will be implementing several others on your own. Let's dive a little deeper and implement API functions that will provision your CUCM via the AXL API.
Up to this point, you have checked the portal's connectivity to the pod devices and initialized the global CUCM SOAP API Python classes shown below:
- myAXL
- myPAWSVersionService
- mySXMLRisPort70Service
- mySXMLControlCenterServicesService
- mySXMLPerfMonService
In this section, you will implement the following CUCM AXL Provisioning API tasks using the above mentioned classes:
- Get a phone device configuration details from CUCM
- Add a phone device to CUCM
- Update a phone device configuration on CUCM
- Delete a phone device from CUCM
- Get an end user's configuration details from CUCM
- Verification
Step 1 - Get Phone
One thing that you might want your portal to be able to do is display information about a phone configured in CUCM. To do this, you need to provide an API endpoint that can go retrieve the desired phone information from CUCM and provide it to the front-end.
With the help of the CUCM SOAP API Python class myAXL you will send a getPhone thick AXL method and relay the response if successful.
- In the VS Code tab, using the Explorer function, open up flaskr/api/v1/cucm.py
-
In the
cucm_phone_api()
class,
def get(self, device_name):
method, locate the existing
line
raise Exception('Not implemented yet!!')
remove it and replace it with the following highlighted lines.
The get() function of the cucm_phone_api class gets called when the portal API receives a GET request to the /phone/<string:device_name> endpoint. All it does is call the get_phone() method of the myAXL class while passing the device_name variable as an argument. The device_name variable is expected to be passed in to the portal API route as part of the URL. For example: "/cucm/phone/CSFPOD22USER1". This type of parameter is also referred as a path parameter . The get_phone() method returns a dictionary containing the phone device configuration details and some error checking is performed before returning the response.
- Save this file by going to Application Menu → File → Save or by simply Pressing Ctrl+S
-
Ensure the
cucm_phone_api()
class,
def get(self, device_name):
method looks exactly as seen below.
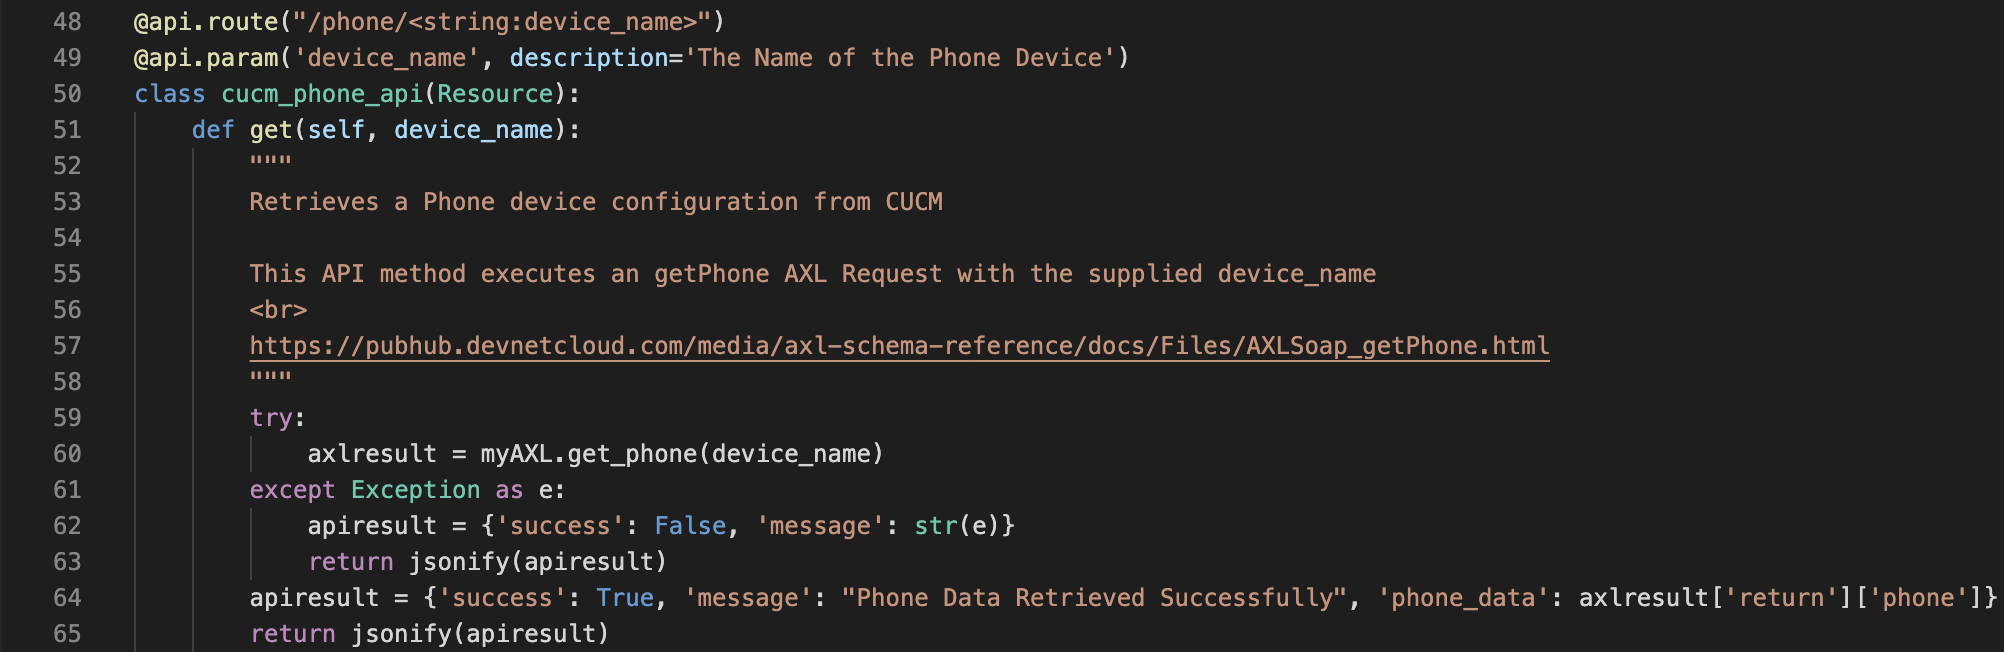

Step 2 - Add Phone
Next you will implement a function to provide the front-end with the ability to add a phone. You will build upon the cucm_phone_api() class where you added a get method earlier.
You may recall from the REST APIs chapter, RESTful APIs map the HTTP verbs GET , POST , PUT , and DELETE to retrieve, create, modify, and delete an object that is being interacted with. In the Portal API, you will be building the POST method for the /cucm/phone/{device_name} portal API route, which will in turn execute a series of CUCM AXL API methods in order to achieve the task of adding the device based on your desired provisioning criteria. This is an example where the logic of the portal API is doing more than just calling an equivalent API on product APIs. This code is orchestrating multiple API calls to achieve a desired outcome of not only adding a phone, but also associating it with a user and setting the primary extension.
The simple business logic is as follows:
- Get CUCM user details and retrieve the user's telephone number and current associated devices list
- Add the phone device to CUCM database
- Update the CUCM user, associating the directory number, newly added phone device and assign the user's primary extension
With the help of the CUCM SOAP API Python class myAXL you will utilize the following thick AXL methods:
and relay a final response if all AXL API requests are successful.
- In the VS Code tab, using the Explorer function, open up flaskr/api/v1/cucm.py
-
In the
cucm_phone_api()
class,
def post(self, device_name):
method, locate the existing
line
raise Exception('Not implemented yet!!')
. Remove it and replace it with the following highlighted lines.
This is a large block of code, so let's try to step through a few of the lines of code above to understand what is happening. You should first of all understand that this code is being executed any time the portal API receives a POST request to the /phone/<string:device_name> endpoint. The first line you added populates a variable cucm_add_phone_query_parsed_args with the parameters that were passed to your code via the front-end API. The Flask-RESTPlus extension looks at the rules that are defined in the parsers.py file we mentioned earlier and validates that the parameters are present and of the correct type. The second highlighted line of code (line 17) shows the call to the get_user function. This is the function call that issues an AXL request to UCM and retrieves the user data. The next few lines are just parsing through the data that was returned to extract the phone number and associated devices.
Next, you see a dictionary (set of key-value pairs) is created with all the information needed to describe a new phone to add. While this looks like a lot of data, it just represents the required parameters for the phone we are trying to add. There are actually many other optional parameters you can pass that are documented in the AXL API documentation.
After this, you see a call to the add_phone function on line 57 which issues the AXL API call to add the phone. Finally, the last highlighted line shows the AXL API call to update_user which performs the task of updating the list of associated devices for the user.
- Save this file by going to Application Menu → File → Save or by simply Pressing Ctrl+S
Step 3 - Update Phone
Next let's work on updating an existing phone's configuration in the CUCM database via the portal API. You will build upon the cucm_phone_api() class where you have added the GET (retrieve) and POST (create) methods earlier. Now you will add the PUT method that will modify a given phone device name.
The simple business logic is as follows:
- Update the phone device configuration given API request arguments
- Apply the phone configuration and let it pick up the changes
With the help of the CUCM SOAP API Python class myAXL you will utilize the following thick AXL methods:
and relay a final response if all AXL API requests are successful.
- In the VS Code tab, using the Explorer function, open up flaskr/api/v1/cucm.py
-
In the
cucm_phone_api()
class,
def put(self, device_name):
method, locate the existing
line
raise Exception('Not implemented yet!!')
remove it and replace it with the following highlighted lines.
You can see that this code is fairly straightforward. There is a variable created called phone_update_data that contains the data to be updated. In the name of simplicity, the update method you are creating here only allows you to update the calling search space and description of the device. This data is passed to the update_phone method which invokes the AXL API to update the phone. After updating the phone, the apply_phone method is called which tells CUCM to tell the phone to pick up the updated configuration.
- Save this file by going to application menu → File → save or by simply pressing Ctrl+S
Step 4 - Delete Phone
The final phone operation you will implent allows you to delete an existing phone device from the CUCM database via the Portal API. You will add the DELETE method to the cucm_phone_api() class that delete a given phone device based on the name provided.
With the help of the CUCM SOAP API Python class myAXL you will utilize the following thick AXL Method:
and relay a final response if all AXL API requests are successful.
- In the VS Code tab, using the Explorer function, open up flaskr/api/v1/cucm.py
-
In the
cucm_phone_api()
class,
def delete(self, device_name):
method, locate the existing
line
raise Exception('Not implemented yet!!')
remove it and replace it with the following highlighted lines.
You can see that deleting an existing phone is easy. The one line you have added invokes the AXL API call to delete the phone, given the name of the device provided.
- Save this file by going to Application Menu → File → Save or by simply Pressing Ctrl+S
Step 5 - Get User
Next up let's work on retrieving an existing CUCM end user configuration detail from the CUCM database.
With the help of the CUCM SOAP API Python class myAXL you will utilize the following Thick AXL Method:
and relay a final response if all AXL API requests are successful.
- In the VS Code tab, using the Explorer function, open up flaskr/api/v1/cucm.py
-
In the
cucm_user_api()
class,
def get(self, userid):
method, locate the existing
line
raise Exception('Not implemented yet!!')
remove it and replace it with the following highlighted lines.
- Save this file by going to Application Menu → File → Save or by simply Pressing Ctrl+S
Step 6 - Verification
You have added a lot of new capabilities to the Provisioning Portal's APIs. Now it is time to make sure it all works as expected, again utilizing the Portal's RESTPlus/Swagger UI page.
- In VS Code, make sure flaskr/api/v1/cucm.py file is saved
-
Restart the Flask app by clicking the green restart button from the controller:
which you should always see along the top of the window, when Flask is running.
Or, if Flask is not started at all, click the Debug button on the left side
followed by
the green start/play button next to
Start LTRCOL-2574 Portal
- If the Terminal window at bottom right shows: * Running on http://10.0.122.40.40:5000/ (Press CTRL+C to quit) , then the Flask app is running.
- Access the RESTPlus/Swagger UI page at http://dev1.pod22.col.lab:5000/api/v1/
- Expand the cucm section.
-
Perform the following individual checks:
-
Get a Phone Device Configuration Details from CUCM
- Click the GET /cucm/phone/{device_name} operation.
- On the right, click Try it out .
- For the device_name Parameter, enter CSFPOD22UCMUSER
- In the expanded section, click Execute .
-
Scroll down and examine the server response. You should note a server response code of
200
and a response body with the details of the Phone Device Configuration.
Here is a sample response body. The output shown here has been significantly truncated for brevity.
On your system you wil see a lot more data returned.
    {
        "message": "Phone Data Retrieved Successfully",
        "phone_data": {
            "AllowPresentationSharingUsingBfcp": null,
            "aarNeighborhoodName": {
            "_value_1": null,
            "uuid": null
            },
            "activationIDStatus": null,
            ...
            "automatedAlternateRoutingCssName": {
            "_value_1": null,
            "uuid": null
            },
            ...
            "description": "Cisco Live LTRCOL-2574 - pod22ucmuser",
            ...
            "name": "CSFPOD22UCMUSER",
            ...
        }
    }
-
Add a Phone Device to CUCM
- Click the POST /cucm/phone/{device_name} operation.
- On the right, click Try it out .
- For the description Parameter, enter Cisco Live LTRCOL-2574 - pod22UCMUSER Cisco Webex Desk Pro
- For the phonetype Parameter, enter Cisco Webex Desk Pro
- For the ownerUserName Parameter, enter pod22ucmuser
- For the calleridname Parameter, enter Pod22 UCM User
- For the device_name Parameter, enter SEP00A0C914C829
- In the expanded section, click Execute .
-
Scroll down and examine the server response. You should note a server response code of
200
and a response body with the uuids of the newly added phone and the associated
user you just updated.
Here is a sample response body:
    {
        "message": "Phone Added Successfully",
        "phone_uuid": "{34103D82-4947-7DB7-E2BC-CB2043EEEF74}",
        "success": true,
        "user_uuid": "{9E35D561-735E-2357-C4EE-18BBBDA8CB5B}"
    }
-
Update a Phone Device Configuration on CUCM
- Click the PUT /cucm/phone/{device_name} operation.
- On the right, click Try it out .
- For the callingSearchSpaceName Parameter, enter Unrestricted_CSS
- For the device_name Parameter, enter SEP00A0C914C829
- In the expanded section, click Execute .
-
Scroll down and examine the server response. You should note a server response code of
200
and a response body with the uuid phone device you just updated.
Here is a sample response body:
    {
        "message": "Phone Configuration Updated & Applied Successfully",
        "success": true,
        "uuid": "{34103D82-4947-7DB7-E2BC-CB2043EEEF74}"
    }
-
Delete a Phone Device from CUCM
- Click the DELETE /cucm/phone/{device_name} operation.
- On the right, click Try it out .
- For the device_name Parameter, enter SEP00A0C914C829
- In the expanded section, click Execute .
-
Scroll down and examine the server response. You should note a server response code of
200
and a response body with the uuid of the phone you have just deleted.
Here is a sample response body:
    {
        "message": "Phone Successfully Deleted",
        "success": true,
        "uuid": "{34103D82-4947-7DB7-E2BC-CB2043EEEF74}"
    }
-
Delete another Phone Device from CUCM (
CSFPOD22UCMUSER
)
- Click the DELETE /cucm/phone/{device_name} operation.
- On the right, click Try it out .
- For the device_name Parameter, enter CSFPOD22UCMUSER
- In the expanded section, click Execute .
-
Scroll Down and Examine the Server response. You should note a Server response code of
200
and a response body with the uuid of the phone you have just deleted.
Here is a sample response body:
    {
        "message": "Phone Successfully Deleted",
        "success": true,
        "uuid": "{34103D82-4947-7DB7-R2D2-WOK043EFFF77}"
    }
-
Get an EndUser Configuration from CUCM
- Click the GET /cucm/user/{userid} operation.
- On the right, click Try it out .
- For the userid Parameter, enter pod22ucmuser
- In the expanded section, click Execute .
-
Scroll Down and Examine the Server response. You should note a Server response code of
200
.
Here is a sample response body:
    {
        "message": "User Data Retrieved Successfully",
        "success": true,
        "user_data": {
            "associatedCapfProfiles": null,
            "associatedDevices": null,
            "associatedGroups": {
            "userGroup": [
                {
                "name": "Standard CTI Enabled",
                "userRoles": {
                    "userRole": [
                    "Standard CTI Enabled"
                    ]
                }
                },
                {
                "name": "Standard CCM End Users",
                "userRoles": {
                    "userRole": [
                    "Standard CCM End Users",
                    "Standard CCMUSER Administration"
                    ]
                }
                }
            ]
            }
            ...
            "userid": "pod22ucmuser",
            ...
        }
    }
-
Get a Phone Device Configuration Details from CUCM
Congratulations! You have added some core CUCM provisioning capabilities to the Portal APIs that allows you to manage phone devices. Let's add some CUCM Serviceability capabilities to the Portal APIs that can help you monitor CUCM.
In this section, you will implement the following CUCM Serviceability XML API tasks in your Provisioning Portal API:
- Search for devices in the Real-Time Information Database
- Get CUCM services status information
- Get performance monitoring counters from CUCM
- Verification
Step 1 - Device Search
Earlier you used Python to retrieve information from the Serviceability XML API. You will now incorporate similar functionality into the portal to retrieve the phone device registration details from your CUCM Real-Time Information Database. You will achieve this by leveraging the global CUCM SOAP API Python class mySXMLRisPort70Service that you instantiated earlier.
With the help of your CUCM SOAP API Python class mySXMLRisPort70Service you will send a selectCMDevice RisPort70 API request and relay the response if successful.
- In your VS Code tab, using the Explorer function, open up flaskr/api/v1/cucm.py
-
In the
cucm_device_search_api()
class,
def get(self):
method, locate the existing
line
raise Exception('Not implemented yet!!')
remove it and replace it with the following highlighted lines.
The first part of this code is just parsing through the input parameters and then creating the data structure that is required for the selectCMDevice API call. Once the data is in the right format, the ris_query method is called. This API call queries CUCM for the real-time information of the devices that match the search criteria and returns a dictionary with the results. The data is extracted from the result and returned as part of the apiresult .
- Save this file by going to Application Menu → File → Save or by simply Pressing Ctrl+S
Step 2 - CUCM Services Status
Next let's work on the code to get CUCM Services Status using the Portal API. You will achieve this by leveraging the global CUCM SOAP API Python class mySXMLControlCenterServicesService that you instantiated earlier.
With the help of your CUCM SOAP API Python class mySXMLControlCenterServicesService you will send a soapGetServiceStatus Control Center Services API request and relay the response if successful.
- In your VS Code tab, using the Explorer function, open up flaskr/api/v1/cucm.py
-
In the
cucm_service_api()
class,
def get(self):
method, locate the existing
line
raise Exception('Not implemented yet!!')
remove it and replace it with the following highlighted lines.
Like the previous example, this code is just parsing through the input parameters and then creating the data structure that is required for the soapGetServiceStatus API call. Once the data is in the right format, the ccs_get_service_status method is called. This API call queries CUCM for the status of the services that match the search criteria and returns a dictionary with the results. The data is extracted from the result and returned as part of the apiresult .
- Save this file by going to Application Menu → File → Save or by simply Pressing Ctrl+S
Step 3 - CUCM Performance Monitoring Counters
Next you will implement the ability to retrieve CUCM performance counters in the Portal API. You will achieve this by leveraging the global CUCM SOAP API Python class mySXMLControlCenterServicesService that you instantiated earlier.
This Portal API will execute the following logic:
-
If the perfmon_counters parameter is supplied, then do the following:
- Open a performance monitoring session
- Add the PerfMon counters that you would like to poll to the monitoring session
- Collect PerfMon session data to retrieve the counter values
- If any of the PerfMon counter names include a "%" or "Percentage", pause for 5 seconds and collect PerfMon session data again in order to get accurate sampling.
- Close the Performance Monitoring Session
- If perfmon_class parameter is supplied, collect the entire class of counters via the perfmonCollectCounterData API method
With the help of the CUCM SOAP API Python class mySXMLPerfMonService and the input parameters supplied you will execute the following CUCM PerfMon API methods in order to efficiently retrieve the performance monitoring counters' values.
- perfmonCollectCounterData
- perfmonOpenSession
- perfmonAddCounter
- perfmonCollectSessionData
- perfmonCloseSession
and relay a final response if all PerfMon API requests are successful.
- In your VS Code tab, using the Explorer function, open up flaskr/api/v1/cucm.py
-
In the
cucm_perfmon_api()
class,
def post(self):
method, locate the existing
line
raise Exception('Not implemented yet!!')
remove it and replace it with the following highlighted lines.
Again, this is quite a bit of code but it is just parsing through the input parameters and depending on what is passed, it will construct the list of performance counters in the format that is required for the perfmonAddCounter API call. The counters are then passed to the perfmon_collect_session_data method which queries CUCM for the performance counter values and returns a dictionary with the results. According to the documentation, some counters do not return a result on the first query and require some time for the data to be populated. As a result, if the counter name includes a "%" or "Percentage", the code will pause for 5 seconds and collect the data again. The data is extracted from the result and returned as part of the apiresult after closing the session.
If you were writing an application that needed to poll these counters on a regular basis, you would not close the session after each query. Instead, you would open the session once and then add the counters and collect the data as needed. You would only close the session when you were done polling the counters.
- Save this file by going to Application Menu → File → Save or by simply Pressing Ctrl+S
Step 4 - Verification
You have added even more capabilities to your Provisioning Portal's APIs, now it is time to make sure it all works as expected, again utilizing your Portal's RESTPlus/Swagger UI page.
- In VS Code, make sure flaskr/api/v1/cucm.py file is saved
-
Restart your Flask app by clicking the green restart button from the controller:
which you should always see along the top of the window, when Flask is running.
Or, if Flask is not started at all, click the Debug button on the left side
followed by
the green start/play button next to
Start LTRCOL-2574 Portal
- If the Terminal window at bottom right shows: * Running on http://10.0.122.40.40:5000/ (Press CTRL+C to quit) , then your Flask app is running.
- Access the RESTPlus/Swagger UI page at http://dev1.pod22.col.lab:5000/api/v1/
- Expand the cucm section.
-
Perform the following individual checks:
-
Search for Devices in the Real-Time Information Database
- Click the GET /cucm/device_search operation.
- On the right, click Try it out .
- For the SearchItems Parameter, enter CSFPOD22UCMUSER
- In the expanded section, click Execute .
-
Scroll down and examine the server response. You should note a server response code of
200
and a response body with the details of the Phone Device Configuration.
Here is a sample response body:
    {
        "TotalDevicesFound": 1,
        "message": "Device Search Results Retrieved Successfully",
        "ris_search_result": {
            "SelectCmDeviceResult": {
            "CmNodes": {
                "item": [
                {
                    "CmDevices": {
                    "item": [
                        {
                        "ActiveLoadID": "Webex_for_Windows-45.5.0.32411",
                        ...
                        "Description": "Cisco Live LTRCOL-2574 - pod22ucmuser",
                        "DeviceClass": "Phone",
                        "DirNumber": "\+19197220001-UnRegistered",
                        "DownloadFailureReason": null,
                        "DownloadServer": null,
                        "DownloadStatus": "Unknown",
                        ...
                        "Httpd": "No",
                        "IPAddress": {
                            "item": [
                            {
                                "Attribute": "Unknown",
                                "IP": "10.0.122.45",
                                "IPAddrType": "ipv4"
                            }
                            ]
                        },
                        "InactiveLoadID": "Webex_for_Windows-45.5.0.32411",
                        "IsCtiControllable": true,
                        "LinesStatus": {
                            "item": [
                            {
                                "DirectoryNumber": "\+19197220001",
                                "Status": "UnRegistered"
                            }
                            ]
                        },
                        "LoginUserId": "pod22ucmuser",
                        "Model": 503,
                        "Name": "CSFPOD22UCMUSER",
                        "NumOfLines": 1,
                        "PerfMonObject": 2,
                        "Product": 390,
                        "Protocol": "SIP",
                        "RegistrationAttempts": 0,
                        "Status": "UnRegistered",
                        "StatusReason": 0,
                        "TimeStamp": 1654799252
                        }
                    ]
                    },
                    "Name": "cucm1a.pod22.col.lab",
                    "NoChange": false,
                    "ReturnCode": "Ok"
                }
                ]
            },
            "TotalDevicesFound": 1
            },
            "StateInfo": ""
        },
        "success": true
    }
If you recall, you deleted this CSF device in the last section, so you might be wondering why you are still getting a result back from this API call. The Real-time Information System (RIS) database is an in-memory store and does not pay attention to what is in the CUCM database. RIS will maintain information about unregistered devices for a period of time, even if the device has been deleted from the database. The in-memory store cleanup is controlled via CUCM RIS Data Collector Service Parameter named RIS Unused Cisco CallManager Device Store Period which defaults to 3 days and could be as high as 30 days.
-
Get CUCM Services Status Information
- Click the GET /cucm/service operation.
- On the right, click Try it out .
- For the Services Parameter, enter Cisco CallManager, Cisco Tftp
- In the expanded section, click Execute .
-
Scroll down and examine the server response. You should note a server response code of
200
and a response body with the service status of the CallManager and TFTP services.
Here is a sample response body:
    {
        "message": "Service(s) Status Info Retrieved Successfully",
        "service_info": {
            "ReasonCode": -1,
            "ReasonString": null,
            "ReturnCode": {
            "_value_1": "0"
            },
            "ServiceInfoList": {
            "item": [
                {
                "ReasonCode": -1,
                "ReasonCodeString": " ",
                "ServiceName": "Cisco CallManager",
                "ServiceStatus": "Started",
                "StartTime": "Wed Feb  5 09:15:51 2025",
                "UpTime": 1108052
                },
                {
                "ReasonCode": -1,
                "ReasonCodeString": " ",
                "ServiceName": "Cisco Tftp",
                "ServiceStatus": "Started",
                "StartTime": "Wed Feb  5 09:16:51 2025",
                "UpTime": 1108044
                }
            ]
            }
        },
        "success": true
    }
-
Get Performance Monitoring Counters from CUCM
- Click the POST /cucm/perfmon operation.
- On the right, click Try it out .
- For the payload Parameter, enter the following payload.
- In the expanded section, click Execute .
-
Scroll down and examine the server response. You should note a server response code of
200
and a response body with performance counter data.
Here is a sample response body:
    {
        "message": "PerfMon Data Retrieved Successfully",
        "perfmon_class_result": [
            {
            "CStatus": 1,
            "Name": {
                "_value_1": "\\\\cucm1a.pod22.col.lab\\System\\Allocated FDs"
            },
            "Value": 7712
            },
            {
            "CStatus": 1,
            "Name": {
                "_value_1": "\\\\cucm1a.pod22.col.lab\\System\\Being Used FDs"
            },
            "Value": 7712
            },
            {
            "CStatus": 1,
            "Name": {
                "_value_1": "\\\\cucm1a.pod22.col.lab\\System\\Freed FDs"
            },
            "Value": 0
            },
            {
            "CStatus": 1,
            "Name": {
                "_value_1": "\\\\cucm1a.pod22.col.lab\\System\\IOAwait"
            },
            "Value": 0
            },
            {
            "CStatus": 1,
            "Name": {
                "_value_1": "\\\\cucm1a.pod22.col.lab\\System\\IOCpuUtil"
            },
            "Value": 0
            },
            {
            "CStatus": 1,
            "Name": {
                "_value_1": "\\\\cucm1a.pod22.col.lab\\System\\IOKBytesReadPerSecond"
            },
            "Value": 0
            },
            {
            "CStatus": 1,
            "Name": {
                "_value_1": "\\\\cucm1a.pod22.col.lab\\System\\IOKBytesWrittenPerSecond"
            },
            "Value": 229
            },
            {
            "CStatus": 1,
            "Name": {
                "_value_1": "\\\\cucm1a.pod22.col.lab\\System\\IOPerSecond"
            },
            "Value": 24
            },
            {
            "CStatus": 1,
            "Name": {
                "_value_1": "\\\\cucm1a.pod22.col.lab\\System\\IOReadReqMergedPerSecond"
            },
            "Value": 0
            },
            {
            "CStatus": 1,
            "Name": {
                "_value_1": "\\\\cucm1a.pod22.col.lab\\System\\IOReadReqPerSecond"
            },
            "Value": 0
            },
            {
            "CStatus": 1,
            "Name": {
                "_value_1": "\\\\cucm1a.pod22.col.lab\\System\\IOReqQueueSizeAvg"
            },
            "Value": 0
            },
            {
            "CStatus": 1,
            "Name": {
                "_value_1": "\\\\cucm1a.pod22.col.lab\\System\\IOSectorsReadPerSecond"
            },
            "Value": 0
            },
            {
            "CStatus": 1,
            "Name": {
                "_value_1": "\\\\cucm1a.pod22.col.lab\\System\\IOSectorsReqSizeAvg"
            },
            "Value": 18
            },
            {
            "CStatus": 1,
            "Name": {
                "_value_1": "\\\\cucm1a.pod22.col.lab\\System\\IOSectorsWrittenPerSecond"
            },
            "Value": 458
            },
            {
            "CStatus": 1,
            "Name": {
                "_value_1": "\\\\cucm1a.pod22.col.lab\\System\\IOServiceTime"
            },
            "Value": 0
            },
            {
            "CStatus": 1,
            "Name": {
                "_value_1": "\\\\cucm1a.pod22.col.lab\\System\\IOWriteReqMergedPerSecond"
            },
            "Value": 8
            },
            {
            "CStatus": 1,
            "Name": {
                "_value_1": "\\\\cucm1a.pod22.col.lab\\System\\IOWriteReqPerSecond"
            },
            "Value": 24
            },
            {
            "CStatus": 1,
            "Name": {
                "_value_1": "\\\\cucm1a.pod22.col.lab\\System\\Max FDs"
            },
            "Value": 582286
            },
            {
            "CStatus": 1,
            "Name": {
                "_value_1": "\\\\cucm1a.pod22.col.lab\\System\\Total CPU Time"
            },
            "Value": 109266374
            },
            {
            "CStatus": 1,
            "Name": {
                "_value_1": "\\\\cucm1a.pod22.col.lab\\System\\Total Processes"
            },
            "Value": 207
            },
            {
            "CStatus": 1,
            "Name": {
                "_value_1": "\\\\cucm1a.pod22.col.lab\\System\\Total Threads"
            },
            "Value": 1138
            }
        ],
        "perfmon_counters_result": [
            {
            "CStatus": 0,
            "Name": {
                "_value_1": "\\\\cucm1a.pod22.col.lab\\Cisco CallManager\\RegisteredOtherStationDevices"
            },
            "Value": 2
            },
            {
            "CStatus": 0,
            "Name": {
                "_value_1": "\\\\cucm1a.pod22.col.lab\\Cisco Tomcat Connector(http-bio-8443)\\ThreadsBusy"
            },
            "Value": 1
            }
        ],
        "success": true
    }
Notice that the query included the System class and two counters. The response includes the values of the all the counters in the System class and the two counters that were queried.
-
Search for Devices in the Real-Time Information Database
You have now added some core CUCM monitoring capabilities to your Portal APIs that allows you to keep an eye on the health and operational state of your CUCM servers. Let's add some core REST API capabilities to your Portal which will help you with Webex APIs.
The next few sections will take you through the steps implement a variety of capabilities allowing your portal to interact with Webex APIs. To achieve these goals, you will start with the following steps:
- Add your Service App Client ID, Secret, and Refresh Token to the Environment.
- Look up the user by email, get their user object ID and, with that, look up the user's details, including all Webex Calling information.
- Retrieve all licenses, then find the object ID of a Webex Calling and On-prem UCM licenses.
- Webex Calling users must be associated with a Location, so the object ID of a desired location must be retrieved.
- Update the user, modifying the licenses and updating their location.
Step 1 - Add your Service App Client ID, Secret, and Refresh Token to the Environment
In the example you completed earlier, you obtained an access token using a Service App client ID , client secret , and refresh token . This enabled administrative access to Webex. In this section, you will use the information you obtained previously to enable your Portal to perform administrative tasks in Webex as well.
-
Access your VS Code instance:
https://dev1.pod22.col.lab:8443
and from
the
Explorer
open BOTH of the following files:
- examples\service_app.py ; and
- .env
-
In
examples\service_app.py
, find and copy the values of the Service App variables and
copy them to the corresponding variables in the
.env
file:
Source Variable ( examples\service_app.py ) Destination Setting ( .env ) client_id=' Ca083181a235caf__Your_Client_ID__caff336f93cd1ded ' SERVICE_APP_CLIENT_ID=' ___PASTE_SERVICE_APP_CLIENT_ID___ ' client_secret=' 083181aCa083181a__Your_Client_Secret__1a23181a2ca ' SERVICE_APP_CLIENT_SECRET=' ___PASTE_SERVICE_APP_CLIENT_SECRET___ ' refresh_token=' Q4ZG1NmIa__Your_Refresh_Token__-733-48f-86f-be4d ' SERVICE_APP_REFRESH_TOKEN=' ___PASTE_SERVICE_APP_REFRESH_TOKEN___ ' - Save the .env file
Step 2 - Look up Person Details
Now you can start using the wxc_sdk in your project.
- In your VS Code tab, open up flaskr/api/v1/wbxc.py using the Explorer .
-
In the earlier examples, you ran the
service_app.py
script to create an access token,
which you then manually pasted into the
wxc_enable_user.py
file.
The access token was then used to instantiate a wxc_sdk instance to be able to access the Webex APIs.
To handle this automatically, we have created a class:In this code, self.get_tokens() will either read a set of access/refresh tokens from a file, or use the environment variables you set above. If an access token is about to expire or isn't found to begin with, then the refresh token will be used to create a new access token, as you did in the example. The access token is then used to create an instance of the API. By placing this token refresh capability in this class, each time a new instance of this ServiceApp class is instantiated, the token may be refreshed, if needed, as long as the refresh token has not expired.
To create an instance of the ServiceApp class, you just need this single line of code:
In previous examples, you had created a variable named api which contained an instance of the WebexSimpleApi class and used it to perform API calls like this:
You will be using the sa instance of the ServiceApp class to perform the same API calls. The ServiceApp() class calls the WebexSimpleApi class for you but before doing so, it will check if the access token is still valid and refresh it if needed. You can perform the same people list call like this:
If you would like to explore in more detail how the ServiceApp() class works, you can look at the code in the flaskr/api/v1/service_app/__init__.py file.
Now you are ready to add to the portal code. Remove the pass from the section in get_person_det and replace with the following:
The get_person_det() function takes an email address as an argument and returns the detailed user information for a user with that email address. This code is very similar to what you did in the previous examples. It creates a new instance of the ServiceApp class, then uses it to look up a user using the people.list() API and then retrieves the detailed user information using the people.details() API.
-
The wbxc.py file already contains a class named
wbxc_user_api
that will be called when the
/wbxc/user/<userid>
API is called on your Portal API. Extend it to
report success or failure based on the
get_person_det()
results. Any
RestError
exceptions that may be generated by the wxc_sdk are already handled.
Now if your Portal API receives a request on the /user/<userid> endpoint, it will look up that user in Webex and return the result as JSON. If the user is not found, it will return an error message.
Step 3 - Enabling a User for Webex Calling
-
This section will add the code to enable a user for Webex Calling.
Find the
class wbxc_user_enable_api()
section in the
flaskr/api/v1/wbxc.py
file. You
will be updating the
put
method.
The put accespt a single argument, the userid which is the user's email address. The first step to enabling a user for Webex Calling is to get the detailed user information by calling get_person_det() method that you just implemented, then look up the Webex Calling Professional and On-Prem UCM licenses. Since this is also a common task, a get_lic_by_name() function was created to look up the respective license in the same way you did in the earlier example sections. Next, query the Location to which this user and number will be assigned. Following this, look up the user's phone number, which should already be pre-populated based on what was synchronized to the account from the Active Directory via the Directory Connector. If no number is found for the user, return an error. This is an area that could require a lot of custom enhancements. For example, you could use APIs to look for available numbers in the location and assign the next available number to the user.
Add the following to your code:
-
Check to see if the user is already enabled for Webex Calling and if they are not, prepare the user
by adding the Webex Calling Professional license and removing the On-prem UCM license, then set
the location and update the person.
Add the following to your code and then examine it. The comments in the code explain what each step does.
- Save this file
- In VS Code, start (or restart) your Flask app by clicking Debug > Start Debugging (or Restart Debugging , if already started).
The put method in the wbxc_user_disable_api class has already beeen implemented for you. This function is used to disable Webex Calling and just does the opposite of the steps you just perfromed. The function looks up the user details and the license, exactly as before, then removes the Webex Calling License and adds the Unified Communication Manager (UCM) license. The only other difference is that since removing the Webex Calling license also removes the phone number, you can simply save that data before updating the user's license and then running another update to the user afterwards to re-apply the phone number. You can look at the code in the wbxc_user_disable_api medthod if you want to see the exact code that does this.
Step 4 - Try it out
First test retrieving a user.
- Point your browser to the Portal API page - http://dev1.pod22.col.lab:5000/api/v1/
- Expand wbxc
- Click the GET request with the URI " /wbxc/user/{userid} Retrieve a user in WbxC by user id"
- Click Try it out at the right
- In the userid field, enter the userid pod22wbxuser
- Click Execute
-
You should see a
200
response code and a successful message, with the entire user
object being printed out in the Response body.

In a previous section of this lab, you enabled Webex Calling features for the user pod22wbxuser . To test the code you just implemented, you will first disable Webex Calling for this user, then re-enable it.
- While still in the wbxc section of your Portal API page , click the PUT request with the URI " /wbxc/user/disable/{userid} " and description "Disable a Webex Calling Person by user ID."
- Click Try it out at the right
- In the userid field, enter the userid pod22wbxuser
- Click Execute
- You should see a 200 response code and a successful message, with a message indicating Successfully disabled Webex Calling for user pod22wbxuser .
- The Webex app should be already running on your PC. Within a few seconds of disabling Webex Calling, you should see the bottom left corner of the Webex App show an error indicating "Phone services are disconnected".
Now go through the steps to re-enable Webex Calling on the phone using the API you created.
- Point your browser to the Portal API page - http://dev1.pod22.col.lab:5000/api/v1/
- Expand wbxc
- Remain in the wbxc section of your Portal API page and find the PUT request with the URI " /wbxc/user/enable/{userid} " and description "Enable a Person for Webex Calling by user ID".
- Click Try it out at the right
- Make sure the location field is set to your Pod number.
- In the userid field, enter the userid pod22wbxuser
- Click Execute
-
You should see a
200
response code and a successful message, with the entire user
object being printed out in the Response body.
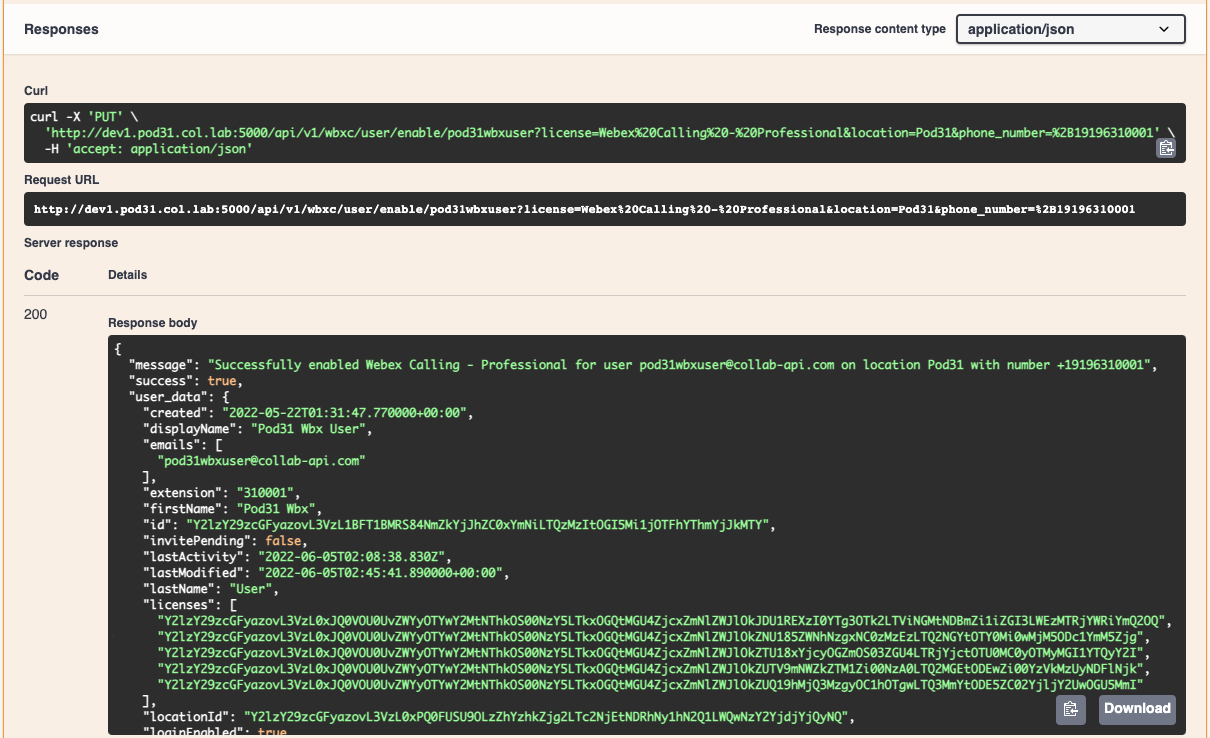
- To get phone services back up and running quickly after re-enabling Webex calling, sign out of your Webex App, then sign in again with pod22wbxuser@collab-api.com and password: C1sco.123 . You must sign out and sign back in for the call to work.
-
Once signed in, you should see the
Call Settings
in the bottom left corner. There should be no
"Phone services are disconnected" or similar errors.
-
In the Webex app, click the
PU
icon at top left. Click
Settings
,
then click
Phone Service
. Make sure it shows
Webex Calling
and
connected
.
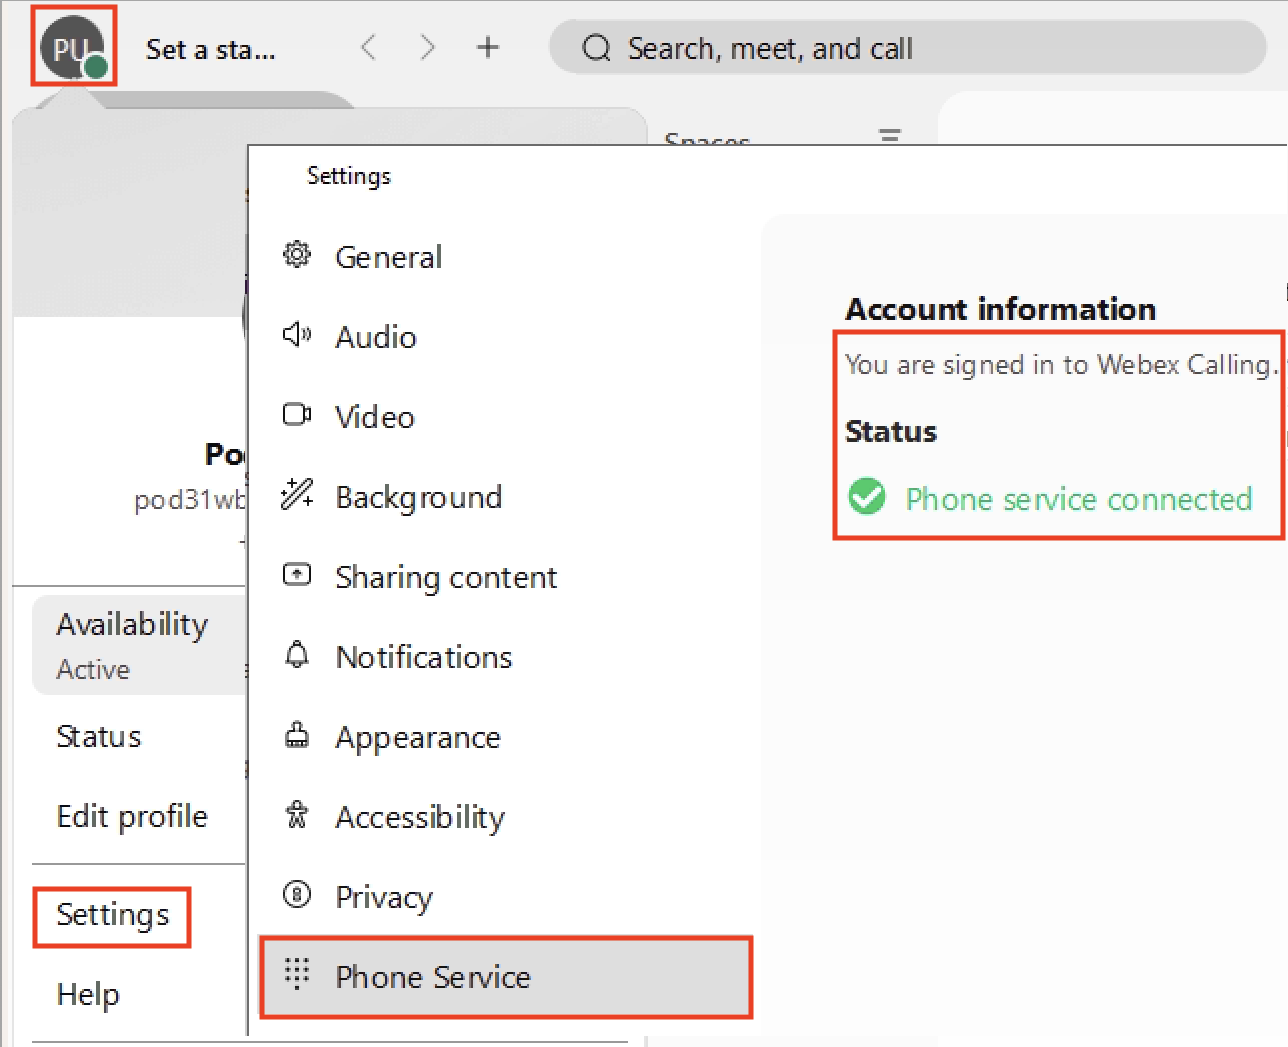
- Click the following to place a call: +19197221111 . This calls another UCM-registered phone via a CUBE Local Gateway between Cisco Webex and your pod's Unified CM.
Webex Calling has a vast amount of configuration exposed via the API. From placing calls to configuring call handling, many things can be automated and simplified depending on your requirements. In the next section, you will take a look at using a Bot to send notifications as well as receive commands that can execute some of the same APIs that you have already implemented.
In this section, you will look at add some basic messaging functionality in the portal using the Bot you created earlier.
Step 1 - Add the Bot access token to the Project
With the SDK software already installed, implement a send_message() function using the following steps:
- First, you need to add your Bot's access token to the Portal code. As with other settings, you will store this in the .env file and the code will read the values from the environment variables that are set based on the contents of the file. In the VS Code tab, open up the .env file.
-
In the file, you will see where the
WBX_BOT_ACCESS_TOKEN
variable is assigned. The value needs to be
set to
your Bot's access token
which should be able to find in the
wbx_bot_access_token
variable in the
examples/wbx_messages.py
file
you completed earlier in this lab.
- Save this file
Step 2 - Add Message send capability
- In VS Code, open up flaskr/api/v1/wbxt.py
-
Now that the access token variable is set, you can initialize the
WebexSimpleApi
object that instantiates the
wxc_sdk
. The code issues a call to the
Get My Own Details
API and stores the result in the
bot
variable. The application needs this information to determine
if a message originated from the Bot itself later in the code.
Add the following to your code: -
In this API, the
room_name
and
text
(the message to be sent)
will be populated via the
args
variable in the request. All you have to do is:
- Get a list of rooms
- Search the results for the room name
- Send a message to that room
This is the same as the earlier example, with the exception that you will search through all Rooms to find one with a particular Room title, and some basic error and exception handling.
- Save this file
- In VS Code, start (or restart) your Flask app by clicking Debug > Start Debugging (or Restart Debugging , if already started).
Step 3 - Send a Message on Behalf of Bot
Now you can move on to attempting to send a message using the Bot via the send_message API you just implemented.
- Make sure you are logged in to Webex. If need be, sign in with email address: pod22wbxuser@collab-api.com and password: C1sco.123
- Access the RESTPlus/Swagger UI page at http://dev1.pod22.col.lab:5000/api/v1/
- Expand the wbxt section.
- Click the POST /wbxt/send_message method.
- Click Try it out .
-
For the
room_name
enter:
LTRCOL-2574 Space
- In the text section, enter Test Message .
- In the expanded section, click Execute .
- Examine the response populated below. You should note a Server response code of 200 and a response body.
- Verify the message was received in the Webex App in the space named "LTRCOL-2574 Space".
Now that you can send messages from the portal via the Bot, you can focus on receiving messages via webhooks. In this chapter you will:
- Remove and Add Webhooks
- Handle incoming Webhook messages
- Configure a message response
- Send an Adaptive Card
- Configure Adaptive Card Response Actions
This is an area that was not covered in previous examples, because the tasks require a web server, such as the Flask instance you are working on, to receive HTTPS POST messages from Webex. You experimented with a bot that echoed back the webhook messages to get a feel for how they work, but now you will enable your own bot to receive and process webhook notifications from Webex.
Step 1 - Remove and Add Webhooks
The earlier webhook section involved sending requests to create two webhooks, one for messages , one for attachmentActions event types with an HTTP callback destination. Those webhooks will remain active until they are removed or they encounter enough errors to where Webex marks them disabled (for example, after 100 failed attempts in a 5-minute period).
To make sure that you don't have multiple webhooks registered, a good housekeeping practice is to remove any existing webhook and re-add them each time you start your application that makes use of the webhooks.
- In your VS Code tab, open up flaskr/api/v1/wbxt.py using the Explorer
-
If you completed earlier sections, this file will already have access to the
WBX_BOT_ACCESS_TOKEN
environment variable which will be used for all webhook tasks.
Your first job is to finish out the functions that remove and re-add the webhooks. Starting with the delete_webhooks_by_name() function. The SDK has a WebehookAPI with some methods that mirror the capabilities from the Webex documentation.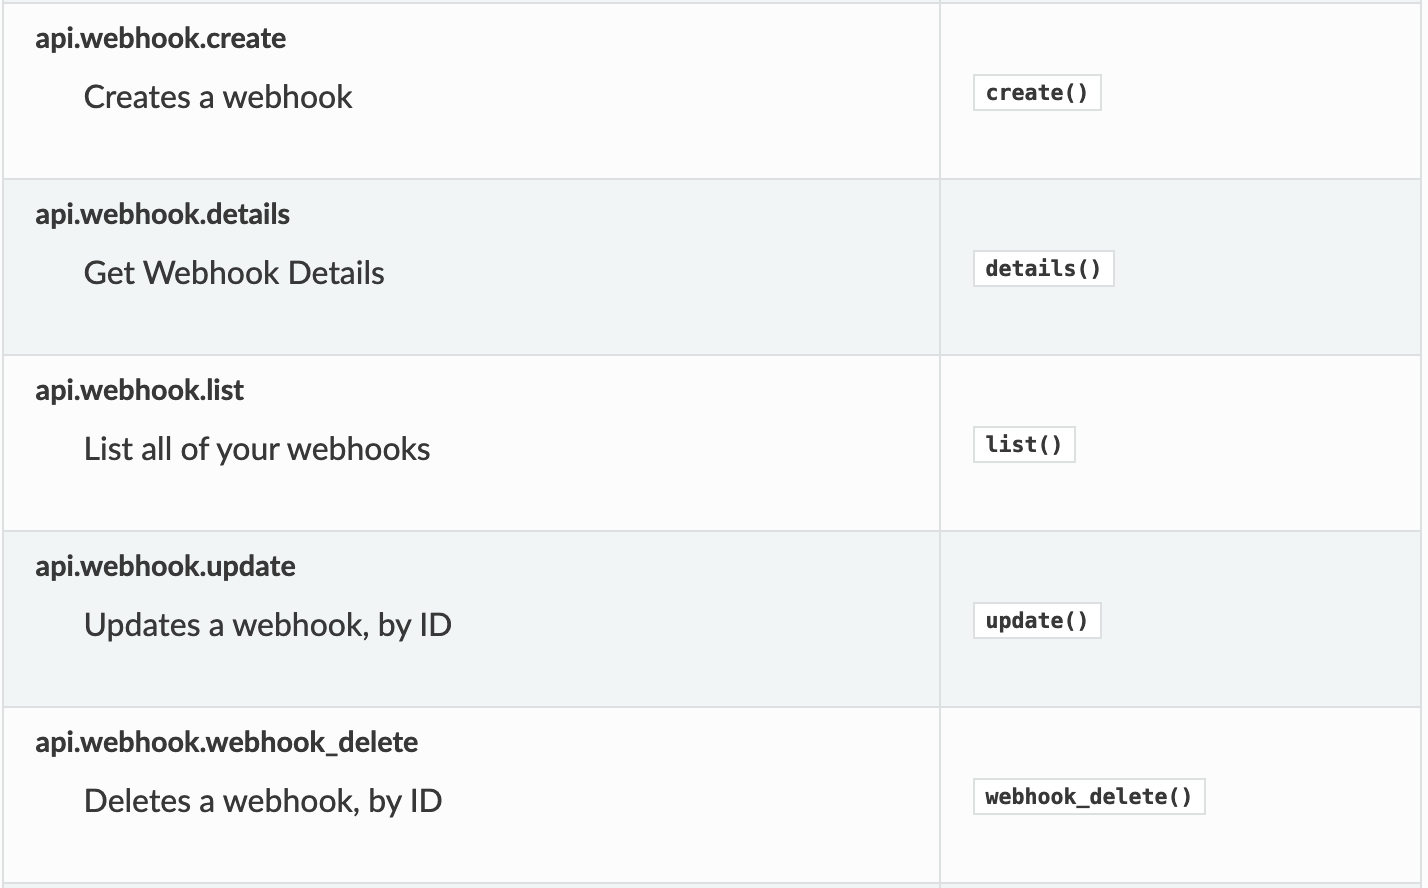
The wbx_bot_api.webhook.list() method is the SDK's version of the Webex List Webhooks API.
As with other list() methods, you can iterate through until you find the "name" that matches the WBX_WEBHOOK_NAME , a constant set to "Cisco Live LTRCOL-2574 Webhook", and then call the wbx_bot_api.webhook.webhook_delete() method supplying the webhook ID of the one you found.
Remove the pass at the beginning of the function and replace it with the code below.
-
Next, create both webhooks (one for
messages
and one for
attachmentActions
). Using the SDK, the
wbx_bot_api.webhook.create()
method is equivalent to the Webex
Create a Webhook
API
that you used previously. The
Create a Webhook
API
WebhookResource
and
WebhookEventType
models used here from the SDK ensure that the data sent is validated and normalized.
Find the create_webhooks() , remove the pass at the beginning of the function and add the following to your file:
-
Now just add code to call the two functions you implemented to delete the webhooks and then recreate them.
This will be called every time your application starts.
Add the following code to your file:
- In VS Code, click Save on the file then start (or restart) your Flask app by clicking Debug > Start Debugging (or Restart Debugging , if already started).
-
You should see messages that the Webhooks are deleted (the ones you created manually) and two new ones created.

Step 2 - Handling incoming webhook messages
You may have noticed that the webhook callback URL is http://collab-api-webhook.ciscolive.com:9022/api/v1/wbxt/events . This callback destination routes from Webex directly to your lab Flask web server. The webhooks will be routed to /events in this flaskr/api/v1/wbxt.py file, where this Namespace is configured.
-
Find the
wbxt_events_api
class under the
@api.route('/events')
line in the file.
The code has a few important steps:
- When Flask handles a request, in this case the POST request, your code has access to an object named request that contains all the data sent by the client. If the data received is in JSON format, it can be accessed using request.json .The request.json data is used to create a WebhookEvent object using its parse_obj method. Basically this is a way to create a Python object from the JSON data using the wxc_sdk. This makes it easier to work with the received data.
- Depending on the resource , you can call the respond_to_message() or respond_to_button_press() method. Otherwise, don't reply with any other data.
NOTE that you will have to scroll towards the end of the file to find the
post()
method of the
wbxt_events_api
class and add the following. After doing this you'll scroll back up to implement a couple more functions in the file.
Step 3 - Configure a message response
You have webhooks configured and a Flask app to receive them. You just need to decide how to handle the message as it arrives.
-
In this section, you can use the information obtained from the webhook event to:
- Determine the Room that originated the event
- The sent Message itself
- This Message , in turn, is used to look up the sender
-
Determine if this is a message that you want to respond to
- Based on who you decide to respond to, create your response message with wbx_bot_api.messages.create() , using the room id.
Scroll up a bit to find the def respond_to_message() function. Remove the pass and replace it with the following. Note that the "self.send_card(room_id=room.id)" line is there already but that function does not do anything yet. - In VS Code, click Save on the file then start (or restart) your Flask app by clicking Debug > Start Debugging (or Restart Debugging , if already started).
- The Webex app should be still running. If not, you can launch it and sign in using email: pod22wbxuser@collab-api.com and password: C1sco.123
- Click to start a conversation with your Pod22 Test Bot (cl2026-lab-pod22-bot@webex.bot)
- Send a message and verify that you receive " Your available options are: " in reply.
Based on the message reponse, you are clearly not done. Next add an adaptive card to the response.
Step 4 - Respond with an Adaptive Card
The intricacies of adaptive card design is definitely beyond the scope of this lab. It is just a JSON-formatted text file used implement a graphical element similar to an HTML web form, including certain graphics, buttons and drop-downs. For this lab a simple adaptive card has been provided in the file: flaskr/api/v1/adaptive_card.json .
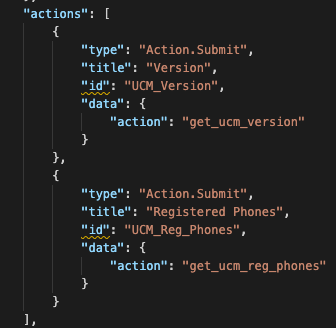
It has a few actions , that will generate data that you can see when when a user clicks a button on the card. If you like, you can copy the contents of that file and paste it in a message to the Webhook Echo Bot (webhook-echo@webex.bot) and see what it looks like. Shortly, your web server will be responding with the same content, so you can see it then.
In your code, you need to do two things: send this adaptive card as part of a message, so the sender can see it; and then handle any submissions. Start by sending the card:
-
The adaptive card file is already loaded for you and stored in the
adaptive_card_content
variable. Expand the
send_card
function to send the adaptive card content as an attachment
to a message. As indicated, the text will only be visible if the client cannot render the card.
Scroll up a bit in the file to find the send_card function. Remove the pass statement and replace it with the following: - Now we have the ability to respond with a card. Save your file in VS Code then start (or restart) your Flask app by clicking Debug > Start Debugging (or Restart Debugging , if already started).
- Click to resume the conversation with your Pod22 Test Bot (cl2026-lab-pod22-bot@webex.bot)
- Send another message and see if you get the adaptive card in the response. Note that it might take a few seconds for the card to render.
Step 5 - Configure Response Actions
So far, you are using the webhook to respond to text-based messages. The reply now also includes an adaptive card. The final step is to respond to submissions by that adaptive card, which triggers a second webhook.
All the work has to be done in the respond_to_button_press() function. Similar to replying to a message, you need to determine the room the message originated from. Instead of a message, an attachment action must be read, which will allow you to read the submitted data as well as determine the sender. You will again only reply to a sender within your own Webex organization.
-
Locate the
respond_to_button_press()
method, where the
room
,
attachement_action
, and
sender
are determined similar to a
the code you just implemented when a message is received instead of the attachment action.
Since this is the same as the previous code, it has already been implemented for you as seen here:
-
You now just need to determine the action to take based on the particular submission.
Let's take the get version request. The attachment action will have an 'action' key that, per the
adaptive card, will have a value of
get_ucm_version
based on that specific
button press. You can then call the API via
cucm_get_version_api.get(Resource)
,
convert that reply to JSON, then reply back with the version if the query was successful. Note that
you can use markdown instead of plain text, so some things can be bolded. Copy the following code
and paste it in the
respond_to_button_press()
function.
-
Another button action triggers the
get_ucm_reg_phones
action.
For this, you can leverage the
cucm_perfmon_api.post()
function created earlier,
passing the
perfmon_counters
directly to the method. Depending on the logic you
want to implement, you can just sum the values of the counters together and return the result in
the reply message.
-
Lastly, you can handle the
user_search
action. You have to read the
user
key, which stores the user ID to query. In
flaskr/api/v1/core.py
, you already have
a
core_users_api
class, which calls methods in the classes you created, namely
cucm_user_api
to query CUCM, and
wbxc_user_api
, which queries Webex.
for user information. A determination is made as to where the user "lives" (i.e. if the CUCM user has
a
Home Cluster
property set, or the Webex Calling user has a
Location ID
). The result is simply which phone system the user belongs to. If
the
user_detail
checkbox is selected during the card submission, then the full user
details are also sent.
- In VS Code, start (or restart) your Flask app by clicking Debug > Start Debugging (or Restart Debugging , if already started).
- In your Webex app, access your conversation Pod22 Test Bot (cl2026-lab-pod22-bot@webex.bot)
- Now try clicking the buttons, such as the Version and Get Registered Phones under Unified CM , or try looking up pod22wbxuser under User Lookup .
Congratulations! You have completed have implemented several of the Python functions necessary to create the Portal API that can now be used by the front-end of the Provisioning Portal. The next section will take you through a tour of the portal.
Now that you have implemented the portal API that provides a way for the web front-end to leverage the capabilities made available by the Unified CM and Cisco Webex APIs, it's time to explore the finished product - a working portal that leverages these APIs to provide some monitoring capabilities as well as the ability to easily provision a user's devices and migrate users between UCM Calling and Webex Calling. Previous versions of this lab also included sections on Unity Connection and Cisco Meeting Server APIs, but in the interest of time they have been removed, however the portal still makes use of these APIs as well and you're free to explore and use this code in your own projects if you so desire. Remember that all the code in this lab is available for you to download from Github as shown in the Reference section. The portions of the API that interact with Unity Connection and CMS are already implemented for you so that those parts of the portal will function.
Accessing the Portal
To access the portal, navigate to http://dev1.pod22.col.lab:5000 . Another tab should open and you should see a dashboard that looks something like this:
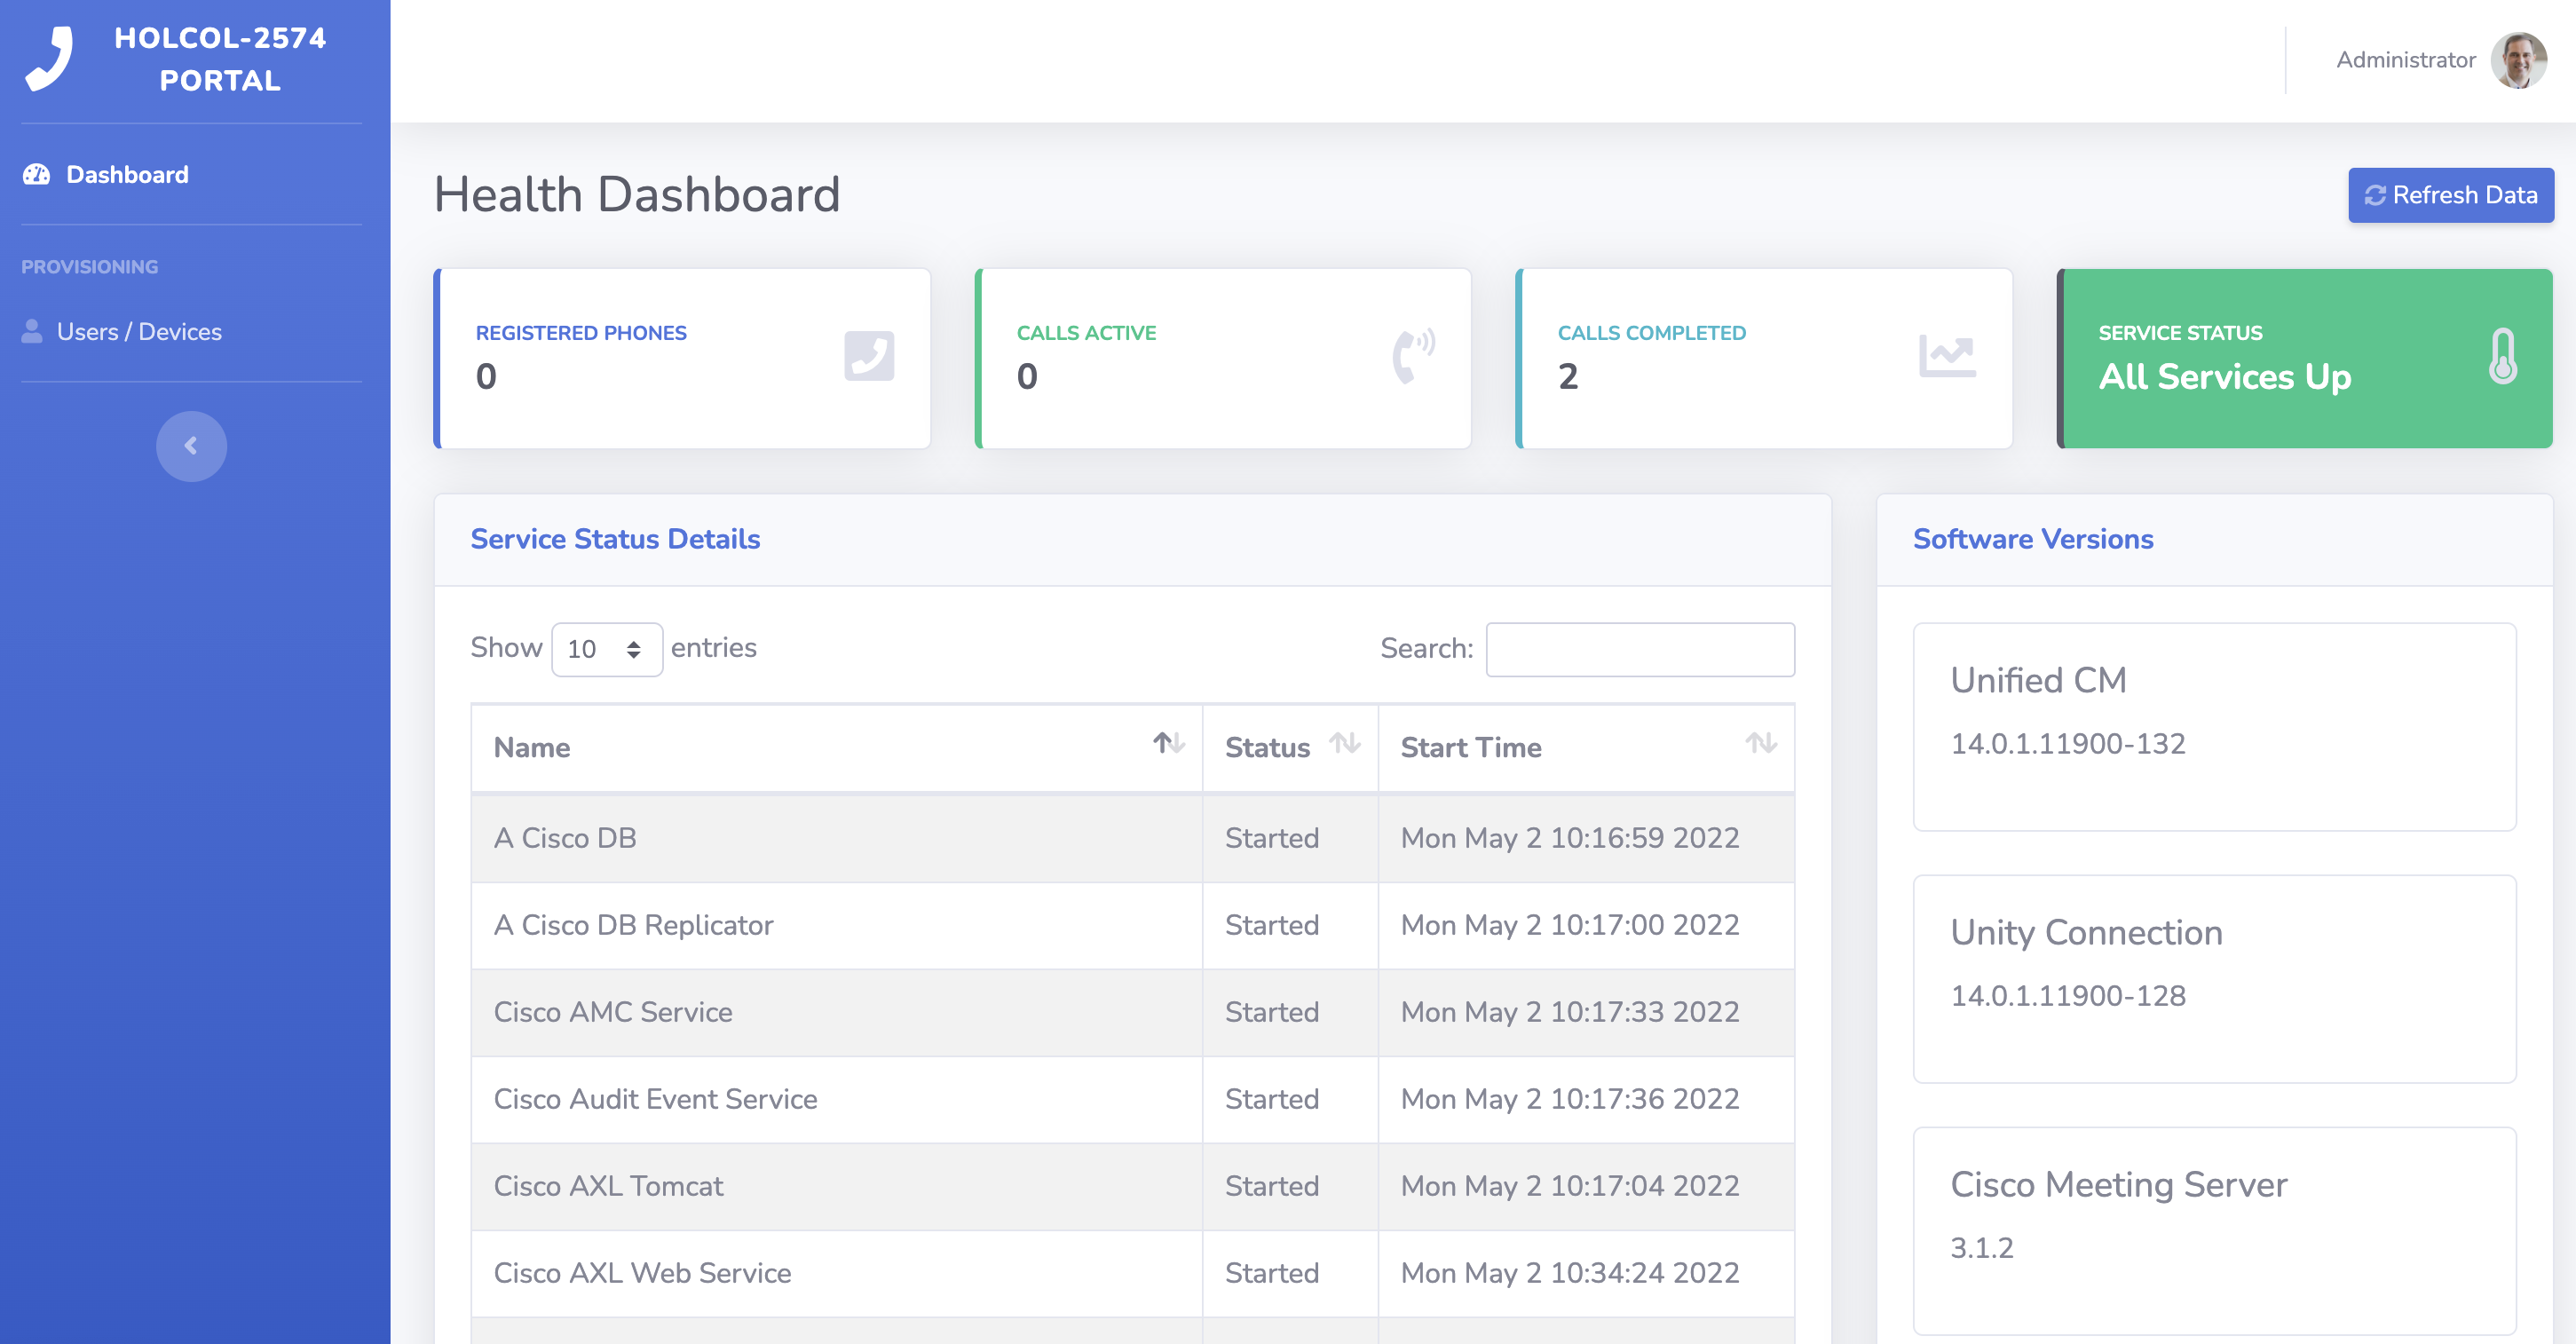
If you have implemented all the code in the previous sections of this lab correctly, you should see the cards at the top populate with the counters, the service list should populate, and you should see the running version on your Unified CM along with Unity Connection and Cisco Meeting Server.
This one page indirectly makes use of 5 different APIs! The front-end developer who was tasked with building this dashboard has no idea how many APIs are being used on the back-end, and nor should they care. This web page is making API calls to the API you created which in turn calls the respective APIs on Unified CM, Unity Connection, and CMS. Here is where the data is coming from:
- The Registered Phones, Calls Active, and Calls Completed cards make use of data obtained via the Perfmon Serviceability API on Unified CM.
- The Service Status and Service Status Details panes use data obtained via the Service Control API on Unified CM.
- On the Software Versions card, the Unified CM version is obtained via the PAWS API, the Unity Connection version via CUPI, and the CMS version via the CMS API.
Although the back-end you implemented is written in Python, the front-end code must be written in Javascript, as that is the only language that can be executed by the web browser. To get a better understanding of how the portal is obtaining this information, you will need to look at the Javascript code that is responsible for making the API calls to the back-end. Follow these steps to look at the code. You will not be implementing anything in this section, but rather looking at the Javascript code and understanding how it interacts with the back-end.
Step 1 - Exploring the Portal Source Code for the Dashboard
The front-end of the portal makes use of common web technologies - HTML, CSS, and Javascript. As mentioned earlier, the goal of this lab is not to teach you how to be a front-end developer, so the code for the front-end is being provided for you. That said, it is still helpful to explore this code and understand how the front-end makes use of the APIs you created.
All the code for the front-end can be found in the flaskr → static and flaskr → templates directories in your project. In the static directory, you will find the following folders:
- css / sass : These folders contain the Cascading Style Sheets (CSS) that tell the browser how to format the various elements on the screen.
- images : Contains various images that are used on the portal.
- js : Contains the Javascript code. This is where the majority of the interaction with the API occurs. You will find various sub-folders in this folder. The majority of them are open source Javascript libraries that the site makes use of. The code specific to the portal is in the portal sub-directory of the js directory.
The templates folder contains all the HTML files for the various web pages. In case you are interested, the HTML templates in the folder make use of Jinja templates which allow for the ability to reuse components of the web pages.
First look at the HTML template that first loads when you navigate to the Dashboard to see which Javascript code it is executing. Navigate to flaskr → templates and open the index.html file. Towards the end of the file, you should see the following. This code gets executed by the browser once the web page has finished loading.
The four lines highlighted above are the calls to the functions defined in the .js files. The focus on this section will be on the Javascript code. Navigate to the flaskr → static → js → portal directory in VS Code. You should see six files - core.js, cms.js, ucm.js, ucxn.js, wbxc.js, and wbxt.js. Each of these contain the Javascript relevant to each product the portal interacts with. Start with the simplest of the functions - the three that retrieve the code version and update the website.
Start with the update_ucm_version() which, as the name implies, retrieves the version of Unified CM. Open the ucm.js file. Navigate to the end of the file and you should see the following:
The two lines highlighted above show the most important parts to understand of this code. The first highlighted line shows the function call get_ucm_version() . You will examine the contents of this function in a moment. The get_ucm_version() function will make the API call to retrieve the version from the back-end. Once the version is retrieved, the code after the then gets executed, extracting the result from the response and updating the HTML element on the web page to show the version.
Now search for get_ucm_version() in the same ucm.js file. You should see the following code:
You can see that this function is very simple. This code makes use of a very popular Javascript library called jQuery . This library provides a function called ajax which allows for the asynchronous execution of HTTP requests. You can see the two parameters passed to this function are very straightforward: the type which is the HTTP verb to use, GET in this case, and the url. Notice that the URL does not contain the hostname. This is because the web browser knows to send the request to the same server that is already serving the web page. Here you see the API call to the /api/v1/cucm/version endpoint that you implemented earlier. That code on the back-end, in turn, makes use of the PAWS API to retrieve the active version from Unified CM. As you can see the front-end developer does not need to know anything about SOAP, PAWS, the UCM IP address, login credentials for the server, etc... This makes it very easy for the front-end developer to obtain the version information and use it however they like on the web portal.
If you look in the ucxn.js and cms.js files. you will find similar functions being called for obtaining the Unity Connection and CMS versions as well. Feel free to explore these on your own.
The next function that was called when the web page loaded was refresh_ucm_perfmon_data() . You can also find this function defined in the ucm.js file. You can see that the first part of this function looks like this:
Basically this function calls get_ucm_perfmon_data() and then uses that data returned to update the various cards displayed on the dashboard screen. To see how this function retrieves the perfmon data, find the get_ucm_perfmon_data() function in the ucm.js file. It should look like this:
Again you can see that the front-end developer has very easy access to the performance counter information. If you wanted to make this even simpler, you could have hard-coded the counters on the back-end and just returned them without the front-end developer having to know about the individual counter names. In this case, the implementation provides some flexibility that allows the front-end developer to control what data to retrieve at the expense of some additional complexity of having to know the names of the counters. This is always a balancing act of balancing ease of use with flexibility.
You can see that in this case, the request is a POST to the /api/v1/cucm/perfmon endpoint which, on the back-end, uses the Serviceability XML API to retrieve the PerfMon counters. The biggest difference between this request and the previous requests to retrieve the version is that it also contains a data field that provides the list of counters to retrieve. For a seasoned Javascript developer, making requests like this are second-nature.
If you want to explore some more on your own, go back to refresh_ucm_perfmon_data() and look at how the counters returned are manipulated to add certain values for display on the web page. You can also explore how get_service_status() is called to retrieve the service states and populate the list of services as well as determining whether to indicate that all services are up or not.
Step 2 - Portal User Provisioning Page
Now that you have explored the dashboard that makes use of the serviceability and monitoring APIs, you can turn your attention to the user provisioning page. On the left side of the portal screen, click on the Users / Devices link. You should see a screen that looks like this:
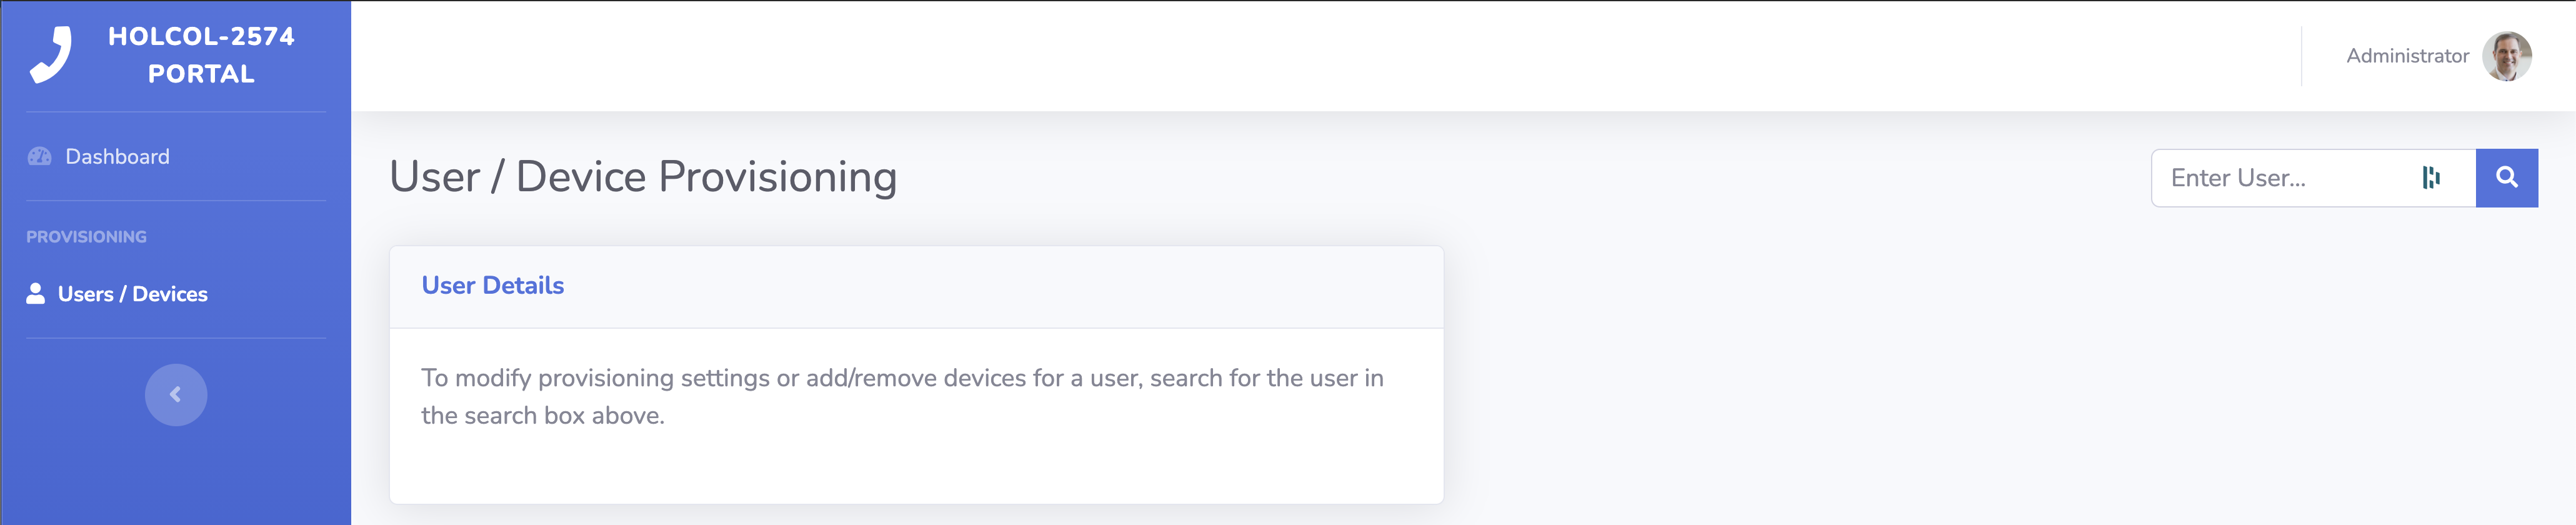
In the upper right corner of the screen, you should see a box labeled "Enter User...". In this box, enter pod22ucmuser and click the search icon. After a few seconds, you should see the page refresh and show the user profile information that should look similar to the screen below.
This page on the portal is, once again, leveraging several APIs on the back-end to provide the information you see. The user details and associated devices (even though there are no associated devices at this point) come from the AXL API. The AXL API is also what allows you to add a device in the "Add Device" section. Voicemail and the Meeting Space cards on the top of the page make use of the CUPI and CMS APIs respectively. The voicemail button also makes use of the UDS API to look up a user's phone number and display name.
In previous steps in the lab, you had added the CSF device to Unified CM and then deleted it, so the portal should show that no phones are currently associated with the user. The beauty of this portal is that it makes user administration very simple and streamlined. To add a phone, the administrator only needs to enter the device name, model, and a description. No additional input is required. If this were to be deployed in a production environment you would likely have an option to pick a class of service or some other policy to define the Calling Search Space to determine calling permissions for the user, or perhaps you would look up the user's role in the company on the back-end and automatically determine the class of service from their job role instead of worry about this on the front-end web page.
Step 3 - Using the User Provisioning Page for UCM Users
Before exploring the Javascript code behind the user provisioning page, take a moment to use the page to perform some administrative functions of adding a phone, enabling voicemail, and adding a CMS space for the user. First re-add your Webex App device so that it can register again.
- In the Add Device section of the portal, enter the device name CSFPOD22UCMUSER .
- Select Cisco Unified Client Services Framework from the list of device types.
- Enter Cisco Live LTRCOL-2574 - pod22ucmuser in the Description field.
- Click the Add Device button.
- You should see a message saying "Successfully added CSFPOD22UCMUSER." You should also see the device added to the list of Associated Devices at the bottom of the page. Additionally, the portal should have posted a message to the LTRCOL-2574 Space space in the Webex App that you had previously sent messages to.
- Click the Details button for the device on the Associated Devices table. You should see a window appear with all the details of the phone retrieved from UCM. Notice how many parameters exist for the phone, even though you only had to provide a device name, device type, and description. This output is just the raw output from the getPhone AXL API call that is being returned, but a web developer could use this information to display the information however they see fit. The raw JSON output is only being shown for illustrative purposes.
- Close the details window to return back to the portal.
The Webex App on your desktop is likely still registered with Webex Calling, so if you would like to test to see if the addition of the phone worked, you can log out of the Webex App and log back in as pod22ucmuser@collab-api.com with password C1sco.123 . Once registered you should be able to dial the voicemail pilot by dialing 5999999 from the Webex App. Feel free to skip this step if you like.
Step 4 - Using the User Provisioning Page for Webex Calling Users
The provisioning portal also provides limited functionality for Webex Calling Users. It could be expanded to include more capabilities, but for the sake of example, the portal allows you to enable and disable Webex Calling for a user or migrate a user from UCM Calling to Webex Calling and vice versa. You should still be on the Users / Devices link of the provisioning portal.
Now search for the Webex Calling user. In the upper right corner of the screen where you had previously searched for the user pod22ucmuser , replace the user name with pod22wbxuser and click the search icon. After a few seconds, you should see the page refresh and show the user profile information that should look similar to the screen below.
This page on the portal is, once again, leveraging several APIs on the back-end to provide the information you see. When the user search occurs, the backend is actually looking for the user in both UCM and Webex Calling. The backend then returns data about whether the user is enabled on UCM, Webex Calling, none, or both. The frontend logic then determines which UI and options to display depending on what kind of user it found. In this case you can see that the user information is limited in this example, but could include more information returned from the API. The portal generates a cross-launch URL using the user ID returned from the API so that you can click on the Configure Calling Settings in Control Hub button which would require appropriate credentials to log in.
The portal provides the ability to disable or enable Webex Calling or migrate the user back to UCM Calling. If you would like, click the Migrate to UCM Calling button. After a few seconds, the UI should update with their UCM device information and provide you with the option to migrate back to Webex Calling. Note that sometimes the phone number synchronized from the directory gets removed, so if you re-add the user, be sure to enter the number +19197220002 into the phone number field before you re-enable Webex Calling.
Step 5 - Exploring the Portal Source Code for the Provisioning Page
Now that you have see the provisioning portal in action, it's time to look at how this all works behind the scenes. You will notice that it is very similar to what you saw for the Dashboard page on the portal.
First take a look at the code that is executed when a user enters a user ID to search for. Open the core.js file and search for the function user_search() . You should see code like this:
Take a look at the lines highlighted above. The first highlighted line is just retrieving the value of the username that the user has entered into the search box on the web page. This value is then passed into the find_user(username) function. Search for the find_user function in ucm.js to examine how it works. You should see the function that looks like this:
Again, the code needed in the browser to interface with the API on the back-end is very simple. It just makes a simple API call using the GET method to the /api/v1/core/users/ endpoint. If this were a production application, you would want to have some authentication for these API calls. This API call searches both UCM and Webex Calling for the user and then returns a response indicating where the user was found and (if applicable) the user details for that user.
The rest of the user_search function is looping through the response and performing actions depending on whether the user is found in UCM, Webex Calling, both, or neither. Feel free to explore the various functions that are called as a result of the logic. For example, show_ucm_user_data located in the ucm.js file.
The next part of the portal code to explore is the code that handles adding a device. You will see that this is also quite simple for the front-end developer. In the ucm.js file, search for the add_ucm_device function.
The add_ucm_device function gets called when someone clicks the "Add Device" button on the provisioning portal. You can see that the first few lines pull the data from the web form where the user entered the device name, description, and model, as well as the name and user ID of the user that was retrieved earlier during the user search. This information is then passed to the insert_device function. If the insert is successful, the portal calls post_wbxt_notification to post a message to Webex indicating that the phone was added.
Search for the insert_ucm_device function in ucm.js to see how it works.
Similar to other Javascript functions you have already seen, this function sends an HTTP POST to the /api/v1/cucm/phone/ endpoint and passes the required data. Notice that in this case, the calling search space is being hard-coded into this request. In a production application you would likely want to determine which CSS to configure through some other method. You can see how little work is needed by the front-end developer to add a phone. Also note that in this example, the phone data parameters are being passed as arguments in the URI as opposed to in the message body. This was done as a workaround for a problem we encountered with the swagger UI we are using in the lab, and the better approach would be to send the parameters in JSON format in the message body.
As mentioned earlier, if the phone insertion is successful, a message is posted to Webex by calling the post_wbxt_notification function. Open the wbxt.js file. This should be the only function you see in that file as shown below:
You can see that this function sends an HTTP POST to the back-end with a room name and the message text to send. The back-end takes care of all the details of interfacing with the Webex cloud and sending the message.
You have completed the lab. The following sections are reference sections that give you some additional information about some of the APIs, the tools you have used, as well as some instructions for setting up your own development environment similar to what we have set up for this lab. Thank you for your participation and we hope you forge ahead and leverage APIs in your own environment to automate and simplify the provisioning, monitoring, and operations of your Cisco collaboration environment. Also, as a reminder, the code for this lab is available on Github at the link provided in the references section.
Besides the content you have already discovered in this lab, we have provided some additional sections that let you explore some other tools to work with some of these APIs, as well as add extra functionality to your portal.
Specifically, we will cover the APIs for Cisco Unity Connection and Cisco Meeting Server, each of which have REST-based APIs that are fairly straightforward. For each case, he did not leverage an SDK, as we did with the Webex APIs, but rather built a reusable REST layer for each of these APIs to use.
The bonus section content falls into two categories: product-specific APIs and how to work with them using tools such as Postman, and Python examples implementing portions of these APIs by way of the portal.
Product-specific APIs:
- This Overview, which covers Postman basics
- Unity Connection Provisioning - which covers the Unity CUPI API in detail
- Cisco Meeting Server (CMS) API
Additional Portal sections:
While the Webex APIs have a querying tool build directly into their documentations, the Unity Connection and CMS APIs do not. Therefore, we will introduce a popular tool to accomplish the same tasks.
Step 1 - Postman
Postman is already installed on your student virtual machine. You will first build your own queries to understand the process better, then use a Postman Collection, which is simply a pre-defined group of queries that can be organized and use variables to avoid having to build every query from scratch.
All REST APIs we will work with use the HTTPS protocol to ensure that the API requests are encrypted. In many cases, the SSL certificates on the servers providing the REST API use self-signed certificates. As a result, clients like Postman may generate an error because they cannot trust the server. In a production environment, you would want to use proper CA-signed certificates so that this is not an issue. For this lab, you will have Postman simply disable SSL certificate verification so that it will ignore untrusted certificates. Perform these steps:
-
From the Desktop of your Remote Desktop session, launch the
Postman
application.
You may notice a yellow bar indicating Working locally in Scratch Pad . This is normal. - Click File > Settings
- On get General tab, make sure that the SSL certificate verification option to make sure it is set to OFF (greyed out).
- Click the X to close the Settings window.
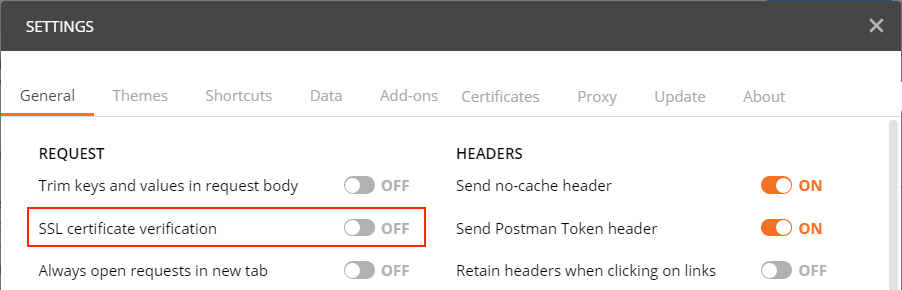
Now you are ready to attempt your first request. For illustration purposes, you will send a request to a Cisco Meeting Server (CMS) to query its system status.
-
From the blank Postman UI, Find the
+
icon to create a new request.
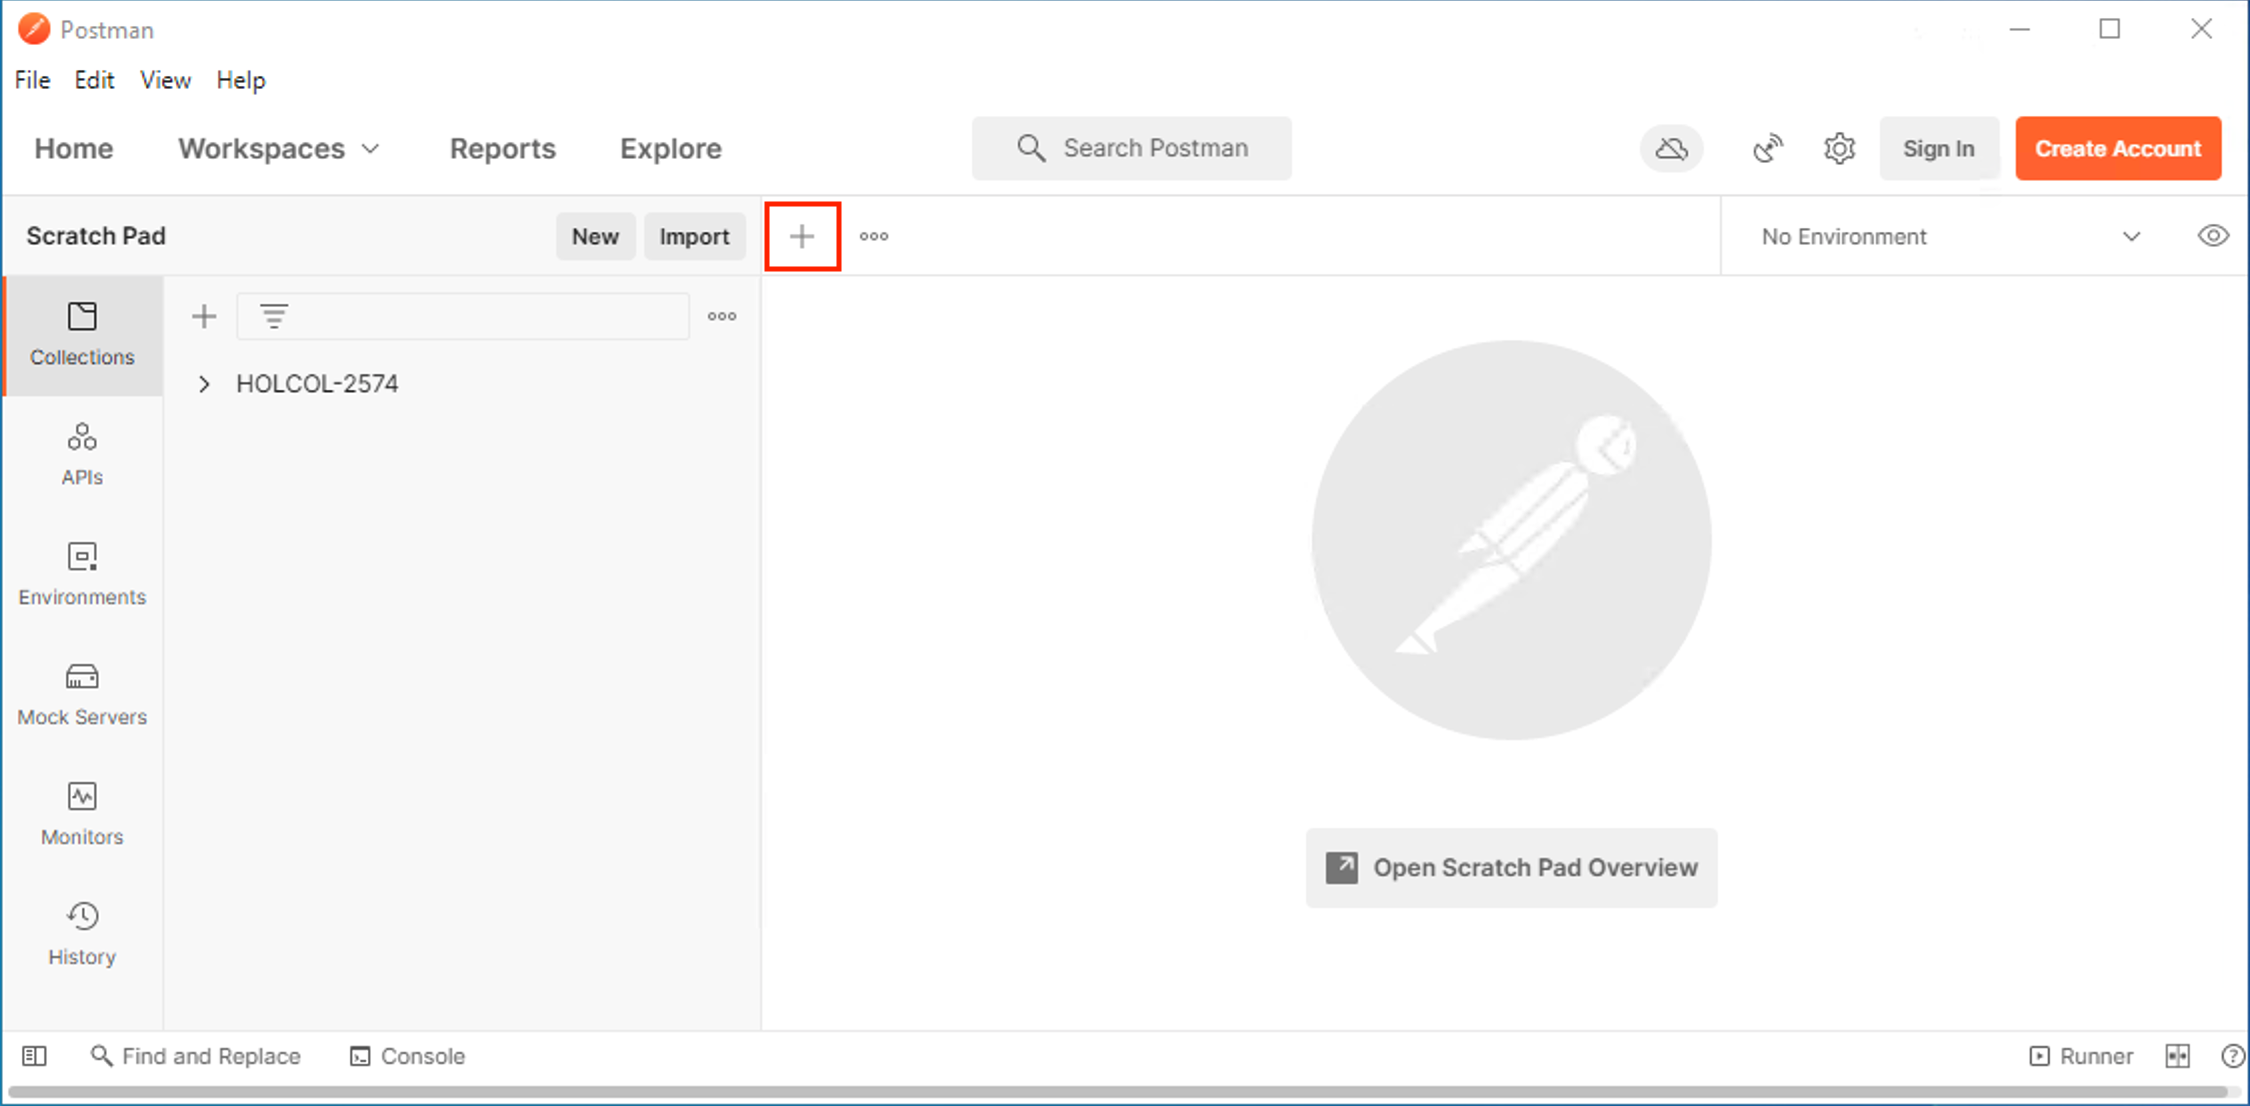
-
Notice the default request type is
GET
. If you click on
GET
you will see
a list of verbs supported by Postman. For now, leave it set to
GET
.
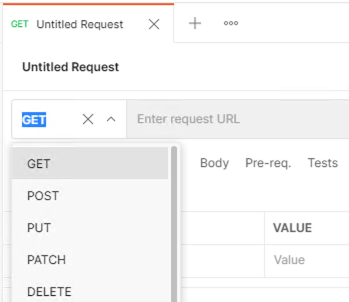
- To the right of GET , you should see a field that says Enter request URL . This is where you will enter the URL to which you send the query. Enter the following URL into this field: https://cms1a.pod22.col.lab:8443/api/v1/system/status
- For most queries, authentication of some form is required. In this case, you will use basic username and password authentication, so you need to configure these credentials in Postman to send with the request. Below the GET button, there is an Authorization tab. Select it now.
-
For the
Type
of authorization, select
Basic Auth
from the drop-down
-
After selecting
Basic Auth
, enter the
Username
of
admin
and the
Password
as
C1sco.123
Postman will add these credentials to the request as a Header item. - The Headers tab does not require any specific changes for this particular query, because you are not sending a payload and the Postman tool is able to display anything this server can send to us. Later on this will be one area of differentiation in the various REST services you will explore.
-
Finally, click the blue
Send
button.
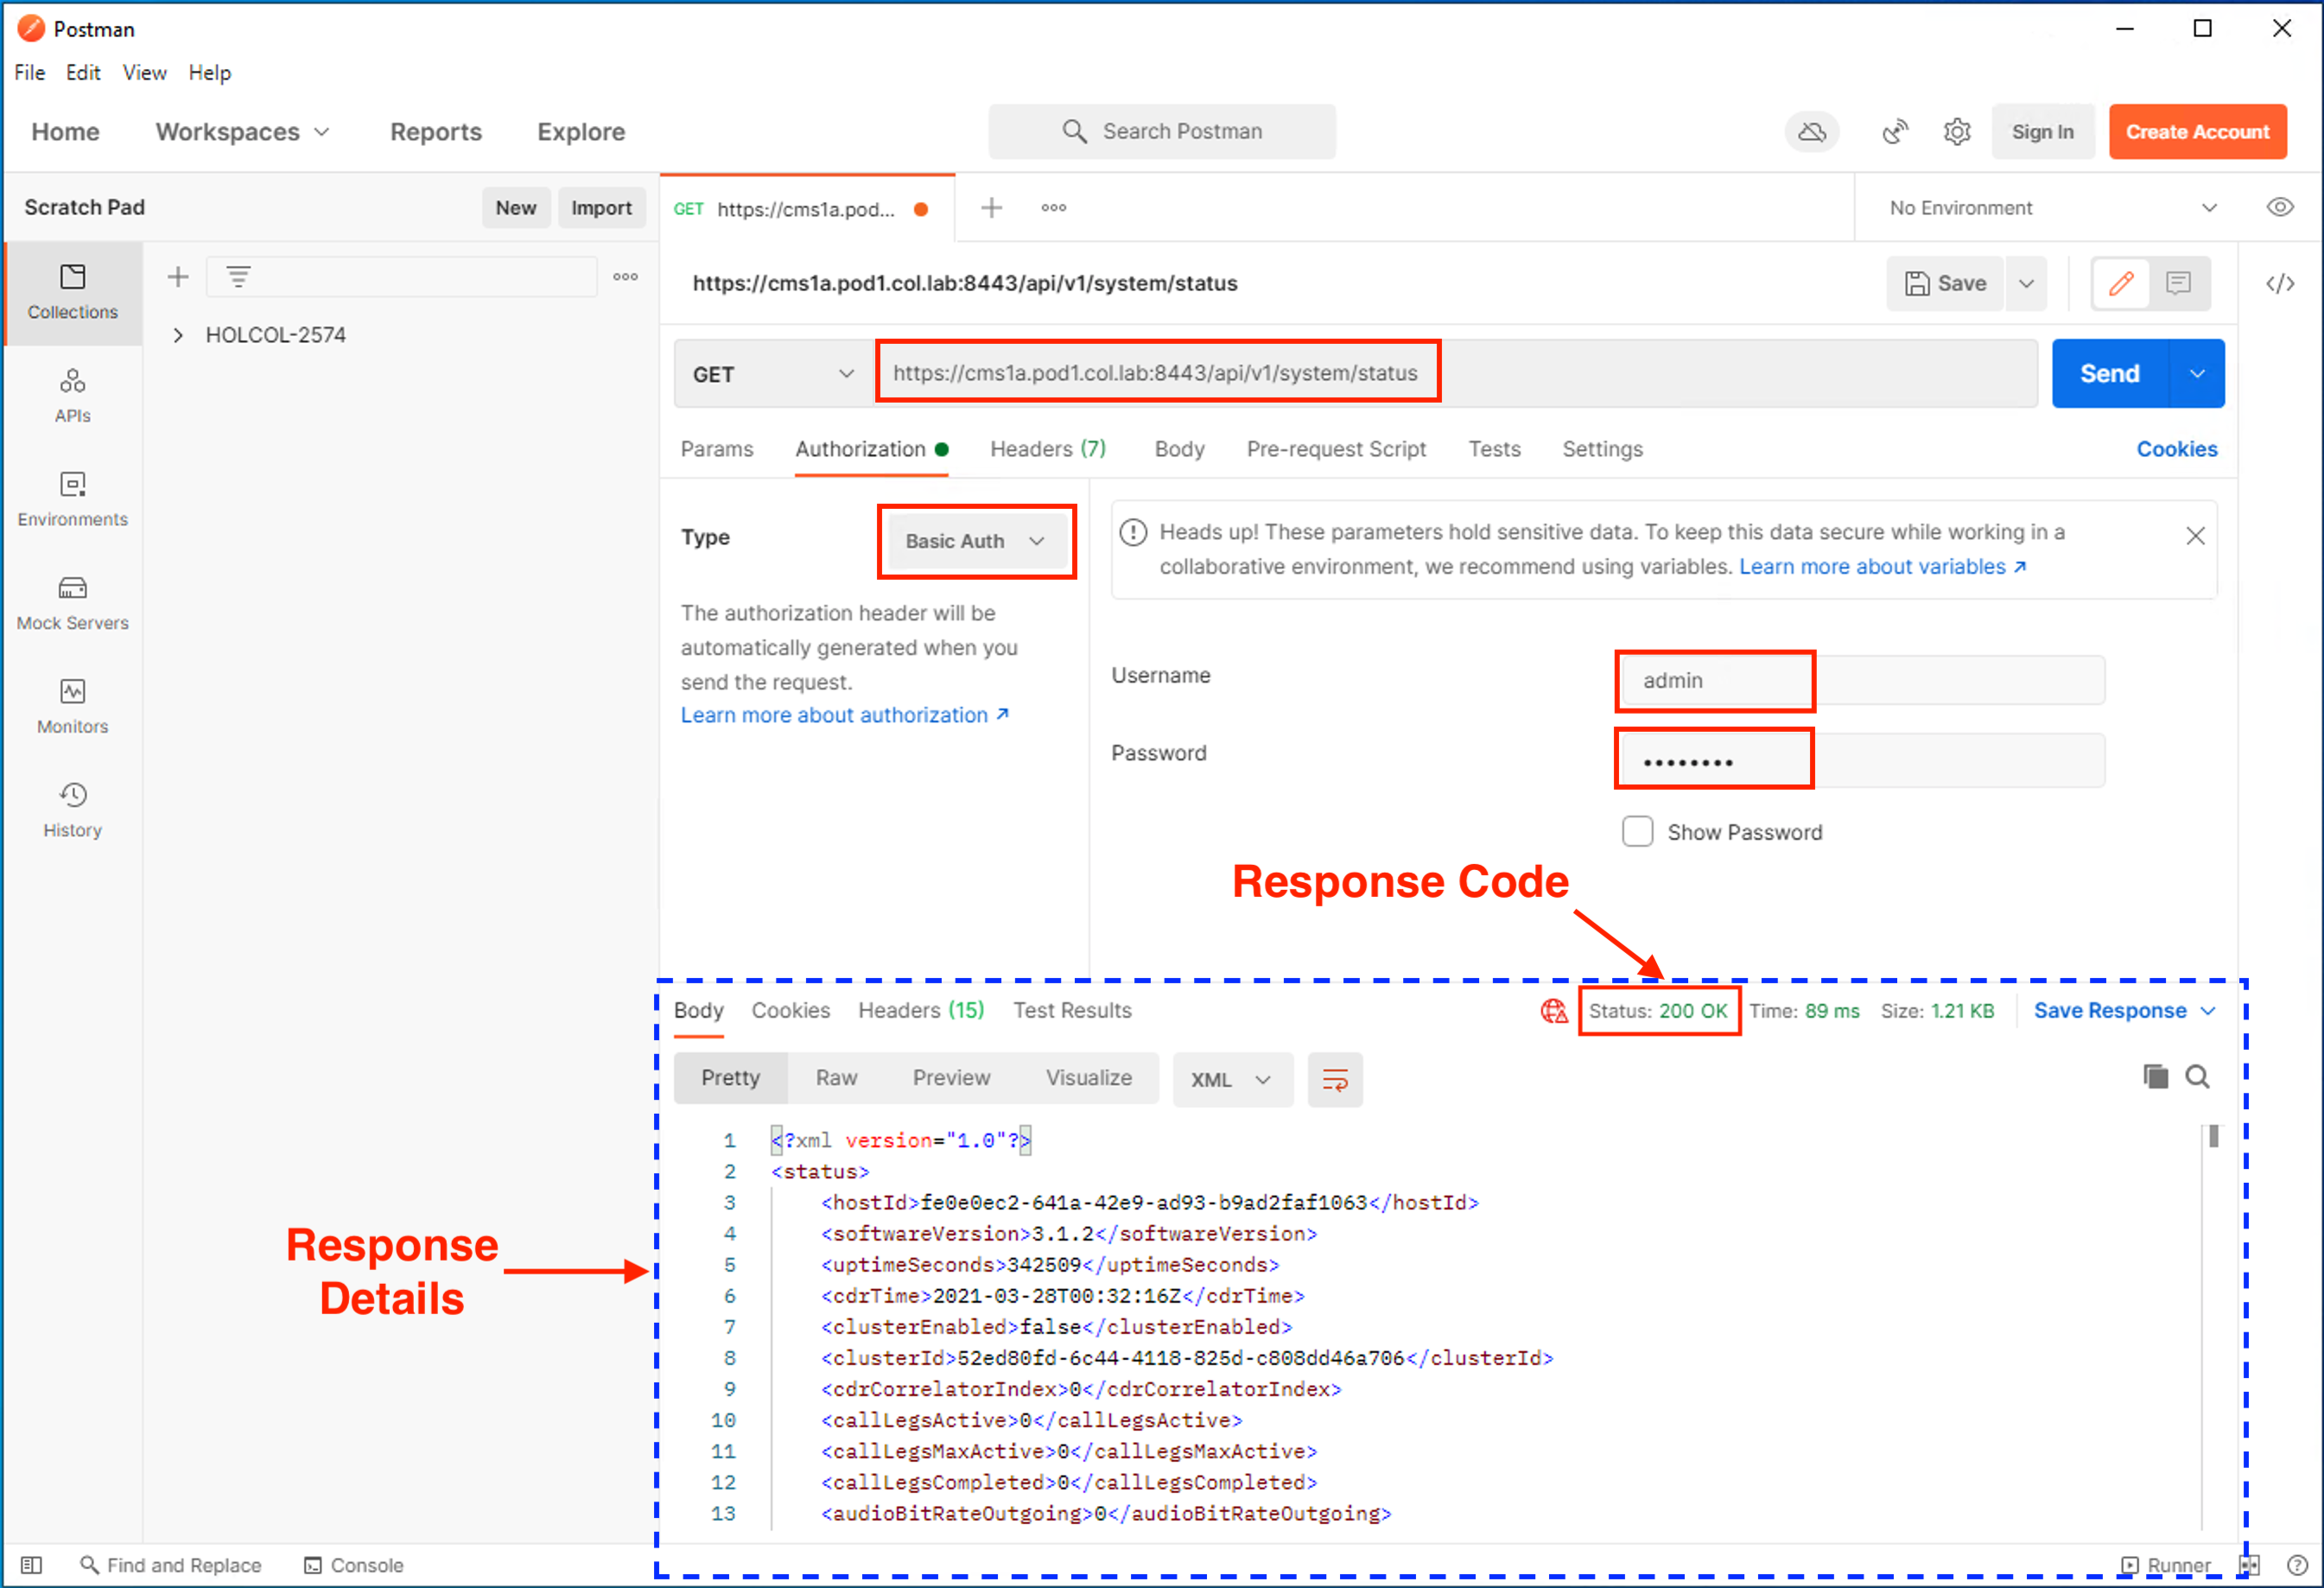
- The response is now shown in the pane below at the right side. You will notice that there is a Status message with a 200 OK . This is extremely important to check each time you send something, just to be sure the request was understood by the server, meaning there was no typo or an invalid parameter used, or even an authentication failure. In general, anything in the 200-299 range is a success; whereas a 404 would indicate the URL destination was not found. A 401 is generally an authentication error and a 503 indicates "server busy". Other 5XX responses usually indicate some system problem, or something is malformed in the request.
-
The response payload or body is shown with the
Body
tab selected. By default it will
be in "Pretty" format, which simply adds spacing/indentation to the XML or JSON response, if possible.
In this case, the response is in XML, so the data is surrounded by keys, such as:
<softwareVersion>3.1.2</softwareVersion>which is nested under <status>...</status>
Step 2 - Postman Collections
While you could create each query by hand like this, pasting the URLs and filling in header/content values, Postman has the concept of a Collection , which are simply several preconfigured queries in a folder. You should already have a Collection loaded into your Postman instance, called HOLCOL-2574 . The Collection will have required URLs, pod number and credentials pre-configured for all queries, so they don't need to be entered each time. Follow these steps to explore your Postman Collection.
- In Postman, make sure at the left side of the screen, the side-bar is visible (otherwise select View > Toggle Sidebar ).
- On that side-bar, make sure the Collections tab is selected.
- Expand the HOLCOL-2574 collection. You should see two folders, Direct to Server and Via Portal API , as well as a GET request at the bottom.
-
Click on the
GET CMS system status - Sample Query
item. The sample query should
open as a new tab.
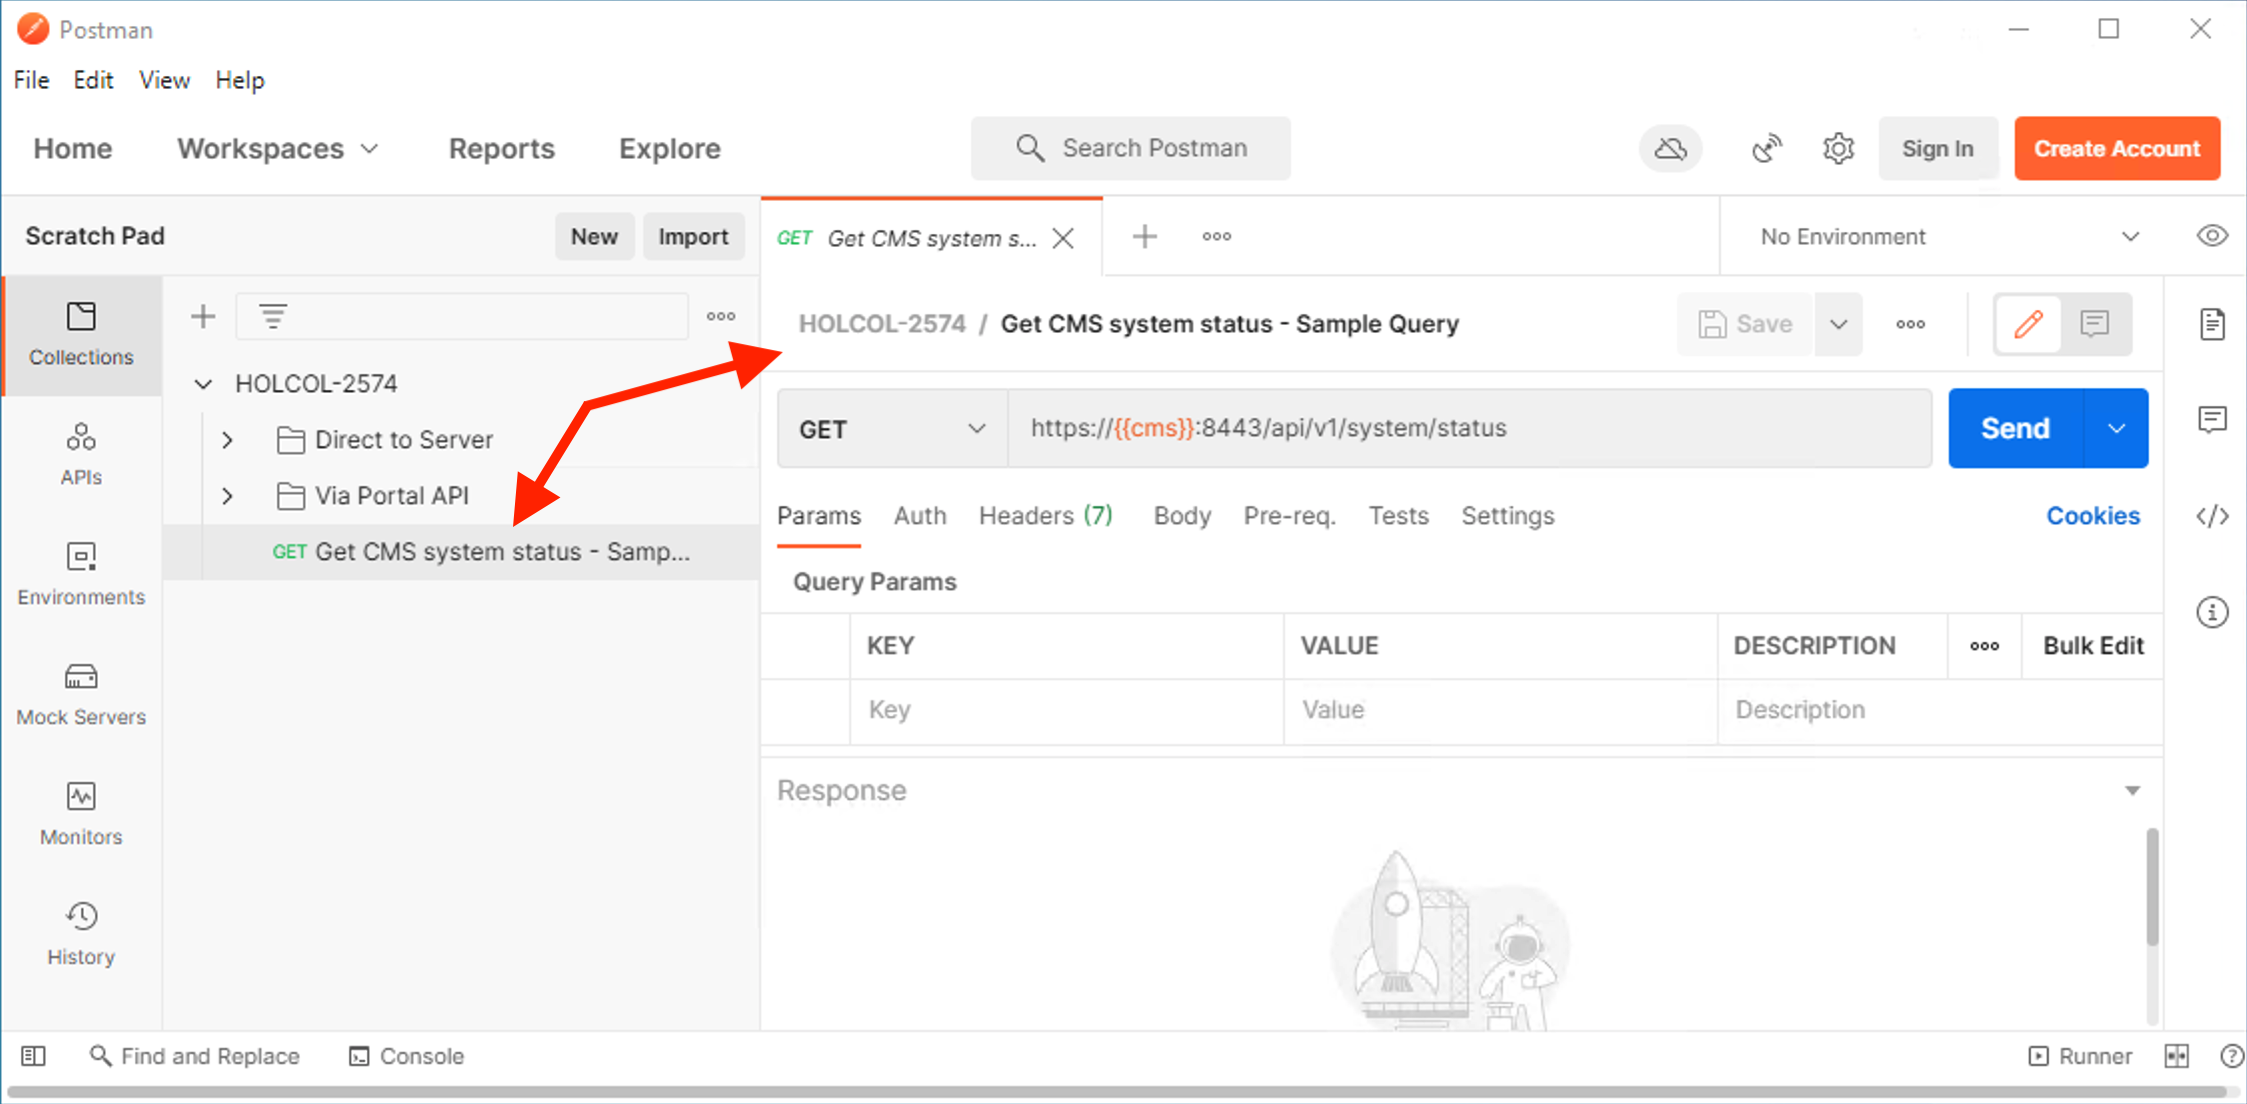
- You will notice all settings are already filled in. The Collection has some variables defined, such as the variable, so when you see that in the URL, be assured that your CMS hostname will be substituted in its place. Click Send and you'll observe the same results as before. (If needed, the View > Show Postman Console can show the raw request/response for additional detail)
In the next section you will explore a RESTful API in depth: the Cisco Unity Provisioning Interface API.
Cisco Unity Connection has a set of feature-rich APIs to accomplish various tasks:
- Cisco Unity Connection Provisioning Interface (CUPI) API for administrative provisioning functions, such as adding/removing users and system-wide settings.
- CUPI API (for End Users) for provisioning end-user accessible features, such as their greetings or transfer settings.
- Cisco Unity Connection Messaging Interface (CUMI) API handles all send/receive/reply and other message functionality.
- Cisco Unity Connection Telephony Interface (CUTI) API is a web service for Telephony Record and Playback (TRaP) functions. Using this, you can place a call from Unity Connection and then record the audio to a greeting or a recorded name.
- Cisco Unity Connection Imaging Interface (CUII) API allows access to message state, but responses will be in the form of graphical icons, indicating the state.
- Cisco Unity Connection Notification Interface (CUNI) API is used for managing subscriptions to events, such as notifications when voice mail messages are received or deleted.
Most of these APIs function very similarly. They are all REST-based and can typically respond with either JSON or XML in the response body. As mentioned above, the API for managing and provisioning a Unity Connection system is the CUPI API. Most of the other APIs simply add more functionality for specific use cases and types of server or client data.
NOTE: this lab will focus entirely on features exposed by the supported APIs, which means it is not a direct database query/request. Unity Connection does have some ability to do this using tools such as the Cisco Utilities Data Link for Informix (CUDLI) and/or the Python Scripting Host , however these tools are generally meant to handle specific one-off scenarios and are not part of this lab and should not be used for regular, ongoing automation tasks.
In this section, you will perform the following tasks:
- Get a list of all LDAP users available for import into Unity Connection
- Search for a specific user to import
- Import a user into Unity Connection
- Modify a user's settings
- Modify a Voicemail PIN and unlock a mailbox
- Retrieve the user to verify settings changes
- Delete the voicemail user account
Step 1 - List Unity Connection LDAP Users
In Unity Connection, users can either be created manually or imported either via LDAP or via a CUCM server using AXL. For this lab, you will use LDAP. For this, the LDAP synchronization between Unity and the LDAP server is already set up. When synchronization occurs, Unity simply learns about those users that exist in LDAP and are available for import, which is to say, have actual accounts with or without a voicemail box created in Unity Connection.
First, generate a query to get the users that can be imported as show in the following steps.
- In Postman, make sure the side-bar at the left is visible.
- In the HOLCOL-2574 collection, navigate to Direct to Server > CUC and click on Get LDAP Users to import
-
Examine the query that opened in a new tab:
- Notice it is a GET request to: https://cuc1a.pod22.col.lab/vmrest/import/users/ldap
- In the Headers you have Accept set to application/json . With this header, you are telling the server that you would prefer the response data to be in JSON format. Unity Connection supports XML, by default, or JSON. Note that this will only be honored for GET requests. Things like POST , where you will sending information to the server, will usually generate a simple string reply containing the object ID created. A POST and DELETE will not return any data at all; and the successful response code is 204 No Content .
-
Click
Send
to execute the query.
-
Note the result status is
200 OK
and the body looks like this:
{ "@total": "5", "ImportUser": [ { "alias": "Token_User_501dfdf6-2861-4072-a4f8-8abaa0f5b7aa", "firstName": "", "lastName": "Token", "pkid": "8993458a-4a99-47c4-92ec-3f01bfa06942" }, { "alias": "pod22user1", "firstName": "Pod22", "lastName": "User1", "pkid": "6ad0a9c9-260a-5663-668f-275a290c8be2" }, ... -
The result consists of a dictionary with one key being
@total
(indicating that there are 5
ImportUser
entries) and the other being
ImportUser
consisting of a
list
of users
available for import, where each user consists of their alias, firstName, lastName, and pkid. This pkid is especially
useful, since it uniquely identifies this object in the same way that the uuid field identified objects in CUCM.
Note: The fact that the data under ImportUser is a JSON list (as denoted by the square brackets, [ and ] ) is significant: if @total , that is to say, the number of items under ImportUser , were exactly 1, then the user data under ImportUser would be a JSON dictionary with that user's settings (alias, firstName, lastName, and pkid) and not in a list of dictionaries. When working with these results programmatically as you will do later in the lab, you need to account for both scenarios.
Step 2 - Search for a specific user to import
Searching in CUPI for users of any type is done via parameters in the URI. The following steps will show you how to add a query for the alias that matches pod22user1 exactly. The part that would need to be added to the URL is ?query=(alias%20is%20pod22user1) . If you consider that %20 is the hexadecimal representation of the space character, this is very readable (e.g. ?query=(alias is pod1user1) ). Aside from the is keyword, CUPI also supports startswith in order to perform a wildcard search.
- In Postman, in the HOLCOL-2574 collection under Direct to Server > CUC , click on the Get LDAP User query.
- Notice nothing is different except for the ?query=(alias%20is%20pod22user1) portion appended to the URL. Click Send
-
There should be exactly one result user:
{ "@total": "1", "ImportUser": { "alias": "pod22user1", "firstName": "Pod22", "lastName": "User1", "pkid": "6ad0a9c9-260a-5663-668f-275a290c8be2" } } -
Copy the
pkid
value for your LDAP user, since you will need to
use it in the next step.
Step 3 - Import a User into Unity Connection
Importing a user, just as creating a user in Unity Connection, consists of a POST request and specifying not only what user should be imported, but also a template to use when creating this user. This is exactly the same in the Unity Connection GUI, since there are so many settings, the system only allows you to add a user using a template that has most settings filled in for you. In the actual Postman request, we need to not only specify parameters, as we did earlier, but also add a body to the request.
- In the Postman HOLCOL-2574 collection under Direct to Server > CUC , click on Import LDAP User with new VM .
- Notice that the URL is now a POST method, and the URL is the same as previous queries, but then has a parameter added at the end: ?templateAlias=voicemailusertemplate . This specifies the default, system-generated "voicemailusertemplate".
-
Underneath the URL, the
Body
has some required content. The pkid of the user
to be imported must be specified. In this case, use the pkid retrieved from the previous query.
You will also fill in a DTMF Access ID, which is basically the phone number associated with this
mailbox.
You need to replace the value of the PKID with the pkid of your user from the earlier step. The full Body will be in JSON format such as:
{ "dtmfAccessId": "12345", "pkid": "dbc37047-7565-6b29-3327-18850f64d406" } - Click Send to submit this query.
-
The result should be a string, indicating the URL to this new user. The pkid-like portion at the end
is different than the original PKID specified in the request:
/vmrest/users/3967c91f-30ee-4656-83ac-3bc4600ee0dd
This occurs despite that your request still has an Accept header with "application/json". However, since this is the reply to a POST instead of a GET , the response is different and you need to be able to handle this kind of response, as well.
Step 4 - Retrieve the User's Settings
- In the Postman HOLCOL-2574 collection, under Direct to Server > CUC , click on Get user .
- The URL is now: /vmrest/users with paramenter ?query=(alias%20is%20pod22user1) Without this parameter, you would get a list of all current Unity Connection accounts (with and without mailboxes). Click Send ,
-
The reply contains a single user (the
@total
key is 1) and a
User
key
that has all settings associated with that user in dictionary format:
{
    "@total": "1",
    "User": {
        "URI": "/vmrest/users/3967c91f-30ee-4656-83ac-3bc4600ee0dd",
        "ObjectId": "3967c91f-30ee-4656-83ac-3bc4600ee0dd",
        "FirstName": "Pod22",
        "LastName": "User1",
        "Alias": "pod22user1",
        "City": "",
        "Department": "31",
        "DisplayName": "Pod22 User1",
        ...
        "ListInDirectory": "true",
        ...
        "DtmfAccessId": "12345",
        ...
        "UserVoicePinURI": "/vmrest/users/3967c91f-30ee-4656-83ac-3bc4600ee0dd/credential/pin",
        ...
You have also see the ListInDirectory and DisplayName settings, which you will modify next. The PKID for this user account is in the ObjectId field. It is the same ID that was returned when importing/creating the account using the LDAP user. Copy this user PKID (ObjectID) value from your response for the next step
Step 5 - Modify User's Settings
Modifying most user settings is not difficult. It requires the PUT request and information in the Body indicating what settings to change. Not all settings can be modified. Some things, such as the alias, first name / last name, and password are controlled in LDAP because you chose to import that user instead of creating the user from scratch, where everything can be specified and modified.
- In the Postman HOLCOL-2574 collection, under Direct to Server > CUC , click on Modify CUC user .
- Make sure the URL is similar to: /vmrest/users/32139706-1743-4729-a4e7-7684a5345fe5 , where the ID after /vmrest/users/ is the pkid of the mailbox to be modified, i.e. the URI from the previous query or the result of the POST to create the user account.
-
In the
Body
, specify the new settings. For CUPI, the boolean values must be their string
equivalents, i.e. you have to put true/false in quotes.
{ "DisplayName": "Updated User", "ListInDirectory": "false" } - Click Send .
-
Upon successful execution, the response should be a
204 No Content
.
- To convince yourself that the change was made successfully, re-execute the Get user query. Either switch back to the previous tab in Postman or in the collection under Direct to Server > CUC , click on Get user .
-
Everything is already filled out, so just click
Send
and validate the update:
{
    "@total": "1",
    "User": {
        "URI": "/vmrest/users/3967c91f-30ee-4656-83ac-3bc4600ee0dd",
        ...
        "DisplayName": "Updated User",
        ...
        "ListInDirectory": "false",
        ...
Step 6 - Modify A Voicemail PIN and Unlock a Mailbox
Updating a voicemail user's PIN and unlocking the mailbox is one of the most common administrator tasks. PINs can be forgotten, and after repeated failed attempts, a mailbox is locked for some time. Luckily, unlocking the mailbox and changing the PIN is no more difficult than other user setting updates. Note that existing passwords and PINs can never be retrieved, however they can be changed, if they were forgotten. Also be aware that in this lab scenario, the user voicemail accounts are imported from our LDAP directory. User passwords , not the PIN, are utilizing LDAP authentication, so they cannot be changed in Unity Connection (either via the GUI or API). If these were stand-alone users not tied to LDAP, then that would, of course, be possible.
- In the Postman HOLCOL-2574 collection, under Direct to Server > CUC , click on Modify CUC user credentials .
- Make sure the URL is similar to: /vmrest/users/32139706-1743-4729-a4e7-7684a5345fe5/credential/pin , where the ID following /vmrest/users/ is the pkid of the user to be modified.
-
The
Body
is set to:
{
    "Credentials": "14235834",
    "HackCount": 0,
    "TimeHacked": []
}
This sets the PIN credential and unlocks the account by resetting the HackCount and TimeHacked settings (the latter being set to a blank value). - Click Send .
- Upon successful execution, the response should again be a 204 No Content .
- In understanding an API, it is important to understand the error conditions that can occur. For example, in situations where some kind of illegal input was supplied, then CUPI will responsd with an XML error message. You can see this by re-issuing the above query, but this time change the "Credentials" value in the Body to just "1" and click Send .
-
The response will be a
400 Bad Request
response code, with a body of:
{
    "errors": {
        "code": "DATA_EXCEPTION",
        "message": "Password does not have enough characters",
        "DetailCode": "19"
    }
}
Step 7 - Delete the Voicemail User Account
Deleting a user is simple, as expected. It requires a DELETE operation sent to the /vmrest/users/ URL followed by the pkid of the user account to be deleted. Note that this simply deletes the account in Unity Connection. In this case, this same user would then be available to be re-imported via LDAP.
- In the Postman HOLCOL-2574 collection, under Direct to Server > CUC , click on Delete CUC user .
- Make sure the URL is similar to: /vmrest/users/32139706-1743-4729-a4e7-7684a5345fe5 , where the ID following /vmrest/users/ is the pkid of the user to be deleted.
- Click Send .
- A 204 No Content message is returned to indicate successful deletion.
Feel free to close some or all of the requests in Postman at this time (no need to save anything), as you will be adding more in the next section.
Now that you are familiar with Unity Connection's CUPI API, you can dive into the Cisco Meeting Server (CMS) API, another REST-based API.
Cisco Meeting Server (CMS) has a rich REST-based API that allows configuration of nearly all settings, many of which can only be configured via the API, especially when working with clustered CMS systems. Any CMS server can have the WebAdmin service enabled, which also enabled the administrative GUI page. A separate account may be used for API access, or an admin account can be used.
The Cisco Meeting Server API documentation can be found here: https://www.cisco.com/c/en/us/support/conferencing/meeting-server/products-programming-reference-guides-list.html
CMS supports the regular GET , POST , PUT , and DELETE verbs to retrieve, create, modify, and delete an object. All of the requests will be sent to /api/v1 . Responses could include 503, to indicate a busy condition, a 404, if the destination is not found, or other 4XX and 5XX response codes, which will are documented in an XML-encoded reply to the message body.
There are a few features to note:
- Responses to a GET request will generally include a payload in the text/xml format.
- Data in POST and PUT messages should be sent in x-www-form-urlencoded format and should have this Content-type specified in the header. This places the key/value pairs as parameters in the URL. There is (so far) one documented exception to this, for custom layout templates, where a JSON payload is required, but this is not applicable in this lab.
- Failures are reported in a predictable XML format such as that below. These errors have more detailed explanations in the documentation. You can use this information to create a mapping, in order to provide better error reporting. As a simple example, userDoesNotExist is explained as: " You tried to modify or remove a user using an ID that did not correspond to a valid user ".
To illustrate Meeting Server capabilities, you will configure the following using Postman:
- Retrieve system status
- Create a Space
- Modify a Space
- Retrieve Spaces
- Delete a Space
Step 1 - Retrieve System Status
You already retrieved the system status of CMS in the REST overview section. You will repeat this using a Postman Collection just to make sure everything is set up.
- In Postman, make sure at the left side of the screen, the side-bar is visible (otherwise select View > Toggle Sidebar ).
- Make sure the Collections tab is selected.
- Below that, open the HOLCOL-2574 > Direct to Server > CMS folder.
- Click on GET system_status , which should open in a new tab.
- Click Send and you should see the status, similar to what was observed previously.
Step 2 - Create a Space
Creating a Space in CMS is fairly straightforward. A POST request is sent to /api/v1/coSpaces . Note that in the CMS API, Spaces are always called coSpaces, deriving the name from its origins with Acano. In the Header of the request, the Content-type must be specified as application/x-www-form-urlencoded . This will pass the information you enter in the Body section as part of the URL in the correct format. In this case, all of the key/value pairs will be encoded something like this to the URL itself:
name=New%20Space&callId=5555&secondaryuri=5555&uri=space
So technically these are URL parameters instead of a payload as we have seen with JSON previously. But
having the correct Content-type specified is significant. If the server does or does not expect a particular
Content-type may determine the success of the query.
As you can already see, even though both Unity Connection's CUPI and the CMS API are both REST-based, they have
some significant differences in how the informtion is passed to them.
- In the Postman HOLCOL-2574 collection, navigate to Direct to Server > CMS and click on Create coSpace , which should open in a new tab.
- Examine the Header , which will have Content-Type set to application/x-www-form-urlencoded .
-
Now look at the
Body
tab. It will have
some of the desired settings for this new Space in a table format. With the
Body
tab
selected, at the right, you can click to toggle
Bulk Edit
mode, which will make
the settings appear as follows (and can easily be copy/pasted instead of entered one at a time):
name:New Space
uri:space
secondaryuri:5555
- Click Send .
- Verify that the reply back is a 200 OK
-
Notice that neither a pkid or object ID or anything was returned. Unlike CUPI, CMS puts this into the header of the reply.
If you look at the reply, next to the selected
Body
tab, there will be a
Headers
tab.
Click on it and you will see the reply
headers, including a
Location
header that does, in fact, contain the URL of the
created object. For example:
/api/v1/coSpaces/2cb3a80a-51a4-4086-9487-fc06087e78edCopy this object id (the coSpaceID) value from your Location header, since you will need to use it in the next step.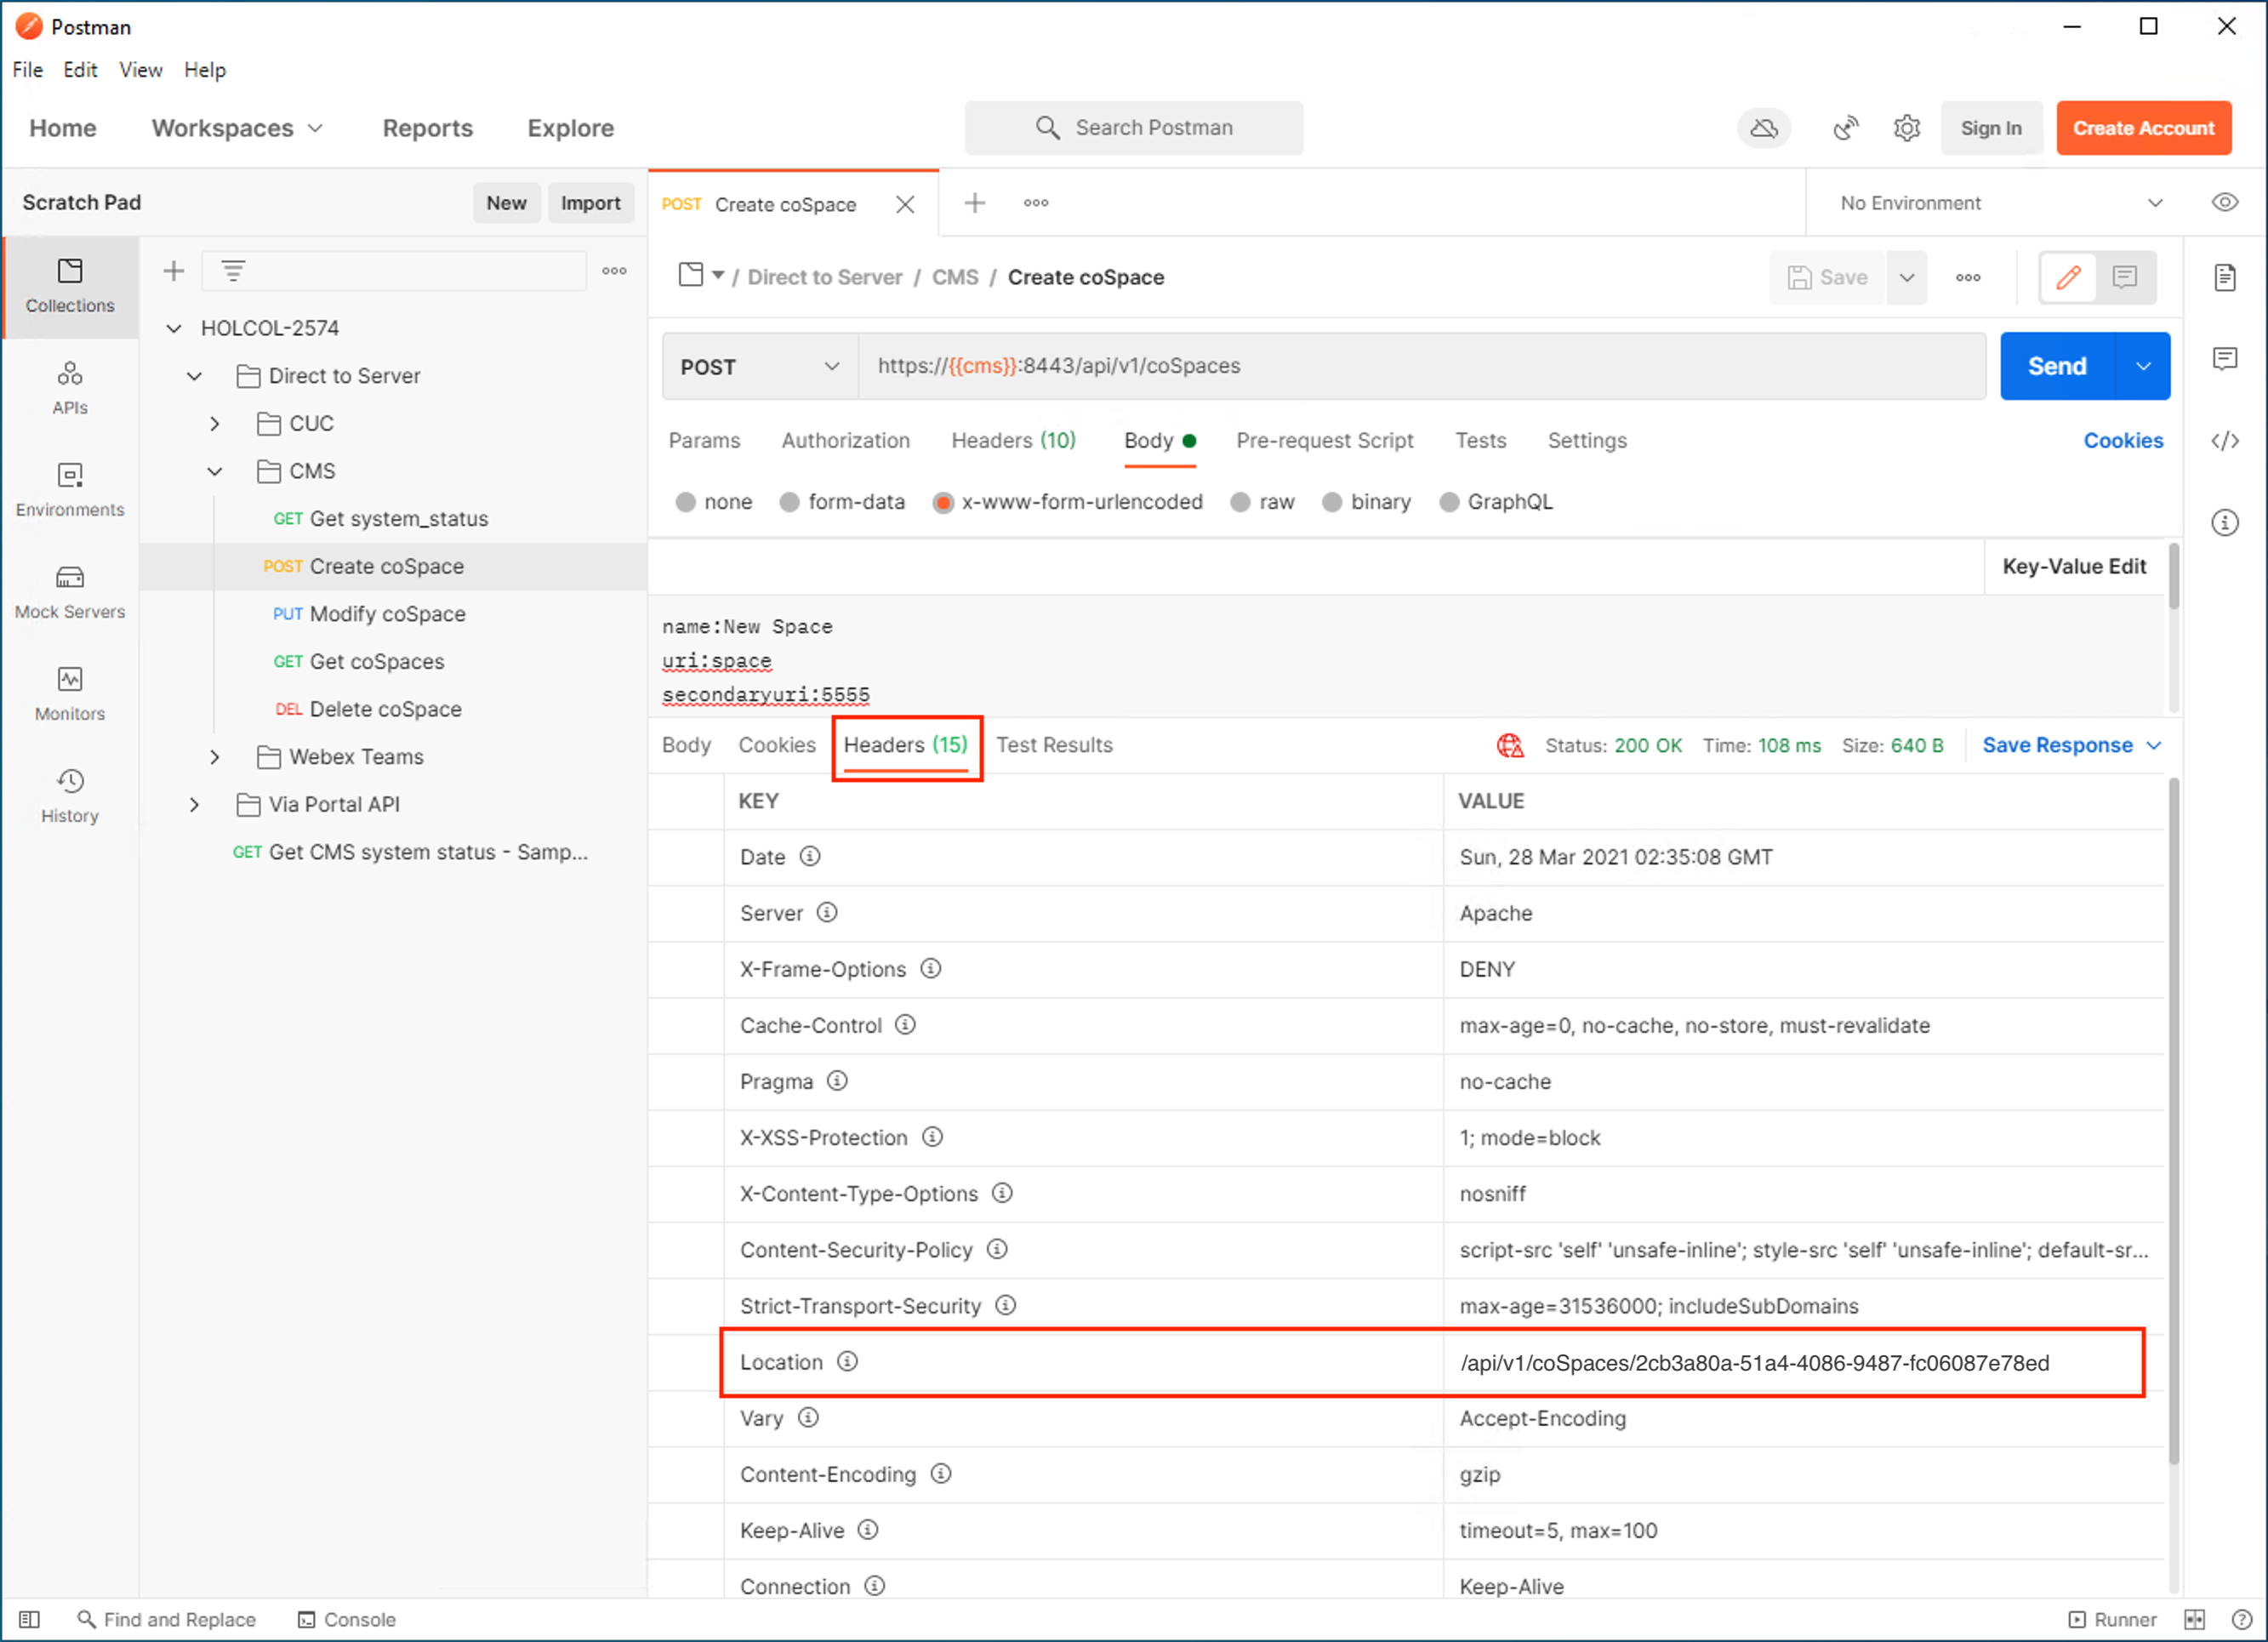
Step 3 - Modify a Space
Modifying the Space is similar as creating the Space, since you are sending data (with the desired changes), however that the Space ID will now be part of the URL.
- In the Postman HOLCOL-2574 collection, navigate to Direct to Server > CMS and click on Modify coSpace .
- Modify the URL so as to contain the coSpace ID (from the Location response header) from the previous step.
-
The
Body
simply instructs to change the
name
of the Space to "Modified Space"
and updates the
uri
to "newspace".
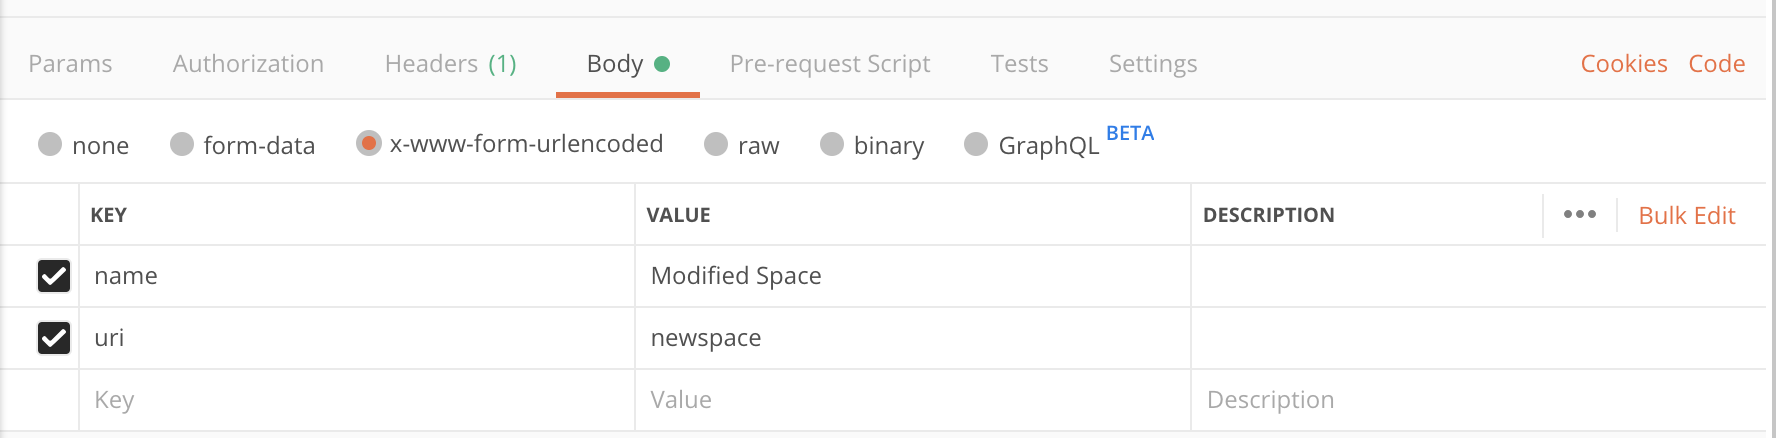
-
Click
Send
and you receive a 200 response code.
Step 4 - Retrieve Spaces
Retrieving the list of all Spaces is simply of sending a GET request to /api/v1/coSpaces .
- In the Postman HOLCOL-2574 collection, navigate to Direct to Server > CMS and click on GET coSpaces .
-
In the request tab, click
Send
and you should see one coSpace, as part of a valid XML in the
reply body.
And here you can see the coSpace ID, which was only part of the Location reply header when created. Take note of this since you will need it in the next step.
You'll notice that this request was not very specific, in that it always retrieves the entire list of coSpaces unless
a
filter
parameter is specified, for example,
https://cms1a.pod22.col.lab:8443/api/v1/coSpaces
?filter=pod
The problem that you will need to solve later, is that the filter above,
pod
is searching coSpace names, URIs,
and
secondaryURIs for
*pod*
. So if the filter only contains a single letter, it is almost the same as
getting the entire list. There is no way of specifying a specific user, without using that user's object ID.
A second consideration is that CMS can limit the number of items it returns. Currently the documentation states that the internal limit is 10, meaning if you have a 100-Space system and you send a request to GET /api/v1/coSpaces to retrieve them all, you will receive only 10 coSpaces in the reply, however , the total= value (see the reply above) will indicate the total number of matches (not the number returned). Using this total and the offset parameter, will allow us to get a "page" at a time, if you need to get a larger list of coSpaces. For example, if a GET /api/v1/coSpaces (with offset 0 implied) will return, say, the first 10; a GET /api/v1/coSpaces?offset=10 will retrieve from 11-20, etc.
Do not assume the number returned will be limited to 10. This number may change and has been observed in certain versions to have changed. The point is simply not to assume that if you are requesting all records, that all will be returned at a time.
Step 5 - Delete a Space
Deleting a Space simply requires the coSpace ID, which you have from the previous query.
- In the Postman HOLCOL-2574 collection, navigate to Direct to Server > CMS click Delete coSpace .
- Modify the URL so as to contain the coSpace ID from the previous step.
- Click Send and you should receive a 200 OK . If you run the query again, you'll see a 400 Bad Request with a failure code of coSpaceDoesNotExist , because a Space with that coSpaceID had already been removed.
Now you are ready to look at notifications using Webex.
Now that you have had some experience interacting with SOAP-based APIs, you can turn your attention to the other type of web service: REST. In order to send REST-based requests using Python, this lab will utilize the Python Requests library. To make this re-usable, a REST class will be implemented as a basic building block to send and receive the various request types (GET, POST, PUT, and DELETE) and to manage session re-use, so that each REST API, such as CUPI and CMS, can extend the class by adding the API-specific headers and parsing of the responses.
While you won't be able to test this code individually here, all subsequent REST modules will leverage it.
- Basic REST Request
- Response Checking
Step 1 - Basic REST Request
The REST class will use the following parameters:
- host : The host name / IP address of the server
- port : The server port for API access (default: 443)
- username and password : The credentials for basic authentication
- base_url : The base URL, such as "/api/v1" for a given API. This is simply to avoid having to send, for example, "/api/v1" with every request.
- headers : A dictionary of header settings that we need to apply. These are specific to the API you are interacting with, such as a specific Accept header for CUPI.
- tls_verify : Whether or not server certificate validation will be enforced.
Within this class, besides the __init__ method to initialize the class, there will be two methods:
- _send_request() send the request to the server--regardless of what verb is required and return the response. This method should return a Python dictionary indicating 'success', the raw 'response', and a 'message', which can be used to relay error information which may have occurred.
- _check_response() used to check if the response was in the 200-299 range, indicating a success from the HTTP perspective. This will only help identify basic HTTP-type errors. More API-specific error evaluation will occur later. For example, CUPI may return a 400 HTTP response to a query and then put more information about the specific error in the payload, which we can further process and return to the user.
Start implementing these methods using Visual Studio Code.
- In your VS Code tab, open up flaskr/rest/v1/rest.py using the Explorer
-
The
__init__
method initializes the REST object with parameters mentioned above.
In order for your application to minimize its impact on the server, add
a Session() instance. This object, also part of the Python Requests library, allows certain
parameters to persist from one request to the next (meaning, that it adds and re-uses a session ID
in the request header, if the server supplied one).
The server, therefore, does not need to instantiate a new client session for every request
made, potentially using up limited server resources--especially in the case of Unity Connection
and Communications Manager--as their individual sessions do not time out for 30 minutes,
by default. Notice that the Session() instance is created with credentials and the TLS
verification setting. The headers are also updated with the API-specific headers that are
passed to the object.
Add the following to the __init__() method:def __init__(self, host, username=None, password=None, base_url=None, headers={}, port=443, tls_verify=False): """ Initialize an object with the host, port, and base_url using the parameters passed in. """ self.host = host self.port = str(port) self.base_url = base_url self.session = Session() self.session.auth = HTTPBasicAuth(username, password) self.session.verify = tls_verify self.session.headers.update(headers) -
Currently the
_send_request
method only
sets a
result
variable. You add in functionality by first
properly assigning the
url
variable using the settings
obtained from when the class was initialized (in
__init__
). This
is, in effect, just a concatenation of the strings using the host, port, base_url and
api_method in the correct place to form a correct URL (as we had used with Postman).
Insert the highlighted line below to assign the url variable:# Set the URL using the parameters of the object and the api_method requested # in a format such as: https//host:port/api/v1/api_method url = "https://{}:{}{}/{}".format(self.host, self.port, self.base_url, api_method) -
Now add the code to send the individual request types. As we noted with Postman,
the POST and PUT often have both parameters and a payload, while GET can only have parameters and
DELETE will not have anything aside from the URL.
These requests should be placed inside a
try
block so that if a
RequestExcept
exception occurs, it can be returned in the 'message' instead
of crashing your program. There will be a different request for each of the supported
types. Only PUT and POST will need to send a payload, and a DELETE doesn't require any parameters
other than the URL to send to, which will include and object ID of some kind built into the URL.
If a response is received, you simply place it in 'response'
and set 'success' to True. You do not need to do any further interpretation of whether things
were successful yet.
Insert the following below the # Send the request comment line:# Send the request and handle RequestException that may occur try: if http_method in ['GET', 'POST', 'PUT', 'DELETE']: if http_method == 'GET': raw_response = self.session.get(url, params=parameters) elif http_method == 'POST': raw_response = self.session.post(url, data=payload, params=parameters) elif http_method == 'PUT': raw_response = self.session.put(url, data=payload, params=parameters) elif http_method == 'DELETE': raw_response = self.session.delete(url) result = { 'success': True, 'response': raw_response, 'message': 'Successful {} request to: {}'.format(http_method, url) } except RequestException as e: result = { 'success': False, 'message': 'RequestException {} request to: {} :: {}'.format(http_method, url, e)} return result
Step 2 - Response Checking
In most cases you will want to have some checks in place to see if a HTTP response code other than the 200-299 range was received. This can indicate congestion or other transient or permanent failure on the server side. You just need a method that you can call to check for that simple condition. In this lab, you won't implement any retries or other handling, but it could be added for specific cases.
-
In
flaskr/rest/v1/rest.py
, we have created a method called
_check_response
. Currently it looks like this. Remove
the highlighted
pass
line:
def _check_response(self, raw_response): """ Evaluates a response status. If it has a non-2XX value, then set the 'success' result to false and place the exception in the 'message' :param raw_response: The raw response from a _send_request. :returns: Returns a the same dictionary passed to it, with the 'success' and 'message' keys modified, if needed. :rtype: Dict """ pass -
Add the following code:
def _check_response(self, raw_response): """ Evaluates a response status. If it has a non-2XX value, then set the 'success' result to false and place the exception in the 'message' :param raw_response: The raw response from a _send_request. :returns: Returns a the same dictionary passed to it, with the 'success' and 'message' keys modified, if needed. :rtype: Dict """ try: # Raise HTTPError error for non-2XX responses raw_response['response'].raise_for_status() except HTTPError as e: raw_response['success'] = False raw_response['message'] = 'HTTPError Exception: {}'.format(e) return raw_response - Save this file now, as you have finished configured it.
Now you have a method to send the requests and one to check the results for obvious return failures. Next you can implement each individual API to utilize these methods and parse the results according to their own requirements.
For the native REST APIs, this lab will start with Cisco Unity Connection's Provisioning API (CUPI). You have already configured the generic REST portion, and we have extended that class for you with the CUPI-specific components, namely the header and then the response parsing. Specifically, in flaskr/cuc/v1/cupi.py , a CUPI class has been built which extends the REST class using a base_url of /vmrest and a header defined as:
In this CUPI class, we have two methods:
-
_cupi_request()
- sends the request using the REST
_send_request()
,
checks for basic errors and then returns the parsed response from
_cupi_parse_response()
. The
_cupi_request()
method takes the following variables:
- api_method : The API method, such as "users" that will be used with the existing base_url to form a complete url, such as "/vmrest/users"
- parameters : A dictionary of URL parameters to be sent, such as {'offset': 10}
- payload : The payload to be sent, used with a POST or PUT
- http_method : The request verb. CUPI only supports 'GET', 'PUT', 'POST', and 'DELETE'
-
_cupi_parse_response()
- this function parses the response and then
performs the following tasks:
- Decodes the JSON response and looks at its contents to make sure they are returned consistently (i.e. handle the case for a single item)
- If the results content is just a string, then return it. This is the situation you observed in the response of a POST message.
- In some situations, Unity Connection will return a web page describing an error exception. Instead of the whole web page, only the Exception message will be returned.
In this section, you will implement the following Unity Connection Provisioning API tasks:
- Get Version
- Get LDAP Users Available for Import
- Import an LDAP User by User Id
- Get a User by ID
- Modify user settings and voicemail PIN by User Id
- Delete the voicemail account by User Id
- Verification
Step 1 - Get Version
As with Postman, start with something simple: retrieving the Unity Connection version. If you recall, we sent a GET request to /version/product/ , which is what you can recreate here.
- In your VS Code tab, open up flaskr/api/v1/cuc.py
-
Near the top, you can instantiate the CUPI object. This will allow you to re-use the same object--and more importantly,
re-use the connections--for each request.
-
In the
cuc_version_api()
class, under the
get()
function, replace the
pass
line with the following highlighted line. Since the CUPI object
has already been instantiated as
myCUPI
, you can simply call the
_cupi_request()
method. Remember that the
base_url
for this object
is
/vmrest
, so the full URL requested will be
/vmrest/version/product/
using the default
http_method
of
GET
.
- Save this file.
Step 2 - Get LDAP Users Available for Import
Now that you are able to perform CUPI queries, build the front-end API to implement the LDAP users query, to find out who is available to be imported into the system.
- In your VS Code tab, open up flaskr/api/v1/cuc.py
-
In the
cuc_import_ldapuser_api()
class, add the following
highlighted line after the arguments are read. The
get_search_params()
function uses the argments to create a valid filter, like
query=(alias is user1)
.
Feel free to take a look at
get_search_params()
in this same file.
Then you can call the
_cupi_request()
method using the parameters built from the arguments.
- Save this file.
When you were working with Postman and, for example, importing users into Unity Connection, you would also retrieve a list of users and then look for the pkid, which you would later use in the POST request to import that specific user. You don't want your front-end web developers to have to worry about something like a pkid or how to retrieve this for each of the product APIs. To perform an import of a user, you really want them to be able to supply only the user ID . In your code on the backend, you can look up the pkid based on that user and perform the import if that user is found.
Step 3 - Import an LDAP User by User Id
To import an LDAP user using your API, you must implement the following logic:
- Read in the user id for the user you want to import.
- Use myCUPI 's send_request to request "import/users/ldap" for the desired user, using the query=(alias is <userid>) parameter to look them up in the Unity Connection LDAP database: myCUPI._cupi_request("import/users/ldap", parameters=params) , where params is the query.
- If you receive a user in the response, use that user's pkid to construct a POST request to "import/users/ldap", which imports the user, just as you had seen with Postman. E.g.: myCUPI._cupi_request("import/users/ldap", parameters=params, payload=args, http_method='POST') , where the parameter specifies the voicemail templateAlias.
- Handle errors, such as no user found or an error in querying for the user.
You can now implement this logic in the code.
- In your VS Code tab, open up flaskr/api/v1/cuc.py
-
In the
post()
function in the
cuc_user_api
class, add the following:
- Save this file.
Step 4 - Get a User by ID
The Unity Connection-related tasks such as modifying and deleting a user should require only the user ID as an input. For that, you need a function that can look up a Unity Connection user account and retrieve their pkid . Luckily, we have already seen that Unity Connection allows for a specific user search using a GET to /vmrest/users with a query parameter such as the following: ?query=(alias is <userid>) . You should put this in its own function, because every one of the subsequent requests will need that exact same lookup.
- In your VS Code tab, open up flaskr/api/v1/cuc.py
-
In the
get_user_by_id()
function, replace the
pass
line with the following:
-
To test this later, add the following to the
get()
function:
This will search for and return a specific Unity Connection user, with all their settings, given only the user ID.
Step 5 - Modify User Settings and Voicemail PIN by User Id
Now that you have a way to look up a user account, you can then add the ability to modify them. You may also want to provide a simple flag for a user to reset a mailbox and change a user's PIN. We have handled gathering the input for you. Now, a few API calls in succession will be required to implement user modifications, based on what was supplied. Keep in mind that the credential/PIN changes are a different API method than other user settings.
The following logic will need to be implemented:
-
Read in the arguments. This is done for you and will include the following
dictionary keys:
- ListInDirectory - True/False - controls whether the account is listed in the Unity directory
- IsVmEnrolled - True/False - controls whether the account's initial enrollment prompt will play
- PIN - Integer - a new PIN for the account
- ResetMailbox - True/False - ability to reset the ResetMailbox and TimeHacked , which, in effect, allows the user to try to log in again after being locked out (which usually happens when a password was forgotten)
- Look up the user in order to get the account's ObjectId
- If there are user settings to change, issue the PUT request to /users/ObjectId to do so.
- If credential/voicemail reset settings were supplied then issue a PUT request for that (since it's a different URL, /users/ObjectId/credential/pin )
- You need to handle errors such as the user not found, or if one of these requests generates an error
Now turn your attention to implementing this in your code.
- In your VS Code tab, open up flaskr/api/v1/cuc.py
-
In the
put()
function of the
cuc_user_api
class, replace the
pass
line with the following to check if any arguments
were actually supplied and look up the user and then the user's object ID:
- Save this file.
Step 6 - Delete the Voicemail Account by User Id
As with other userid operations, you must first look up the user in order to get its Object ID. Then, if there were no errors, issue the DELETE to remove the account.
- In your VS Code tab, open up flaskr/api/v1/cuc.py
-
In the
delete_user()
function, replace the
pass
line with the following
return
line:
- Save this file.
Step 7 - Verification
You have added a lot of code so far, now it is time to make sure it works as expected.
- In VS Code, make sure flaskr/api/v1/cuc.py is saved
-
Restart your Flask app by clicking the green restart button from the controller:
which you should always see along the top of the window, when Flask is running.
Or, if Flask is not started at all, click the Debug button on the left side
followed by
the green start/play button next to
Start LTRCOL-2574 Portal
- If the Terminal window at bottom right shows: * Running on http://10.0.122.40.40:5000/ (Press CTRL+C to quit) , then your Flask app is running.
- Access the Swagger UI page at http://dev1.pod22.col.lab:5000/api/v1/
- Expand the cuc section.
-
Perform the individual checks:
- Get LDAP Users Available for Import
- Click the GET /cuc/ldap_users operation.
- On the right, click Try it out .
- In the expanded section, click Execute .
-
Examine the response. You should note a Server response code of
200
and a response body with the users that can be imported.
- Import an LDAP User by User Id
- Click the POST /cuc/users/{userid} operation.
- On the right, click Try it out .
- For the userid setting, enter pod22user1
- Click Execute .
-
Examine the response. You should note a Server response code of
200
and a response body that should indicate success such as in this example:
The response message, is just as you saw with Postman. The difference is that you don't really need to pay attention to the ID assigned, since your code can retrieve this any time using the user ID. - Modify user settings and voicemail PIN by User Id
- Click the PUT /cuc/users/{userid} operation.
- On the right, click Try it out .
-
Set the following:
- For ListInDirectory , select false
- For IsVmEnrolled , select false
- For ResetMailbox , select true
- Set userid to pod22user1
- Click Execute .
- Examine the response. You should note a Server response code of 200 to indicate a success.
- Get a User by ID
- Click the GET /cuc/users/{userid} option.
- On the right, click Try it out .
- Set userid to pod22user1
- Click Execute .
- Examine the response and make sure you received a response of 200 . Check to see if ListInDirectory and IsVmEnrolled are now false .
- Delete the voicemail account by User Id
- Click the red DELETE /cuc/users/{userid} method.
- On the right, click Try it out .
- Set userid to pod22user1 Click Execute .
-
Examine the response. You should note a Server response code of
200
and a response body that shows
success
as
true
. To test a failure, try executing this again and you should see
something like:
You have a functional CUPI API! Now you are ready to implement the same for Cisco Meeting Server.
As with CUPI, in flaskr/cms/v1/cms.py we have provided a CMS class that extends the REST class, this time with a base_url of /api/v1 and a header as:
A dictionary of error codes is also built, which is pulled from the CMS documentation to provide some more useful error information instead of just a code.
In this CMS class, we also have two methods which provide the same features as the CUPI class, but must process things slightly differently because of the XML return data:
-
_cms_request()
- sends the request using the REST
_send_request()
,
checks for basic errors and then returns the parsed response from
_cms_parse_response()
. The
_cupi_request()
method takes the following variables, exactly as with the CUPI class:
- api_method : The API method, such as "coSpaces" that will be used with the existing base_url to form a complete url, such as "/api/v1/coSpaces"
- parameters : A dictionary of URL parameters to be sent, such as {'offset': 10}
- payload : The payload to be sent, used with a POST or PUT
- http_method : The request verb. CUPI only supports 'GET', 'PUT', 'POST', and 'DELETE'
-
_cms_parse_response()
- this function parses the response and then
performs the following tasks:
- Return the response data, converted from XML, in a predictable format
- For a POST request, return the result in the location header
- Return information about error conditions, which are XML return codes for which there is more information that can be provided.
Once the CMS class is built, you can initialize the class globally, as before. CMS actually does not implement any sessions that could be over-utilized. In this case, the Session will still work as before; it simply will never get a JSESSIONID to use as part of the request header. With the class initialized, you can add functions that send requests similar to what you did with Postman, however, you can fine-tune this data to return exactly what you want. For example, the Get Version function will query the /system/status endpoint in CMS as before, but we will only return the version, since that is all that was asked for.
In this lab, we have assumed that if users are assigned personal CMS Spaces, then they will be created with the user ID as the uri , the telephone number as a secondaryURI , and the name of the Space built from the user's display name. These properties could be retrieved from an LDAP directory, but for this lab we chose to implement a UDS-based query using the exact same REST class you already built. It is already initialized as myCUCMuds and only has one callable function, get_user(userid) , that returns a response dictionary with a userName , phoneNumber , and displayName that we can use.
This will allow you to build a POST to create a Space using the information from the data in UDS of the CUCM--and return an error, if that user does not exist in the CUCM.
Just as with CUPI, user modifications/deletions will require you to look up users by user ID. In this lab's case, that means trying to mach a user ID to a URI, a field which you will have populated with the user ID when the Space was created. The challenge is that CMS does not allow you to do a direct lookup. It only allows you to add a filter= parameter, which is always a wildcard filter. In other words, to search for a specific user, you must first search with a filter, then for the results returned, you need to look through each of them to see if the user id you are searching for matches the URI field.
To complicate things further, CMS can throttle responses, limiting the number of objects returned to 10 (per documentation). To retrieve more results than that, you have to implement paging; that is to say repeating the same query, each time adjusting the offset in order to get the next "page."
In this section, you will implement and verify the following Cisco Meeting Server API tasks:
- Retrieve the Version
- Retrieve a CMS Space by User Id
- Create a CMS Space by User Id
- Modify a CMS Space by User Id
- Delete the Space by User Id
- Verification
Step 1 - Retrieve the Version
When working with Postman, you retrieved the system status from CMS, which included the version. In this case, you can first write a function to return the CMS version directly, using the information from the system status query.
- In your VS Code tab, open up flaskr/api/v1/cms.py
-
As you did previously with CUPI, the first step is to instantiate the
CMS
object near the
top of the file. Add the following lines:
-
In the
cms_version_api()
class, under the
get()
function,
replace the
pass
line with the following highlighted text:
- Save this file.
Step 2 - Retrieve a CMS Space by User Id
Using Postman, you were able to retrieve a list of Spaces and an individual Space using the Space ID. But in your web portal, you will want to retrieve, create, update, and delete a CMS space using only a user id, where the user ID is mapped to a URI associated with the Space.
Since all of these tasks require retrieving a list of Spaces and then searching through them to see if the user ID matches a Space URI, you should put that capability in its own function.
- In your VS Code tab, open up flaskr/api/v1/cms.py
-
The main function to retrieve the ID of the coSpace using the user ID is
get_coSpace_id()
. Logically, it needs to:
- Query the coSpaces using the user ID as the filter (in order to reduce the number of coSpaces returned in the reponse)
- Check if all coSpaces were returned in the response, or if it is a partial list, since CMS will limit the number of items returned, but at the same time will indicate how many matches there are.
- For the coSpaces returned, check if the URI/secondaryURI of these coSpaces matches the user id you are searching for exactly.
- If the original response did not include all coSpaces that matched the filter, then you need to repeat your query one or more times, each time repeating checks on the response and using the offset capability to retrieve the "next" set of matches.
-
The
get_coSpace_id()
function also utilizes another function, called
match_space_uri()
, that searches a provided list of Spaces and if one
of those Space's URI/Secondary URI matches the user ID you are searching for, then return
the ID of that Space.
Replace the pass line with the following highlighted text in the match_space_uri() function:
Step 3 - Retrieve a CMS Space by User Id
Now that you have the ability to look up a Space by the user ID, you just need to add the code to call that function.
- In your VS Code tab, open up flaskr/api/v1/cms.py
-
In the
get()
function of the
cms_spaces_api()
class, replace the
pass
line with the following highlighted
return
line:
- Save this file.
- Since you don't have a user created at this time, you can verify this code later, after the ability to add and modify users is added.
Step 4 - Create a CMS Space by User ID
Creating a CMS Space was not very difficult in Postman. You simply need to send a POST request to /coSpaces . Even without any other parameters, a Space is created. But for this portal you would like to specify a user ID when creating the Space. With the user ID, you should be able to look up properties about the user. The source of this information might be Active Directory, but here we will use the CUCM's User Data Server (UDS).
THe UDS class we have created for you is another very simple REST service, which can send user searches for user IDs in the CUCM. For this, we have built a get_user() function which takes a user string. Utilizing the same REST class, it returns the same response dictionary containing the following keys:
- success (boolean) - whether or not the request succeeded
- message (string) - Detailed message about the message sent/received
- response (string) - the user, if found
- num_found (integer) - number of users found (should be 0 or 1 for us)
- In your VS Code tab, open up flaskr/api/v1/cms.py
-
In the
cms_spaces_api()
class, under the
post()
function,
add the following highlighted lines:
- Save this file.
Step 5 - Modify a CMS Space by User Id
Modifying a CMS object is much simpler. You use get_coSpace_id() . If the response is successful, then you can send the PUT request to CMS with the retrieved Space ID. Otherwise you can respond an errored user lookup (which could have failed because the user was not found or because there was some error communicating with CMS).
- In your VS Code tab, open up flaskr/api/v1/cms.py
-
Under the
put()
function of the
cms_spaces_api()
class,
insert the following highlighted lines:
- Save this file.
Step 6 - Delete the Space by User Id
Similar to Space modification, a CMS Space Delete uses get_coSpace_id() to look up the Space's ID which is used to generate a DELETE request to CMS.
- In your VS Code tab, open up flaskr/api/v1/cms.py
-
In the
cms_spaces_api()
class, under the
delete()
function,
replace the
pass
line with the following highlighted lines:
- Save this file.
Step 7 - Verification
You have added a lot of code so far, now it is time to make sure it works as expected.
- In VS Code, make sure flaskr/api/v1/cms.py is saved
-
Restart your Flask app by clicking the green restart button from the controller:
which you should always see along the top of the window, when Flask is running.
Or, if Flask is not started at all, click the Debug button on the left side
followed by
the green start/play button next to
Start LTRCOL-2574 Portal
- If the Terminal window at bottom right shows: * Running on http://10.0.122.40.40:5000/ (Press CTRL+C to quit) , then your Flask app is running.
- Access the Swagger UI page at http://dev1.pod22.col.lab:5000/api/v1/
- Expand the cms section.
-
Perform the individual checks:
-
Retrieve the Version
- Click the GET /cms/version method.
- On the right, click Try it out .
- Click Execute .
- Examine the response populated below. You should note a Server response code of 200 and a response body with the version.
-
Create a CMS Space by User Id
- Click the POST /cms/spaces/{userid} operation.
- On the right, click Try it out .
- Enter the user ID: pod22user1
- Click Execute .
-
Examine the response. You should note a Server response code of
200
and the results should show a message with the new object's ID.
For example:
The "message" contains the object ID of the new Space.
-
Modify a CMS Space by User Id
- Click the PUT /cms/spaces/{userid} operation.
- On the right, click Try it out .
- Change the name to New Pod22 User1 Space
- Change the defaultLayout to allEqual
- Enter the user ID: pod22user1
- Click Execute .
- Examine the response. You should note a Server response code of 200 and the results should success as true .
-
Retrieve a CMS Space by User Id
- Now look up that Space by ID. Within the Swagger UI, click the GET /cms/spaces/{userid} operation.
- On the right, click Try it out .
- Enter the user ID: pod22user1
- Click Execute .
- Examine the response. Make sure the name has been changed to New Pod 22 User1 Space and the defaultLayout is set to allEqual .
-
Delete the Space by User Id
- Click the DELETE /cms/spaces/{userid} operation.
- On the right, click Try it out .
- Enter the user ID: pod22user1
- Click Execute .
- Examine the response. You should note a Server response code of 200 .
- To check some of the error handling, simply repeat this same DELETE /cms/spaces/{userid} operation by clicking Execute . Since the object was deleted, the ID you specify now is invalid, and you should get a fairly readable message in the return.
-
Retrieve the Version
Cisco Meeting Server capabilities could be easily expanded. But now you are ready to take a look at Cisco Webex and notifications.
While AXL API exposes many CUCM Database provisioning tasks, the UC Serviceability XML API is a collection of SOAP-based APIs that expose multiple capabilities for CUCM administrators to automate management and monitoring tasks.
The family of UC Serviceability XML APIs consist of the following 5 APIs:
- Real-Time Information (RiSPort) → API Reference
- Call Detail Records (CDRonDemand) → API Reference
- Performance Monitoring (PerfMon) → API Reference
- Control Center and Control Center Extended (ControlCenter) → API Reference
- Log Collection (Log Collection, DimeGetFile) → API Reference
Each of these APIs has its own dedicated WSDL file that describes its unique methods (service endpoints) and unlike AXL (AXLAPI.wsdl) they are available to download directly from a given CUCM node. Note that all methods (service endpoints) are NOT available in all CUCM releases. See https://developer.cisco.com/site/sxml/documents/operations-by-release/ for more information.
Let's take a closer look at the RisPort70 and Perfmon APIs.
In this section, you will use SoapUI to perform the following tasks:
- Download RIS and Perfmon WSDL files
- Check Phone Registration Status via RisPort
- Check Phone Registration Status via Perfmon
- Delete a Phone
Step 1 - Download RIS and Perfmon WSDL files
-
Unlike the AXL (AXLAPI.wsdl) file you had to download via the axltoolkit plugin, the RISPort and Perfmon WSDL
files can be
downloaded directly from a CUCM URL. First you need to be authenticated with the CUCM.
Access the CUCM GUI at https://cucm1a.pod22.col.lab and log in with username admin and password C1sco.123 -
Now that you are authenticated,
Right Click
each of the following links and select
Save link as...
and then set the
Save as type
option to
All Files
in order to download them to your local machine into your
Downloads
folder:
- https://cucm1a.pod22.col.lab:8443/realtimeservice2/services/RISService70?wsdl → Save as RISService70.wsdl
- https://cucm1a.pod22.col.lab:8443/perfmonservice2/services/PerfmonService?wsdl → Save as PerfmonService.wsdl
-
Next you need to add each of these WSDL files to the already opened SoapUI project. Open SoapUI and
Right click
on the
UCMSOAP
Project and select
Add WSDL
.
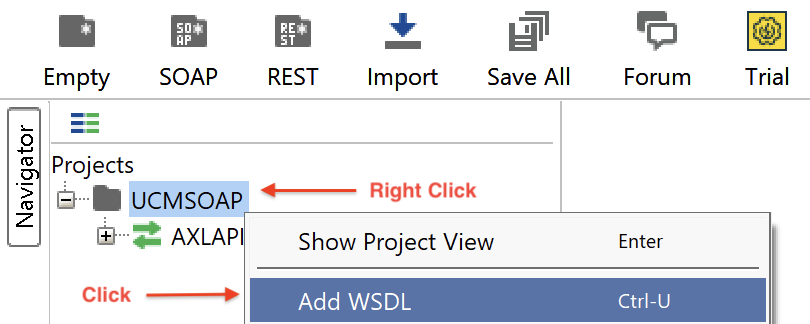
-
For the
RisPort70
WSDL file; click
Browse
.
Navigate to your WSDL file downloaded earlier:
Click on
button the get to the Desktop, then enter or navigate to the location of the file
C:\Users\student1\Downloads\RISService70.wsdl
and Click OK
-
Repeat the
Add WSDL
operation for the
PerfmonService
WSDL file;
Navigate to your WSDL file downloaded earlier:
Click on
button the get to the Desktop, then enter or navigate to the location of the file
C:\Users\student1\Downloads\PerfmonService.wsdl
and Click OK
You should now have two more bindings added to SoapUI project named UCMSOAP as shown below. You may have to collapse the AXLAPIBinding tree to see the other two you just added.
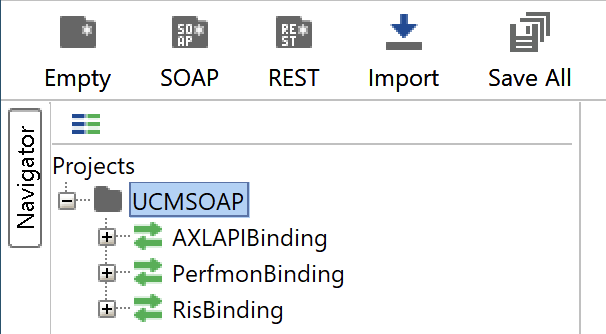
-
For the
RisPort70
WSDL file; click
Browse
.
Navigate to your WSDL file downloaded earlier:
-
Next, similar to the steps you performed in the SOAP Overview Section for AXLAPIBinding, you need to set the default endpoint URL and credentials
for the
PerfmonBinding
and
RisBinding
objects.
- Right-click on PerfmonBinding and pick Show Interface Viewer (same as double-clicking or pressing Enter).
- Select the Service Endpoints tab. Double-click the Endpoint Column entry and update https://localhost:8443/perfmonservice2/services/PerfmonService to https://cucm1a.pod22.col.lab:8443/perfmonservice2/services/PerfmonService
- Double-click on the Username field and enter admin
- Double-click on the Password field and enter C1sco.123 . Be sure to press Enter to save the value.
- Close the PerfmonBinding window by clicking the X in the right of its blue title bar .
-
Repeat these steps for the
RisBinding
as shown below:
- Right-click on RisBinding and pick Show Interface Viewer (same as double-clicking or pressing Enter).
-
Select the
Service Endpoints
tab. Double-click the Endpoint Column entry and update
https://localhost:8443/realtimeservice2/services/RISService70
to
https://cucm1a.pod22.col.lab:8443/realtimeservice2/services/RISService70 - Double-click on the Username field and enter admin
- Double-click on the Password field and enter C1sco.123 . Be sure to press Enter to save the value.
- Close the RisBinding window by clicking the X in the right of its blue title bar .
When sending SOAP requests via SoapUI, if you ever get a response payload that indicates " <!--custom Cisco error page--> " and "HTTP Status 401" in the content, double check your Binding Service Endpoint Username & Password
Step 2 - Check Phone Registration Status via RisPort
The RisPort70 (Real-Time Information Port) service provides an API for querying the current connection status of phones, devices, and CTI applications connected to the CUCM.
The RisPort70 API documentation is located here: https://developer.cisco.com/docs/sxml/#!risport70-api
- Open SoapUI in the UCMSOAP project.
-
In the Navigator, under
RisBinding
, expand the
selectCMDevice
method.
This method allows clients to perform Cisco Unified CM device-related queries. The method returns a snapshot of real-time device registration status from each Cisco Unified CM node. The data includes registration status, IP address, model info, and CTI application connections to the device. A single device may appear in multiple elements if the device has registered to multiple nodes. Devices may be requested by wildcard using an asterisk, *.
- Double-click on Request 1 to open it.
- Again you can see a series of method elements that needs to be supplied, however all elements are required, otherwise the Sample SOAP request payload is not much different than what you have seen with AXL. In this step, We would like you to search CUCM RIS DB based on the Description field and get Device Registration status for Device Descriptions containing Cisco* . Copy and Paste the following payload it into your SoapUI selectCMDevice / Request1 : Some of the parameters you are including in this request deserve some explanation. All of these parameters are documented in the API guide mentioned earlier so you should reference that guide for details on what each of the above parameters means. You must refer to the API guide to determine what value in the Model field maps to a particular phone model.
-
Click
Run
and observe the selectCmDeviceResponse payload. Notable pieces of information are:
For each device matching the selection criteria, you can see the real-time registration status:
You can also see run-time information such as the IP address of the device:
or the Active Software Version the device is running:
Step 3 - Check Phone Registration Status via Perfmon
The Perfmon API is an interface to the CUCM performance counters normally accessed through by the Real-Time Monitoring Tool (RTMT). The PerfMon API allows clients to perform the following tasks:
- Collect Perfmon data either session-based or single-transaction
- Retrieve a list of all PerfMon objects and counter names installed on a particular host
- Retrieve a list of the current instances of a PerfMon object
- Retrieve a description of a PerfMon counter
The session-based counters are useful for tracking information over time. For that, a perfmonOpenSession is required initially to get a session ID. Sessions can be explicitly closed when data collection is complete (best practice) or they will automatically clear if idle for 25 hours. The session ID is subsequently used in queries such as perfmonAddCounter and perfmonCollectSessionData .
See https://developer.cisco.com/docs/sxml/#!perfmon-api for more information on PerfMon API.
In this section, you will perform a single transaction request utilizing the perfmonCollectCounterData operation. You will be querying the Cisco CallManager Performance Counter Class from the CUCM host. This PerfMon API operation request requires not only the Perfmon Counter Class Name (aka Object), but also the specific CUCM Node/Host. For example, this means that even if the SOAP Request is sent to the publisher server in the cluster, the performance class data from any of the other CUCM Cluster nodes can be retrieved. Follow these steps to retrieve performance data using the PerfMon API:
- Open SoapUI in the UCMSOAP project.
- In the Navigator, under PerfmonBinding expand the PerfmonCollectCounterData method.
- Double-click on Request 1 to open it.
- There are only two elements required, the Host and the Object (aka Performance Counter Class). The query to retrieve all counters under the Cisco CallManager counter class can be seen below. Click the copy button and paste the following payload into your SoapUI PerfmonCollectCounterData / Request 1 :
- Click the Run button. In the response payload you will find the RegisteredOtherStationDevices counter, which should indicate 1 , for the only registered Webex Client device.
Webex
Relevant Webex resources:
- The Webex API is documentation: https://developer.webex.com . This is where you can sign in to get your own Personal Access Token, create a Bot, access the API, etc.
- Webex on DevNet: https://developer.cisco.com/webex/ . Look for the Learn link for access to the Cisco Learning labs or participate in group support/discussion forums using the FAQ link.
- Webex Calling Software Development Kit (SDK): https://pypi.org/project/wxc-sdk/ with documentation at:
- The WebexPythonSDK at https://webexcommunity.github.io/WebexPythonSDK/ is a community developed Pythonic wrapping of the Webex APIs. It is especially useful for Bot/messaging application and also has a support Webex Space for questions.
- For Postman fans, there is an excellent Postman Collection for Webex Messaging and Admin APIs at: https://github.com/CiscoDevNet/postman-webex
- The Webhook Echo Bot used in this lab is available open source at: https://github.com/pgiralt/wx-webhook-echo
- The webex_bot module uses Websockets to simplify the process of creating a conversational bot: https://pypi.org/project/webex-bot/
Unity Connection - CUPI
Unity Connection has implemented the following APIs:
- Cisco Unity Connection Provisioning Interface (CUPI) API for administrative provisioning functions, such as adding/removing users and system-wide settings.
- CUPI API (for End Users) for provisioning end-user accessible features, such as their greetings or transfer settings.
- Cisco Unity Connection Messaging Interface (CUMI) API handles all send/receive/reply and other message functionality.
- Cisco Unity Connection Telephony Interface (CUTI) API is a web service for Telephony Record and Playback (TRaP) functions. Using this, you can place a call from Unity Connection and then record the audio to a greeting or a recorded name.
- Cisco Unity Connection Imaging Interface (CUII) API allows access to message state, but responses will be in the form of graphical icons, indicating the state.
- Cisco Unity Connection Notification Interface (CUNI) API is used for managing subscriptions to events, such as notifications when voice mail messages are received or deleted.
The difference in CUPI for administrators and CUPI for end users is in the rights required by the account accessing the system. System administration tasks, consequently, require an account with the System Administrator role (configured via the GUI under the User > Roles). Whereas CUPI for end users are accessible to end users for administering their own account, such as greetings, transfer rules, etc.
Aside from the Postman collection we have for testing, the Cisco Unity Provisioning API (CUPI) for administrator and end users has a published Web Application Description Language (WADL) that can be downloaded. This is an XML file that models the resources provided by the web service, similar to what the WSDL file does for the SOAP API. This file can be downloaded from the Unity server using the URL https://{UnityConnectionServer}/vmrest/application.wadl . This isn't available for all APIs, not even all of the Unity Connection APIs, but for these common administrative tasks, having this reference handy is extremely useful. Additionally, a schema is published on the server itself, accessible via https://{UnityConnectionServer}/vmrest/schema . This is especially useful in analyzing the types of data that may be returned for a given query.
Note:
Make sure the entire file is downloaded. Usually it's best to use something like
curl
or
wget
.
For example:
curl -k -u admin:C1sco.123 https://cuc1a.pod22.col.lab/vmrest/application.wadl -o application.wadl
Once downloaded either SoapUI or Postman can import this file (File > Import). In Postman, this loads a Collection, for which all
options are exposed. You can fill in the credentials at the Collection root and then easily perform queries,
checking/unchecking the options you intend to send.
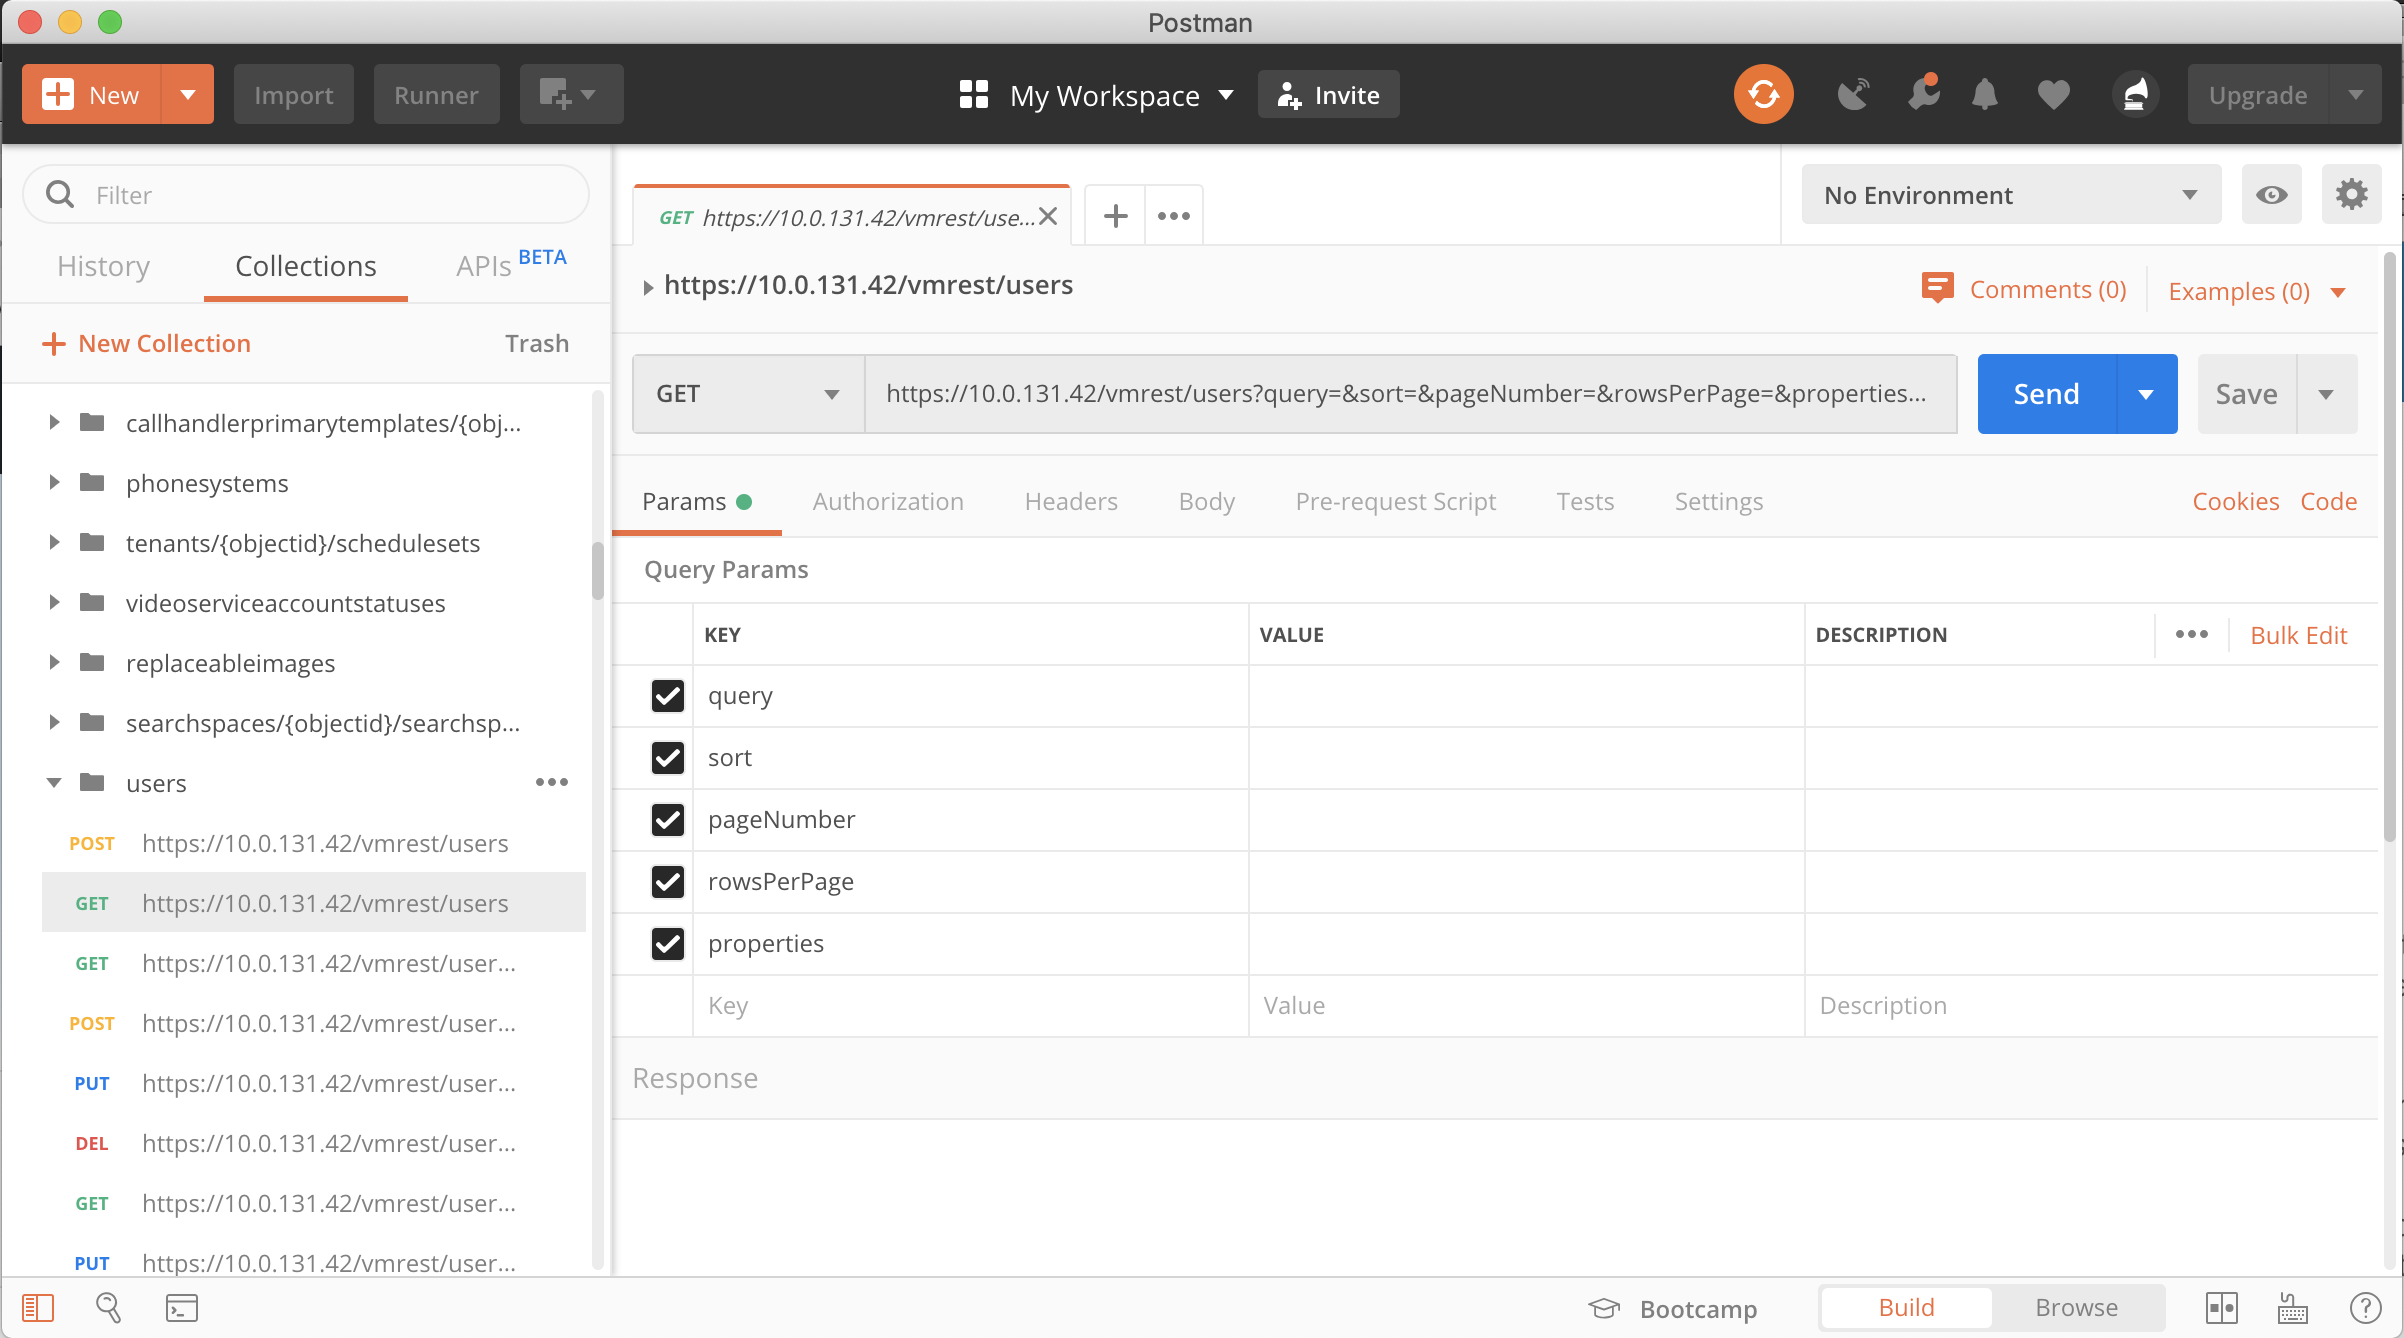
In general, Unity Connection's APIs are fairly flexible. A field that is not understood is always ignored by the server, meaning if some setting is changed that exists in a newer version and that same setting is specified in an older one, the older server will simply ignore that data. As far as the query itself, the server will generally respond back with at 415 if the Content-Type header is not understood and a 302 if there is a connection attempt to an insecure (http) for that is redirected by the server to a secure (https) port.
In this lab, we only have one Unity Connection cluster, but if you have multiple, networked Unity Connection clusters, you can determine which cluster that user is located by querying the globalusers table. For example: GET http://{UnityConnectionServer}>/vmrest/globalusers?query=(alias%20is%jdoe)
For larger data queries, the rowsPerPage and pageNumber can be used to implement paging, thereby reducing the amount of data the server will have to respond with for a query. The query parameter, with its filtering options ( dtmfaccessid startswith 855512 ) can further reduce the amount of data.
Regarding Unity Connection's performance, the system is able to process a maximum of 5 web application requests at one time. The throttle uses a global variable for this, so any request in any process using the throttle will count towards 1 of the 5. Any request that comes in while 5 or more others are processing will get queued and processed as soon as one of the active requests is complete. We can queue up to 255 requests (or the thread limit in tomcat, which is 150). As long as requests process at a rate of 1 request per second, the other requests will remain in the queue. If the requests start processing at a rate slower than 1 per second, the queue wait mechanism times out and the client will get a "server busy" (HTTP 503) response.
For troubleshooting, Unity Connection does provide VMREST micro traces, set on the
Cisco Unity Connection
Serviceability
page under
Traces
>
Micro Traces
. This generally requires
Debug
-level traces and are written to the CUC Tomcat log trace file location (from the CLI:
file list activelog cuc/diag_Tomcat_* date detail
For example a GET request for the /version/product may look like:
    10:29:20.548 |20085,,,VMREST,3,DEBUG [http-bio-443-exec-2]  com.cisco.connection.rest.SecurityFilter#doFilter - IMS result code: 0
    10:29:20.558 |20085,,,VMREST,3,DEBUG [http-bio-443-exec-2]  com.cisco.connection.rest.CorsFilter#doFilter - doFilter - The request is not a CORS request as request is from same origin: null . Delegating to next filter for further processing.
    10:29:20.558 |20085,,,VMREST,3,DEBUG [http-bio-443-exec-2]  com.cisco.connection.rest.RequestFilter#filter - REQUEST GET version/product/
    10:29:22.004 |20085,,,VMREST,3,DEBUG [http-bio-443-exec-2]  com.cisco.connection.rest.VersionInformationRestImpl#checkProductVersion - Installed product version: 12.5.1.14900-45
Cisco Meeting Server - CMS
Cisco Meeting Server API access is available via the webadmin feature. This is enabled on a Callbridge server and then uses a user account--either an administrator or minimally an api user. For example, you can add a user for api access via the CLI using the command: user add apiuser api , which then prompts for a password.
Aside from the official API documentation , Cisco Meeting Server has examples and code snippets on Devnet . From there you can download a Postman Collection for most of the CMS methods, as well as a Python SDK called Canopy. These items aren't necessarily maintained by Cisco on a per-release basis, but in general they are very helpful and can be extended for any additional API methods that are introduced. Cisco does maintains interactive API documentation at https://ciscocms.docs.apiary.io . This documentation and tool allows you to run mock queries and get results directly within the framework. At some point in the future, this will likely become the official API documentation repository for CMS.
The documentation does a good job explaining the object hierarchy in CMS, but there are some general considerations to point out with this API:
- Requires HTTPS and Basic authentication.
- Successful GET requests will receive response payload in text/xml format.
- POST and PUT methods require the Body as Content-Type: x-www-form-urlencoded
- While CMS limits the number of responses (officialy 10, although in some intstances has been observed to be higher), GET requests support limit and offset parameters to implement a paging capability. For example, for a large number of objects, the first 10 results would be returned using offset=0 and limit=10, the next 10 using offset=10 and limit=10.
- The filter parameter for GET requests often searches a variety of fields (for example, when using filter on coSpaces, the URI, secondaryURI and Name parameters fields are all searched. It does so in a wildcard fashion. Meaning filter=test is searching for *test*. You cannot use filter and enforce an exact match.
The following provides some background information on the types of tools we use in this lab as well as tips for working with them.
Visual Studio Code (VS Code)
As mentioned in the lab, we utilized Microsoft Visual Studio Code for code editing. Although the ability to run VS Code remotely, yet be accessed via a browser using code-server may not be relevant for your situation, to assist in debugging and formatting of Python code, you will almost certainly want a Python extension, or the Python Extension Pack , which includes a few Python-related extensions. Without this extension, VS Code can't even help us in syntax-related errors in Python code.
Since VS Code is multi-platform, regardless of the machine you use, once installed, the steps described in the lab here should be very similar, regardless of your specific platform. It is also a good starting off point for any subsequent tools, because in most cases, you'll want to use things that integrate with VS Code so that a single environment can be utilized.
Source Version Control - Git
Git is a set of tools to implement a distributed version-control system for tracking source code changes. Used in conjunction with hosting services like GitHub, GitLab, or BitBucket, software projects can be developed and shared with other developers. Even with just one developer, utilizing Git is useful to track changes, revert, and maintain proper versioning.
For this lab, while the lab guide is hosted on one of our servers, the API portal itself is published to a Git repository that is publicly available. That means with the right environment set up, you can download this software, run it and modify it as you wish. Obviously you won't be able to test with the equipment we make available to you, but with very minimal modifications, if you have access to a lab or test equipment, you can modify this to fit your needs.
If your platform does not come with Git, there are several sources not the least of which is the main Git site .
The external repository for our software is at: https://github.com/collabapilab/ltrcol-2574-portal.git
Note there are two branches in this Repo:
- master Branch contains the fully built-out Portal
- skeleton Branch contains a partially built-out Portal that is meant to be used while following this lab's guide
Virtual Environments
Although not absolutely mandatory, understanding and using virtual environment for your project can save you a lot of time in the long run. A virtual environment, as the name implies, is a context in which the code runs. For example, in this project, all of the Python packages required--including their versions--are documented in the requirements.txt file in the root of the repository. It includes things like Flask, zeep, and many other components. If you just install these ( pip install -r requirements.txt ), then you have just installed these and every other Python project that you have on that system hopefully won't have a problem with those exact packages. With virtual environments, you create a separate "environment" just for this project so that you have an isolated environment for all of this software that is not accessible and will not interact with any other virtual environment. This solves dependency problems and allows you to keep track of exactly what your software package requires to run, if you ever need to share it with someone else or install it to run on another server.
There are a number of software packages that can implement virtual environments. A good reference and primer can be found at https://realpython.com/python-virtual-environments-a-primer/
Webex
Webex allows for users to set up small, temporary sandbox environments . These can be leveraged for testing of features and code without impacting production Webex organizations.
Postman
Postman has many handy features, but for the purposes of code development, it has a feature to generate sample code snippets that can help get you started automating things quickly.
For any request that you generate, you can click on Code at the right, then select the desired language, in our case Python - Requests . The result is an entire software snippet, that can be run in Python.
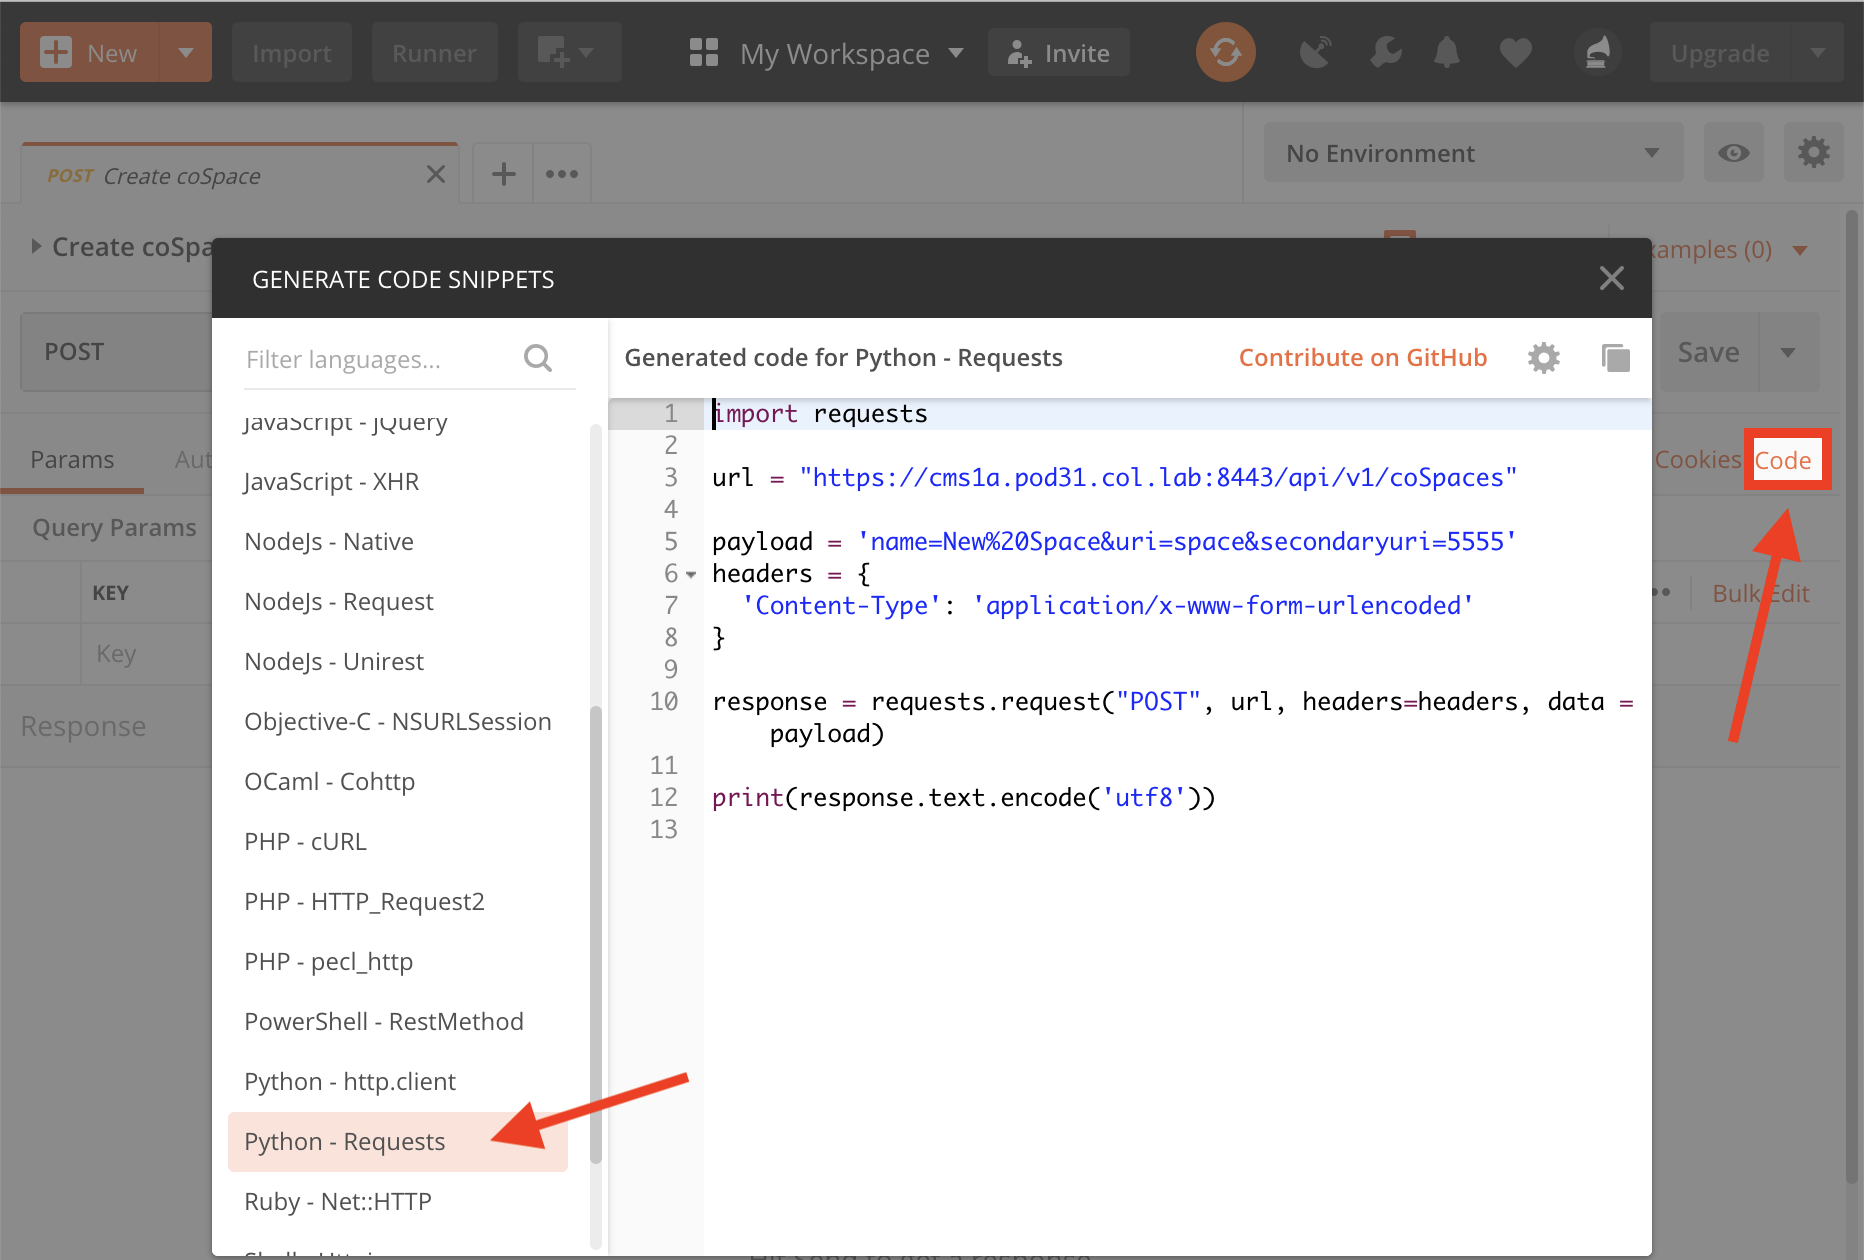
This section is meant to help you set up an environment like the one in this lab. Obviously it helps to have access to lab equipment, such as a CUCM, Unity Connection, or other servers and devices that you can use to test against.
Since you probably are familiar with setting that part of the infrastructure up, we will focus on the development side of things. These instructions will diverge slightly, depending on the machine and operating system you intend to use for development (e.g. Mac, Windows, Linux). But in general, here are some tips to get up and running:
Step 1 - Your Development Environment
To get started, you need to make sure your machine is set up properly for Python development.
-
Start by loading
Microsoft Visual Studio Code
.
There are other editors/IDEs
(the free, community-edition
Pycharm
may be better overall, but it does tend to have a heavier footprint in terms of
how much resources it uses). For Windows deployments, follow the VS Code instructions for
installing subsequent software.
- Be sure to install at a minimum the Python Extension in Visual Studio Code
- Install Python3 . This will give you Python and Pip, the Python package installer needed to load other things.
- Familiarize yourself with Virtual Environments and use them.
Step 2 - Clone the Lab Repository
Once your development machine is up and running, time to clone our repo.
- Clone our repo: git clone https://github.com/collabapilab/ltrcol-2574-portal.git
-
This repo contains two branches:
- master : This branch (default) contains the fully built-out Portal
- skeleton : This branch contains a partially built-out Portal that is meant to be used while following this lab guide. https://collabapilab.ciscolive.com
- Set up a virtual environment for this project.
- Install required Python packages with pip. E.g. from the folder created when you cloned the repo: pip install -r requirements.txt
- Launch VS Code
Step 3 - Run the Flask App
Now you're at the point where a few customizations may be required and then you can run the app.
- By default, the app will run on port 5000. If this is not desireable, then one way you can change it is by setting an environment variable: export FLASK_RUN_PORT=5555
- The simple way to just run the server in development mode (not debug mode!) is from a command line: python -m flask run
-
One of the ways to start the server with a debugger attached, in VS Code, is by using
a
launch.json
file. For example, in our lab, you see a
Start LTRCOL-2754 Portal
button from the Debug menu configurations. In all VS Code installations, you can add/change
the parameters of this file. In our instance we have the following in our
launch.json
:
{
    // Use IntelliSense to learn about possible attributes.
    // Hover to view descriptions of existing attributes.
    // For more information, visit: https://go.microsoft.com/fwlink/?linkid=830387
    "version": "0.2.0",
    "configurations": [
        {
            "name": "Python: hello_world.py",
            "type": "python",
            "request": "launch",
            "program": "${workspaceFolder}/examples/hello_world.py",
            "console": "integratedTerminal",
            "justMyCode": true
        },
        {
            "name": "Python: soap_axl.py",
            "type": "python",
            "request": "launch",
            "program": "${workspaceFolder}/examples/soap_axl.py",
            "console": "integratedTerminal",
            "justMyCode": true
        },
        {
            "name": "Python: soap_sxml.py",
            "type": "python",
            "request": "launch",
            "program": "${workspaceFolder}/examples/soap_sxml.py",
            "console": "integratedTerminal",
            "justMyCode": true
        },
        {
            "name": "Python: wxc_enable_user.py",
            "type": "python",
            "request": "launch",
            "program": "${workspaceFolder}/examples/wxc_enable_user.py",
            "console": "integratedTerminal",
            "justMyCode": true
        },
        {
            "name": "Python: service_app.py",
            "type": "python",
            "request": "launch",
            "program": "${workspaceFolder}/examples/service_app.py",
            "console": "integratedTerminal",
            "justMyCode": true
        },
        {
            "name": "Python: wxm_create_meeting.py",
            "type": "python",
            "request": "launch",
            "program": "${workspaceFolder}/examples/wxm_create_meeting.py",
            "console": "integratedTerminal",
            "justMyCode": true
        },
        {
            "name": "Python: wbx_messages.py",
            "type": "python",
            "request": "launch",
            "program": "${workspaceFolder}/examples/wbx_messages.py",
            "console": "integratedTerminal",
            "justMyCode": true
        },
        {
            "name": "Python: oauth.py",
            "type": "python",
            "request": "launch",
            "program": "${workspaceFolder}/examples/oauth.py",
            "console": "integratedTerminal",
            "justMyCode": true
        },
        {
            "name": "Start LTRCOL-2754 Portal",
            "type": "python",
            "request": "launch",
            "module": "flask",
            // https://flask.palletsprojects.com/en/1.1.x/config/#configuring-from-environment-variables
            "env": {
                "FLASK_APP": "app.py",
                "FLASK_ENV": "development",
                "FLASK_DEBUG": "0"
            },
            "args": [
                "run",
                "--host=0.0.0.0",
                "--no-debugger",
                "--no-reload"
            ],
            "jinja": true
        }
    ]
}
To remotely connect to the lab using the VPN credentials that have been provided to you by your lab proctors using the Cisco Secure Client, follow these instructions.
Downloading / Installing Cisco Secure Client
If you already have the Cisco Secure Client (Anyconnect) installed, go to the next step. If you do not have the Cisco Secure Client installed, navigate to the Cisco Secure Client download page on Cisco.com and download the client for your computer. On Windows, select Cisco Secure Client Pre-Deployment Package (Windows) - includes individual MSI files and on Mac, select Secure Client Pre-Deployment Package (Mac OS) . Unzip the download (if necessary) and install the client. During the installation process, you only need to install the "Core & VPN" module. None of the other modules are required.
If you are not authorized to download the Cisco Secure Client using your Cisco.com account, follow these steps for an alternate download.
- Navigate to https://svs-rtp-dmz-vpn.cisco.com/ .
- Enter your Username and Password provided on the VPN login page .
- Click Continue
- Click the download button to download
- Click the Instructions button on the page for instructions on how to install
Connecting to the Lab with Cisco Secure Client
Once you have the Cisco Secure Client installed, follow these steps to connect to the lab.
- Launch the Cisco Secure Client application
- Enter svs-rtp-dmz-vpn.cisco.com for the connection string.
- Click Connect
- When the connection window appears, make sure the group is set to COLLABAPI .
- Enter your Username and Password as provided on the VPN login page .
- Click OK.
- Click Accept if you accept the statement.
Connecting to Lab PC
You will be working on the lab inside of a PC in the lab with all the necessary software pre-installed. You will connect to this PC using a Microsoft Remote Desktop (RDC) connection. Windows comes pre-installed with the client. If you do not have the client for Mac, download it for free from the Mac App Store.
Once you have the RDP client installed, download this file for your Pod 22 lab PC: pod22-studentvm.rdp
Make sure that your VPN connection to the lab is up before double-clicking on the downloaded rdp file. You will be prompted for a password. Use c1sco123 for the password.
Starting the Lab
The lab manual is available in the web browser on your RDP session, however if you would like to view the lab manual on your local PC, you navigate to the lab manual for your pod 22 by clicking below. Please be sure to connect to the correctly assigned pod number: https://collabapilab.ciscolive.com/lab/pod22/intro/landing .
To remotely connect to the lab using the VPN credentials that have been provided to you by your lab proctors using the native Windows VPN client, follow these instructions.
Configuring Windows VPN client
Step 1: Open Windows Settings by searching for settings in the Windows search box and select the Settings app.
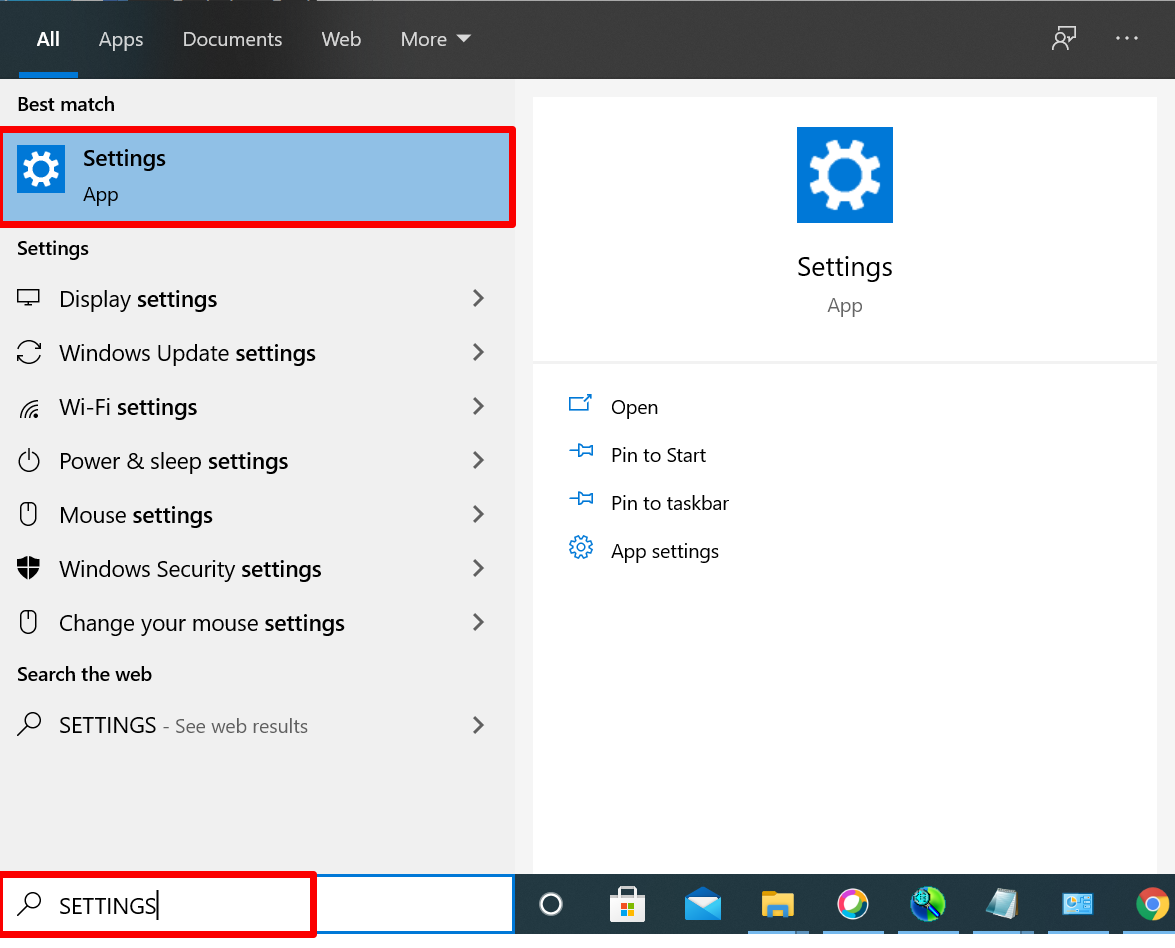
Step 2: Open VPN Settings by searching for VPN in the Windows Settings box and select VPN settings from the menu.
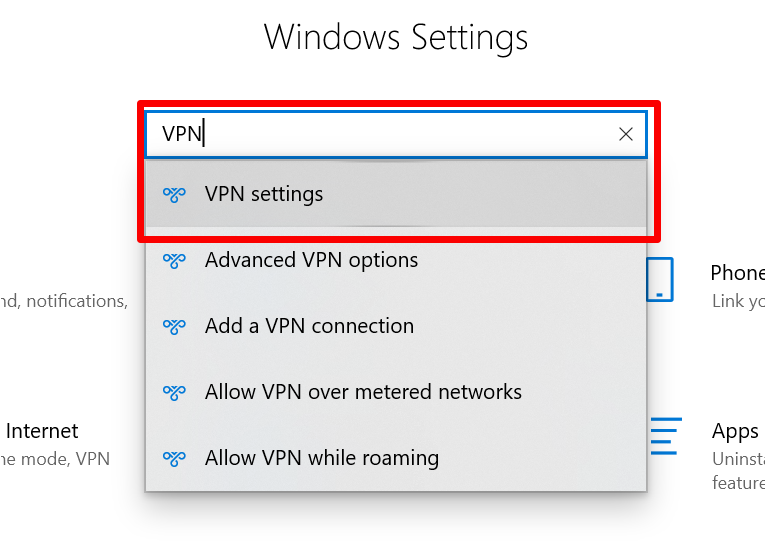
Step 3: Click the Add a VPN connection button.
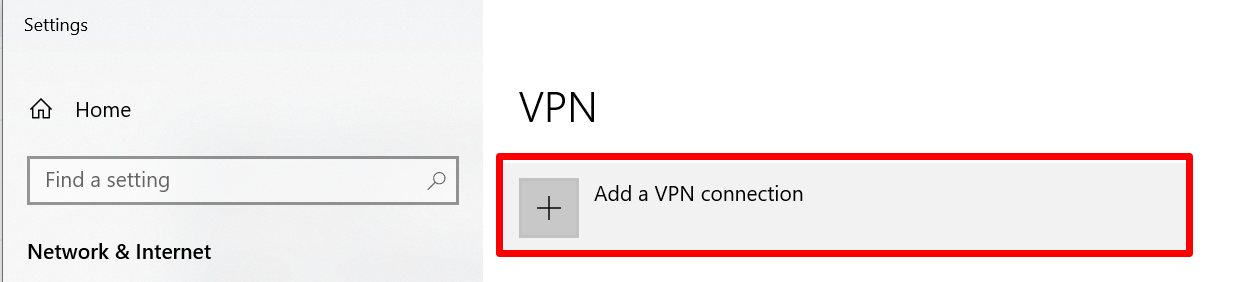
Step 4: In the Add a VPN connection window, configure the following:
- VPN Provider - Windows (built-in)
- Connection Name - HOLCOL-2574
- Server Name - svs-rtp-dmz-vpn.cisco.com
- VPN Type - L2TP/IPSec with pre-shared key
- Pre-shared key - Obtain from your lab proctors
- Type of sign-in info - User name and password
- User name (optional) - You may enter your username here or enter it later if you don't want to save it.
- Password (optional) - You may enter your password here or enter it later if you don't want to save it.
- Click Save

Step 5: You should now see a VPN profile for HOLCOL-2574, but you will not be able to connect yet. Click on Change adapter options .
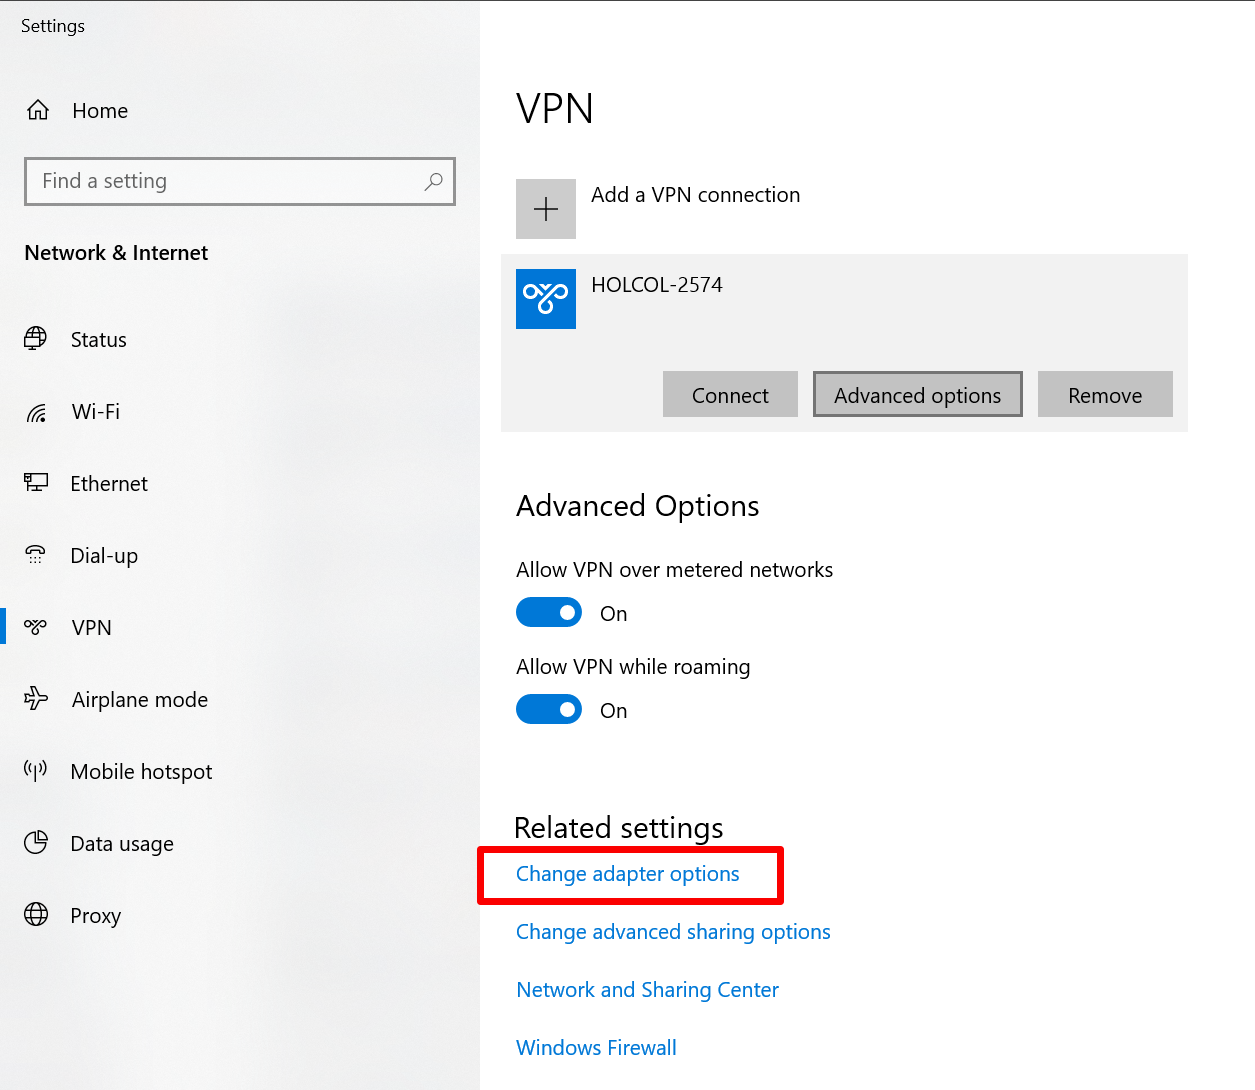
Step 6: The Network Connections window should appear. Right-click on HOLCOL-2564 and select Properties .

Step 7: In the properties window, select the Security tab, select the option for Allow these protocols and make sure only Microsoft CHAP Version 2 (MS-CHAP v2) is selected.
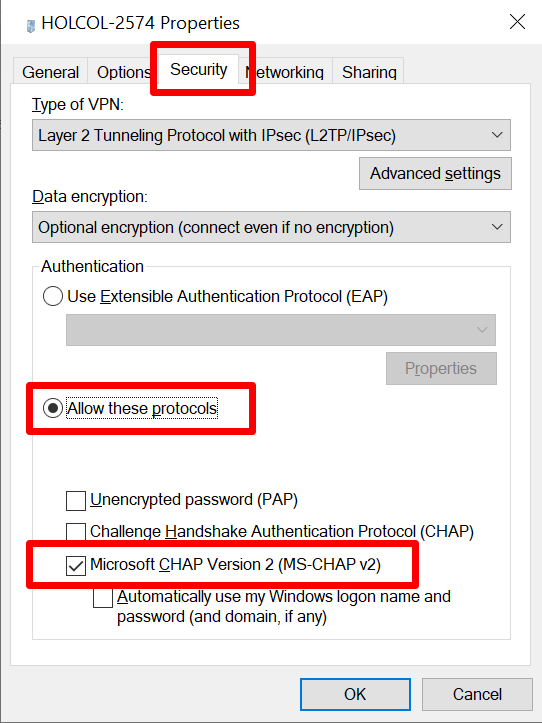
Step 8: To start the VPN connection, double-click on the HOLCOL-2574 icon in the Network Connections window.
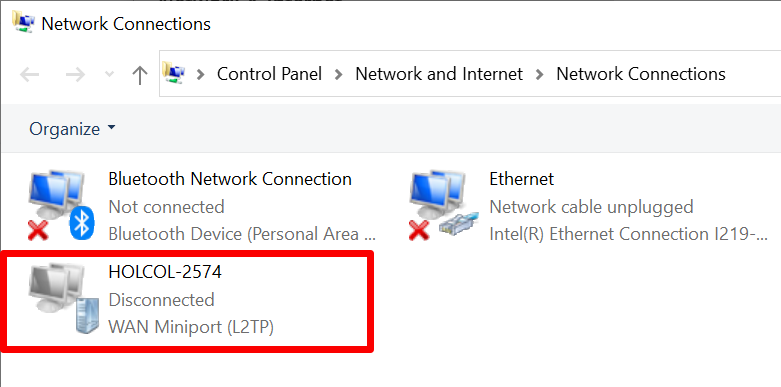
Step 9: A menu will pop up and at the top you should see a VPN option for HOLCOL-2574 . Click the Connect button to initiate the VPN connection. If you did not provide your username and password when you configured the connection, you will be prompted to enter your username and password.
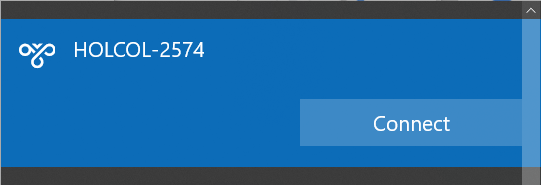
Step 10: Once connected, you can come to the same place to disconnect your connection.
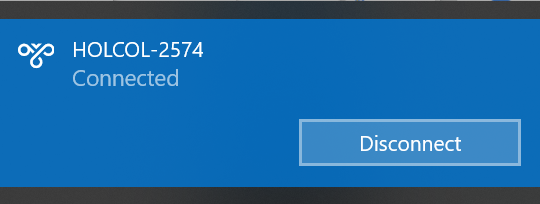
Connecting to Lab PC
You will be working on the lab inside of a PC in the lab with all the necessary software pre-installed. You will connect to this PC using a Microsoft Remote Desktop (RDC) connection. Windows comes pre-installed with the client. If you do not have the client for Mac, download it for free from the Mac App Store.
Once you have the RDP client installed, download this file for your Pod 22 lab PC: pod22-studentvm.rdp
Make sure that your VPN connection to the lab is up before double-clicking on the downloaded rdp file. You will be prompted for a password. Use c1sco123 for the password.
Starting the Lab
The lab manual is available in the web browser on your RDP session, however if you would like to view the lab manual on your local PC, you navigate to the lab manual for your pod 22 by clicking below. Please be sure to connect to the correctly assigned pod number: https://collabapilab.ciscolive.com/lab/pod22/intro/landing .
To remotely connect to the lab using the VPN credentials that have been provided to you by your lab proctors using the native Windows VPN client, follow these instructions.
Configuring macOS VPN client
Step 1: Open System Preferences and select the Network System Preference. Click on the + on the bottom left corner of the window.
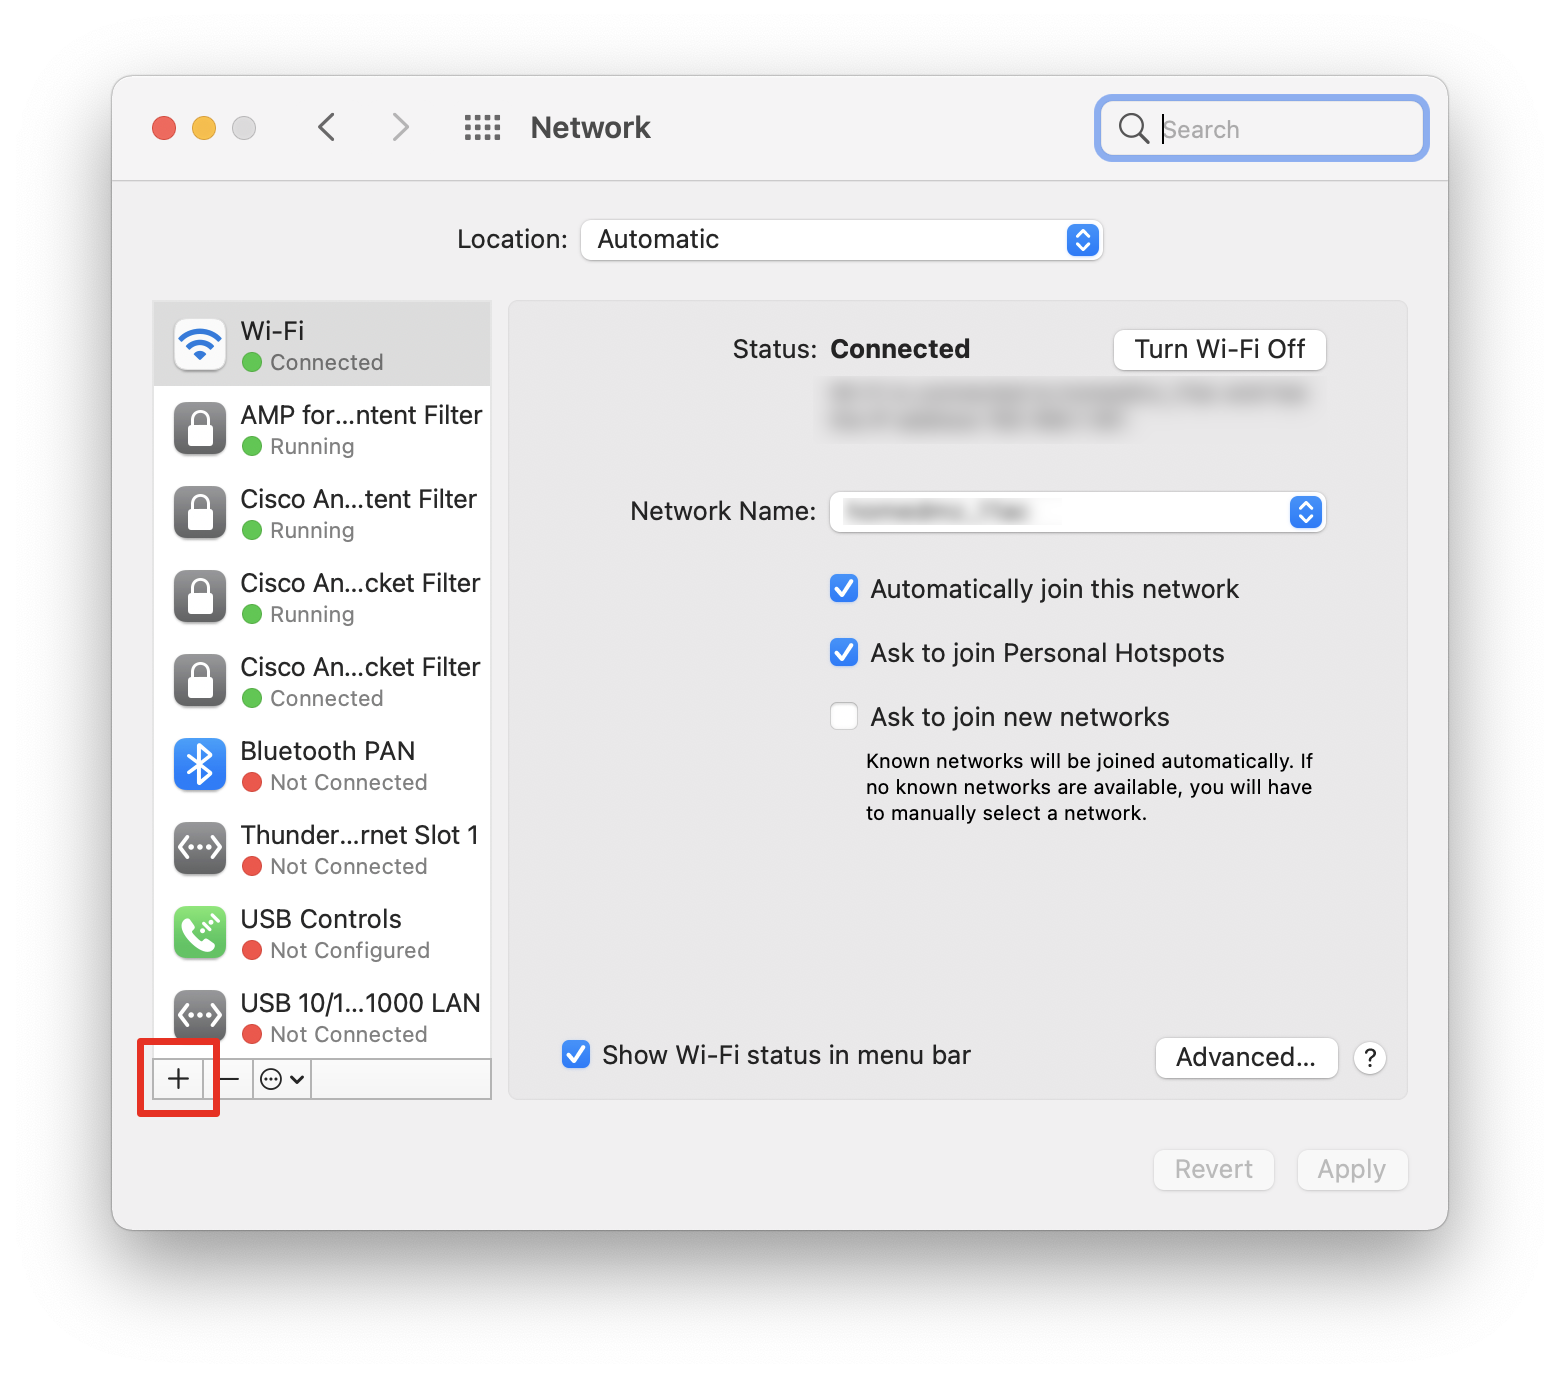
Step 2: In the window that appears, configure the following:
- Interface - VPN
- VPN Type - L2TP over IPSec
- Service Name - HOLCOL-2574 VPN
- Click Create
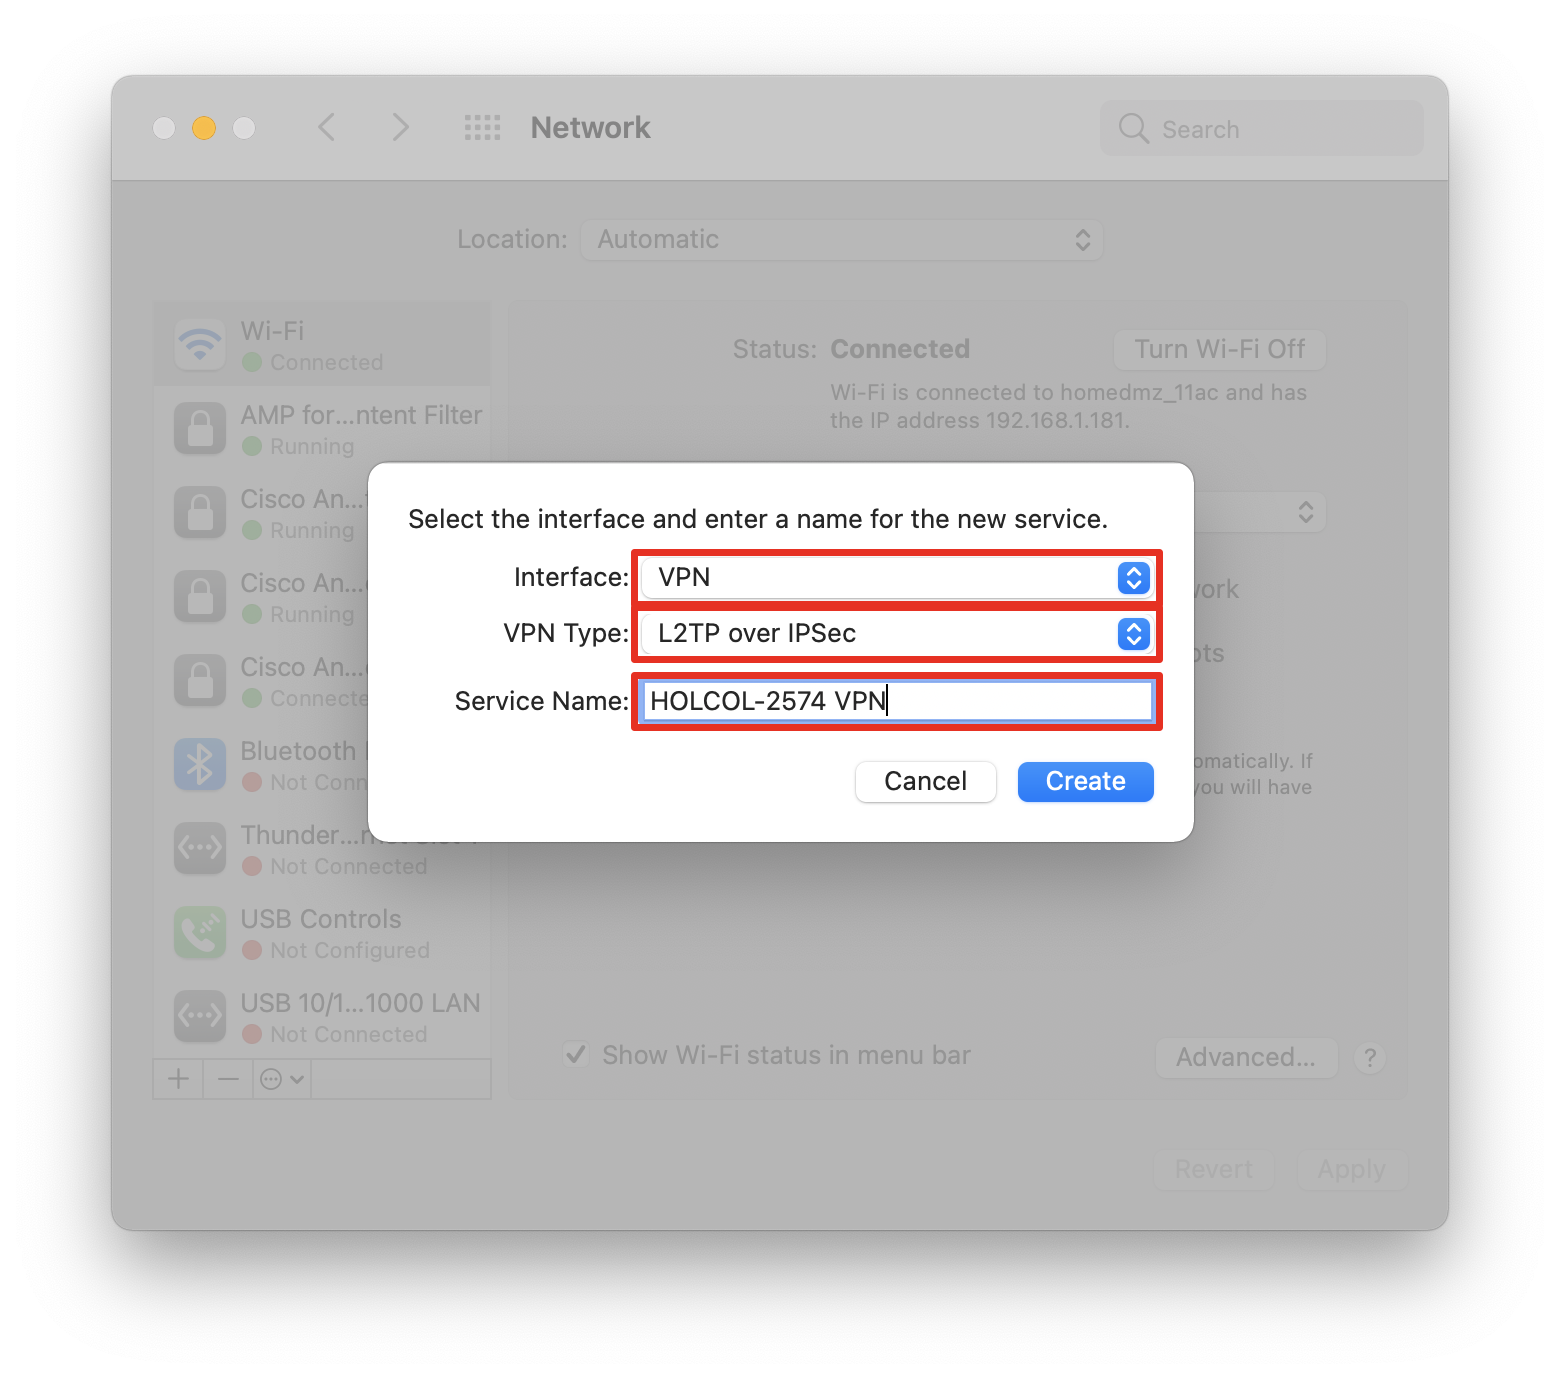
Step 3: On the settings page, configure the following:
- Server Address - svs-rtp-dmz-vpn.cisco.com
- Account Name - Enter your username here.
- Click Apply
- Click Authentication Settings... button
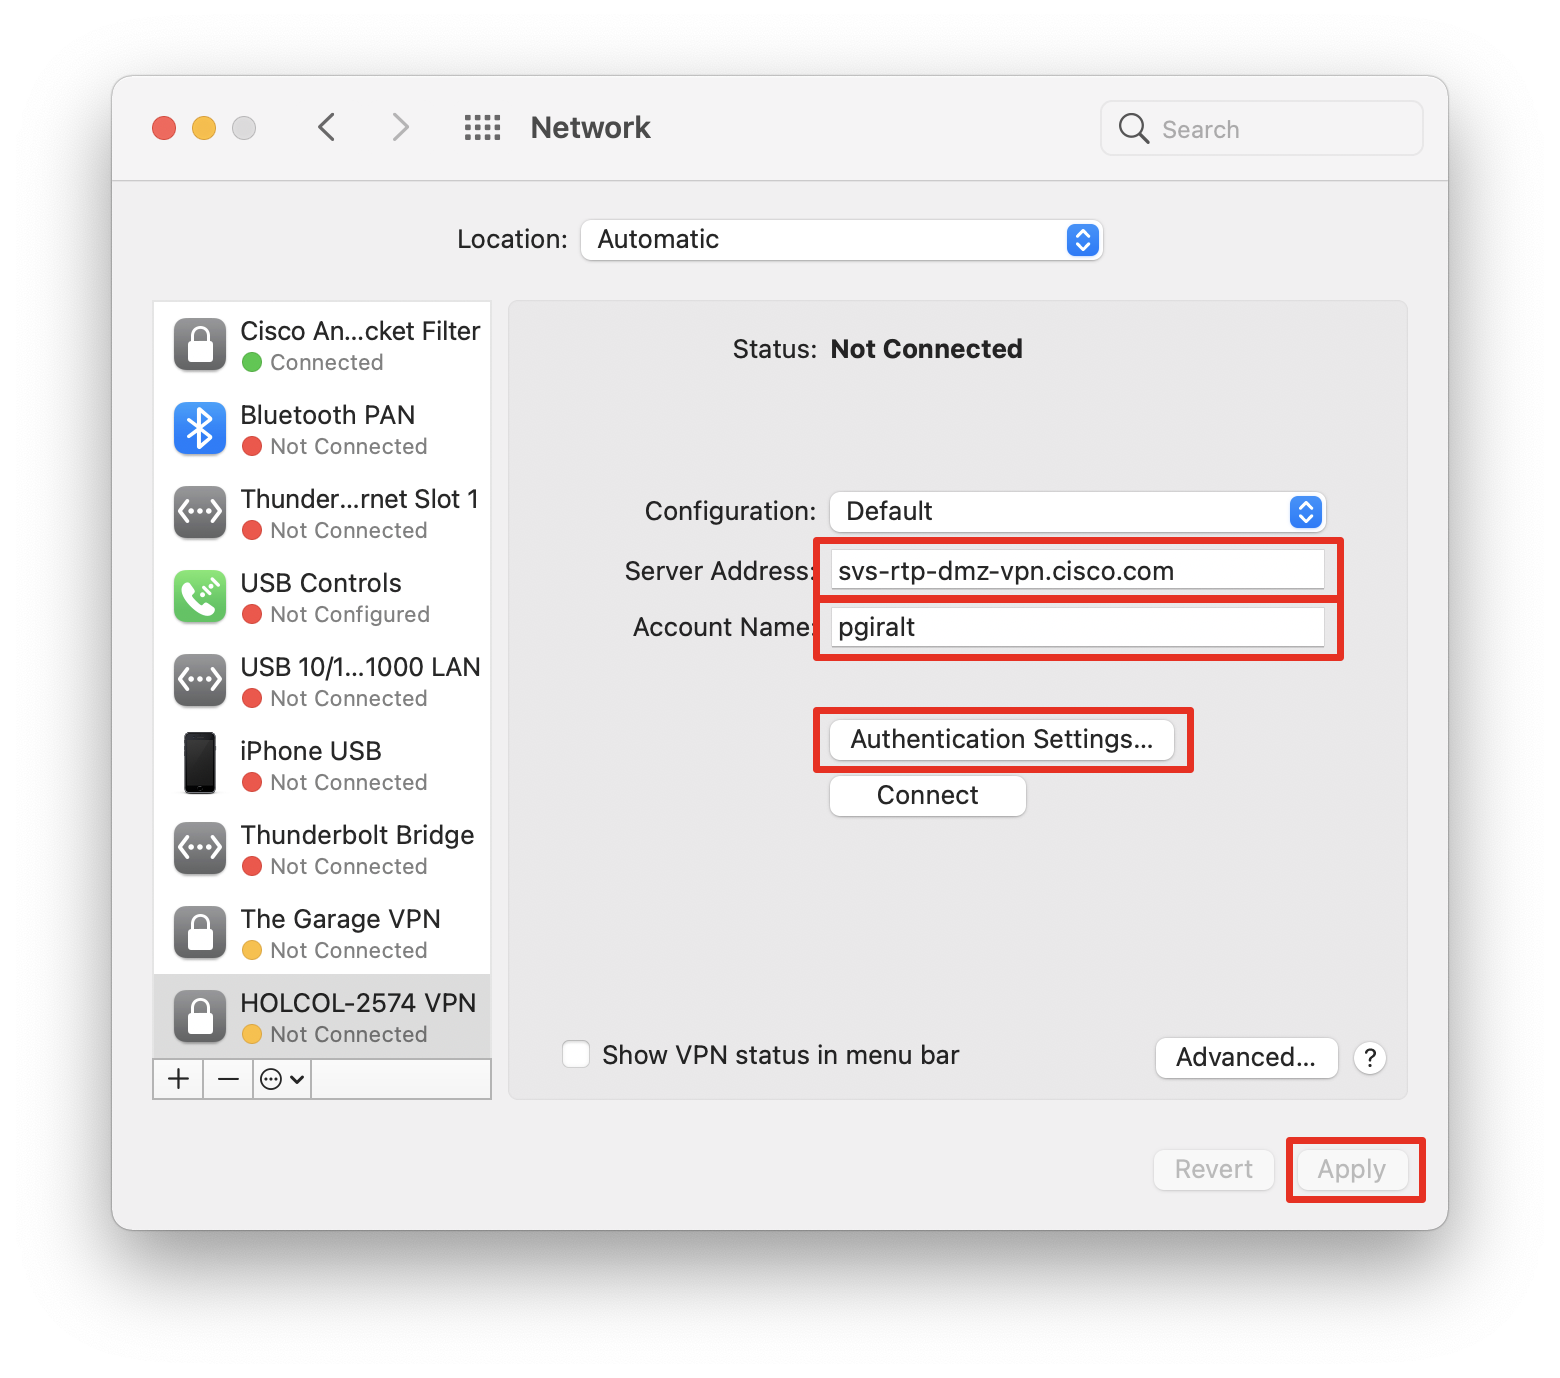
Step 4: On the window that appears, configure the following:
- Password - Enter your password here.
- Shared Secret - Obtain from your lab proctors
- Click OK
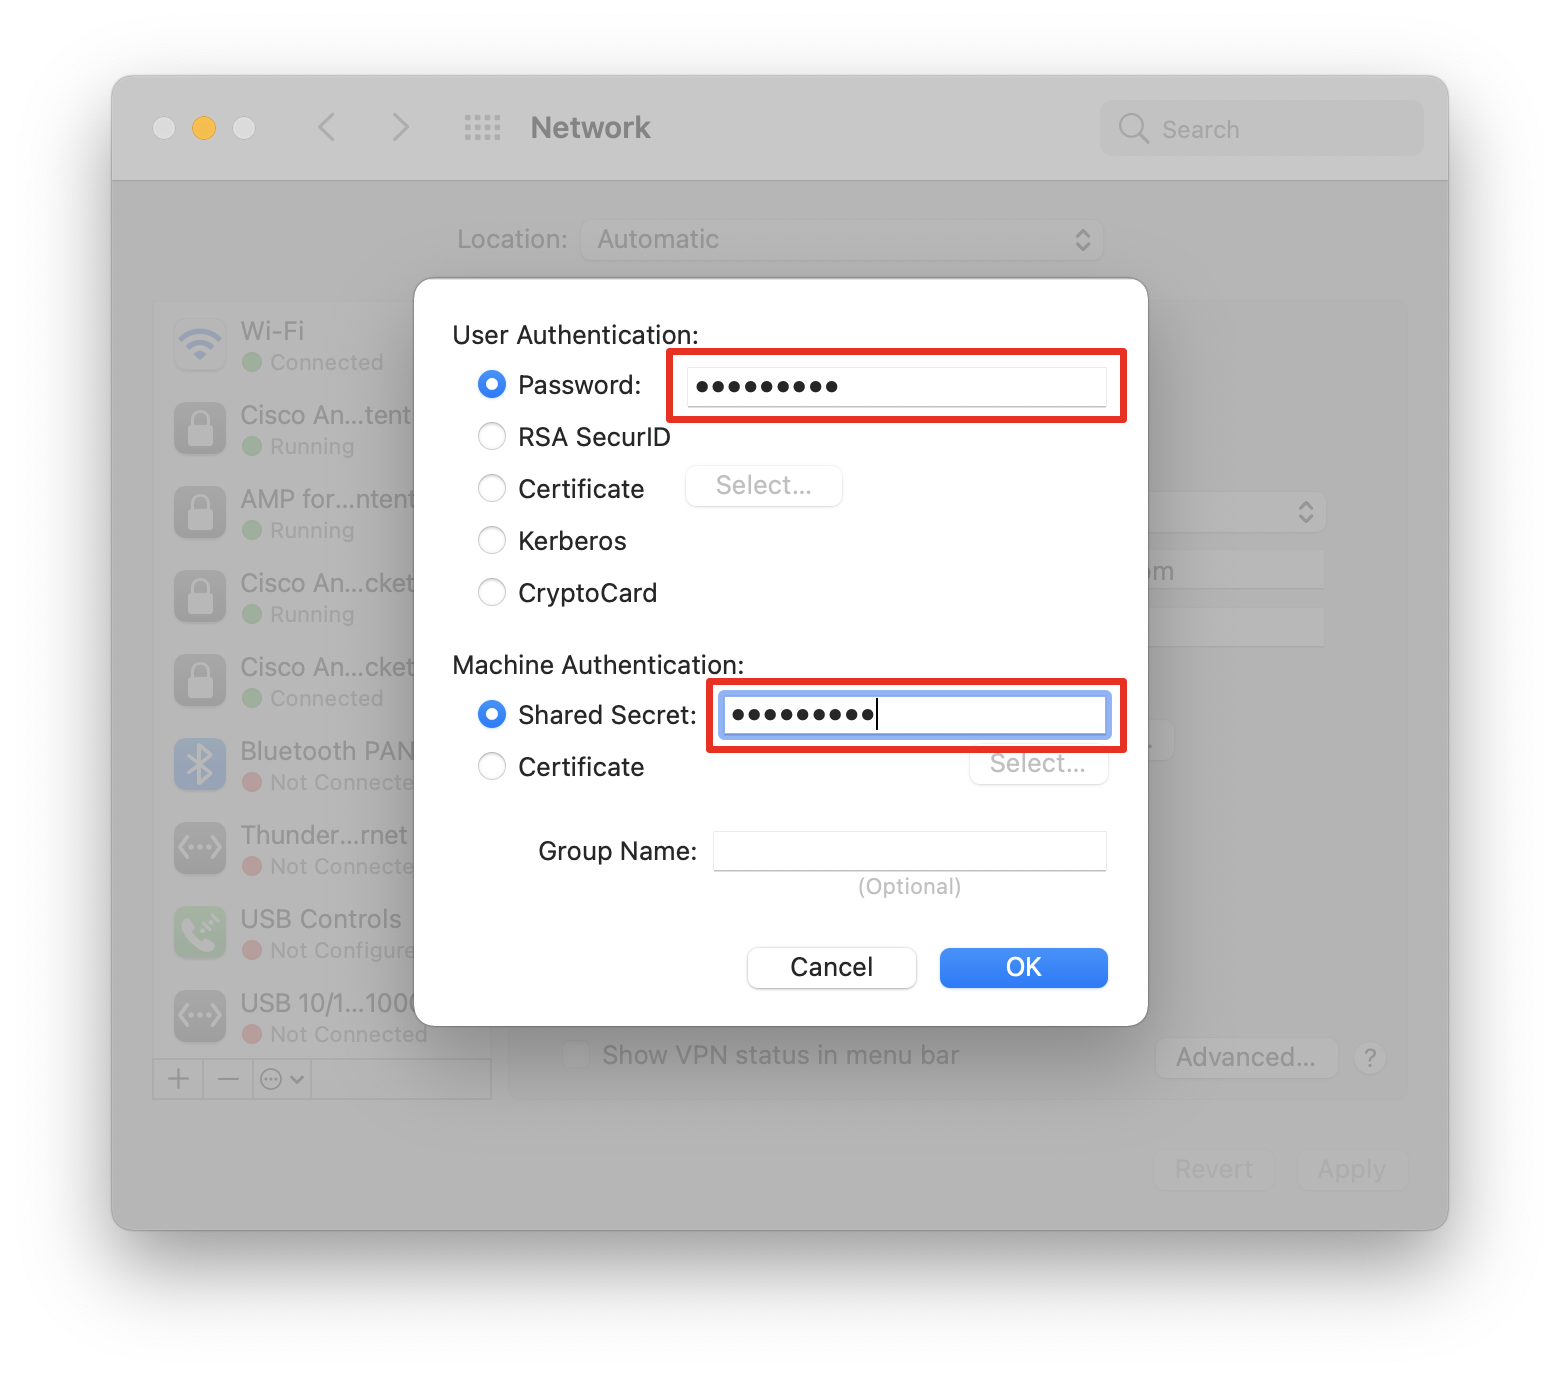
Step 5: Before connecting, click Apply . Now click the Connect button and your connection should be established.
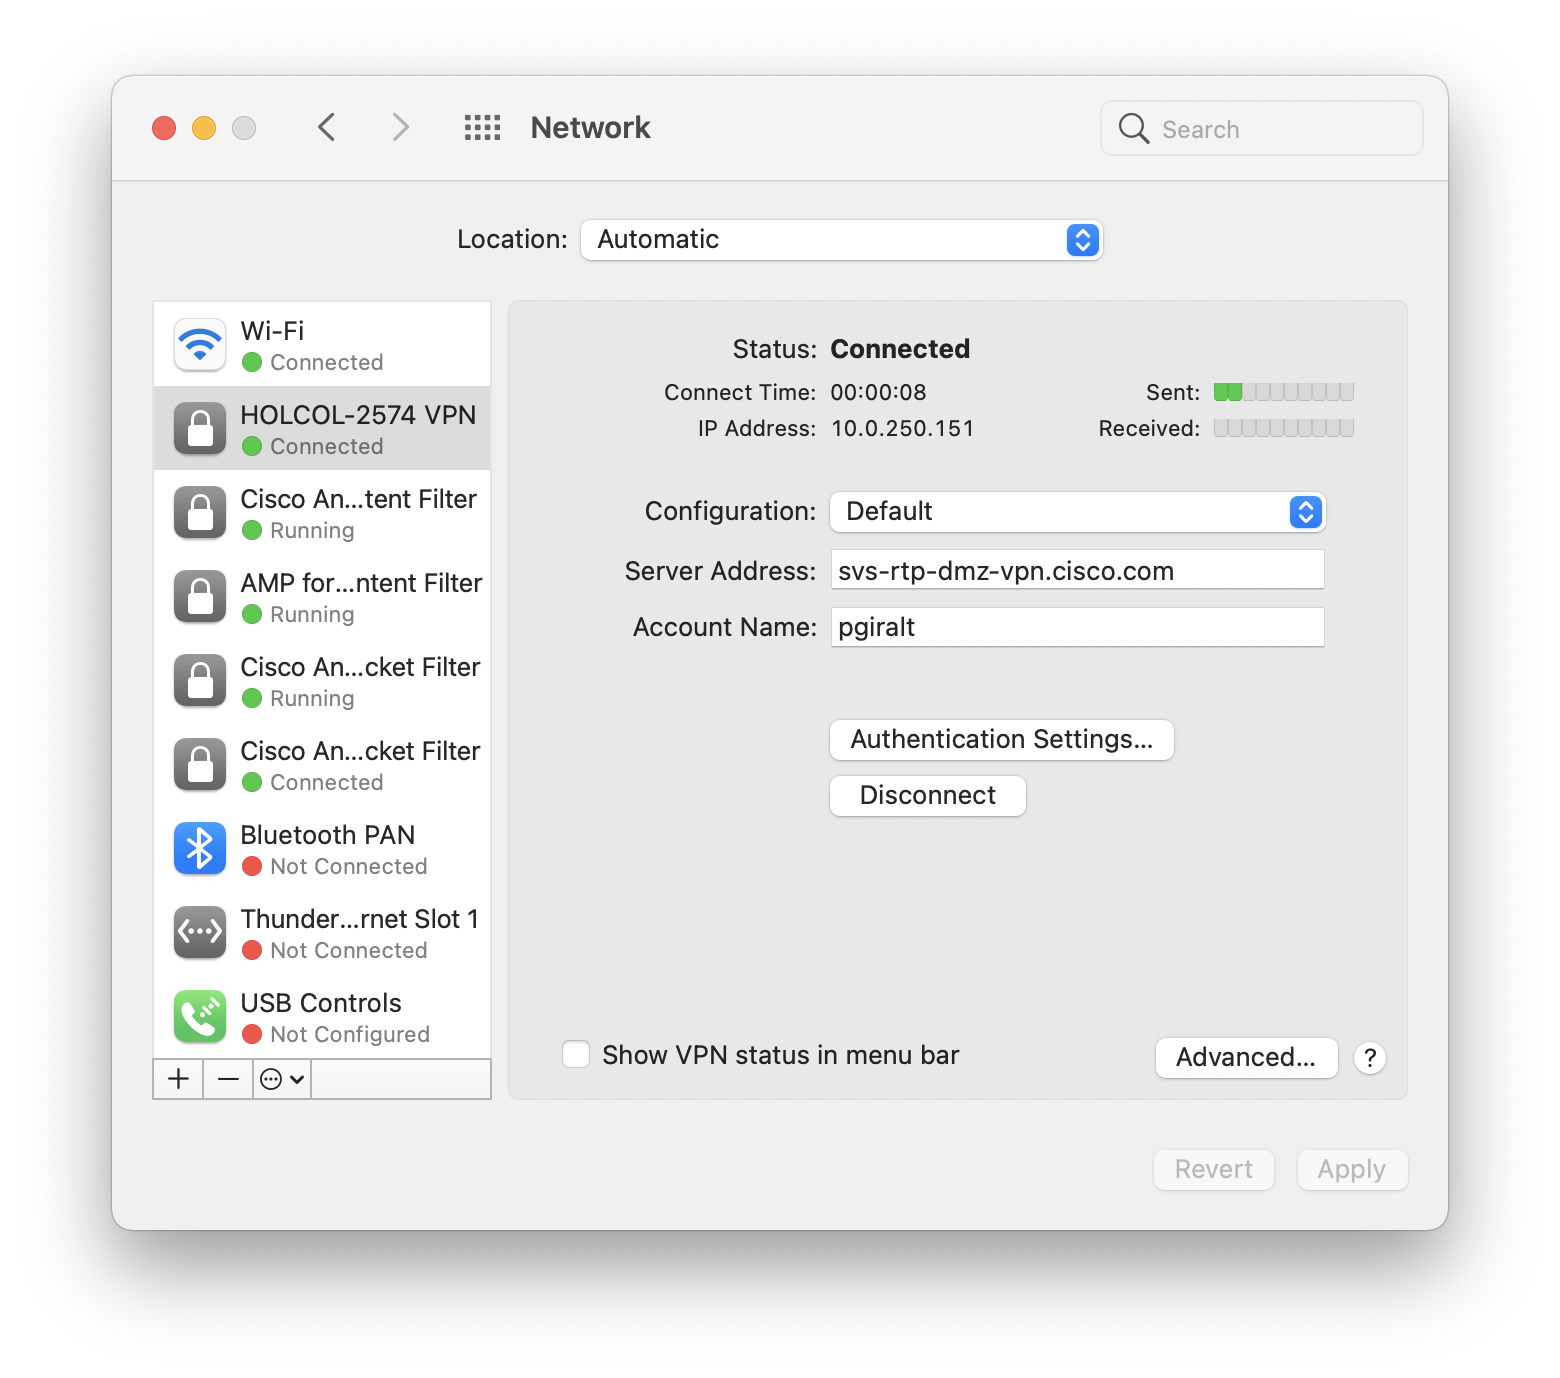
Connecting to Lab PC
You will be working on the lab inside of a PC in the lab with all the necessary software pre-installed. You will connect to this PC using a Microsoft Remote Desktop (RDC) connection. Windows comes pre-installed with the client. If you do not have the client for Mac, download it for free from the Mac App Store.
Once you have the RDP client installed, download this file for your Pod 22 lab PC: pod22-studentvm.rdp
Make sure that your VPN connection to the lab is up before double-clicking on the downloaded rdp file. You will be prompted for a password. Use c1sco123 for the password.
Starting the Lab
The lab manual is available in the web browser on your RDP session, however if you would like to view the lab manual on your local PC, you navigate to the lab manual for your pod 22 by clicking below. Please be sure to connect to the correctly assigned pod number: https://collabapilab.ciscolive.com/lab/pod22/intro/landing .