Up to this point, you have checked the portal's connectivity to the pod devices and initialized the global CUCM SOAP API Python classes shown below:
In this section, you will implement the following CUCM AXL Provisioning API tasks using the above mentioned classes:
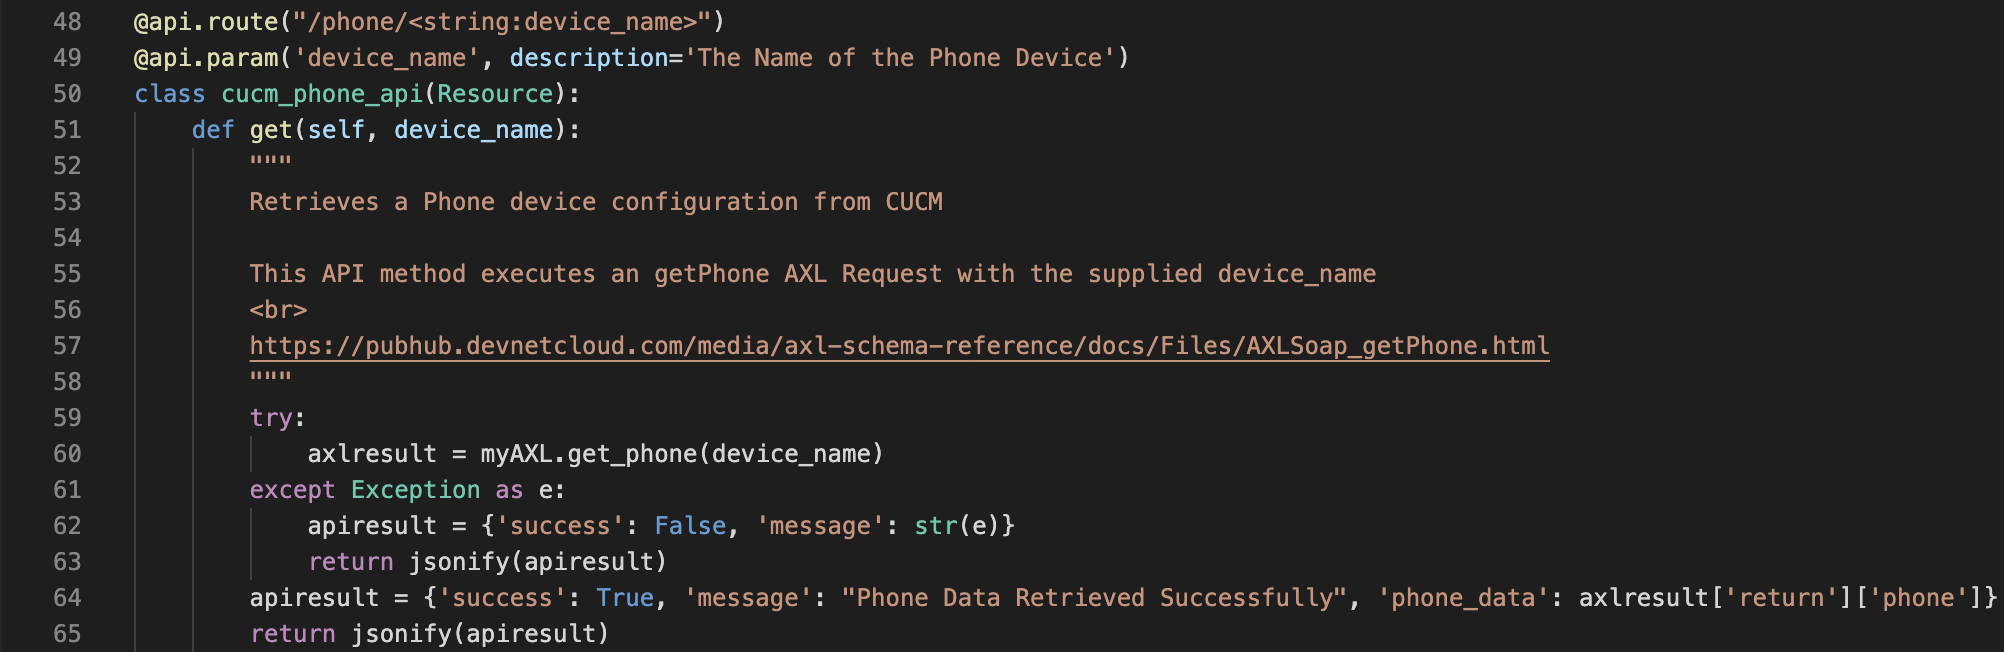
One thing that you might want your portal to be able to do is display information about a phone configured in CUCM. To do this, you need to provide an API endpoint that can go retrieve the desired phone information from CUCM and provide it to the front-end.
With the help of the CUCM SOAP API Python class myAXL you will send a getPhone thick AXL method and relay the response if successful.
The get() function of the cucm_phone_api class gets called when the portal API receives a GET request to the /phone/<string:device_name> endpoint. All it does is call the get_phone() method of the myAXL class while passing the device_name variable as an argument. The device_name variable is expected to be passed in to the portal API route as part of the URL. For example: "/cucm/phone/CSFPOD6USER1". This type of parameter is also referred as a path parameter. The get_phone() method returns a dictionary containing the phone device configuration details and some error checking is performed before returning the response.
Next you will implement a function to provide the front-end with the ability to add a phone. You will build upon the cucm_phone_api() class where you added a get method earlier.
You may recall from the REST APIs chapter, RESTful APIs map the HTTP verbs GET, POST, PUT, and DELETE to retrieve, create, modify, and delete an object that is being interacted with. In the Portal API, you will be building the POST method for the /cucm/phone/{device_name} portal API route, which will in turn execute a series of CUCM AXL API methods in order to achieve the task of adding the device based on your desired provisioning criteria. This is an example where the logic of the portal API is doing more than just calling an equivalent API on product APIs. This code is orchestrating multiple API calls to achieve a desired outcome of not only adding a phone, but also associating it with a user and setting the primary extension.
The simple business logic is as follows:
With the help of the CUCM SOAP API Python class myAXL you will utilize the following thick AXL methods:
and relay a final response if all AXL API requests are successful.
This is a large block of code, so let's try to step through a few of the lines of code above to understand what is happening. You should first of all understand that this code is being executed any time the portal API receives a POST request to the /phone/<string:device_name> endpoint. The first line you added populates a variable cucm_add_phone_query_parsed_args with the parameters that were passed to your code via the front-end API. The Flask-RESTPlus extension looks at the rules that are defined in the parsers.py file we mentioned earlier and validates that the parameters are present and of the correct type. The second highlighted line of code (line 17) shows the call to the get_user function. This is the function call that issues an AXL request to UCM and retrieves the user data. The next few lines are just parsing through the data that was returned to extract the phone number and associated devices.
Next, you see a dictionary (set of key-value pairs) is created with all the information needed to describe a new phone to add. While this looks like a lot of data, it just represents the required parameters for the phone we are trying to add. There are actually many other optional parameters you can pass that are documented in the AXL API documentation.
After this, you see a call to the add_phone function on line 57 which issues the AXL API call to add the phone. Finally, the last highlighted line shows the AXL API call to update_user which performs the task of updating the list of associated devices for the user.
Next let's work on updating an existing phone's configuration in the CUCM database via the portal API. You will build upon the cucm_phone_api() class where you have added the GET (retrieve) and POST (create) methods earlier. Now you will add the PUT method that will modify a given phone device name.
The simple business logic is as follows:
With the help of the CUCM SOAP API Python class myAXL you will utilize the following thick AXL methods:
and relay a final response if all AXL API requests are successful.
You can see that this code is fairly straightforward. There is a variable created called phone_update_data that contains the data to be updated. In the name of simplicity, the update method you are creating here only allows you to update the calling search space and description of the device. This data is passed to the update_phone method which invokes the AXL API to update the phone. After updating the phone, the apply_phone method is called which tells CUCM to tell the phone to pick up the updated configuration.
The final phone operation you will implent allows you to delete an existing phone device from the CUCM database via the Portal API. You will add the DELETE method to the cucm_phone_api() class that delete a given phone device based on the name provided.
With the help of the CUCM SOAP API Python class myAXL you will utilize the following thick AXL Method:
and relay a final response if all AXL API requests are successful.
You can see that deleting an existing phone is easy. The one line you have added invokes the AXL API call to delete the phone, given the name of the device provided.
Next up let's work on retrieving an existing CUCM end user configuration detail from the CUCM database.
With the help of the CUCM SOAP API Python class myAXL you will utilize the following Thick AXL Method:
and relay a final response if all AXL API requests are successful.
You have added a lot of new capabilities to the Provisioning Portal's APIs. Now it is time to make sure it all works as expected, again utilizing the Portal's RESTPlus/Swagger UI page.
 which you should always see along the top of the window, when Flask is running.
 followed by
 the green start/play button next to Start LTRCOL-2574 Portal
    {
        "message": "Phone Data Retrieved Successfully",
        "phone_data": {
            "AllowPresentationSharingUsingBfcp": null,
            "aarNeighborhoodName": {
            "_value_1": null,
            "uuid": null
            },
            "activationIDStatus": null,
            ...
            "automatedAlternateRoutingCssName": {
            "_value_1": null,
            "uuid": null
            },
            ...
            "description": "Cisco Live LTRCOL-2574 - pod6ucmuser",
            ...
            "name": "CSFPOD6UCMUSER",
            ...
        }
    }
    {
        "message": "Phone Added Successfully",
        "phone_uuid": "{34103D82-4947-7DB7-E2BC-CB2043EEEF74}",
        "success": true,
        "user_uuid": "{9E35D561-735E-2357-C4EE-18BBBDA8CB5B}"
    }
    {
        "message": "Phone Configuration Updated & Applied Successfully",
        "success": true,
        "uuid": "{34103D82-4947-7DB7-E2BC-CB2043EEEF74}"
    }
    {
        "message": "Phone Successfully Deleted",
        "success": true,
        "uuid": "{34103D82-4947-7DB7-E2BC-CB2043EEEF74}"
    }
    {
        "message": "Phone Successfully Deleted",
        "success": true,
        "uuid": "{34103D82-4947-7DB7-R2D2-WOK043EFFF77}"
    }
    {
        "message": "User Data Retrieved Successfully",
        "success": true,
        "user_data": {
            "associatedCapfProfiles": null,
            "associatedDevices": null,
            "associatedGroups": {
            "userGroup": [
                {
                "name": "Standard CTI Enabled",
                "userRoles": {
                    "userRole": [
                    "Standard CTI Enabled"
                    ]
                }
                },
                {
                "name": "Standard CCM End Users",
                "userRoles": {
                    "userRole": [
                    "Standard CCM End Users",
                    "Standard CCMUSER Administration"
                    ]
                }
                }
            ]
            }
            ...
            "userid": "pod6ucmuser",
            ...
        }
    }
Congratulations! You have added some core CUCM provisioning capabilities to the Portal APIs that allows you to manage phone devices. Let's add some CUCM Serviceability capabilities to the Portal APIs that can help you monitor CUCM.
