Now that you can send messages from the portal via the Bot, you can focus on receiving messages via webhooks. In
this chapter you will:
Remove and Add Webhooks
Handle incoming Webhook messages
Configure a message response
Send an Adaptive Card
Configure Adaptive Card Response Actions
This is an area that was not covered in previous examples, because the tasks require a web server, such as the
Flask instance you are working on, to receive HTTPS POST messages from Webex. You experimented with a bot that
echoed back the webhook messages to get a feel for how they work, but now you will enable your own bot to receive
and process webhook notifications from Webex.
Step 1 - Remove and Add Webhooks
The earlier webhook section involved sending requests to create two webhooks, one for
messages, one for attachmentActions event types with an
HTTP callback destination.
Those webhooks will remain active until they are removed or they encounter enough errors to where
Webex marks them disabled (for example, after 100 failed attempts in a 5-minute period).
To make sure that you don't have multiple webhooks registered, a good housekeeping practice is to remove any
existing webhook and re-add them each time you start your application that makes use of the webhooks.
In your VS Code
tab, open up flaskr/api/v1/wbxt.py using the Explorer
If you completed earlier sections, this file will already have access to the
WBX_BOT_ACCESS_TOKEN environment variable which will be used for all webhook tasks.
Your first job is to finish out the functions that remove and re-add the webhooks. Starting with
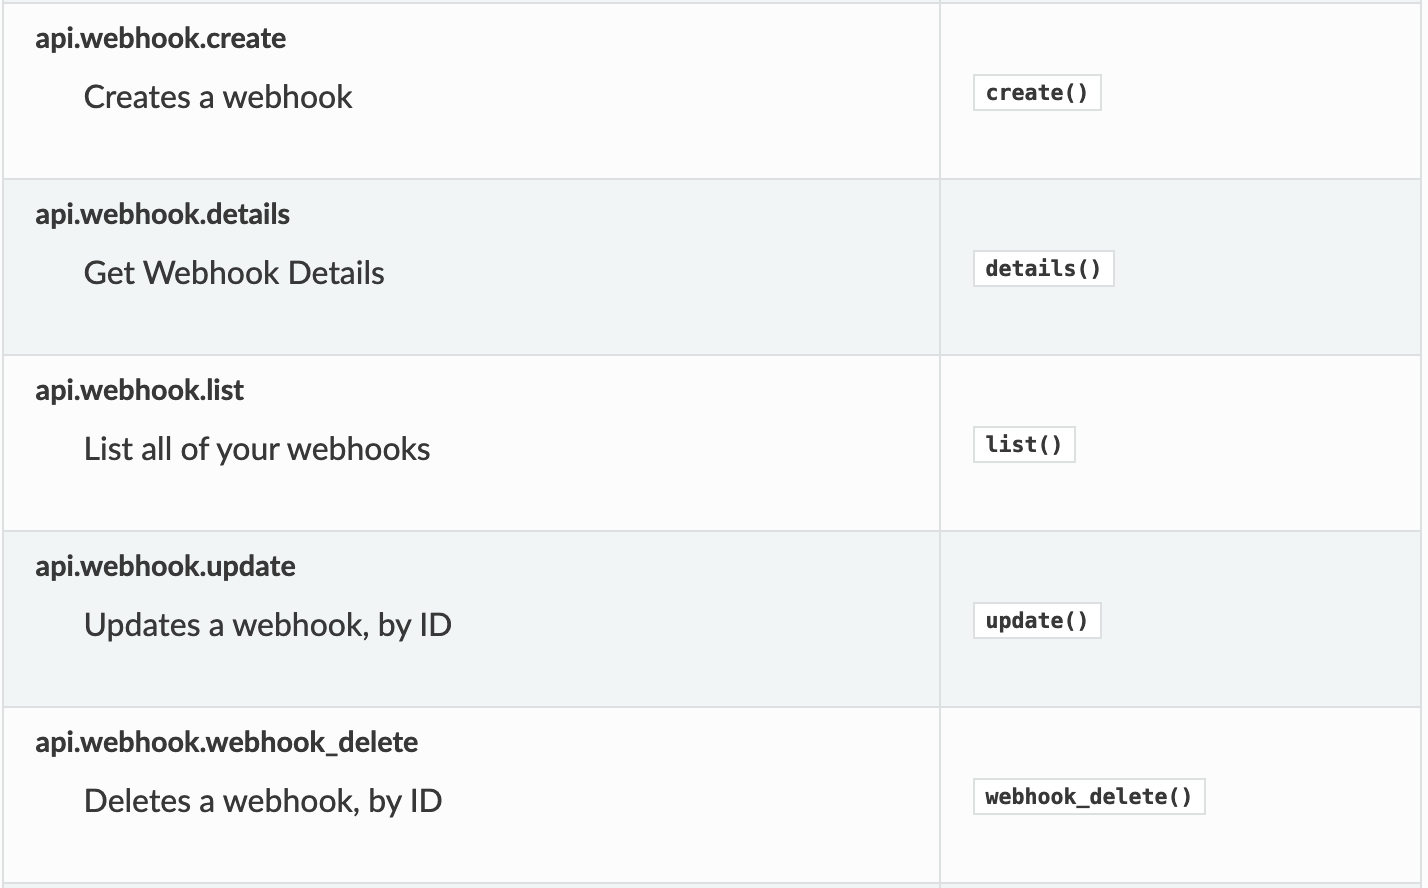
the delete_webhooks_by_name() function. The SDK has a WebehookAPI with some methods
that mirror the capabilities from the Webex documentation.
As with other list() methods, you can iterate through until you find the "name" that matches the
WBX_WEBHOOK_NAME, a constant set to "Cisco Live LTRCOL-2574 Webhook",
and then call the
wbx_bot_api.webhook.webhook_delete()
method supplying the webhook ID of the one you found.
Remove the pass at the beginning of the function and replace it with the code
below.
Next, create both webhooks (one for messages and one for
attachmentActions). Using the SDK, the
wbx_bot_api.webhook.create()
method is equivalent to the Webex
Create a Webhook API
that you used previously. The
Create a Webhook API
WebhookResource and WebhookEventType
models used here from the SDK ensure that the data sent is validated and normalized.
Find the create_webhooks(), remove the pass at the beginning of the
function and add the following to your file:
Now just add code to call the two functions you implemented to delete the webhooks and then recreate them.
This will be called every time your application starts.
Add the following code to your file:
In VS Code, click Save on the file then start (or restart) your Flask app by clicking
Debug > Start Debugging (or
Restart Debugging, if already started).
You should see messages that the Webhooks are deleted (the ones you created manually) and two new ones created.
Step 2 - Handling incoming webhook messages
You may have noticed that the webhook callback URL is http://collab-api-webhook.ciscolive.com:9006/api/v1/wbxt/events. This
callback destination routes from Webex directly to your lab Flask web server. The webhooks will be routed to
/events in this flaskr/api/v1/wbxt.py file, where this Namespace is configured.
Find the wbxt_events_api class under the @api.route('/events') line in the file.
The code has a few important steps:
When Flask handles a request, in this case the POST request, your code has access to an object named request
that contains all the data sent by the client. If the data received is in JSON format, it can be accessed using
request.json.The request.json data is used to create a
WebhookEvent
object using its parse_obj method. Basically this is a way to create a Python object from the JSON data using
the wxc_sdk. This makes it easier to work with the received data.
Depending on the resource, you can call the respond_to_message() or
respond_to_button_press() method. Otherwise, don't reply with any other data.
NOTE that you will have to scroll towards the end of the file to find the post() method of the wbxt_events_api
class and add the following. After doing this you'll scroll back up to implement a couple more functions in the file.
Step 3 - Configure a message response
You have webhooks configured and a Flask app to receive them. You just need to decide how to handle the
message as it arrives.
In this section, you can use the information obtained from the webhook event to:
Determine the Room that originated the event
The sent Message itself
This Message, in turn, is used to look up the sender
Determine if this is a message that you want to respond to
Why do you need to look up the sender and the message for a generic response that only
requires the room ID? Consider that this Bot could have been added by
anyone using Webex. You cannot control that. But you can
control who to respond to. In this case, you might want to only reply if the sender is in the
same Webex organization as the Bot. You could also base the response on the email domain or even
specific user who sent the message. Furthermore, you never want to respond if the sender is
the Bot itself.
Based on who you decide to respond to, create your response message with
wbx_bot_api.messages.create(),
using the room id.
Scroll up a bit to find the def respond_to_message() function. Remove the pass
and replace it with the following. Note that the
"self.send_card(room_id=room.id)" line is there already but that function does not do anything yet.
In VS Code, click Save on the file then start (or restart) your Flask app by clicking
Debug > Start Debugging (or
Restart Debugging, if already started).
The Webex app should be still running. If not, you can launch it and sign in using email:
pod6wbxuser@collab-api.com
and password:
C1sco.123
Send a message and verify that you receive "Your available options are:" in reply.
Based on the message reponse, you are clearly not done. Next add an adaptive card to the response.
Step 4 - Respond with an Adaptive Card
The intricacies of adaptive card design is definitely beyond the scope of this lab. It is just a JSON-formatted
text file used implement a graphical element similar to an HTML web form, including certain graphics,
buttons and drop-downs. For this lab a simple adaptive card has been provided in the file:
flaskr/api/v1/adaptive_card.json.
It has a few actions, that will generate data that you can see when when a user clicks
a button on the card. If you like, you can copy the contents of that file and paste
it in a message to the Webhook
Echo Bot (webhook-echo@webex.bot) and see what it looks like. Shortly, your web server will be responding
with the same content, so you can see it then.
In your code, you need to do two things: send this adaptive card as part of a message, so the sender can see
it; and then handle any submissions. Start by sending the card:
The adaptive card file is already loaded for you and stored in the adaptive_card_content
variable. Expand the send_card function to send the adaptive card content as an attachment
to a message. As indicated, the text will only be visible if the client cannot render the card.
Scroll up a bit in the file to find the send_card function. Remove the pass statement and replace it with the following:
Now we have the ability to respond with a card. Save your file in VS Code then
start (or restart) your Flask app by clicking
Debug > Start Debugging (or
Restart Debugging, if already started).
Send another message and see if you get the adaptive card in the response. Note that it might take a few seconds for the card to render.
Step 5 - Configure Response Actions
So far, you are using the webhook to respond to text-based messages. The reply now also includes an
adaptive card. The final step is to respond to submissions by that adaptive card, which triggers
a second webhook.
All the work has to be done in the respond_to_button_press() function. Similar to replying to
a message, you need to determine the room the message originated from. Instead of a message, an
attachment action must be read, which will allow you to read the submitted data as well as determine the
sender. You will again only reply to a sender within your own Webex organization.
Locate the respond_to_button_press() method, where the room,
attachement_action, and sender are determined similar to a
the code you just implemented when a message is received instead of the attachment action.
Since this is the same as the previous code, it has already been implemented for you as seen here:
You now just need to determine the action to take based on the particular submission.
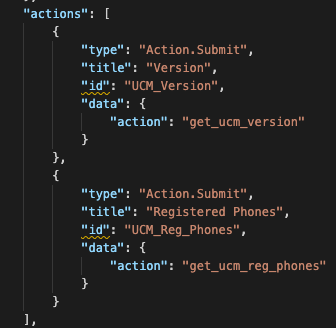
Let's take the get version request. The attachment action will have an 'action' key that, per the
adaptive card, will have a value of get_ucm_version based on that specific
button press. You can then call the API via cucm_get_version_api.get(Resource),
convert that reply to JSON, then reply back with the version if the query was successful. Note that
you can use markdown instead of plain text, so some things can be bolded. Copy the following code
and paste it in the respond_to_button_press() function.
Another button action triggers the get_ucm_reg_phones action.
For this, you can leverage the cucm_perfmon_api.post() function created earlier,
passing the perfmon_counters directly to the method. Depending on the logic you
want to implement, you can just sum the values of the counters together and return the result in
the reply message.
Lastly, you can handle the user_search action. You have to read the user
key, which stores the user ID to query. In flaskr/api/v1/core.py, you already have
a core_users_api class, which calls methods in the classes you created, namely
cucm_user_api to query CUCM, and wbxc_user_api, which queries Webex.
for user information. A determination is made as to where the user "lives" (i.e. if the CUCM user has
a Home Cluster property set, or the Webex Calling user has a
Location ID ). The result is simply which phone system the user belongs to. If
the user_detail checkbox is selected during the card submission, then the full user
details are also sent.
In VS Code, start (or restart) your Flask app by clicking
Debug > Start Debugging (or
Restart Debugging, if already started).
Now try clicking the buttons, such as the Version and Get Registered Phones
under Unified CM, or try looking up
pod6wbxuser
under User Lookup.
Congratulations! You have completed have implemented several of the Python functions
necessary to create the Portal API that can now be used by the front-end of the Provisioning Portal.
The next section will take you through a tour of the portal.
Note: You will need to have a valid bot access token for this to work.

 It has a few actions, that will generate data that you can see when when a user clicks
a button on the card. If you like, you can copy the contents of that file and paste
it in a message to the Webhook
Echo Bot (webhook-echo@webex.bot) and see what it looks like. Shortly, your web server will be responding
with the same content, so you can see it then.
It has a few actions, that will generate data that you can see when when a user clicks
a button on the card. If you like, you can copy the contents of that file and paste
it in a message to the Webhook
Echo Bot (webhook-echo@webex.bot) and see what it looks like. Shortly, your web server will be responding
with the same content, so you can see it then.