The next few sections will take you through the steps implement a variety of capabilities allowing your portal to interact with Webex APIs. To achieve these goals, you will start with the following steps:
In the example you completed earlier, you obtained an access token using a Service App client ID, client secret, and refresh token. This enabled administrative access to Webex. In this section, you will use the information you obtained previously to enable your Portal to perform administrative tasks in Webex as well.
| Source Variable (examples\service_app.py) | Destination Setting (.env) |
|---|---|
| client_id='Ca083181a235caf__Your_Client_ID__caff336f93cd1ded' | SERVICE_APP_CLIENT_ID='___PASTE_SERVICE_APP_CLIENT_ID___' |
| client_secret='083181aCa083181a__Your_Client_Secret__1a23181a2ca' | SERVICE_APP_CLIENT_SECRET='___PASTE_SERVICE_APP_CLIENT_SECRET___' |
| refresh_token='Q4ZG1NmIa__Your_Refresh_Token__-733-48f-86f-be4d' | SERVICE_APP_REFRESH_TOKEN='___PASTE_SERVICE_APP_REFRESH_TOKEN___' |
Now you can start using the wxc_sdk in your project.
In this code, self.get_tokens() will either read a set of access/refresh tokens from a file, or use the environment variables you set above. If an access token is about to expire or isn't found to begin with, then the refresh token will be used to create a new access token, as you did in the example. The access token is then used to create an instance of the API. By placing this token refresh capability in this class, each time a new instance of this ServiceApp class is instantiated, the token may be refreshed, if needed, as long as the refresh token has not expired.
To create an instance of the ServiceApp class, you just need this single line of code:
In previous examples, you had created a variable named api which contained an instance of the WebexSimpleApi class and used it to perform API calls like this:
You will be using the sa instance of the ServiceApp class to perform the same API calls. The ServiceApp() class calls the WebexSimpleApi class for you but before doing so, it will check if the access token is still valid and refresh it if needed. You can perform the same people list call like this:
If you would like to explore in more detail how the ServiceApp() class works, you can look at the code in the flaskr/api/v1/service_app/__init__.py file.
Now you are ready to add to the portal code. Remove the pass from the section in get_person_det and replace with the following:
The get_person_det() function takes an email address as an argument and returns the detailed user information for a user with that email address. This code is very similar to what you did in the previous examples. It creates a new instance of the ServiceApp class, then uses it to look up a user using the people.list() API and then retrieves the detailed user information using the people.details() API.
Now if your Portal API receives a request on the /user/<userid> endpoint, it will look up that user in Webex and return the result as JSON. If the user is not found, it will return an error message.
The put accepts a single argument, the userid which is the user's email address. The first step to enabling a user for Webex Calling is to get the detailed user information by calling get_person_det() method that you just implemented, then look up the Webex Calling Professional and On-Prem UCM licenses. Since this is also a common task, a get_lic_by_name() function was created to look up the respective license in the same way you did in the earlier example sections. Next, query the Location to which this user and number will be assigned. Following this, look up the user's phone number, which should already be pre-populated based on what was synchronized to the account from the Active Directory via the Directory Connector. If no number is found for the user, return an error. This is an area that could require a lot of custom enhancements. For example, you could use APIs to look for available numbers in the location and assign the next available number to the user.
Add the following to your code:
Add the following to your code and then examine it. The comments in the code explain what each step does.
The put method in the wbxc_user_disable_api class has already beeen implemented for you. This function is used to disable Webex Calling and just does the opposite of the steps you just perfromed. The function looks up the user details and the license, exactly as before, then removes the Webex Calling License and adds the Unified Communication Manager (UCM) license. The only other difference is that since removing the Webex Calling license also removes the phone number, you can simply save that data before updating the user's license and then running another update to the user afterwards to re-apply the phone number. You can look at the code in the wbxc_user_disable_api medthod if you want to see the exact code that does this.
First test retrieving a user.

In a previous section of this lab, you enabled Webex Calling features for the user pod6wbxuser. To test the code you just implemented, you will first disable Webex Calling for this user, then re-enable it.
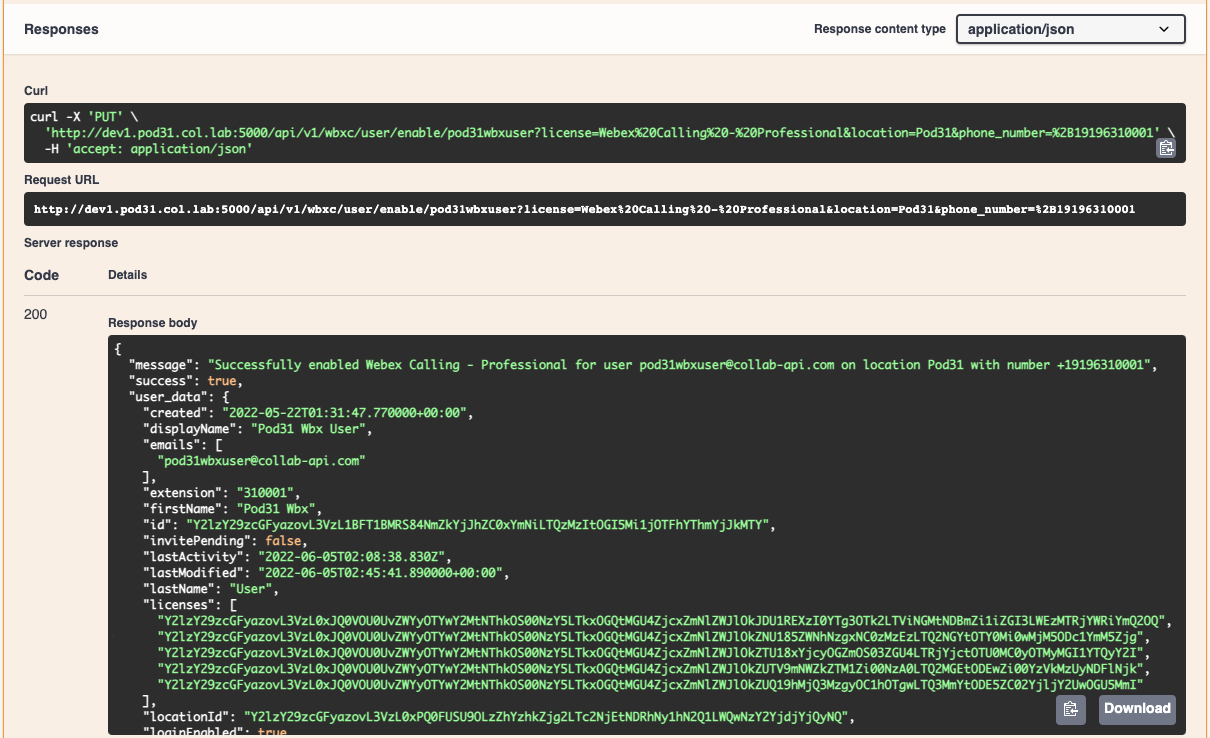
Now go through the steps to re-enable Webex Calling on the phone using the API you created.
Webex Calling has a vast amount of configuration exposed via the API. From placing calls to configuring call handling, many things can be automated and simplified depending on your requirements. In the next section, you will take a look at using a Bot to send notifications as well as receive commands that can execute some of the same APIs that you have already implemented.