Now that you have discovered how to interact with the AXL API by using SoapUI to execute against the
WSDL-defined API methods, you may be wondering how to overcome the challenge of programmatically building
these requests' payloads and parsing their responses.
Good news: this is where a Python library named zeep
comes to our aid. The Zeep library, which can be downloaded from https://pypi.org/project/zeep/,
itself depends on a few more Python libraries, such as
lxml and requests to list a few. Collectively
these Python libraries make our automation development efforts much easier. We will
gently introduce you to these Python libraries before diving deep into them as
you build the provisioning portal.
You will now navigate to your development environment where a web-based VS Code is running.
You will start with executing the listPhone AXL method using Python code.
The six tasks you will accomplish in this section are:
- AXL client setup
- List Phones
- Update a Phone
- Apply Phone Configuration
- Get Phone Details
- Add a Phone
Follow these steps to perform the above listed tasks:
Step 1 - AXL Client Setup
-
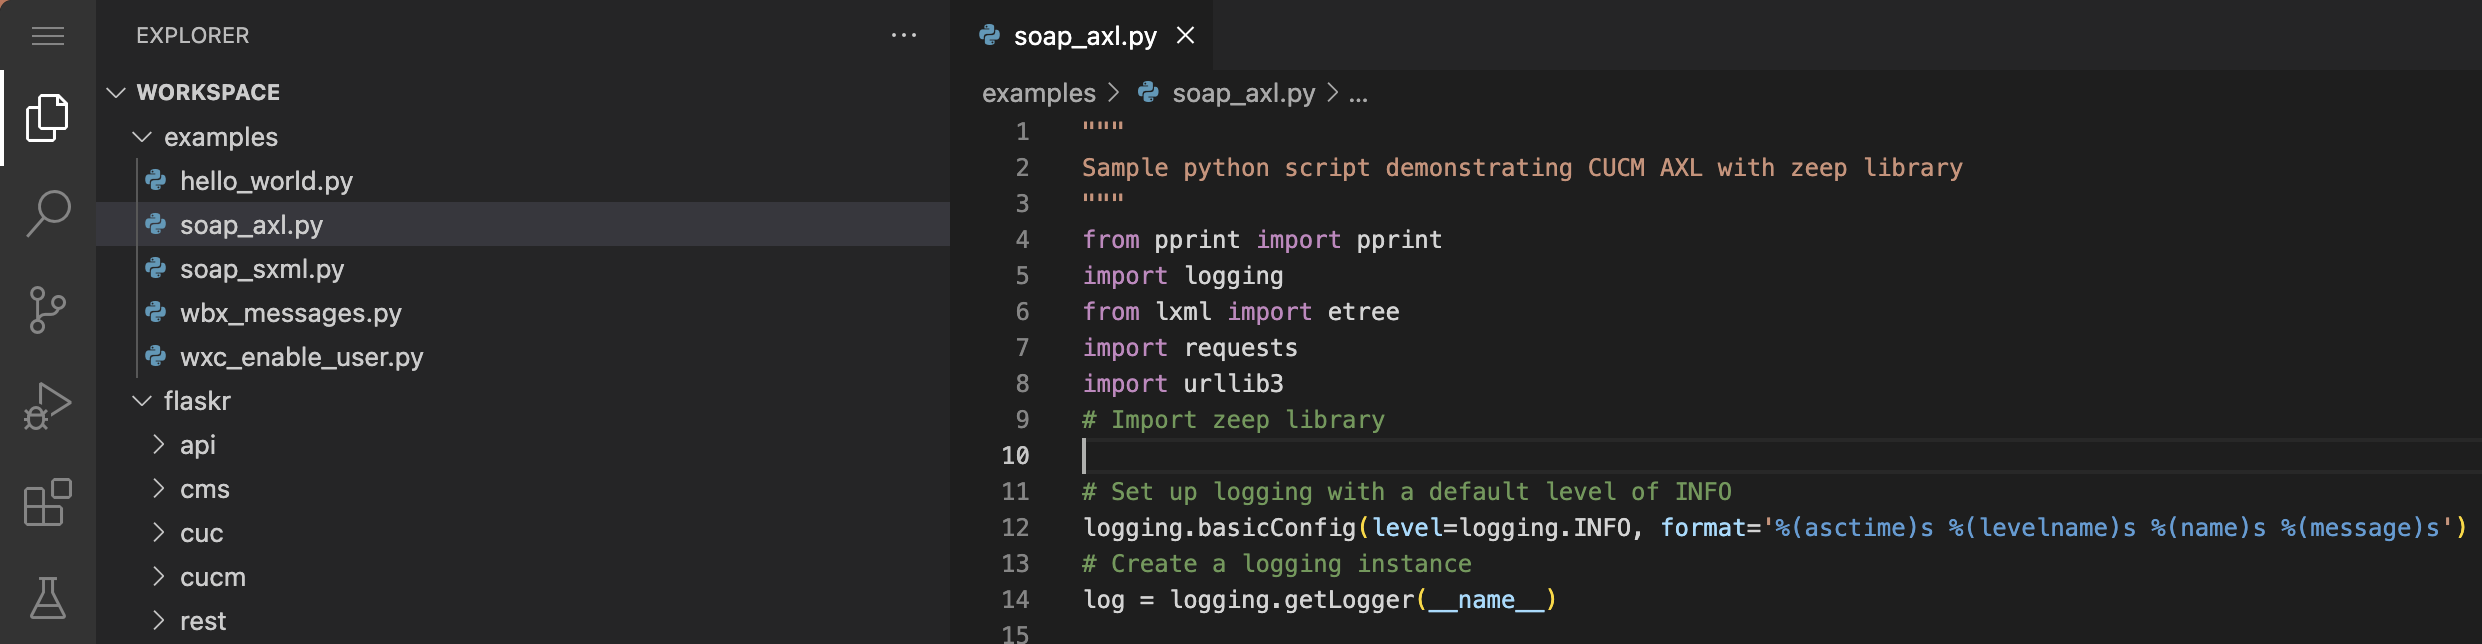
Access your VS Code instance: https://dev1.pod6.col.lab:8443
-
Click the Explorer icon
 at left, and you see a list of folders and files.
-
Navigate to expand the examples folder and click to open
soap_axl.py. You now have the file open for editing.
-
Here is a basic Python script skeleton that you will use to execute SOAP AXL API requests using the
zeep library. The Python environment on your development server has zeep and all other
required libraries installed using the pip tool. Throughtout this lab you will find examples like what
is shown below that indicates the file you must edit, the surrounding lines in the file you should add code, and the code you should
add. You can (and should) use the Copy button on the right to copy the selected line or lines and then paste them
into your VS Code editor window in the correct location.
Start with importing the zeep library to the sample Python script. Click the Copy button next to
the highlighted line and paste it into your file after the line that has the comment saying "Import zeep library".
- You'll notice several lines of code already present in the file that are used to configure logging and create a 'log' object
that you will use to generate log files.
Next, create a few constant variables that you will use to connect and authenticate to your Pod's CUCM AXL API. NOTE that
this is just an example for learning purposes. In a production environment, you would not hard code these values into your script.
Copy and paste your Pod's CUCM hostname, admin username and password into your file.
-
In your development workspace, we have already downloaded the AXL WSDL files for you. Create another constant variable
for the AXL_WSDL_File. You will use this WSDL file location variable to initialize the zeep client. Paste the following highlighted
line it into the file.
-
You will use the session object from the requests Python library to handle authentication,
certificate validation (or not), and persist cookie caching across API requests.
In this lab environment we are not using CA signed (valid) certificates on the CUCM server.
In order to allow the Python script to establish SSL connection you need to disable SSL
certificate verification for the sessions. Disabling SSL certificate validation is not
recommended in production environments, hence there will be a warning printed in your console
every time an insecure request is made. You will disable this warning as well.
Finally you will configure the authentication type and credentials that will be used throughout the session.
The script will utilize the HTTP Basic authentication method and the CUCM_USERNAME and CUCM_PASSWORD
variables that you have created earlier.
The following block of code will first create the session instance, then disable SSL Certificate verification
and configure basic authentication. Paste the following highlighted lines it into your file:
-
For debugging and troubleshooting purposes, you may need to inspect the SOAP envelope content
that is being sent to CUCM and the corresponding responses. The zeep library
comes with a built-in History plugin that makes it easier for you to inspect the payloads.
Create an instance of zeep HistoryPlugin to achieve this. Paste the following into your file:
-
You are now ready to create the zeep.Client instance that will greatly simplify sending and
receiving AXL methods to/from CUCM. You will use the AXL_WSDL_FILE variable, session object,
and the history plugin object to create the client instance. Paste the following into your file:
-
The final step before you can use the zeep client is to create a new ServiceProxy object named service.
The AXL WSDL file you downloaded from CUCM defaults the endpoint url to https://CCMSERVICENAME:8443/axl/
and needs to be updated to reflect your Pod's CUCM_ADDRESS. This configuration is the
same as what you did with SoapUI under AXLAPIBinding -> Service Endpoints configuration.
As you create a new service object using the zeep.client create_service method, insert the CUCM_ADDRESS
variable into the full URI string. This will set the AXLAPIBinding endpoint url to
https://cucm1a.pod6.col.lab:8443/axl/.
Paste the following into your file:
Step 2 - List Phones with Python
Now that you have created this service object you can use it to access any of the methods defined in the WSDL file
such as the listPhones method. Follow these steps to execute the listPhones method to retrieve a list of phones.
-
SoapUI can be useful just to explore the parameters needed to pass to an API method like listPhones.
Don't worry about using SoapUI right now, but if you were to open the listPhones in SoapUI,
you would see the request payload that looks like this:
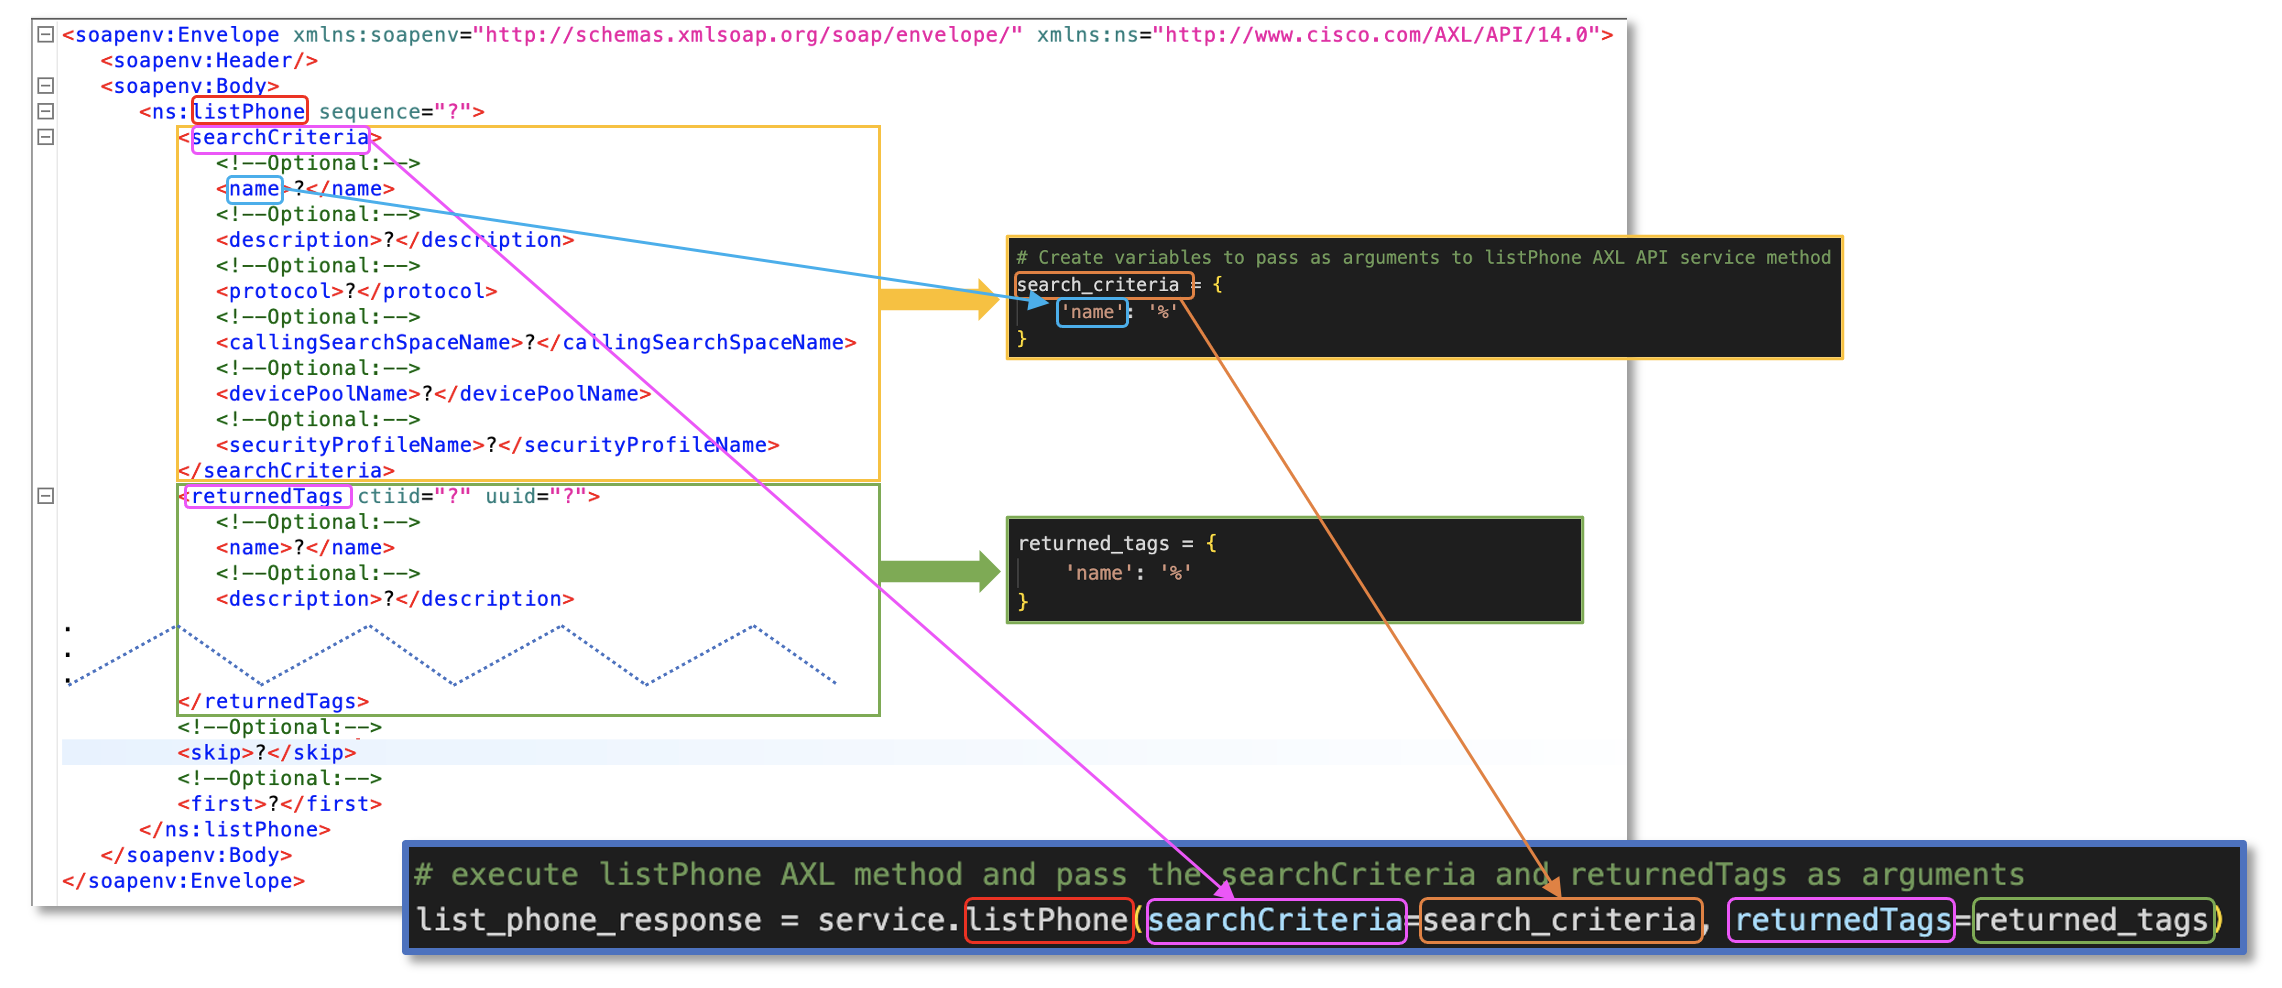
The listPhone method requires the following arguments: searchCriteria and returnedTags.
The methods you call on the Zeep service object have the same names as what you see in SoapUI, so if you want to call
the listPhones method, you would call service.listPhone with the appropriate arguments. The sample
request from SoapUI helps you understand what parameters to pass without having to read through the detailed documentation.
When using Zeep, you do not need to worry about the XML structure of the SOAP request. Zeep will take care of that for you.
Instead, you will pass basic Python data types such as numbers, strings, or dictionaries to the service.listPhone method
depending on what is needed and Zeep will convert them to the appropriate XML structure. In this case, these two parameters
require dictionaries because they are complex data structures that have key value parameters.
Create the following variables that you will pass as arguments to the listPhones method. Paste the following into your file:
-
You now have everything you need to execute the listPhone method via Python. Before proceeding, take a look at
how to identify the arguments and the data structures that must be passed to the service.listPhone method. The left
side shows the XML as you would see it in SoapUI and the other boxes show how those pieces correspond to the
various parts of the Python code. You can derive this same information by looking at the AXL refrence guide as well,
but we find it easier to use SoapUI as a reference. This same process can be used to determine what to pass in to
any of the Thick AXL methods.
-
Execute the listPhone AXL method with the searchCriteria and returnedTags arguments and assign the parsed
response to a variable named list_phone_response. The zeep library will take care of mapping the SOAP response
to a Python dictionary by understanding the AXL Schema defined in its WSDL file. Paste the following into your file:
This line is where all the magic happens. You never created a method called listPhone yet the
service object has a method called listPhone because it was defined in the WSDL file. The zeep library
created this method automatically and understands what parameters it needs based on the schema files.
-
Before running the sample script, add a few logging commands
that will simply log the structured output to the console for debugging purposes.
The first log will print the raw request payload that is sent to the CUCM while executing the service.listPhone method.
The next log will print the raw response payload that is received from the CUCM in response to the listPhone request
The last log will print the parsed response by zeep library. Paste the following into your file.
-
You are now ready to run the sample Python script that will execute the AXL listPhone method. Run the
soap_axl.py
script similar to how you ran the hello_world.py in the introduction to your Development Environment.
In the VS Code navigation bar on the left, click the Run and Debug button.
 Once you click anywhere in list of "RUN AND DEBUG" configurations, You should see a predefined configuration for running a python
script named Python: soap_axl.py in the list. Make sure it is selected:
Once you click anywhere in list of "RUN AND DEBUG" configurations, You should see a predefined configuration for running a python
script named Python: soap_axl.py in the list. Make sure it is selected:

Click the green start arrow next to the RUN AND DEBUG text

As we mentioned in the introduction to your Development Environment section, normally you would need to save your
files before executing them by either File → Save or Control-S.
However the RUN AND DEBUG configuration will automatically save your work in progress before executing the selected file.
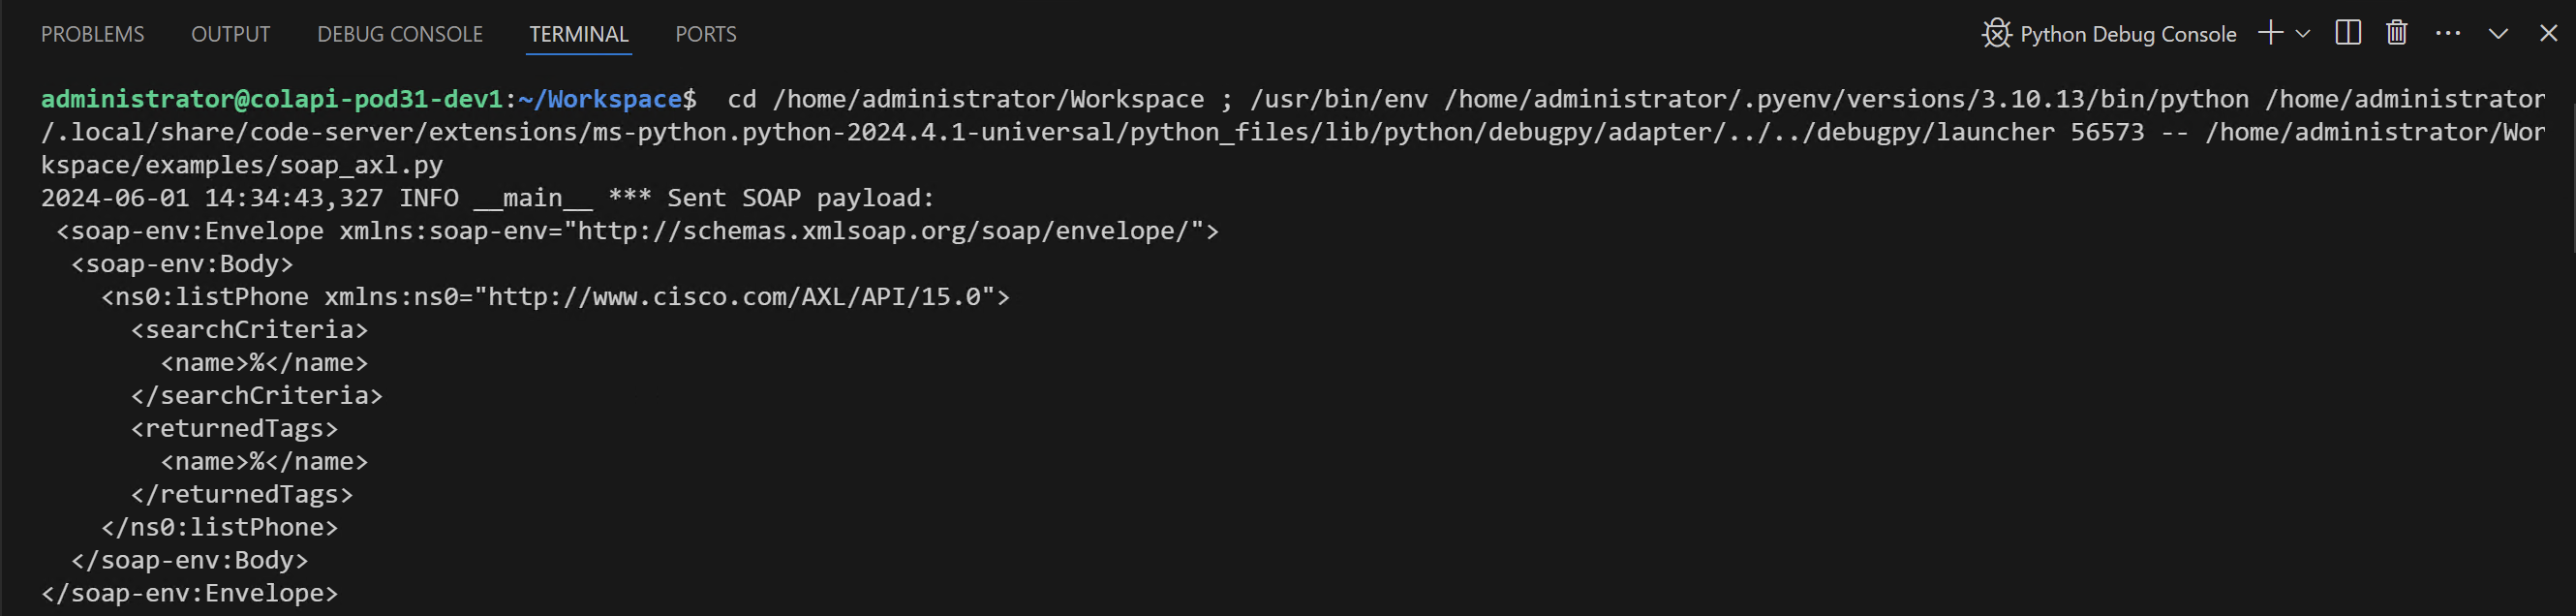
Upon running the soap_axl.py Python script a new Python Debug Console terminal window will open at the bottom
where the output of our script will be displayed. The screenshot below only covers the outbound SOAP payload sent to CUCM;
there should be more logging output below.
 You will notice the list_phone_response variable content is significantly larger then the response SOAP payload received
from CUCM. This is a function of the zeep library parsing the response against the AXL schema. As the code requested, only
the name and the uuid keys will have a value assigned to them. The rest of the
optional returnedTags will have a None value assigned to them. You will utilize this behavior to your advantage later
when using AXL methods that require complex data structures to be passed in, such as updatePhone or addPhone for example.
You will notice the list_phone_response variable content is significantly larger then the response SOAP payload received
from CUCM. This is a function of the zeep library parsing the response against the AXL schema. As the code requested, only
the name and the uuid keys will have a value assigned to them. The rest of the
optional returnedTags will have a None value assigned to them. You will utilize this behavior to your advantage later
when using AXL methods that require complex data structures to be passed in, such as updatePhone or addPhone for example.
Step 3 - Update a Phone with Python
Earlier you added a phone and registered it with CUCM, but the test call failed when you attempted to dial to voicemail
because no Calling Search Space was configured when the phone was added.
In this step you will create a request to update the existing phone and add the Calling Search Space.
- Make sure you still have the soap_axl.py Python file open in your VS Code editor.
- Inspect an example updatePhone request payload from SoapUI.
This payload should look very similar to what you saw when you performed an addPhone with SoapUI, with the exception that
nearly every parameter is now optional. Notice that you are given a choice of providing either
a name or a uuid to identify the device you wish to modify. The one parameter
that is present here which is not present for adding a phone is the newName
parameter. This would be used if you want to rename the device. Any parameter that is not sent in the request will retain
whatever setting was present for that parameter before the update call. This helps you distinguish between setting a parameter
to an empty string versus keeping the existing value. For example, if you were to send <description></description> as one
of the fields, this would clear the description, but if you do not send a description tag in the request at all, the
description would not be modified.
-
The parameter you want to modify to fix the calling search space is called callingSearchSpaceName
which you can find just below the description. The only arguments you need to provide are the phone device name and the
callingSearchSpaceName.
Create a new variable that will supply the required arguments to the updatePhone method. The correct
calling search space for your phone is Unrestricted_CSS.
-
Next you will call the updatePhone AXL method with the arguments and assign the parsed
response to a variable named update_phone_response. Paste the following into your file:
You may notice you are not passing
update_phone_data directly to the updatePhone method. This method expects name and the
callingSearchSpaceName as arguments. You can achieve this by unpacking the
update_phone_data dictionary to its key,value pairs with the ** unpack operator.
In other words, instead of service.updatePhone(**update_phone_data) with the name and
callingSearchSpaceName specified in the update_phone_data dictionary, you could have just as well entered
service.updatePhone(name='CSFPOD6UCMUSER', callingSearchSpaceName='Unrestricted_CSS').
When passing in a small number of parameters, this might be more convenient, but if you are updating a large
number of parameters, the method we show above is typically easier to manage.
For debugging purposes, the three log statements log the outgoing and incoming request payloads as well as the parsed
response data.
-
Re-run the Python: soap_axl.py by clicking the green start arrow next to the RUN AND DEBUG text
If the end of the console output looks as following, you have successfully updated the CSFPOD6UCMUSER
device's Calling Search Space.
Step 4 - Apply Phone Configuration with Python
Modifying a CUCM Phone device configuration is pretty straightforward, but if you have worked on or administered
Unified CM before, you might recall that device setting changes require either a device reset or restart. Normally from
Unified CM Administration you would click the Apply Config button to trigger the phone to download its
latest configuration and let it decide if it needs to go through a full on reset or a quick restart depending on the
configuration update. You can perform this same procedure by using the AXL API as shown below.
-
Make sure you still have the soap_axl.py Python file open in your VS Code editor.
-
Execute the applyPhone AXL method which only expects the name argument and assign the parsed
response to a variable named apply_phone_response.
For debugging purposes you will again log the outgoing and incoming request payloads as well as the parsed
response data. Paste the following into your file.
-
Re-run the Python: soap_axl.py by clicking the green start arrow next to the RUN AND DEBUG text
If the end of the console output looks like the following, you have successfully applied your config update to the CSFPOD6UCMUSER
device.
-
Now test to see if the change of configuration worked by calling from your laptop to your pod's Voicemail pilot again
5999999.
Step 5 - Get Phone Details with Python
As you gain experience with the AXL API, you will often find that the easiest way to add a complex configuration such as
adding a phone is to first retrieve the existing configuration for the object you are trying to add, modify it, and then
use the add method to add the device. For example, to add a phone you would first use the getPhone method to get the details
of a phone that is already configured, modify the returned data structure to your needs, and then use the addPhone method
to add the new phone.
The next AXL method you will use is the getPhone method. You will use its response to help craft the Python arguments for the
addPhone operation you will perform next, where you may recall from SoapUI could take quite large and complicated arguments. The getPhone AXL method will
retrieve the full phone configuration details.
Here is a sample getPhone request that SoapUI generated. As a learning exercise, you will
retrieve all the possible returnedTags. Basically, you will query for the complete phone configuration by not
requesting any returnedTags.
-
Make sure you still have the soap_axl.py Python file open in your VS Code editor.
-
Execute the getPhone AXL method with only the name argument without supplying any returnedTags
and register the response to a variable named get_phone_response.
For debugging purposes we will again log the outgoing and incoming request payloads as well as the parsed
response data. Paste the following into your file.
-
Re-run the Python: soap_axl.py by clicking the green start arrow next to the RUN AND DEBUG text
If your last console output looks like the following trimmed output, you have successfully retrieved all of your Phone device configuration
for CSFPOD6UCMUSER. Both the SOAP response payload and the parsed response is quite large.
Step 6 - Add Phone with Python
The final AXL method you will execute is addPhone. You will use the previous getPhone response's parsed output to
craft the variables that you will pass as arguments to addPhone method.
The required parameters for the addPhone method are name, product, class, protocol,
protocolSide plus any optional parameters you would like to configure.
-
Before you create a new variable to use as an argument with the addPhone AXL method, let's recall how the first part of the get_phone_response
was structured.
If you take a closer look at the callingSearchSpaceName key, it's value is yet another dictionary with two keys _value_1
and uuid. You are not required to supply both of these keys to configure the new phone's callingSearchSpaceName.
As you create a new variable named add_phone_data, you will simply set the callingSearchSpaceName key's value to the name of the calling search space
which is found in the _value_1 key's value as seen above. For example:
You will find many other parameters returned from the various "get" methods return both the name and the UUID for your convenience,
but when doing an add or update, you only specify one.
-
Make sure you still have the soap_axl.py Python file open in your VS Code editor.
-
Create a new variable that will supply all the required arguments to the addPhone method. Paste the following into your file.
-
Execute the addPhone AXL method which only requires the phone argument.
Register the response to a variable named add_phone_response.
For debugging purposes we will again log the outgoing and incoming request payloads as well as the parsed
response data. Paste the following into your file.
-
Re-run the Python: soap_axl.py by clicking the green start arrow next to the RUN AND DEBUG text
If your last console output looks like the following output, you have successfully add a new phone.
Now that you have added a new test phone named CSFPOD6USER2, you can check that
it is in actually inserted in the CUCM database.
-
Access your CUCM server at: https://cucm1a.pod6.col.lab
-
Login in with username
admin
and password
C1sco.123
-
Navigate to Device → Phone and click Find
-
Ensure CSFPOD6USER2 is present in the device list
Now that you have explored the AXL API using Python, you can move on to exploring the Serviceability API in Python in the next section.