Now that you have explored Calling and Meetings APIs, let's take a look at the Messaging APIs.
You will use these APIs to create a mechanism by which you can send notifications to a space when
some action occurs. This can be useful for notifying groups of people when some event occurs.
Such an event can be an outage event or just a notification of a configuration change.
For this type of application, it makes sense to use a Bot
whose purpose is to send these notifications. This allows the Bot account and its access level to be
limited to just this purpose. Because Bots have their own identity, users will see notifications coming
from a specific Bot user as opposed to a personal account. You will create the Bot and get its access token in order
to send messages on its behalf, then create a Webex Space and add the Bot to it.
In this section, you will perform the following tasks:
- Create a Bot
- Add Bot to a Webex Space
- Use Bot to find the Space using the API
- Send a Message to the Space using Bot
- Verify Message was Received
You will start by creating a notifications Bot.
Step 1 - Create a Bot
-
Access the Webex API documentation home page at:
https://developer.webex.com
-
If necessary, click Log in at top right and sign in with the following credentials:
- Email address:
pod6wbxuser@collab-api.com
- Password:
C1sco.123
-
Once logged in, click on your
 icon at the top right.
-
Click My Webex Apps (there should only be the Service App you created earlier)
-
Click Create a New App
-
Click Create a Bot on the Bot tile.
-
For the Bot Name, enter
Pod6 Test Bot
-
For the Bot Username, enter
cl2026-lab-pod6-bot
,
which will create a username of cl2026-lab-pod6-bot@webex.bot
-
Click on one of the Icon images for your Bot, so that it is selected.
-
In the Description paste the following text:
Cisco Live 2026 LTRCOL-2574 Lab Bot for Pod 6 (https://collabapilab.ciscolive.com)
-
At the bottom, click Add Bot.
-
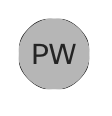
You should now see a Congratulations message and some details about the Bot. Besides
the information you specified, you see the Bot's Access Token. This is the token you
will need to perform any actions, such as sending messages, on behalf of the Bot.
The Bot ID is not important for your purposes.
Be sure to keep track of this access token!! If it is lost, the only course
of action is to generate a new one, which invalidates the previous token. Also be sure to keep
it secure because it represents the equivalent of the username and password of the bot and anyone
with this access token can perform actions on behalf of your bot.
Click Copy next to the Bot Access Token.
-
Access your VS Code instance: https://dev1.pod6.col.lab:8443 and from
the Explorer open wbx_messages.py in the examples folder.
-
Find and replace the ___REPLACE_WITH_BOT_ACCESS_TOKEN___ text in between the quotes with
your Bot access token that you just copied:
Step 2 - Add Bot to a Webex Space
The next step is to add the Bot to a Space that will be used for the notifications. Note that this is only one possible way of
performing notifications. You could write the bot so it has a list of users to notify and the Bot can send 1:1 notifications to
each individual user. You could have also had the bot create this space automatically, but then you would need to create a
mechansim to get the bot to add users to that space. For the sake of simplicity in this lab, you will create the space manually
and have the Bot search for this space and post to it.
-
Open up the Webex App. You should be signed in as pod6wbxuser@collab-api.com already. If not,
sign out and sign in again using email:
pod6wbxuser@collab-api.com
and password:
C1sco.123
-
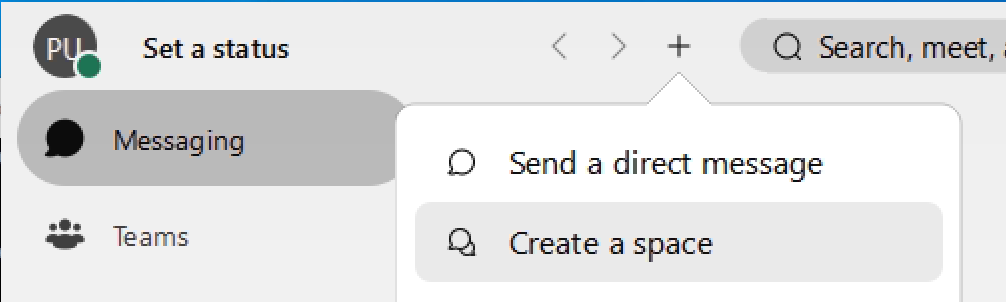
To create a Space, click the +, then Create a space
-
Name the Space
LTRCOL-2574 Space
and in the "Add people by name or email" field, enter
cl2026-lab-pod6-bot@webex.bot
. You may have to press Enter to make sure that email address is
added. If you click paste and it seems like nothing happened, pay attention to the area of the window below
the place where you pasted in the email address. If you see Pod6, then it was added.
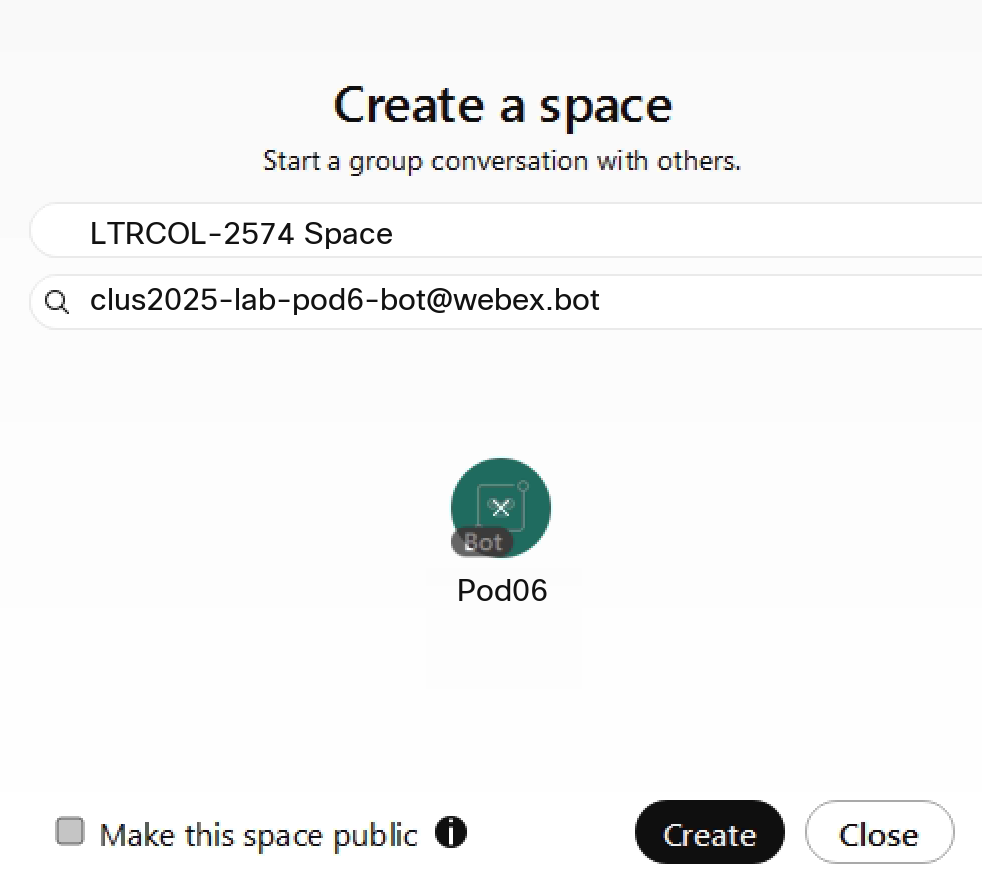
Please make sure this Room title is entered correctly. Your Bot will later search for it by this specific
name.
-
Click Create at bottom. The Space should be created and you should see 2 People in it
(yourself and the Bot). If you get an error indicating that the bot could not be added, try going back to
add the user again, but this time enter the name manually instead of pasting it in. If you see duplicate names
for your bot name, it could indicate your app is still caching the name from a old bot with the same name. Try
selecting the one with the icon color that matches the one you picked when you created the bot. If they are
all the same, try selecting each one to see which one works.
Step 3 - Use Bot to find the Space using the API
Now that you have a Space with your Bot as a member, you can have the Bot send a message to it.
You will use the API by way of the wxc_sdk in a sample script to accomplish this task.
-
Access your VS Code instance: https://dev1.pod6.col.lab:8443 and from
the Explorer open wbx_messages.py in the examples folder.
-
You already filled in the wbx_bot_access_token with the value for your bot. This
will now be used to send a message on behalf of the Bot.
Add the following line to instantiate the WebexSimpleApi object as "api" with this access token.
-
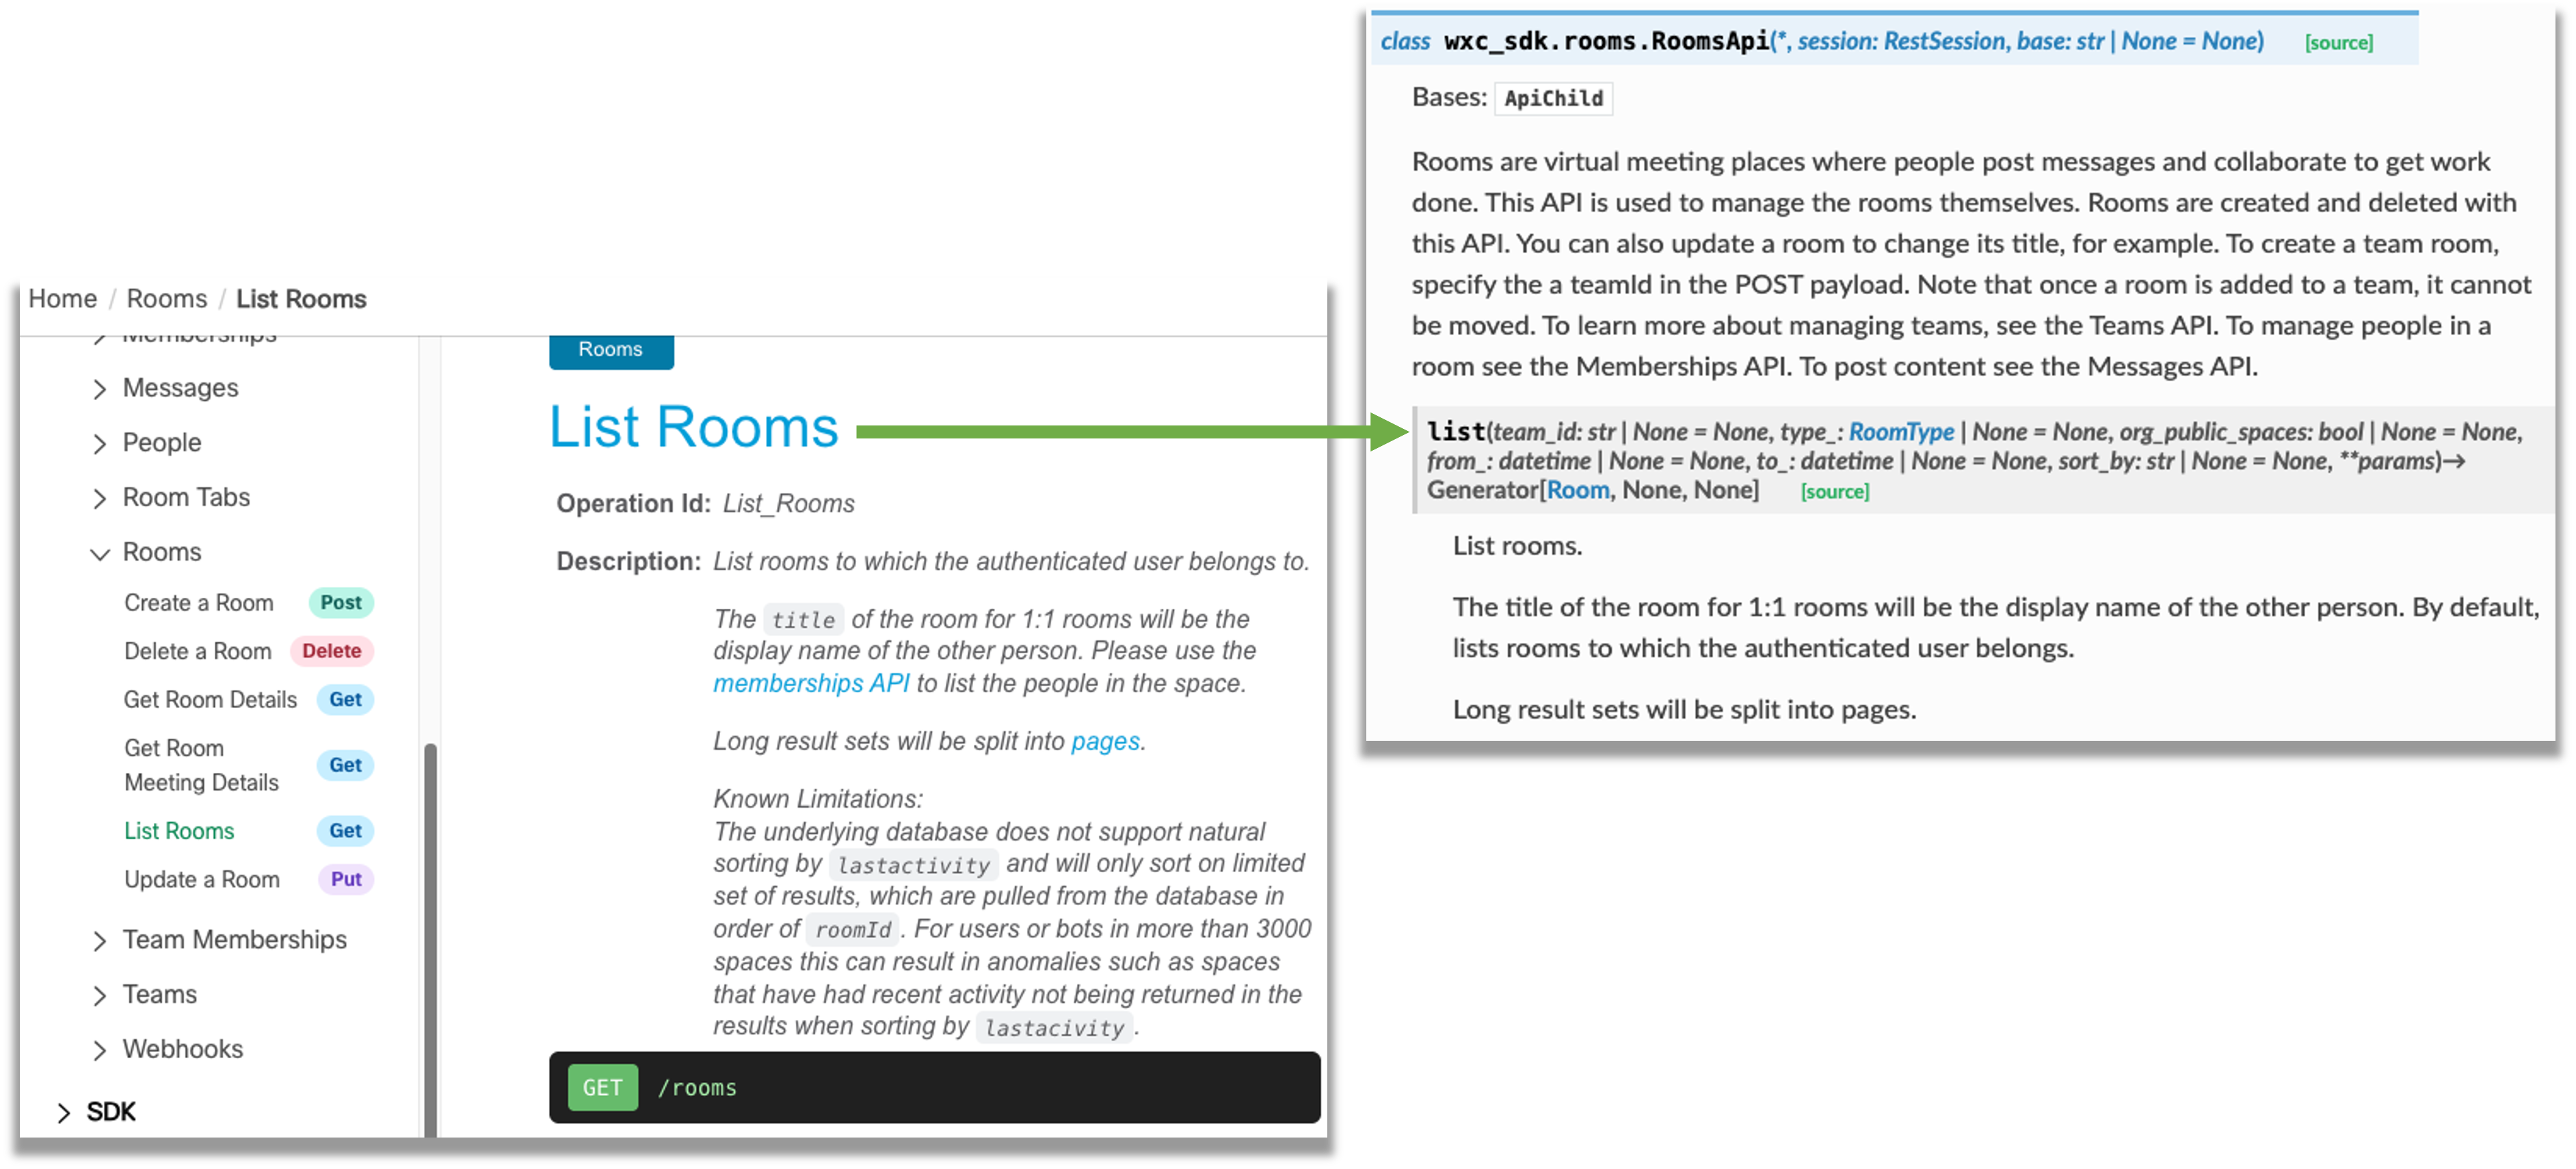
To send a message to a Space, you need to know the Room ID (Spaces were previously known as Rooms in Webex and to maintain
backwards compatibility in the API, all Space related endpoints are still referred to as Rooms). Similar to earlier actions, you can
get a list of Rooms that you have visibility to and then search through the list until you find the
one(s) you want. The Webex API for this is
List Rooms. The
wxc_sdk has a corresponding
RoomsAPI
with a list() method. In examining it more carefully, you will notice that there are no
required parameters, and the return type is a list of Room, which contains all Room
attributes. Search for the room of type "group", which would be any Space that's not a direct 1:1 conversation.
 Add the following to your Python script:
This code calls the list() method of the RoomsApi object, filtered by type='group'. It then iterates through the
list of rooms and prints out the JSON representation of each room.
Add the following to your Python script:
This code calls the list() method of the RoomsApi object, filtered by type='group'. It then iterates through the
list of rooms and prints out the JSON representation of each room.
-
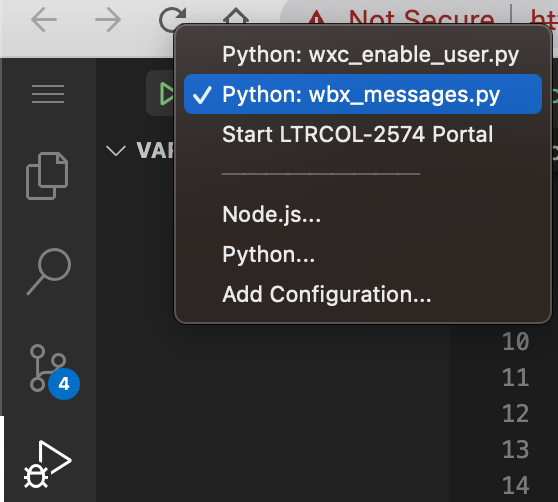
Click the Run and Debug button in the left column.

-
Make sure the predefined configuration for running this script, called
Python: wbx_messages.py is selected:
-
Click the green Start Debugging
 button to run the program in the Terminal window.
-
Since this Bot was just created, it likely is only a member of the Space you just created, the one titled
LTRCOL-2574 Space.
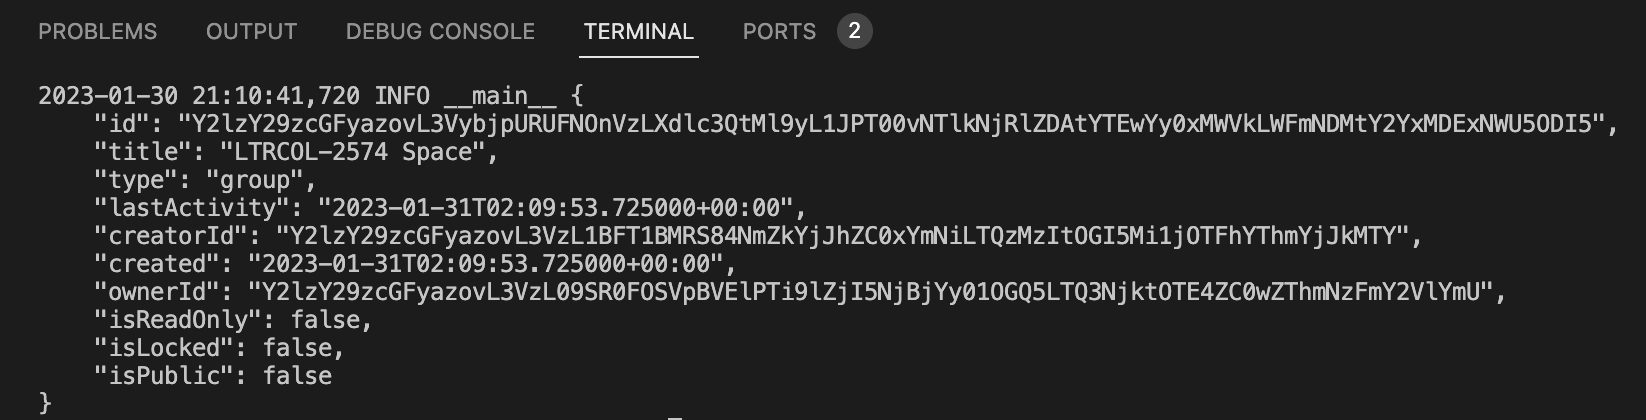
Now that you have found the Room ID, you will use this to send a message to that Space.
Step 4 - Send a Message to the Space using Bot
-
Sending a message is fairly trivial using the SDK. You can supply either a Room ID, or a person ID for whom
the message is to be sent. There are also a different formats, either plain text or markdown,
and even the ability to send Adaptive cards, which we will do later. All of this is done using the
Create a Message POST. The wxc_sdk, in turn, has a
MessagesApi and a create()
method.
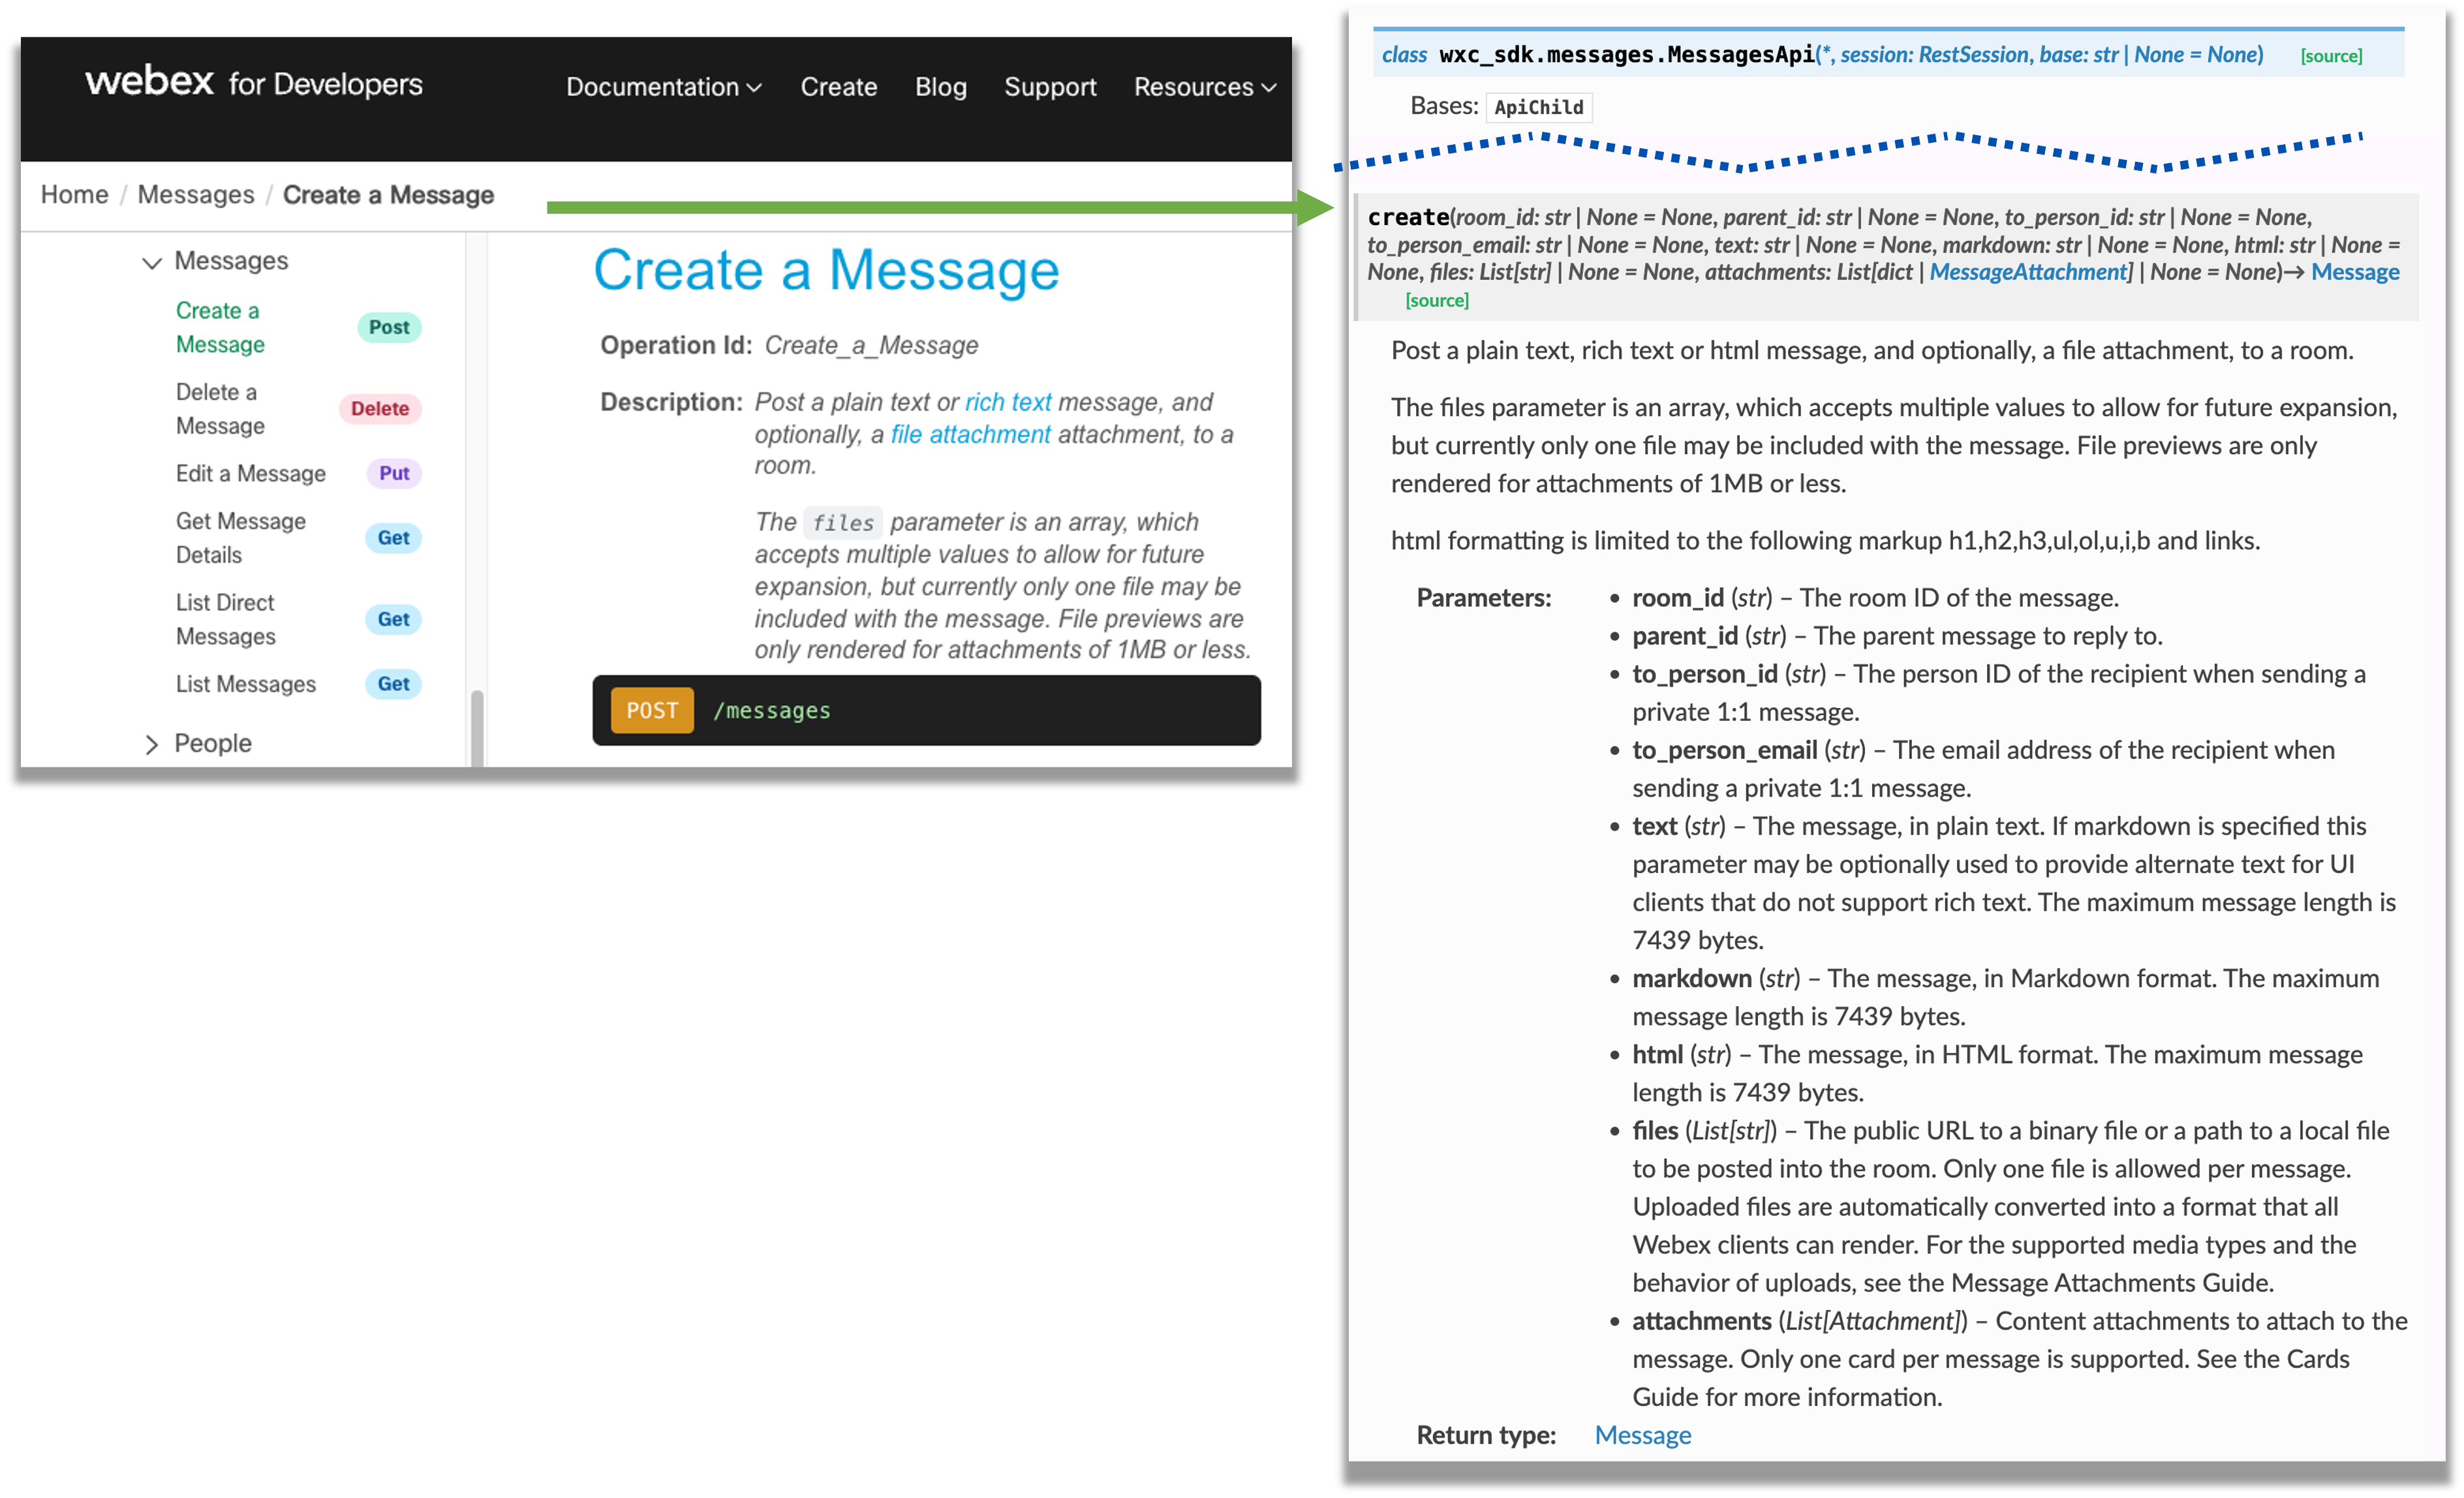
-
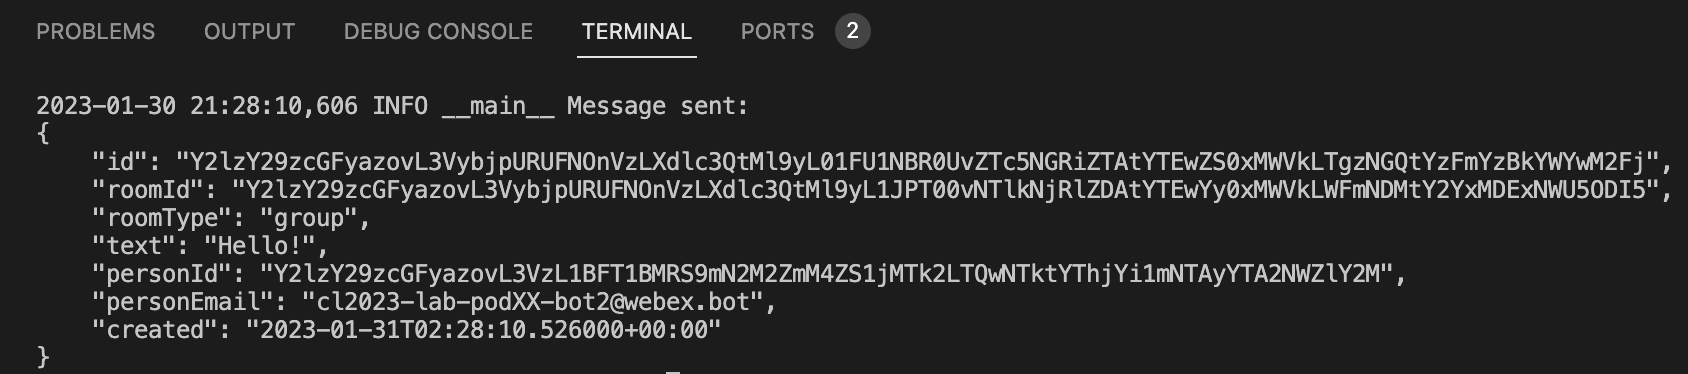
Add the following to your Python script. This will call the create() method of the MessagesApi object with the
room_id of the Space you found in the previous step and the text 'Hello!'. It then logs the response from the API.
-
Click the Start Debugging
button to run the program.
Step 5 - Verify Message was Received
-
In case you didn't notice a pop-up notification, take a look at your Webex client. If need be, launch it and
log in using email:
pod6wbxuser@collab-api.com
and password:
C1sco.123
.
-
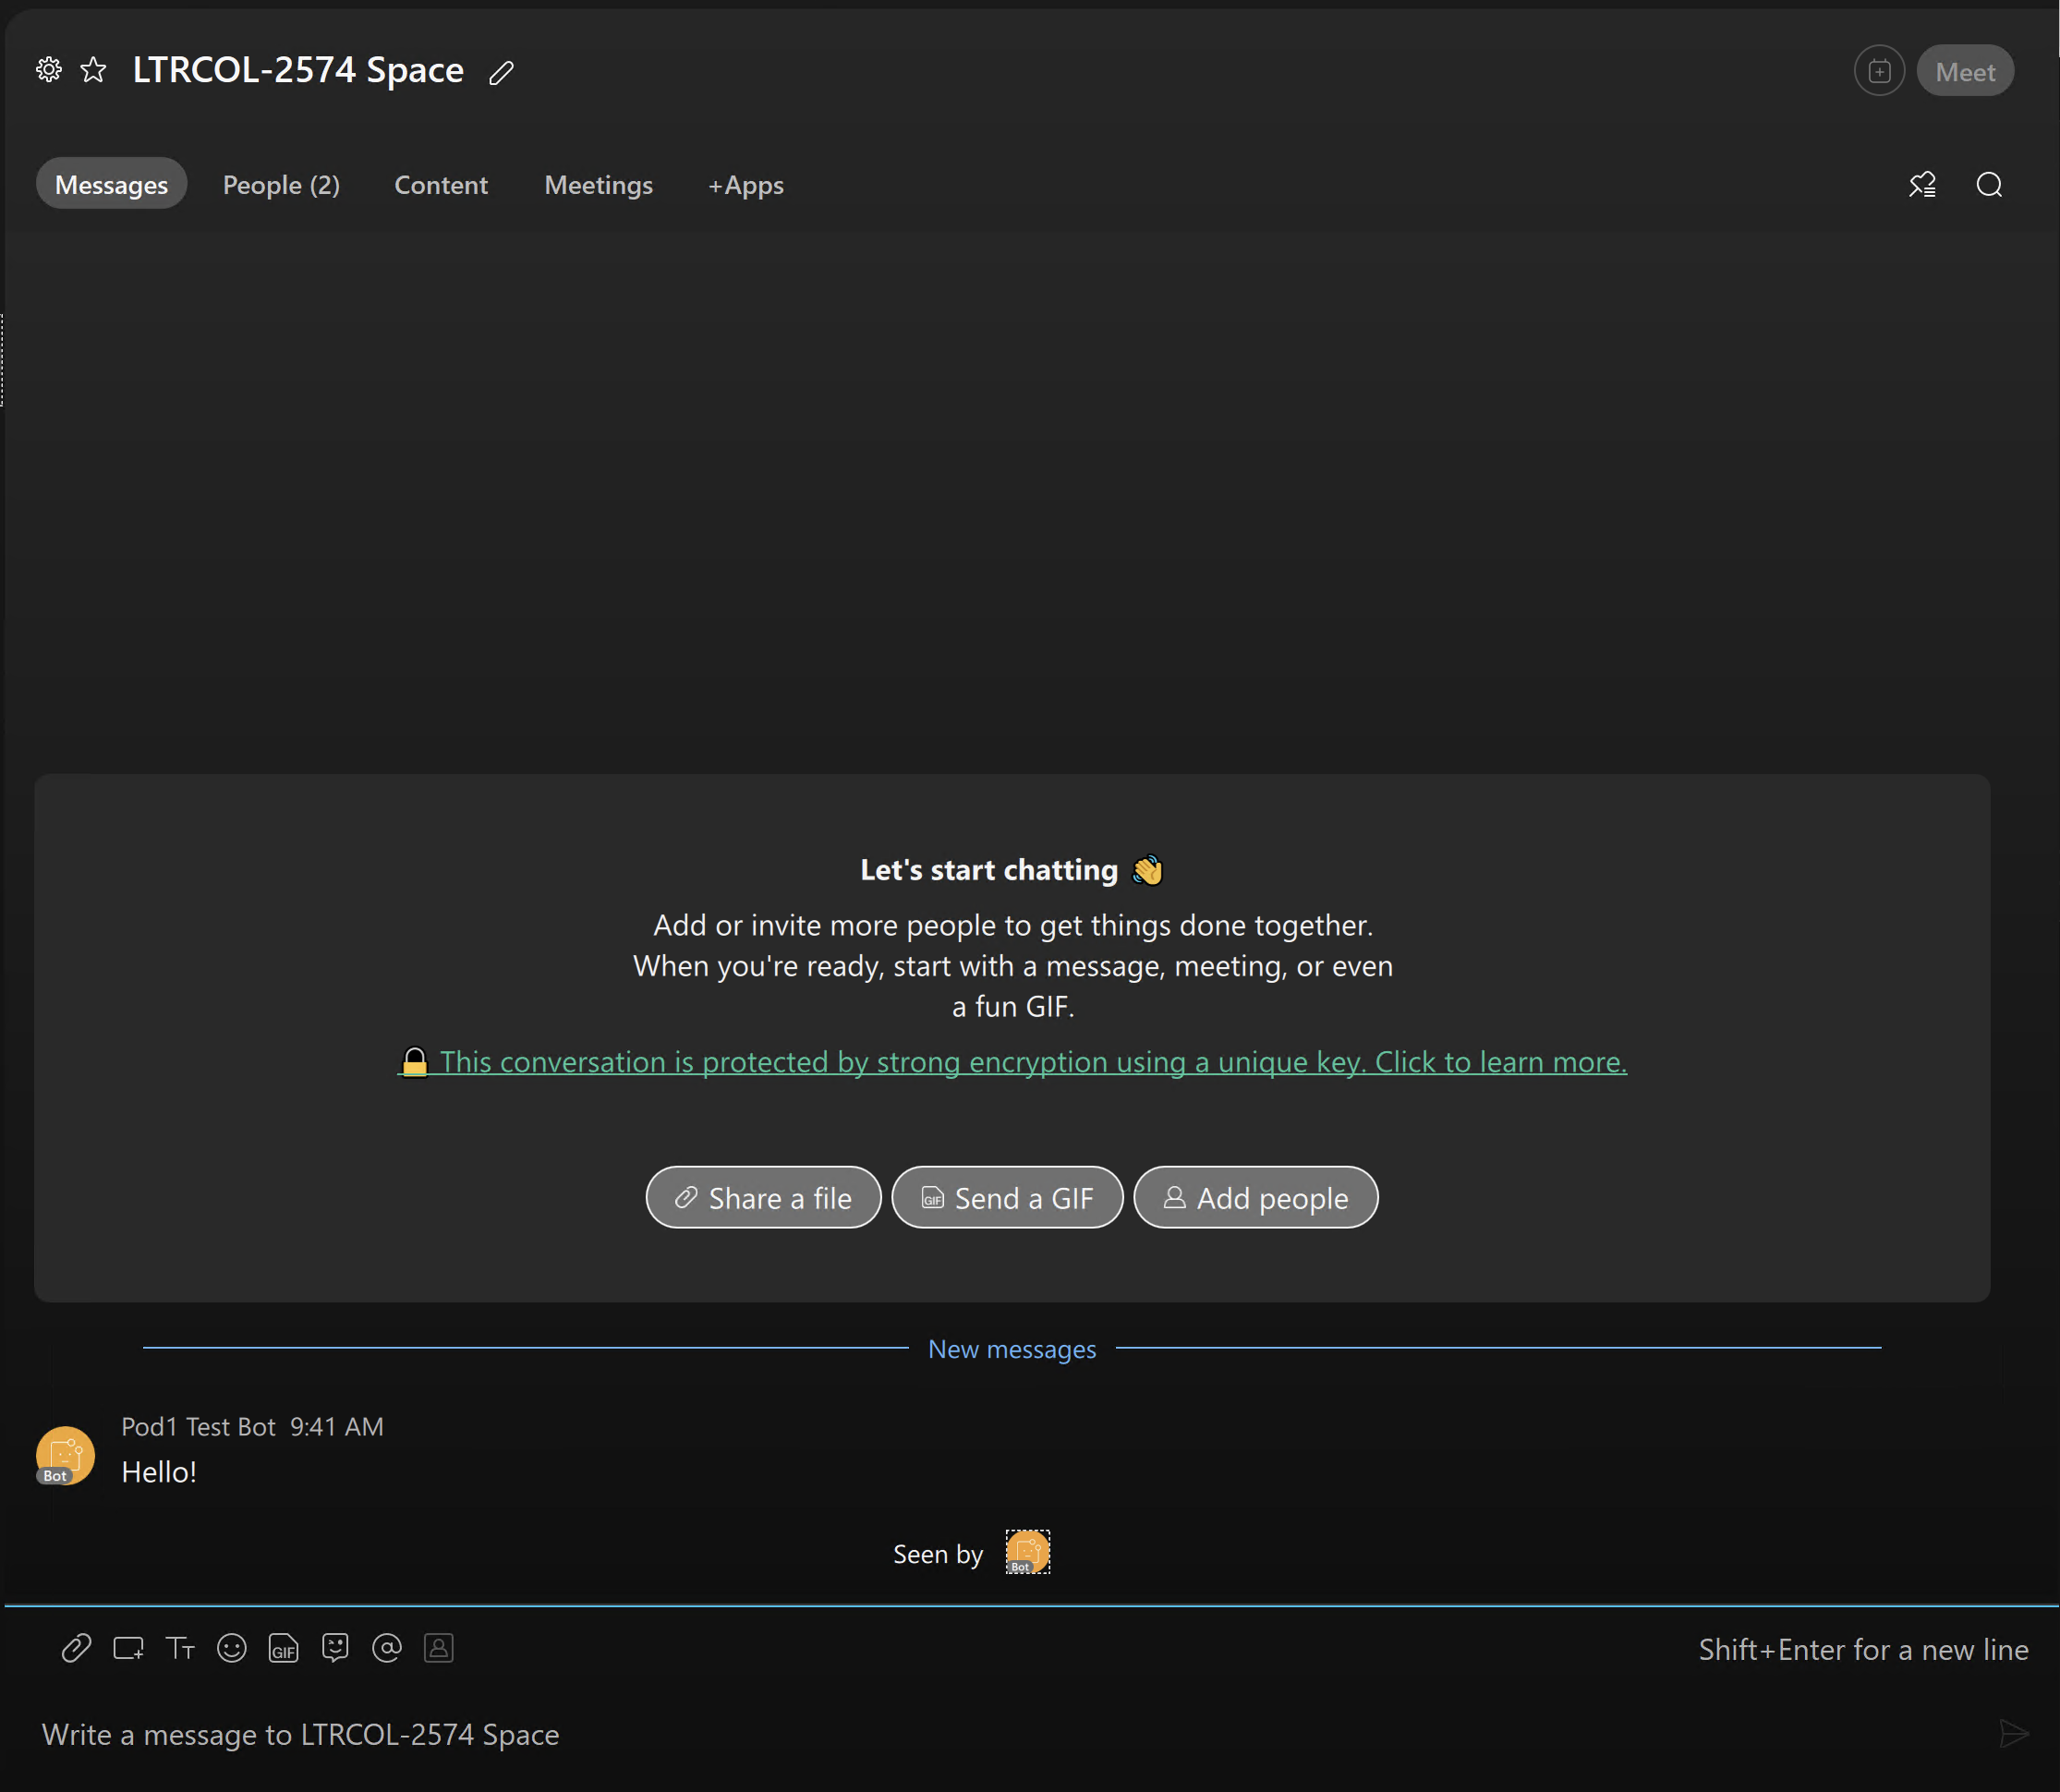
You should see a new LTRCOL-2574 Space Space where you should see the
Hello! message from your
Pod6 Test Bot.
Now that you are able to send messages using a Bot, the next section will cover receiving messages and
events.