While sending individual requests to Webex APIs is straightforward, automating tasks programmatically requires careful
consideration. Most automation requires multiple API requests in series (or maybe even in parallel and aggregating multiple parallel
responses), often using information from one response to
construct a new request on a different API endpoint. You must consider the logic necessary to handle a variety of responses
including errors and also grant your application access to the APIs while maintaining security. Python offers convenient
libraries, such as requests and urllib that allow you to construct and send HTTP(S)
requests, but merely constructing requests is insufficient for robust automation. This is not to say that you cannot work with
Webex APIs by using a simple HTTP library like these, but you are then forced to deal with challenges such as handling
pagination for large datasets and managing response codes indicating congestion, which may warrant retries rather than immediate
failure.
To address these complexities, this lab will show you how to use a Software Development Kit (SDK)
named wxc_sdk, accessible at
https://pypi.org/project/wxc-sdk/. Initially designed for
Webex Calling-specific APIs, this SDK has evolved to encompass the majority of Webex APIs, organized as
individual 'packages' within the SDK.
To demonstrate the use of the SDK, start by performing the same user lookup you did earlier using the developer.webex.com
documentation, but this time using Python. As with all Webex API interactions in this lab,
you will use the wxc_sdk to simplify the task. Follow these steps to get started:
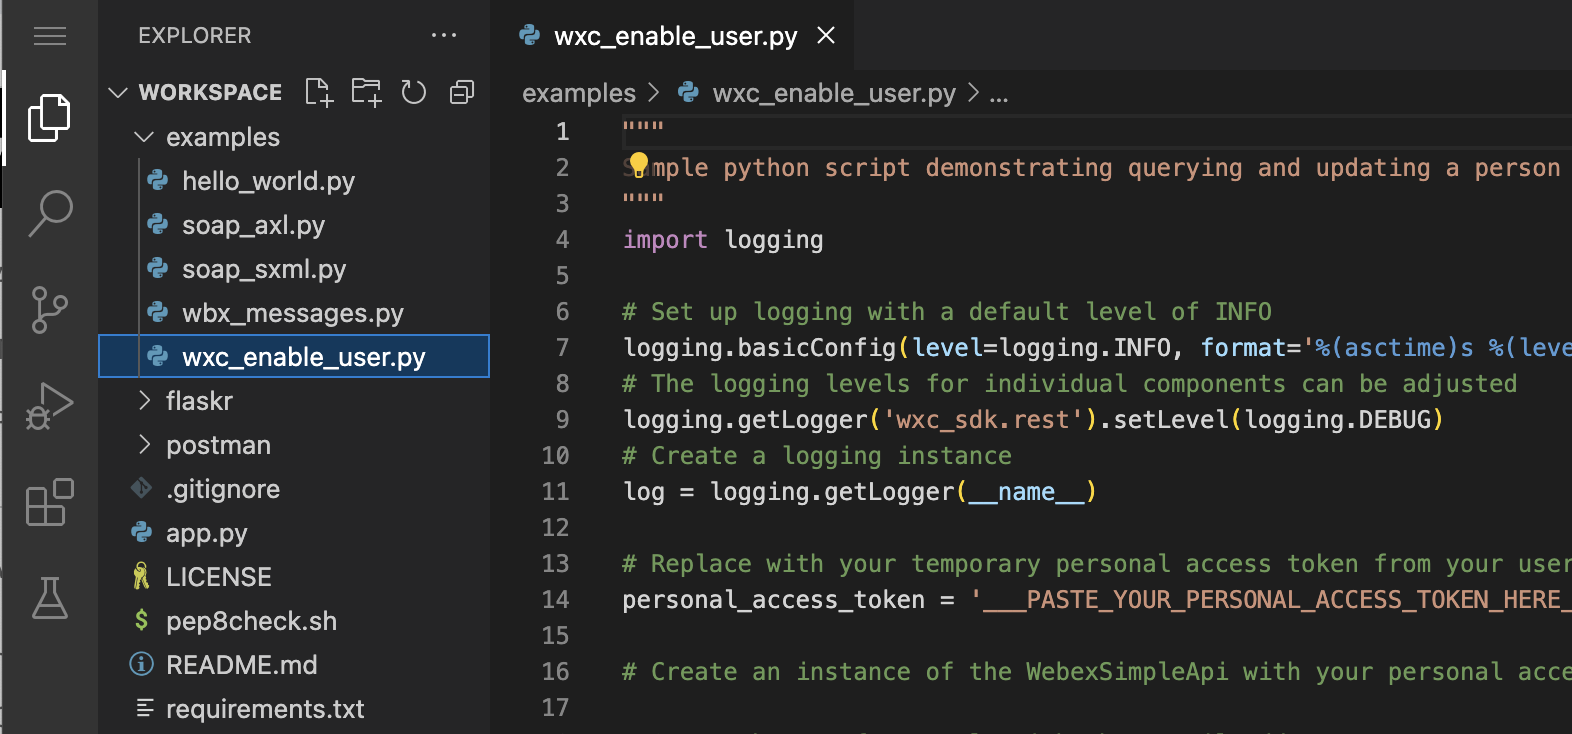
Click the Explorer icon
at left, and you see a list of folders and files.
Navigate to expand the examples folder and click to open
wxc_enable_user.py. You now have the file open for editing.
The file contains a basic Python skeleton that you will use to execute basic Webex API requests using the
wxc_sdk. The Python environment has been installed, as well as the wxc_sdk
using the pip tool. If you want to know more about virtual environments and pip, you can refer to the
Python Packaging
documentation.
The other code already present in the file performs supporting tasks like
setting up the logging infrastructure and contains comments to guide you through the process. If you are unfamiliar
with Python and don't understand what these lines do, you can ignore them for now as they are not essential to the
task of interacting with the Webex APIs.
To use the SDK in this program, you must first import it by importing the WebexSimpleApi object from the wxc_sdk package.
Throughtout this lab you will find examples like what is shown below that indicates the file you must edit, where in the file you should add code,
and the code you should add. You can (and should) use the Copy button on the right to copy the selected line or lines and then
paste them into your VS Code editor window in the correct location.
In this example, you are looking for the line that says import logging and then adding the import statement on the next line as shown below.
Paste the following into your file:
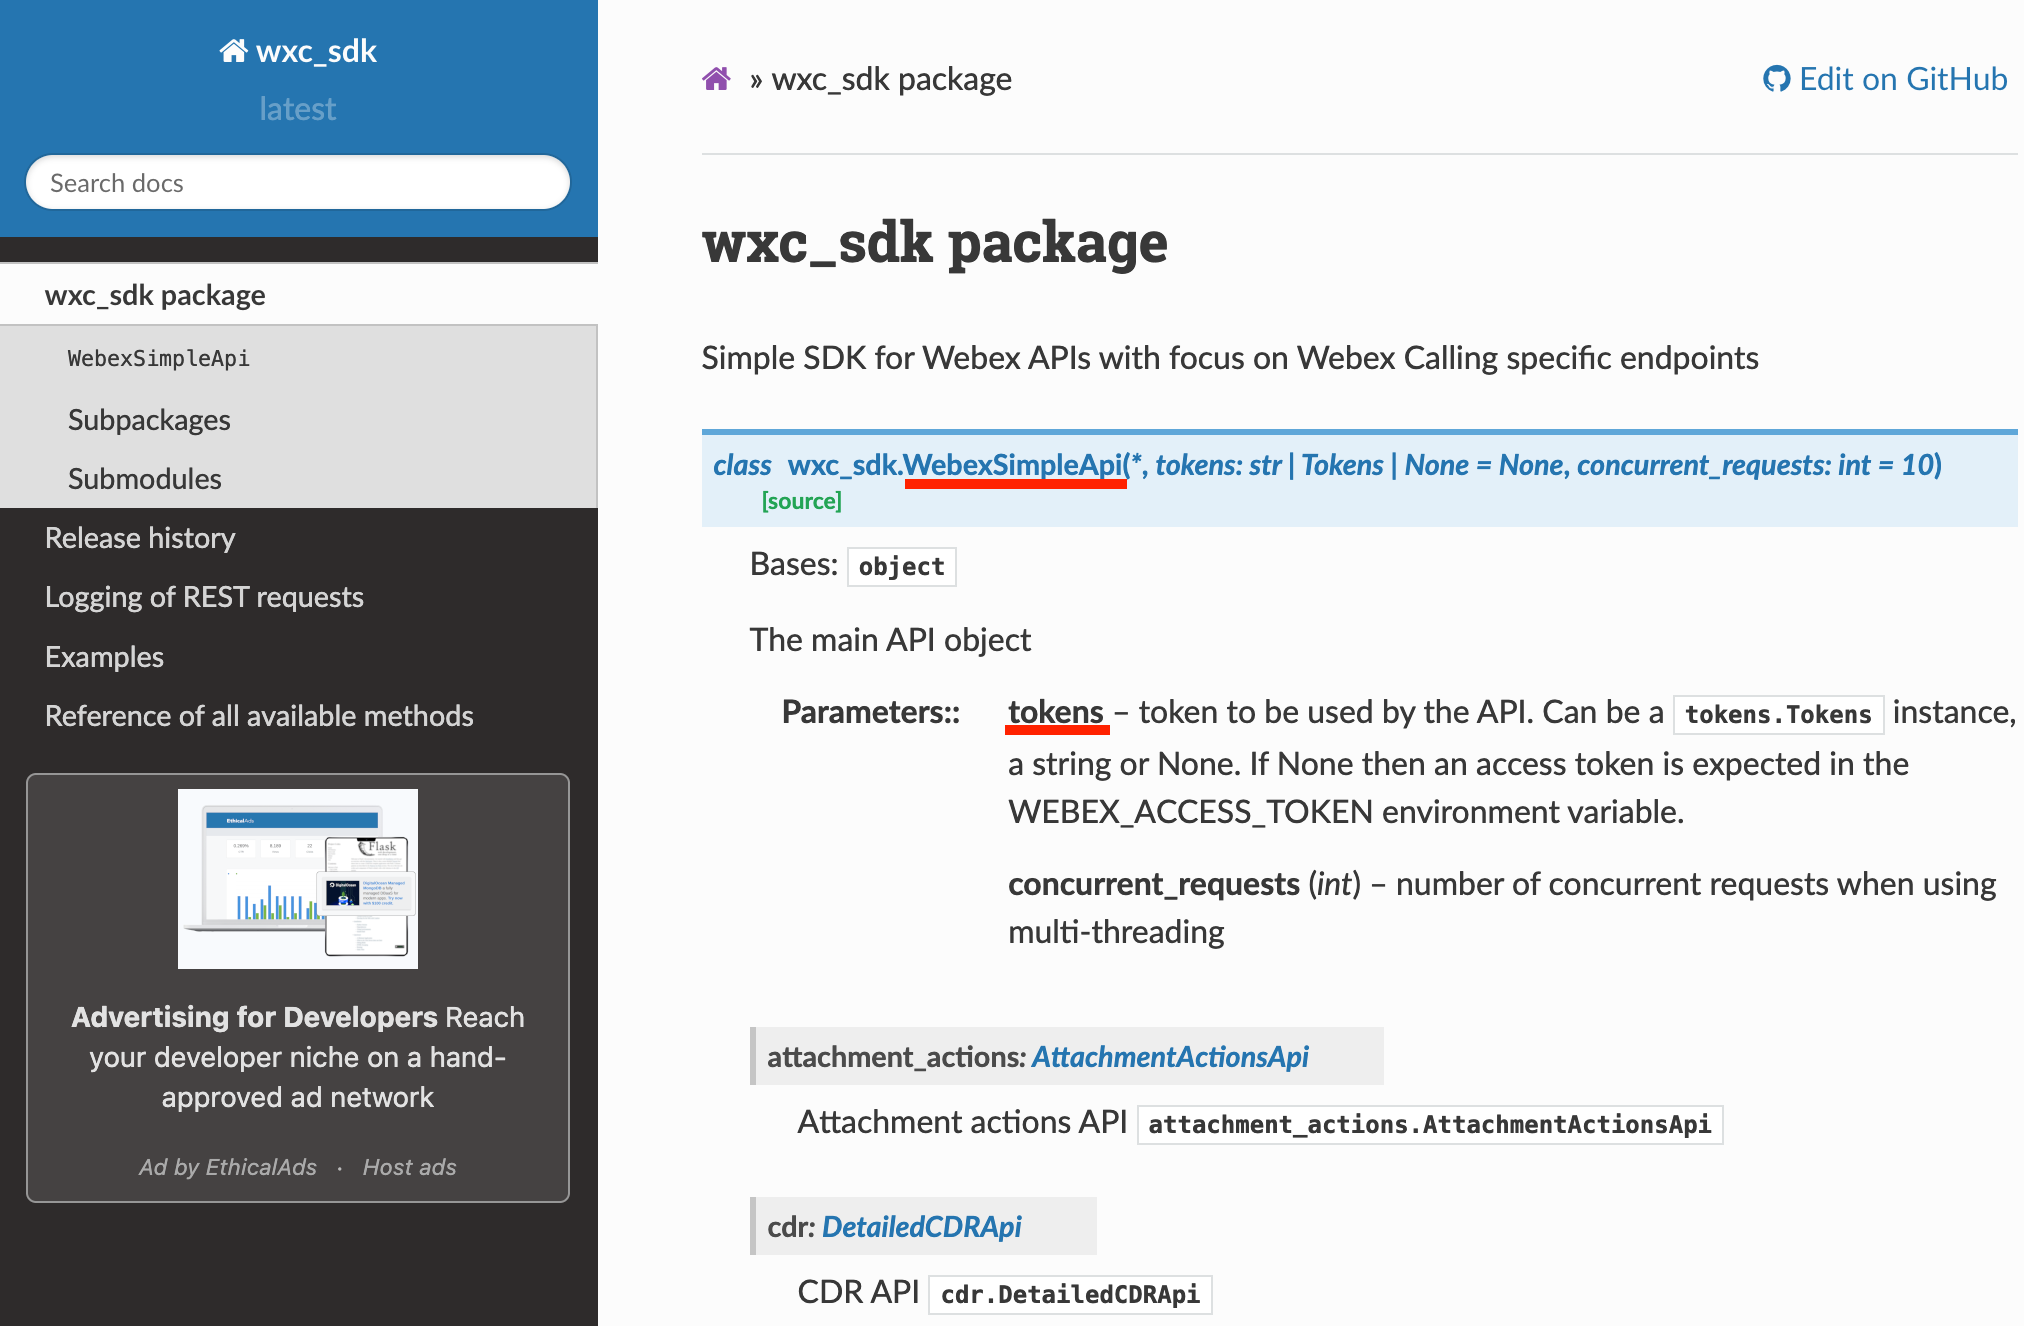
The wxc_sdk
documentation shows that the API is instantiated using the WebexSimpleApi class,
which can optionally take a tokens parameter to specify the access token that will be used for
accessing the Webex APIs. If the token is not specified here, then the SDK looks for a token in the local
environment variable WEBEX_ACCESS_TOKEN. For this lab, you will be using a personal access
token and passing it to the constructor for the class; however, in a production environment, you would likely
inject the token into the environment variable and let the SDK obtain it automatically from there.
Next you must obtain the personal access token. On every page on developer.webex.com, as a logged-in user,
you can obtain your token by simply clicking your user icon on the top right. Navigate to the
List People
API documentation used previously. If at the top right it indicates to "Log in",
sign in with
pod6wbxuser@collab-api.com
and password
C1sco.123
As before, click the copy icon on the Bearer line and OK to confirm the copy.
Switch back to VS Code and
paste the personal access token you just copied to the personal_access_token line
(replace ___PASTE_YOUR_PERSONAL_ACCESS_TOKEN_HERE___ and make sure it is still surrounded by the single quotes)
Add the following line to instantiate the WebexSimpleApi object as "api" with this access token.
You have an API object, but what can you do with it? In the
Webex Documentation, you saw the
Full API Reference section with all available APIs. Most of those will have a
direct mapping to an API subpackage and method implemented in the SDK.
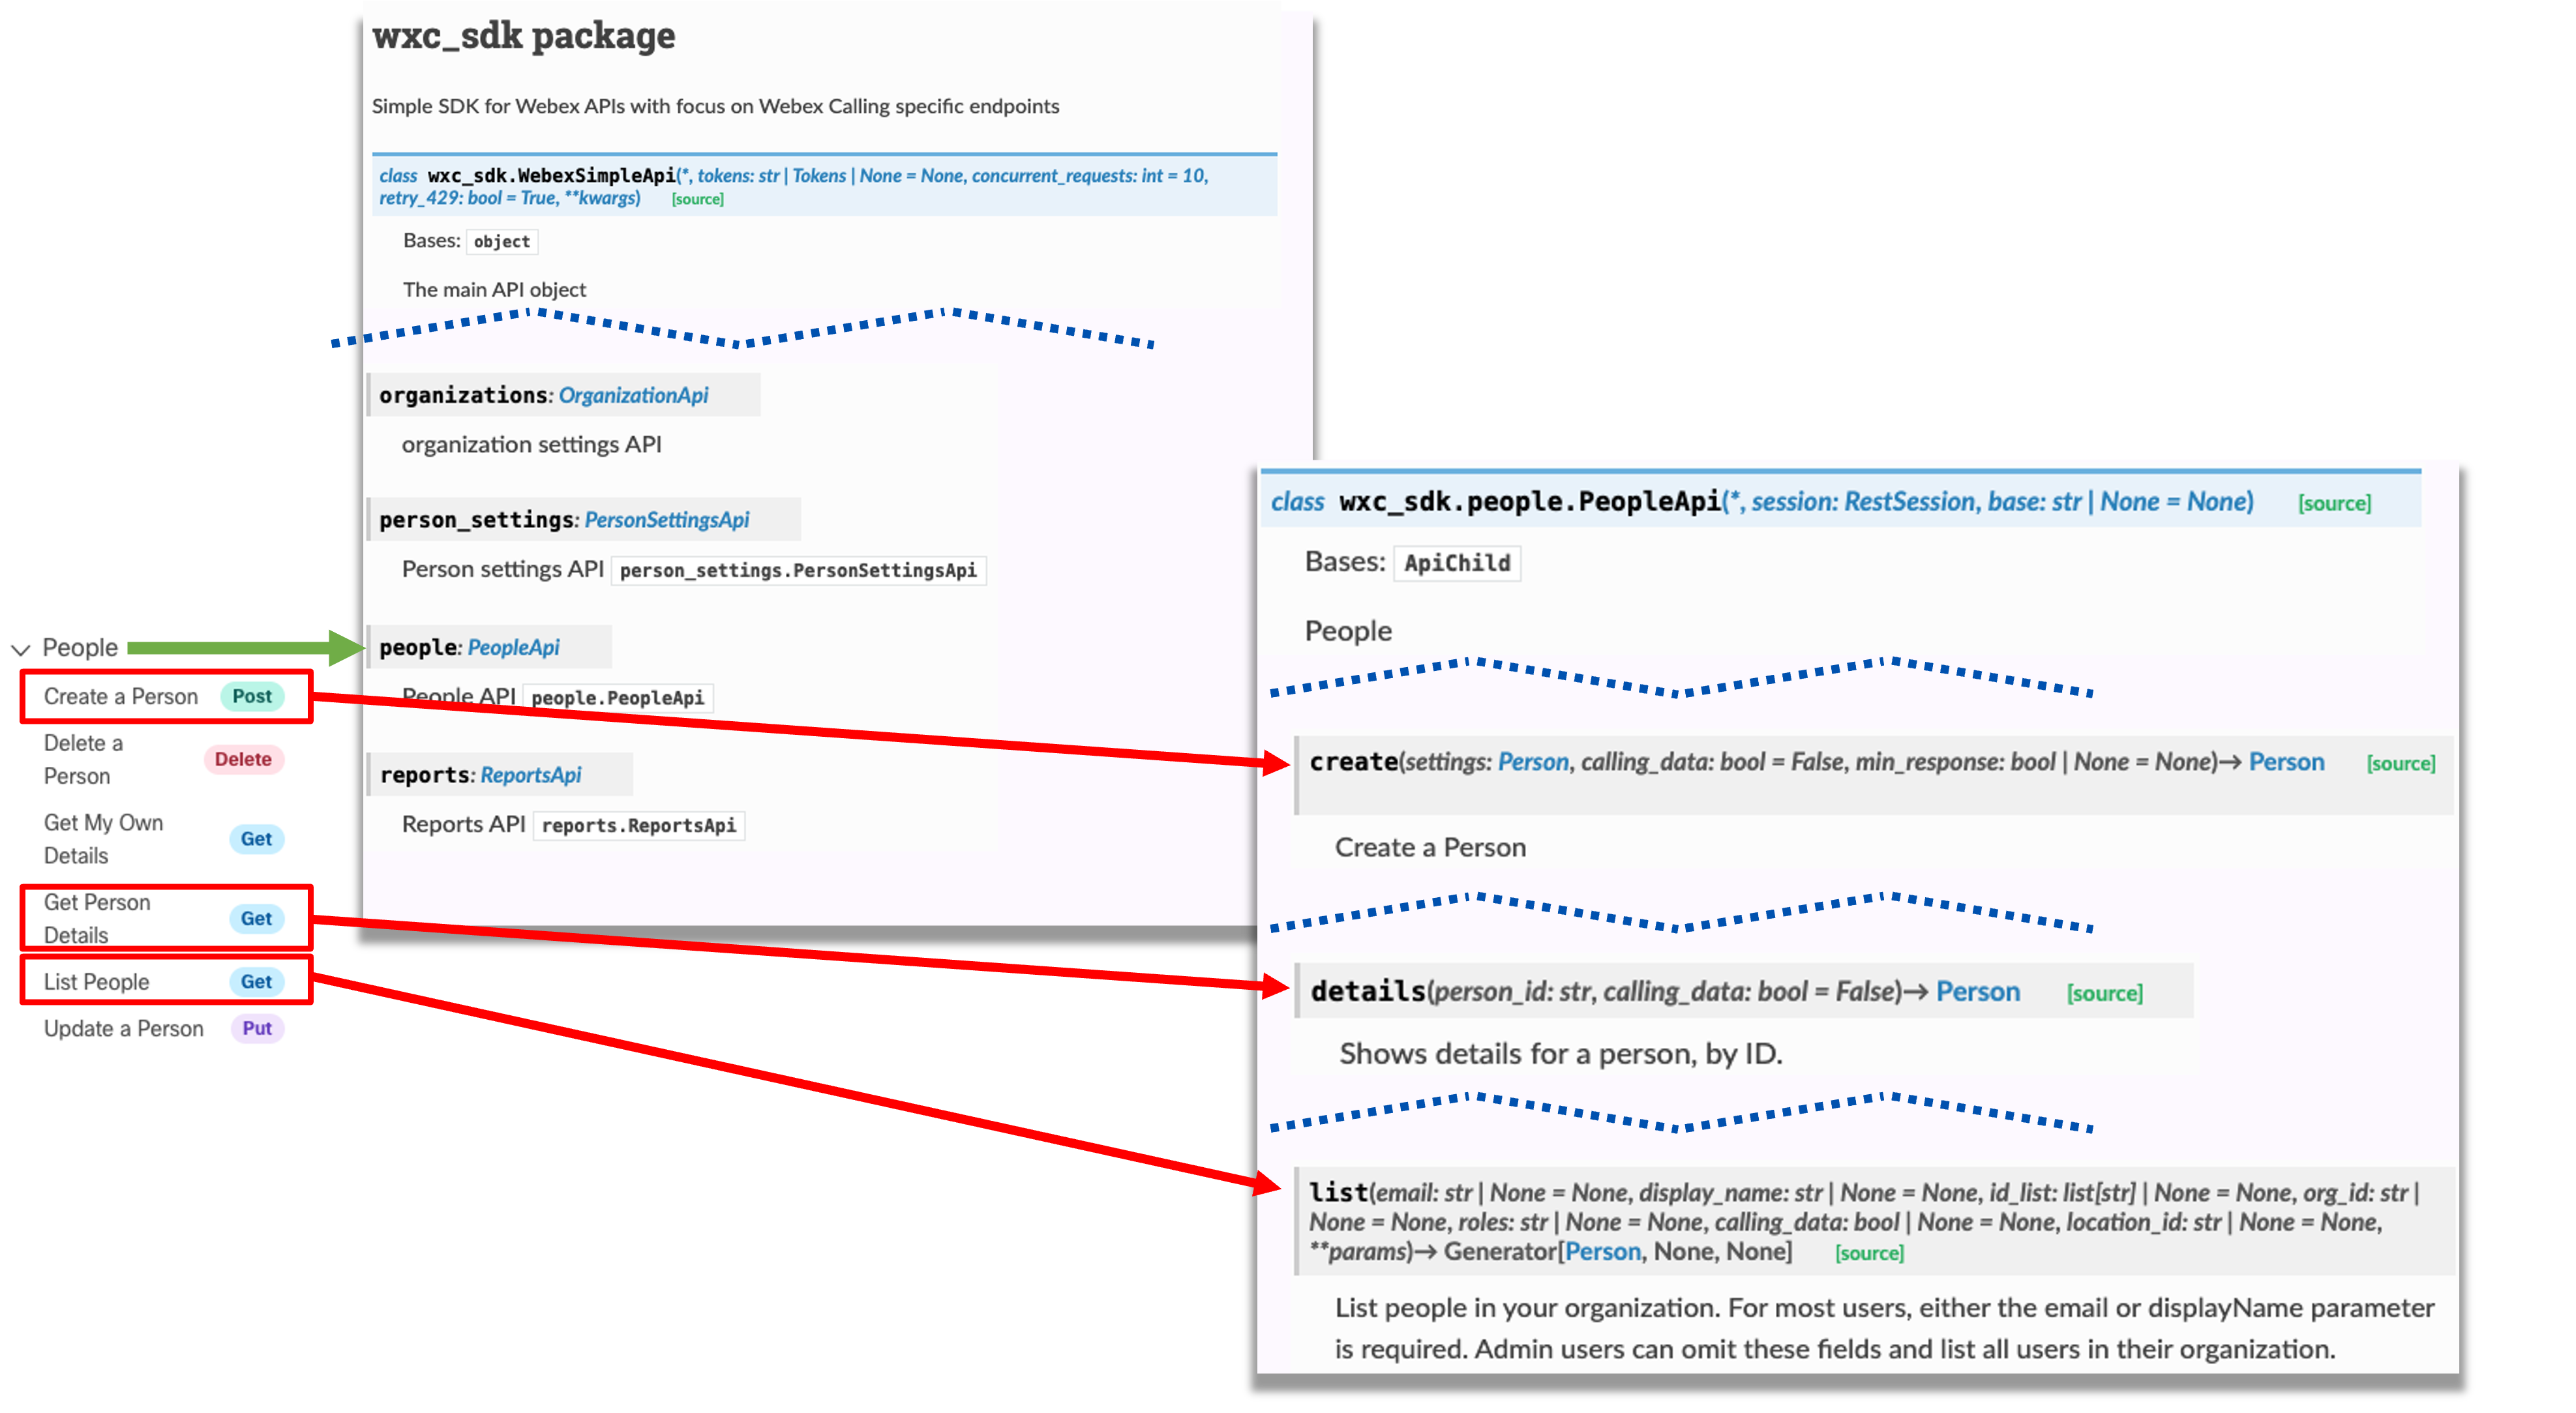
The People
API section in the Webex documentation has a corresponding
PeopleApi subpackage
in the wxc_sdk. This class has the methods
list(), create(), details(), delete_person,
update() and me(), each one corresponding to a Webex API method.
Now repeat the GET List People
query to search for a user with a specific email address, but this time using the SDK instead of the
developer.webex.com page. Since the SDK was initialized as api in the previous step, you can
perform the exact same query with api.people.list() and pass the email address as a parameter.
Replace the email address in the email_to_search variable with
pod6wbxuser@collab-api.com (make sure it is enclosed with quotes):
Add the following line to query the Webex API for people with that email address.
You can store the result in a list variable called webex_user_list. Even though
querying for a single email address should only yield at most a single result (because email addresses
in Webex must be unique), a list is always returned for list APIs.
If you look carefully at the list() method in the documentation, the data type
returned is technically a Generator. While generators have some advantages that
are outside the scope of this lab, they can always be changed to a list, and we will do so in the
lab to simplify the discussion. For more scalable applications, you should use the generator
directly so that you can process the data as it is being returned instead of retrieving all of it
before processing the data.
It is worth spending a minute looking at this line in VSCode. If you hover over any portion of the
api.people.list command, you will see the documentation and possible options.
If you typed this command in manually, you would also get command-line completion.
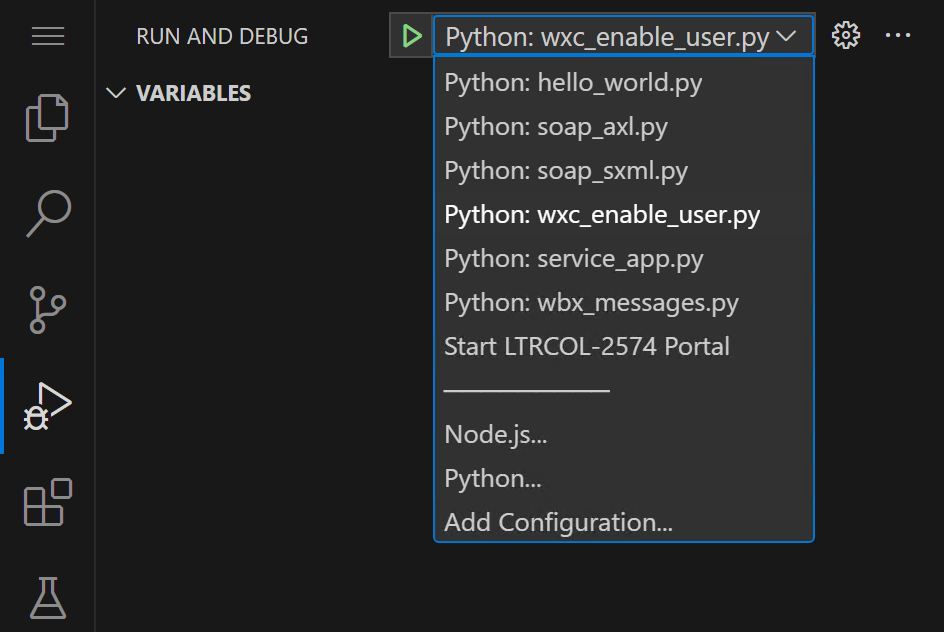
Try running your program to see what happens. You can do this
by clicking the Run and Debug button in the left column.
Once you click anywhere in list of "RUN AND DEBUG" configurations, You should see a predefined Configuration for running a python
script named Python: wxc_enable_user.py in the list. Make sure it is selected:
Click the green Start Debugging
button left of the Python: wxc_enable_user.py text. Doing so launches a
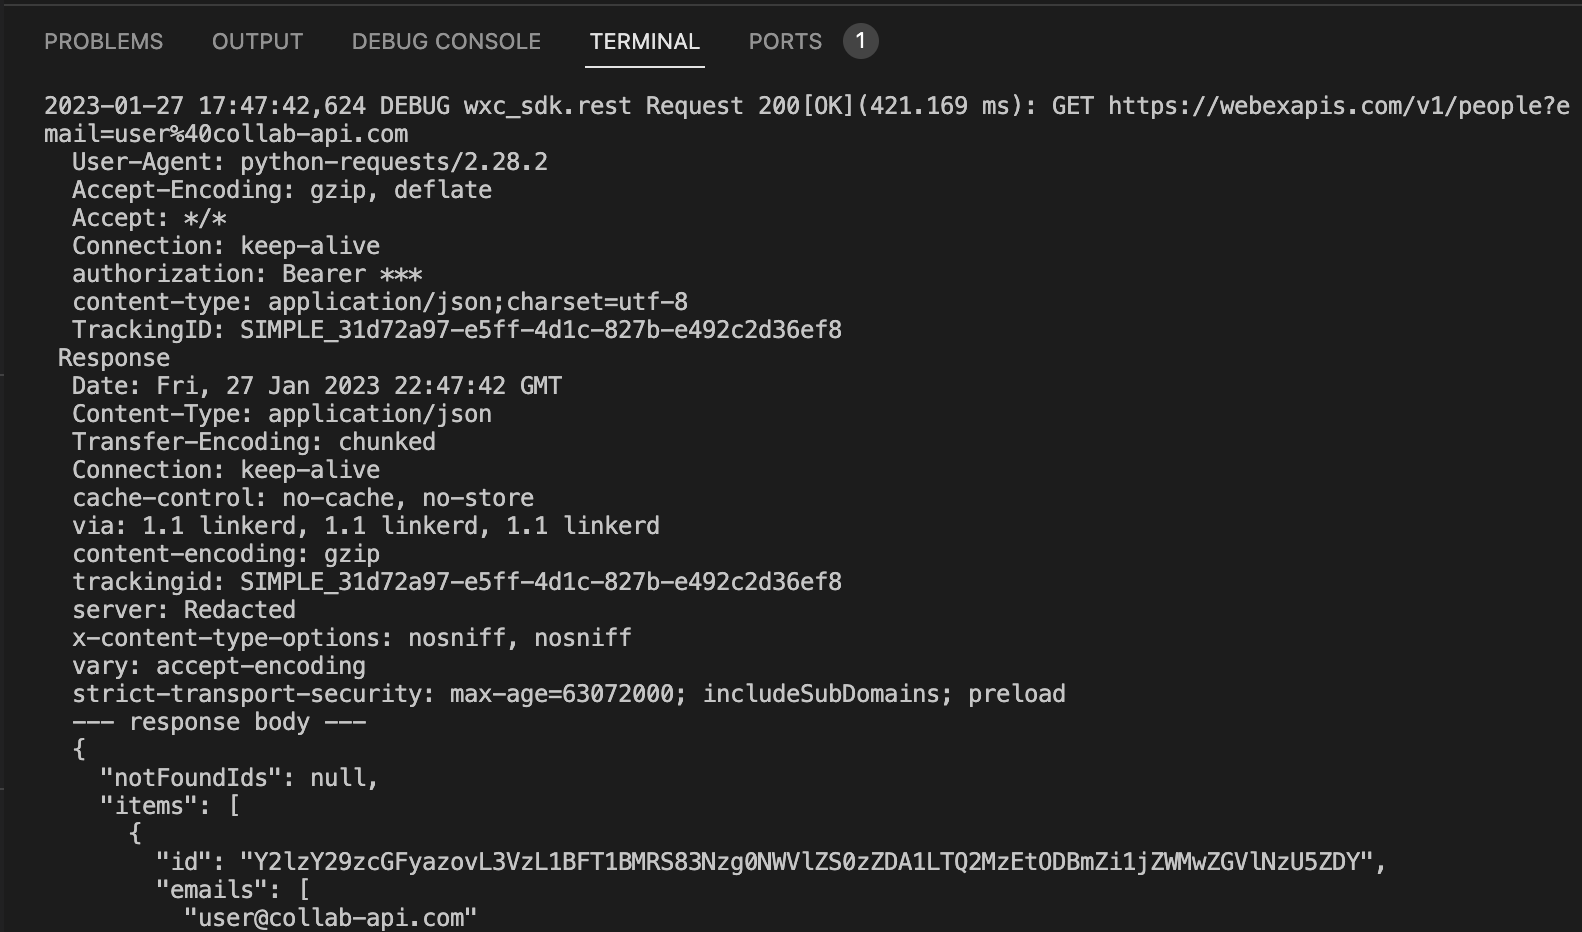
Terminal with the complete logging output at the bottom. If you scroll up a bit in that
Terminal (you may need to resize to make it more visible) you will notice the debug level output from the
SDK. The output shows you all the details of the request and response, including the verb, URI, and headers.
This particular request has no body, but if it did have one, it would be shown as well. The response shows
the status code (displayed at the top where it says Request 200[OK]) along with the headers
and response body. You can see that the content type is application/json and the body is a
JSON object with the user data. You were able to accomplish this with the single line of code you added to the
program - api.people.list(email=email_to_search). This really shows the power of the SDK.
You did not have to specify the URL, the headers, the method, or the body of the request. You simply called
a method on the api.people object and passed the email address you wanted to search for and
got back the results in JSON format.
You may be wondering why the results of the API request and response are displayed on your terminal
when the script does not explicitly have any lines saying print anything. You might expect to see a line
that looks something like print(webex_user_list) in the program. The SDK uses the Python
logging facility to output information. The
logging.getLogger('wxc_sdk.rest').setLevel(logging.DEBUG) command in the
script is setting the log level to DEBUG which triggers the SDK to log the raw messages
for all requests and responses. If you changed this to logging.INFO,
you would not see any of this output. We are therefore relying on the logging in the
wxc_sdk instead of requiring explicit log statements. This is documented in
the wxc_sdk documentation.
The next task is to go over each item in the webex_user_list (there should only
ever be at most one because there can only be one user with a particular email address in Webex)
and log some data to the console using log.info(). Add the following code to the
wxc_enable_user.py file as indicated below:
This for loop iterates through each item in the webex_user_list and assigns
it to the variable webex_user. The log.info() function is then called with
webex_user as the argument. This will output the contents of the webex_user
object to the console.
The webex_user object which represents the single object returned by the SDK is not a simple
Python data structure, but rather a custom one
called Person in this case. This means you need to treat it differently than
a simple Python dictionary as it is an object. If you are not familiar with the difference between the two, for
the purposes of this lab you just need to remember that you access the attributes of an object using the dot
operator (e.g. webex_user.display_name) rather than the square bracket notation used for
dictionaries (e.g. webex_user['display_name']).
To run the program again with the additional code, click Start Debugging again.
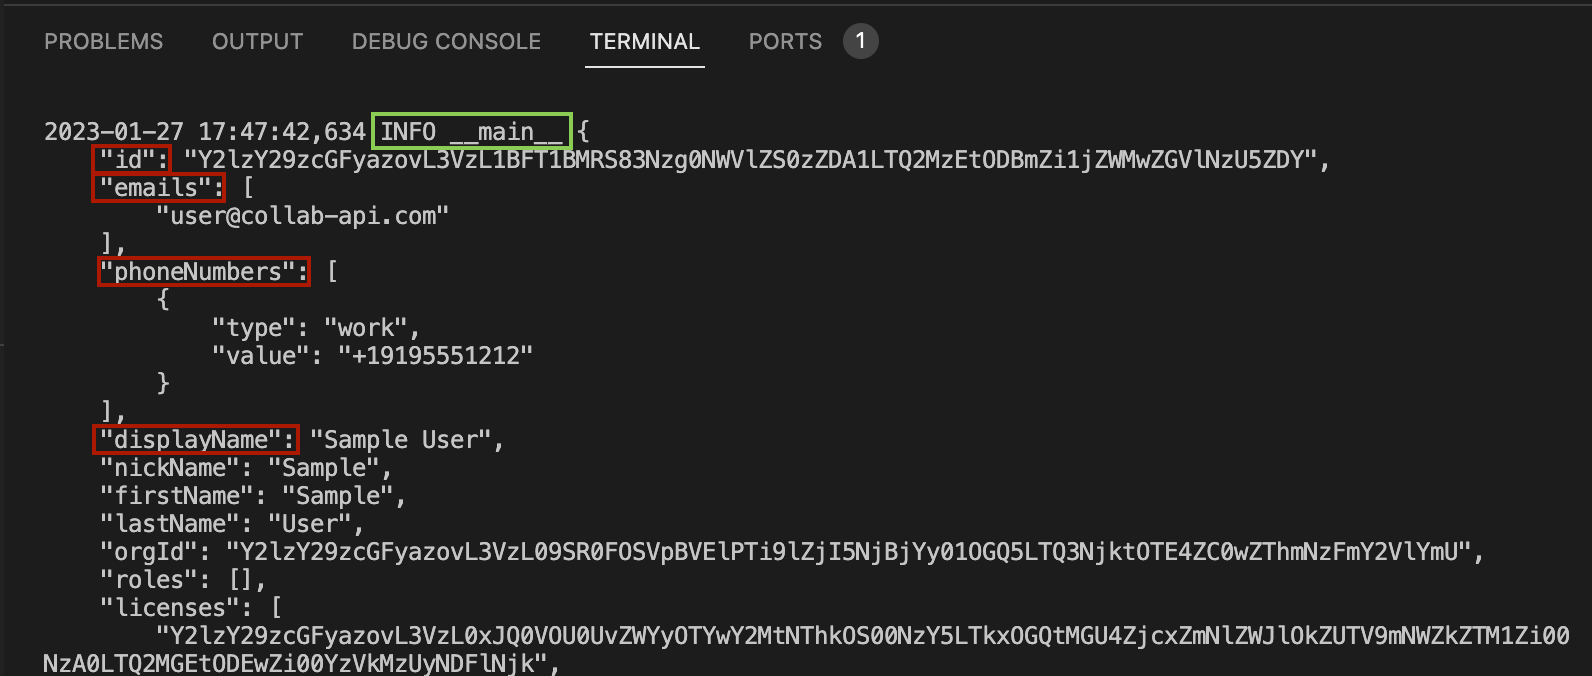
You should see something that looks like this:
The output is not the most readable. Although you can identify some things that look familiar based on the Webex
Documentation, the fields do not exactly match what is in the API. The key is in the wxc_sdk documentation.
This webex_user object is of a Person class, which gives it attributes like "person_id",
"emails", "phone_numbers", etc. What this means, is that if, for example, you need to retrieve this
object's display name, you would use webex_user.display_name. Generally speaking, the SDK
simply converts the camelCase names from the API response to snake_case names in Python. This is a common practice
in Python and is generally considered more readable. For example, the API response has a key called "displayName"
which is converted to "display_name" in the Python object.
Try printing just the object's display name. Replace the log.info(webex_user) line you previously
entered with the following:
Click Start Debugging
You should see a line with "INFO __main__ User information found for"
with the display name of the user with the queried email address.
If you want to print all user data in a readable format (or pass the data to some other system that does not
understand these custom Python classes) the class has a method called model_dump_json()
that converts everything to simpler JSON, with its simpler data formats, effectively the same thing you would
receive from running the API query from the Webex documentation.
Once again replace the same line of code, but this time with the following:
The Python logging capability is used for generating output instead of a simple
print() because it allows us to control the level of output of not just our own
code, but also see information from the underlying SDK, which uses the same logging facility. In
fact, we have set the logging level for the underlying REST calls to DEBUG level, giving greater
visibility into what is being sent and received.
Click Start Debugging and examine the Terminal window output.
If you look carefully, the data structure printed matches the Response Properties from the
List People
method in the Webex API specification exactly (including
the keys "id", "emails", "phoneNumbers", "displayName", etc.).
Pay attention to the output. Notice that the output is once again shown in camelCase, not the snake_case that
the SDK's Python object uses. Keep this in mind if you ever decide to use the raw JSON returned by the
model_dump_json() method. In this lab, we will use the Python object directly.
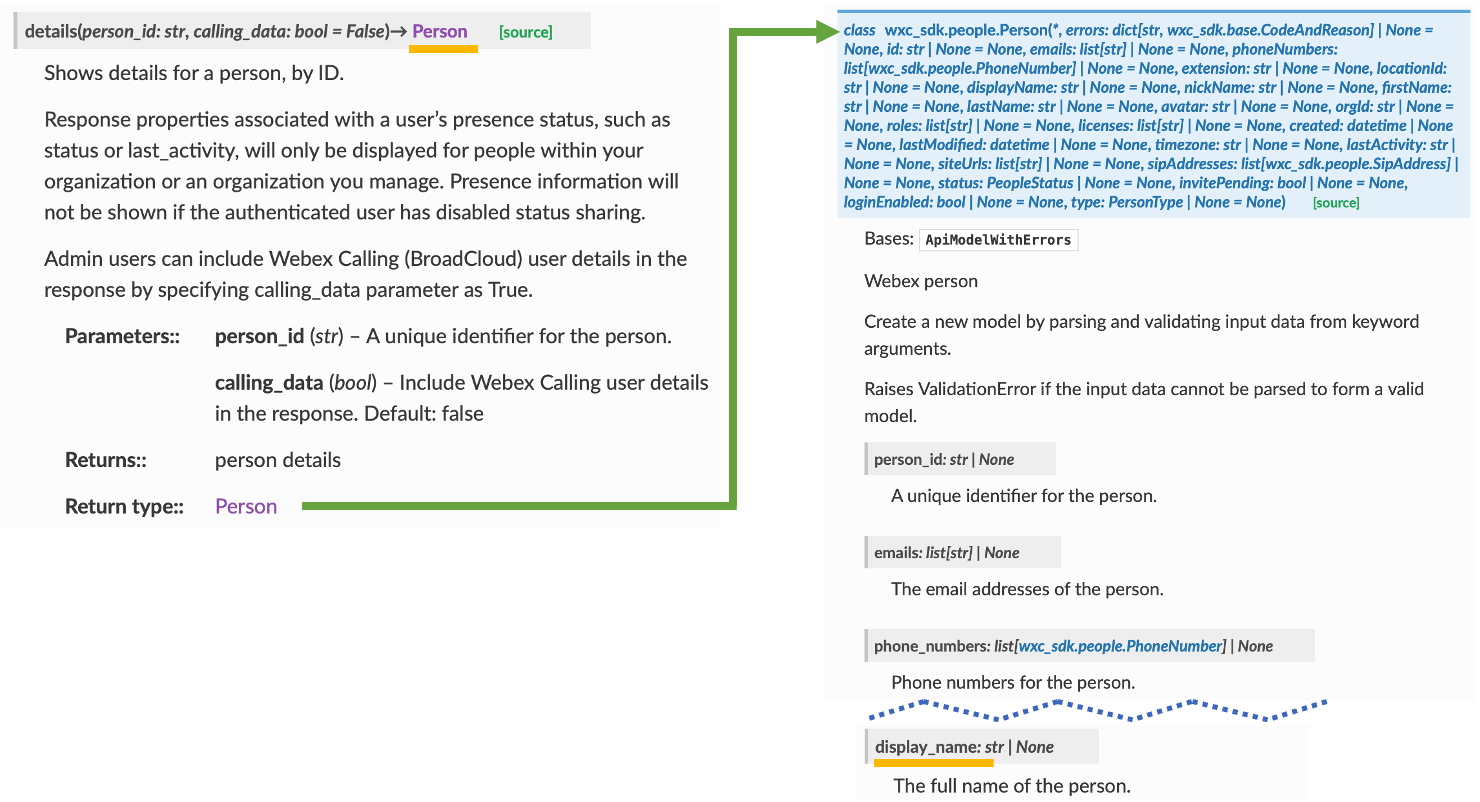
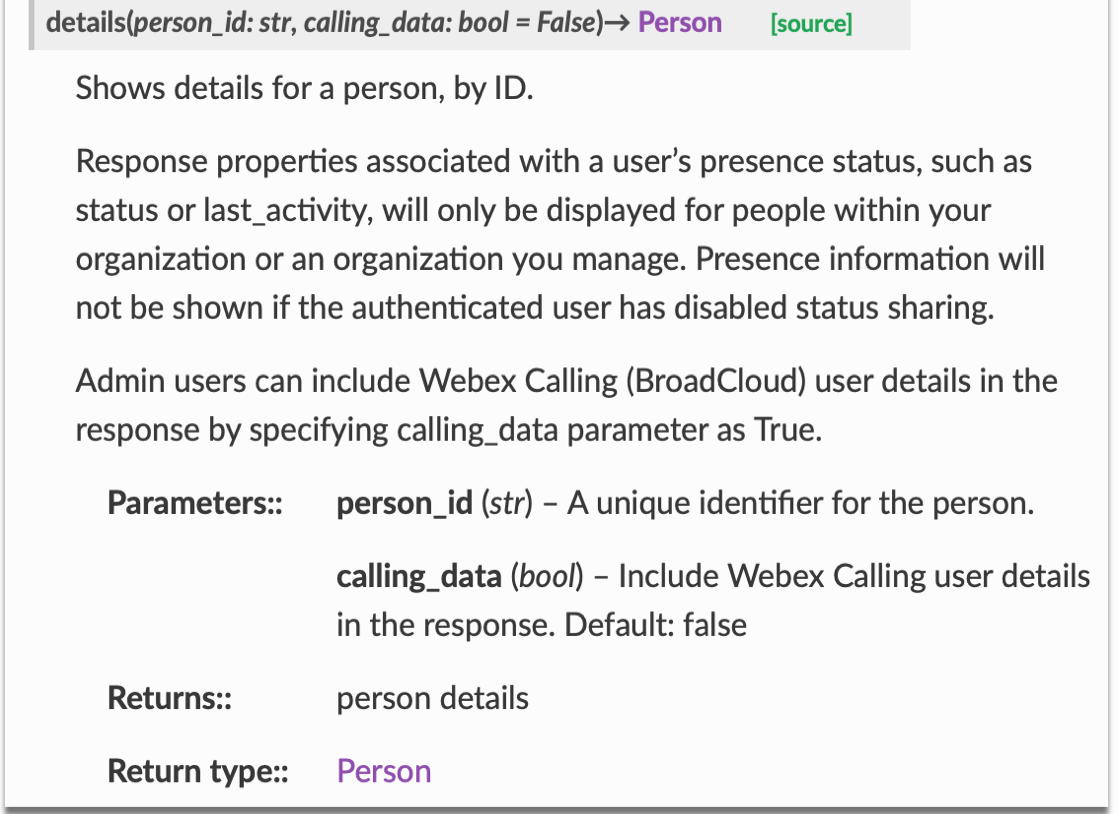
This gives you a lot of information about a particular user, however to get all the settings, you need to
use the api.people.details() method defined as follows in the
SDK documentation:
As seen in the documentation above, this method requires a person_id parameter. If you look
at the output of your script, the webex_user that you populated earlier, being an instance
of the Person class, has a person_id attribute. Therefore, you can pass the webex_user.person_id as the
person_id parameter. Some additional information may be returned if you set the calling_data
flag. To be sure, add this as follows:
Click Start Debugging and examine the Terminal window output.
The output will look basically the same as the previous user dump because, although you specified
calling_data=True, there isn't any calling data at this time because calling is not
enabled for this user yet. This time
through you used the combination of the pformat method and the vars
method to dump the object in a more readable format while preserving the snake_case names you must
use if you want to access these properties. Printing a returned object in this way is a good way to
understand what is being returned without having to look at the SDK documentation.
You might also notice that the phone_numbers attribute is a list of PhoneNumber objects
which are also defined in the SDK documentation. This is common with the SDK where you will see objects
appear as properties of other objects. While this might seem complicated, once you start working
with the SDK, you will find that it is very intuitive and easy to use.
Now that you have completed this basic exmple of using the wxc_sdk to interact with the Webex APIs
and retrieve user information, we will move on to leveraging other methods to obtain the access tokens needed to
interact with the Webex APIs in a way that is more secure and allows you to use the tokens for a longer period of time.
If you recall, the personal access token is only valid for 12 hours. Additionally, you have pasted the token into the
Python code which is not a best practice and is not secure.
 at left, and you see a list of folders and files.

 button left of the Python: wxc_enable_user.py text. Doing so launches a
Terminal with the complete logging output at the bottom. If you scroll up a bit in that
Terminal (you may need to resize to make it more visible) you will notice the debug level output from the
SDK. The output shows you all the details of the request and response, including the verb, URI, and headers.
This particular request has no body, but if it did have one, it would be shown as well. The response shows
the status code (displayed at the top where it says Request 200[OK]) along with the headers
and response body. You can see that the content type is application/json and the body is a
JSON object with the user data. You were able to accomplish this with the single line of code you added to the
program - api.people.list(email=email_to_search). This really shows the power of the SDK.
You did not have to specify the URL, the headers, the method, or the body of the request. You simply called
a method on the api.people object and passed the email address you wanted to search for and
got back the results in JSON format.
button left of the Python: wxc_enable_user.py text. Doing so launches a
Terminal with the complete logging output at the bottom. If you scroll up a bit in that
Terminal (you may need to resize to make it more visible) you will notice the debug level output from the
SDK. The output shows you all the details of the request and response, including the verb, URI, and headers.
This particular request has no body, but if it did have one, it would be shown as well. The response shows
the status code (displayed at the top where it says Request 200[OK]) along with the headers
and response body. You can see that the content type is application/json and the body is a
JSON object with the user data. You were able to accomplish this with the single line of code you added to the
program - api.people.list(email=email_to_search). This really shows the power of the SDK.
You did not have to specify the URL, the headers, the method, or the body of the request. You simply called
a method on the api.people object and passed the email address you wanted to search for and
got back the results in JSON format.

 If you look carefully, the data structure printed matches the Response Properties from the
List People
method in the Webex API specification exactly (including
the keys "id", "emails", "phoneNumbers", "displayName", etc.).
Pay attention to the output. Notice that the output is once again shown in camelCase, not the snake_case that
the SDK's Python object uses. Keep this in mind if you ever decide to use the raw JSON returned by the
model_dump_json() method. In this lab, we will use the Python object directly.
If you look carefully, the data structure printed matches the Response Properties from the
List People
method in the Webex API specification exactly (including
the keys "id", "emails", "phoneNumbers", "displayName", etc.).
Pay attention to the output. Notice that the output is once again shown in camelCase, not the snake_case that
the SDK's Python object uses. Keep this in mind if you ever decide to use the raw JSON returned by the
model_dump_json() method. In this lab, we will use the Python object directly.
 As seen in the documentation above, this method requires a person_id parameter. If you look
at the output of your script, the webex_user that you populated earlier, being an instance
of the Person class, has a person_id attribute. Therefore, you can pass the webex_user.person_id as the
person_id parameter. Some additional information may be returned if you set the calling_data
flag. To be sure, add this as follows:
As seen in the documentation above, this method requires a person_id parameter. If you look
at the output of your script, the webex_user that you populated earlier, being an instance
of the Person class, has a person_id attribute. Therefore, you can pass the webex_user.person_id as the
person_id parameter. Some additional information may be returned if you set the calling_data
flag. To be sure, add this as follows: