Now that you have implemented the portal API that provides a way for the web front-end to leverage the capabilities made available by the Unified CM and Cisco Webex APIs, it's time to explore the finished product - a working portal that leverages these APIs to provide some monitoring capabilities as well as the ability to easily provision a user's devices and migrate users between UCM Calling and Webex Calling. Previous versions of this lab also included sections on Unity Connection and Cisco Meeting Server APIs, but in the interest of time they have been removed, however the portal still makes use of these APIs as well and you're free to explore and use this code in your own projects if you so desire. Remember that all the code in this lab is available for you to download from Github as shown in the Reference section. The portions of the API that interact with Unity Connection and CMS are already implemented for you so that those parts of the portal will function.
To access the portal, navigate to http://dev1.pod6.col.lab:5000. Another tab should open and you should see a dashboard that looks something like this:
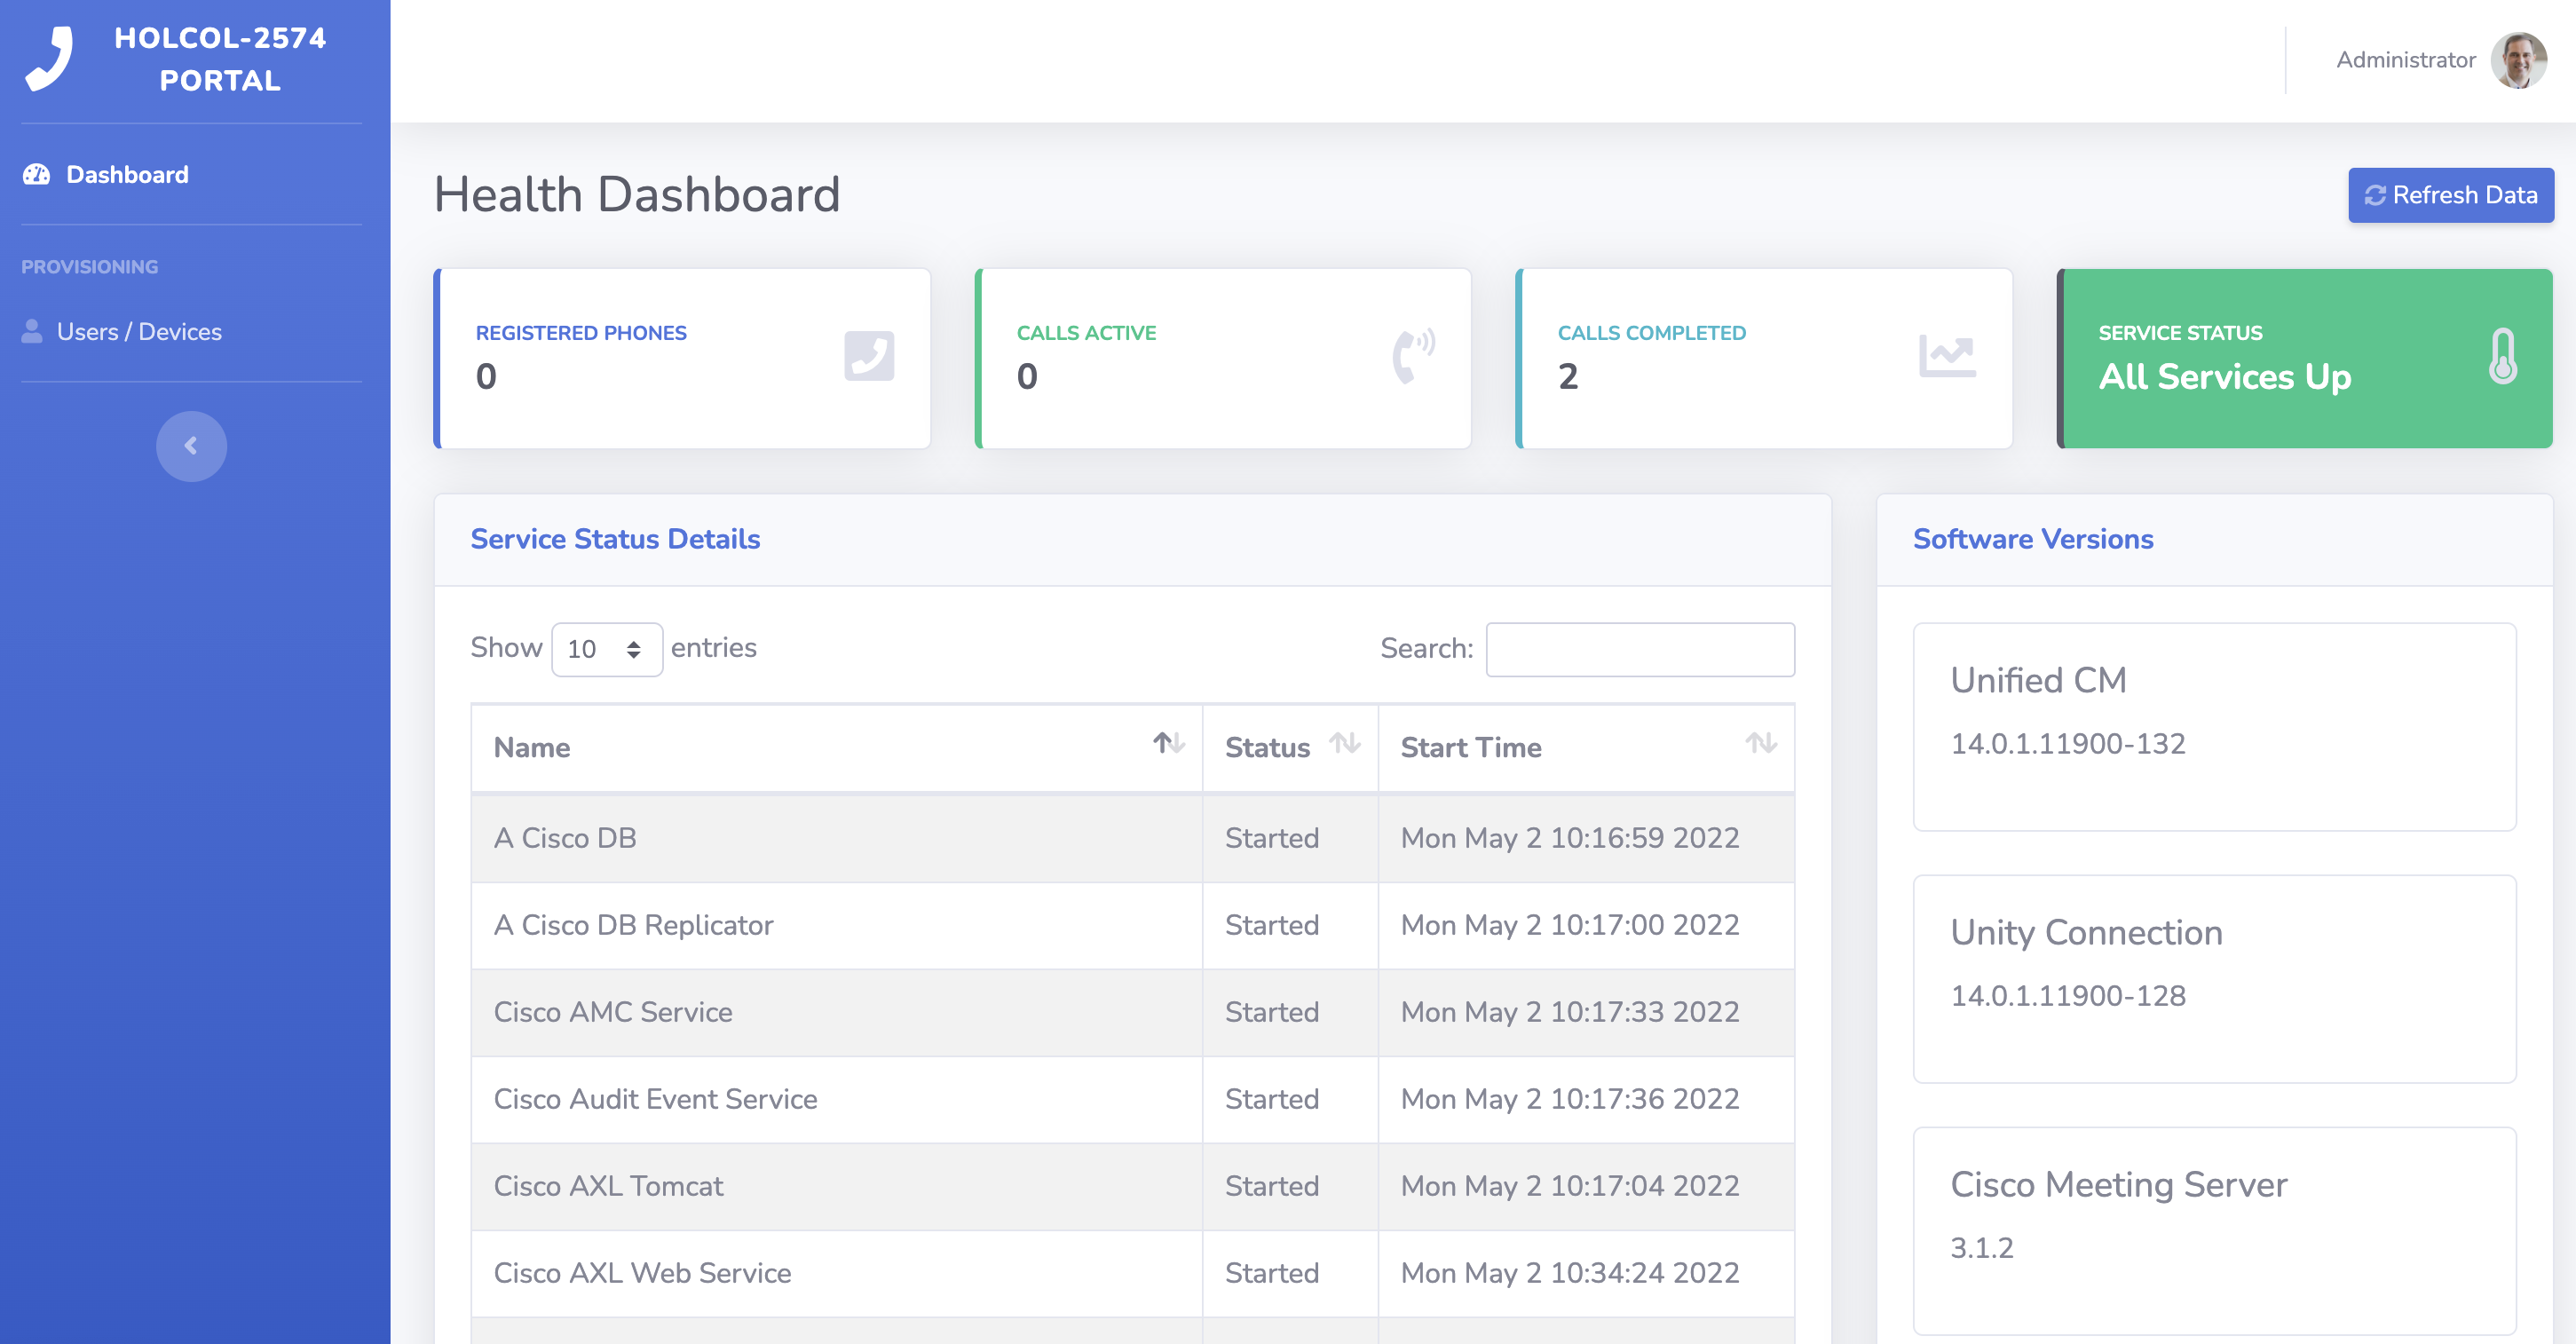
If you have implemented all the code in the previous sections of this lab correctly, you should see the cards at the top populate with the counters, the service list should populate, and you should see the running version on your Unified CM along with Unity Connection and Cisco Meeting Server.
This one page indirectly makes use of 5 different APIs! The front-end developer who was tasked with building this dashboard has no idea how many APIs are being used on the back-end, and nor should they care. This web page is making API calls to the API you created which in turn calls the respective APIs on Unified CM, Unity Connection, and CMS. Here is where the data is coming from:
Although the back-end you implemented is written in Python, the front-end code must be written in Javascript, as that is the only language that can be executed by the web browser. To get a better understanding of how the portal is obtaining this information, you will need to look at the Javascript code that is responsible for making the API calls to the back-end. Follow these steps to look at the code. You will not be implementing anything in this section, but rather looking at the Javascript code and understanding how it interacts with the back-end.
The front-end of the portal makes use of common web technologies - HTML, CSS, and Javascript. As mentioned earlier, the goal of this lab is not to teach you how to be a front-end developer, so the code for the front-end is being provided for you. That said, it is still helpful to explore this code and understand how the front-end makes use of the APIs you created.
All the code for the front-end can be found in the flaskr → static and flaskr → templates directories in your project. In the static directory, you will find the following folders:
The templates folder contains all the HTML files for the various web pages. In case you are interested, the HTML templates in the folder make use of Jinja templates which allow for the ability to reuse components of the web pages.
First look at the HTML template that first loads when you navigate to the Dashboard to see which Javascript code it is executing. Navigate to flaskr → templates and open the index.html file. Towards the end of the file, you should see the following. This code gets executed by the browser once the web page has finished loading.
The four lines highlighted above are the calls to the functions defined in the .js files. The focus on this section will be on the Javascript code. Navigate to the flaskr → static → js → portal directory in VS Code. You should see six files - core.js, cms.js, ucm.js, ucxn.js, wbxc.js, and wbxt.js. Each of these contain the Javascript relevant to each product the portal interacts with. Start with the simplest of the functions - the three that retrieve the code version and update the website.
Start with the update_ucm_version() which, as the name implies, retrieves the version of Unified CM. Open the ucm.js file. Navigate to the end of the file and you should see the following:
The two lines highlighted above show the most important parts to understand of this code. The first highlighted line shows the function call get_ucm_version(). You will examine the contents of this function in a moment. The get_ucm_version() function will make the API call to retrieve the version from the back-end. Once the version is retrieved, the code after the then gets executed, extracting the result from the response and updating the HTML element on the web page to show the version.
Now search for get_ucm_version() in the same ucm.js file. You should see the following code:
You can see that this function is very simple. This code makes use of a very popular Javascript library called jQuery. This library provides a function called ajax which allows for the asynchronous execution of HTTP requests. You can see the two parameters passed to this function are very straightforward: the type which is the HTTP verb to use, GET in this case, and the url. Notice that the URL does not contain the hostname. This is because the web browser knows to send the request to the same server that is already serving the web page. Here you see the API call to the /api/v1/cucm/version endpoint that you implemented earlier. That code on the back-end, in turn, makes use of the PAWS API to retrieve the active version from Unified CM. As you can see the front-end developer does not need to know anything about SOAP, PAWS, the UCM IP address, login credentials for the server, etc... This makes it very easy for the front-end developer to obtain the version information and use it however they like on the web portal.
If you look in the ucxn.js and cms.js files. you will find similar functions being called for obtaining the Unity Connection and CMS versions as well. Feel free to explore these on your own.
The next function that was called when the web page loaded was refresh_ucm_perfmon_data(). You can also find this function defined in the ucm.js file. You can see that the first part of this function looks like this:
Basically this function calls get_ucm_perfmon_data() and then uses that data returned to update the various cards displayed on the dashboard screen. To see how this function retrieves the perfmon data, find the get_ucm_perfmon_data() function in the ucm.js file. It should look like this:
Again you can see that the front-end developer has very easy access to the performance counter information. If you wanted to make this even simpler, you could have hard-coded the counters on the back-end and just returned them without the front-end developer having to know about the individual counter names. In this case, the implementation provides some flexibility that allows the front-end developer to control what data to retrieve at the expense of some additional complexity of having to know the names of the counters. This is always a balancing act of balancing ease of use with flexibility.
You can see that in this case, the request is a POST to the /api/v1/cucm/perfmon endpoint which, on the back-end, uses the Serviceability XML API to retrieve the PerfMon counters. The biggest difference between this request and the previous requests to retrieve the version is that it also contains a data field that provides the list of counters to retrieve. For a seasoned Javascript developer, making requests like this are second-nature.
If you want to explore some more on your own, go back to refresh_ucm_perfmon_data() and look at how the counters returned are manipulated to add certain values for display on the web page. You can also explore how get_service_status() is called to retrieve the service states and populate the list of services as well as determining whether to indicate that all services are up or not.
Now that you have explored the dashboard that makes use of the serviceability and monitoring APIs, you can turn your attention to the user provisioning page. On the left side of the portal screen, click on the Users / Devices link. You should see a screen that looks like this:
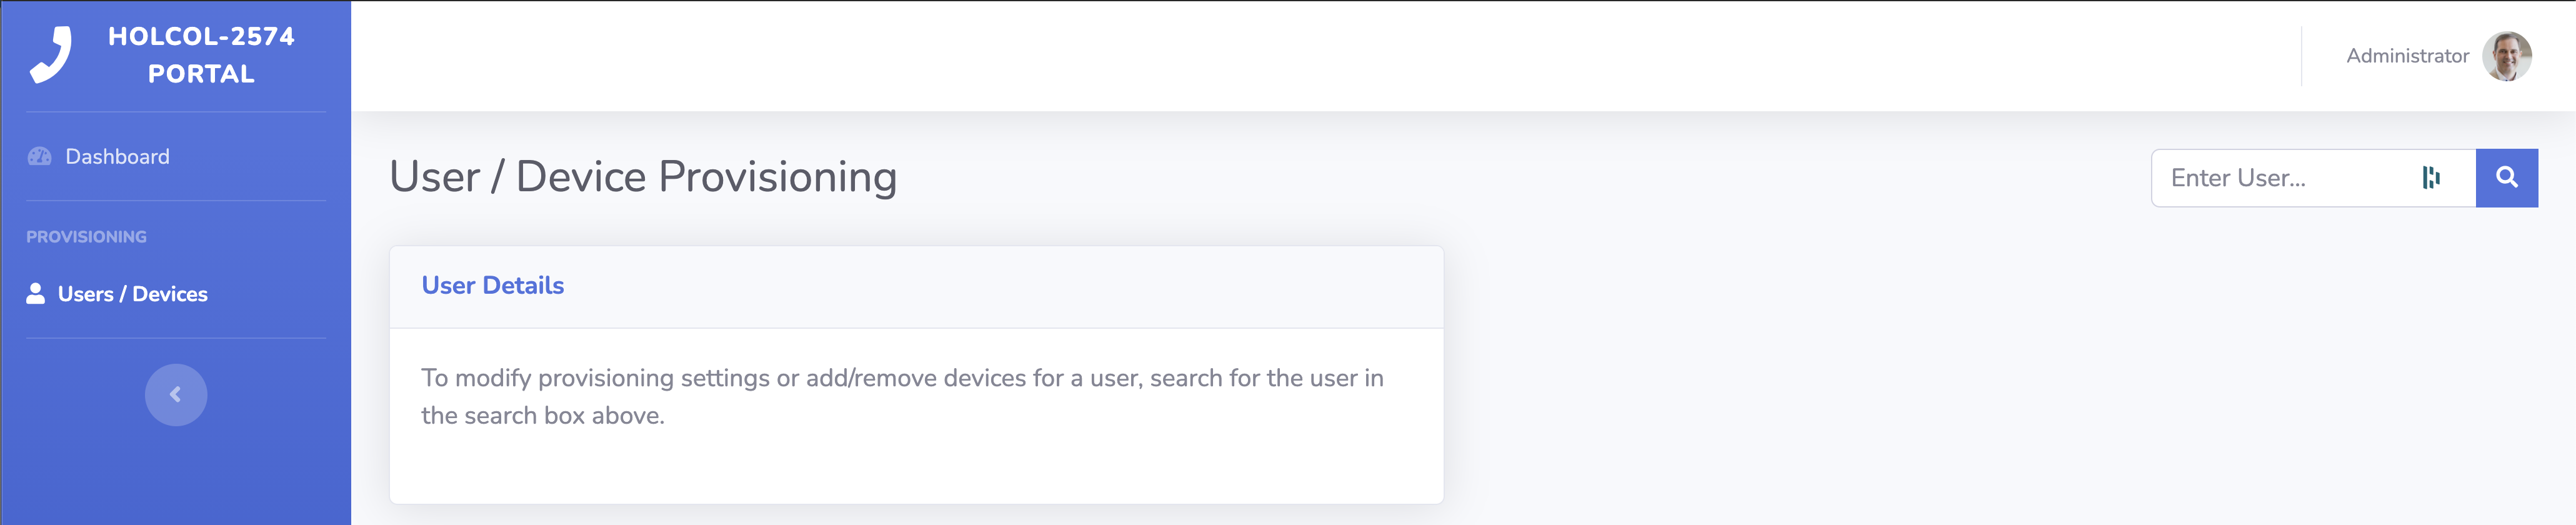
In the upper right corner of the screen, you should see a box labeled "Enter User...". In this box, enter pod6ucmuser and click the search icon. After a few seconds, you should see the page refresh and show the user profile information that should look similar to the screen below.
This page on the portal is, once again, leveraging several APIs on the back-end to provide the information you see. The user details and associated devices (even though there are no associated devices at this point) come from the AXL API. The AXL API is also what allows you to add a device in the "Add Device" section. Voicemail and the Meeting Space cards on the top of the page make use of the CUPI and CMS APIs respectively. The voicemail button also makes use of the UDS API to look up a user's phone number and display name.
In previous steps in the lab, you had added the CSF device to Unified CM and then deleted it, so the portal should show that no phones are currently associated with the user. The beauty of this portal is that it makes user administration very simple and streamlined. To add a phone, the administrator only needs to enter the device name, model, and a description. No additional input is required. If this were to be deployed in a production environment you would likely have an option to pick a class of service or some other policy to define the Calling Search Space to determine calling permissions for the user, or perhaps you would look up the user's role in the company on the back-end and automatically determine the class of service from their job role instead of worry about this on the front-end web page.
Before exploring the Javascript code behind the user provisioning page, take a moment to use the page to perform some administrative functions of adding a phone, enabling voicemail, and adding a CMS space for the user. First re-add your Webex App device so that it can register again.
The Webex App on your desktop is likely still registered with Webex Calling, so if you would like to test to see if the addition of the phone worked, you can log out of the Webex App and log back in as pod6ucmuser@collab-api.com with password C1sco.123 . Once registered you should be able to dial the voicemail pilot by dialing 5999999 from the Webex App. Feel free to skip this step if you like.
The provisioning portal also provides limited functionality for Webex Calling Users. It could be expanded to include more capabilities, but for the sake of example, the portal allows you to enable and disable Webex Calling for a user or migrate a user from UCM Calling to Webex Calling and vice versa. You should still be on the Users / Devices link of the provisioning portal.
Now search for the Webex Calling user. In the upper right corner of the screen where you had previously searched for the user pod6ucmuser, replace the user name with pod6wbxuser and click the search icon. After a few seconds, you should see the page refresh and show the user profile information that should look similar to the screen below.
This page on the portal is, once again, leveraging several APIs on the back-end to provide the information you see. When the user search occurs, the backend is actually looking for the user in both UCM and Webex Calling. The backend then returns data about whether the user is enabled on UCM, Webex Calling, none, or both. The frontend logic then determines which UI and options to display depending on what kind of user it found. In this case you can see that the user information is limited in this example, but could include more information returned from the API. The portal generates a cross-launch URL using the user ID returned from the API so that you can click on the Configure Calling Settings in Control Hub button which would require appropriate credentials to log in.
The portal provides the ability to disable or enable Webex Calling or migrate the user back to UCM Calling. If you would like, click the Migrate to UCM Calling button. After a few seconds, the UI should update with their UCM device information and provide you with the option to migrate back to Webex Calling. Note that sometimes the phone number synchronized from the directory gets removed, so if you re-add the user, be sure to enter the number +19197060002 into the phone number field before you re-enable Webex Calling.
Now that you have see the provisioning portal in action, it's time to look at how this all works behind the scenes. You will notice that it is very similar to what you saw for the Dashboard page on the portal.
First take a look at the code that is executed when a user enters a user ID to search for. Open the core.js file and search for the function user_search(). You should see code like this:
Take a look at the lines highlighted above. The first highlighted line is just retrieving the value of the username that the user has entered into the search box on the web page. This value is then passed into the find_user(username) function. Search for the find_user function in ucm.js to examine how it works. You should see the function that looks like this:
Again, the code needed in the browser to interface with the API on the back-end is very simple. It just makes a simple API call using the GET method to the /api/v1/core/users/ endpoint. If this were a production application, you would want to have some authentication for these API calls. This API call searches both UCM and Webex Calling for the user and then returns a response indicating where the user was found and (if applicable) the user details for that user.
The rest of the user_search function is looping through the response and performing actions depending on whether the user is found in UCM, Webex Calling, both, or neither. Feel free to explore the various functions that are called as a result of the logic. For example, show_ucm_user_data located in the ucm.js file.
The next part of the portal code to explore is the code that handles adding a device. You will see that this is also quite simple for the front-end developer. In the ucm.js file, search for the add_ucm_device function.
The add_ucm_device function gets called when someone clicks the "Add Device" button on the provisioning portal. You can see that the first few lines pull the data from the web form where the user entered the device name, description, and model, as well as the name and user ID of the user that was retrieved earlier during the user search. This information is then passed to the insert_device function. If the insert is successful, the portal calls post_wbxt_notification to post a message to Webex indicating that the phone was added.
Search for the insert_ucm_device function in ucm.js to see how it works.
Similar to other Javascript functions you have already seen, this function sends an HTTP POST to the /api/v1/cucm/phone/ endpoint and passes the required data. Notice that in this case, the calling search space is being hard-coded into this request. In a production application you would likely want to determine which CSS to configure through some other method. You can see how little work is needed by the front-end developer to add a phone. Also note that in this example, the phone data parameters are being passed as arguments in the URI as opposed to in the message body. This was done as a workaround for a problem we encountered with the swagger UI we are using in the lab, and the better approach would be to send the parameters in JSON format in the message body.
As mentioned earlier, if the phone insertion is successful, a message is posted to Webex by calling the post_wbxt_notification function. Open the wbxt.js file. This should be the only function you see in that file as shown below:
You can see that this function sends an HTTP POST to the back-end with a room name and the message text to send. The back-end takes care of all the details of interfacing with the Webex cloud and sending the message.
You have completed the lab. The following sections are reference sections that give you some additional information about some of the APIs, the tools you have used, as well as some instructions for setting up your own development environment similar to what we have set up for this lab. Thank you for your participation and we hope you forge ahead and leverage APIs in your own environment to automate and simplify the provisioning, monitoring, and operations of your Cisco collaboration environment. Also, as a reminder, the code for this lab is available on Github at the link provided in the references section.