Until now, your interactions with Webex APIs have involved sending instructions to Webex to perform actions, and receiving success or failure responses. What if you want your application to be notified when a specific event occurs within Webex, such as a message being sent to your bot? Webex utilizes webhooks for this purpose. A webhook is a mechanism for Webex to initiate an HTTP/HTTPS message to a pre-configured URL to notify your application that a specific event has occurred. Although we are going to explore webhooks in the context of Messaging APIs, webhooks can be used for other purposes like receiving events from Webex about Meetings or Calling.
A webhook involves the Webex Cloud initiating an outbound HTTPS request to your applicaiton. Since this traffic is initiated from the Internet (i.e. Webex Cloud), the additional security exposure must be considered. In most cases, a reverse proxy (such as nginx) is deployed on the Internet that forwards requests to your internal application in order to safeguard your internal servers. When Webex sends a message to this reverse proxy, the proxy decides if the request can be trusted and forwards it to an internal server, and that server's reply is sent back via the proxy. Webex also provides some shared secrets in the messages as an additional layer of protection to allow your application to authenticate that the requests were legitimately received from Webex.
In this lab, the reverse proxy portion won't be covered in detail, however you will have the ability to receive events from Webex, which you will need to process. Let's see what this looks like. In this section, you will examine the following key aspects:
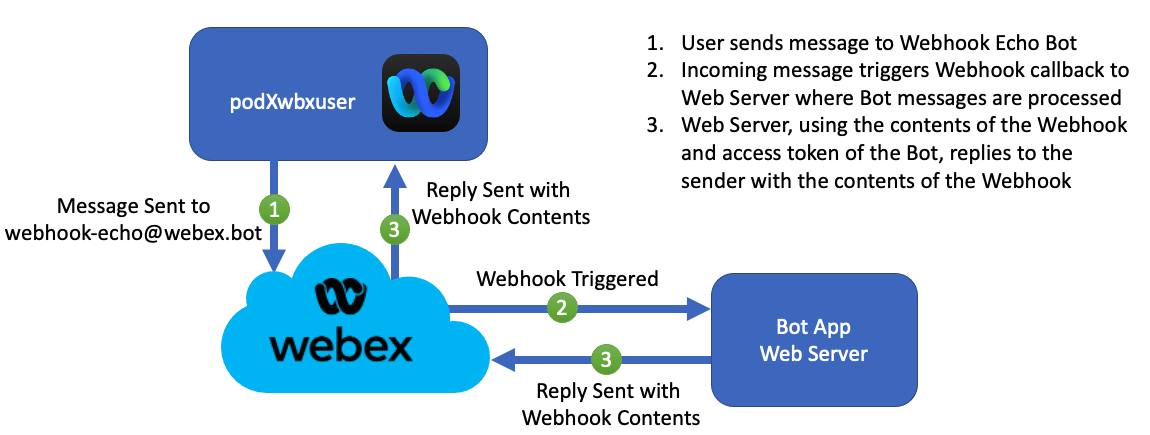
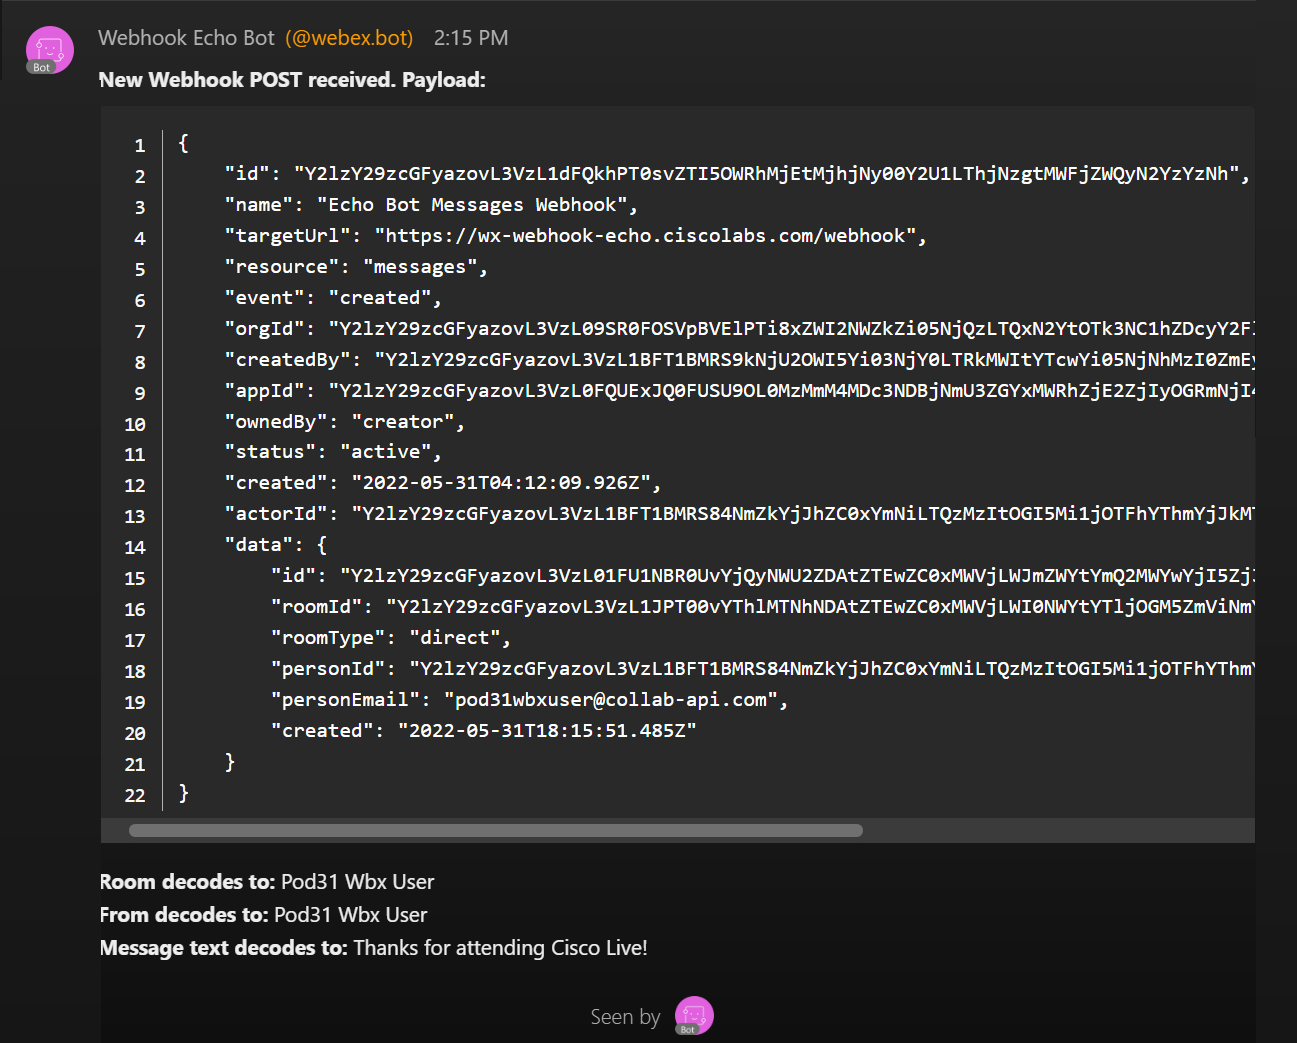
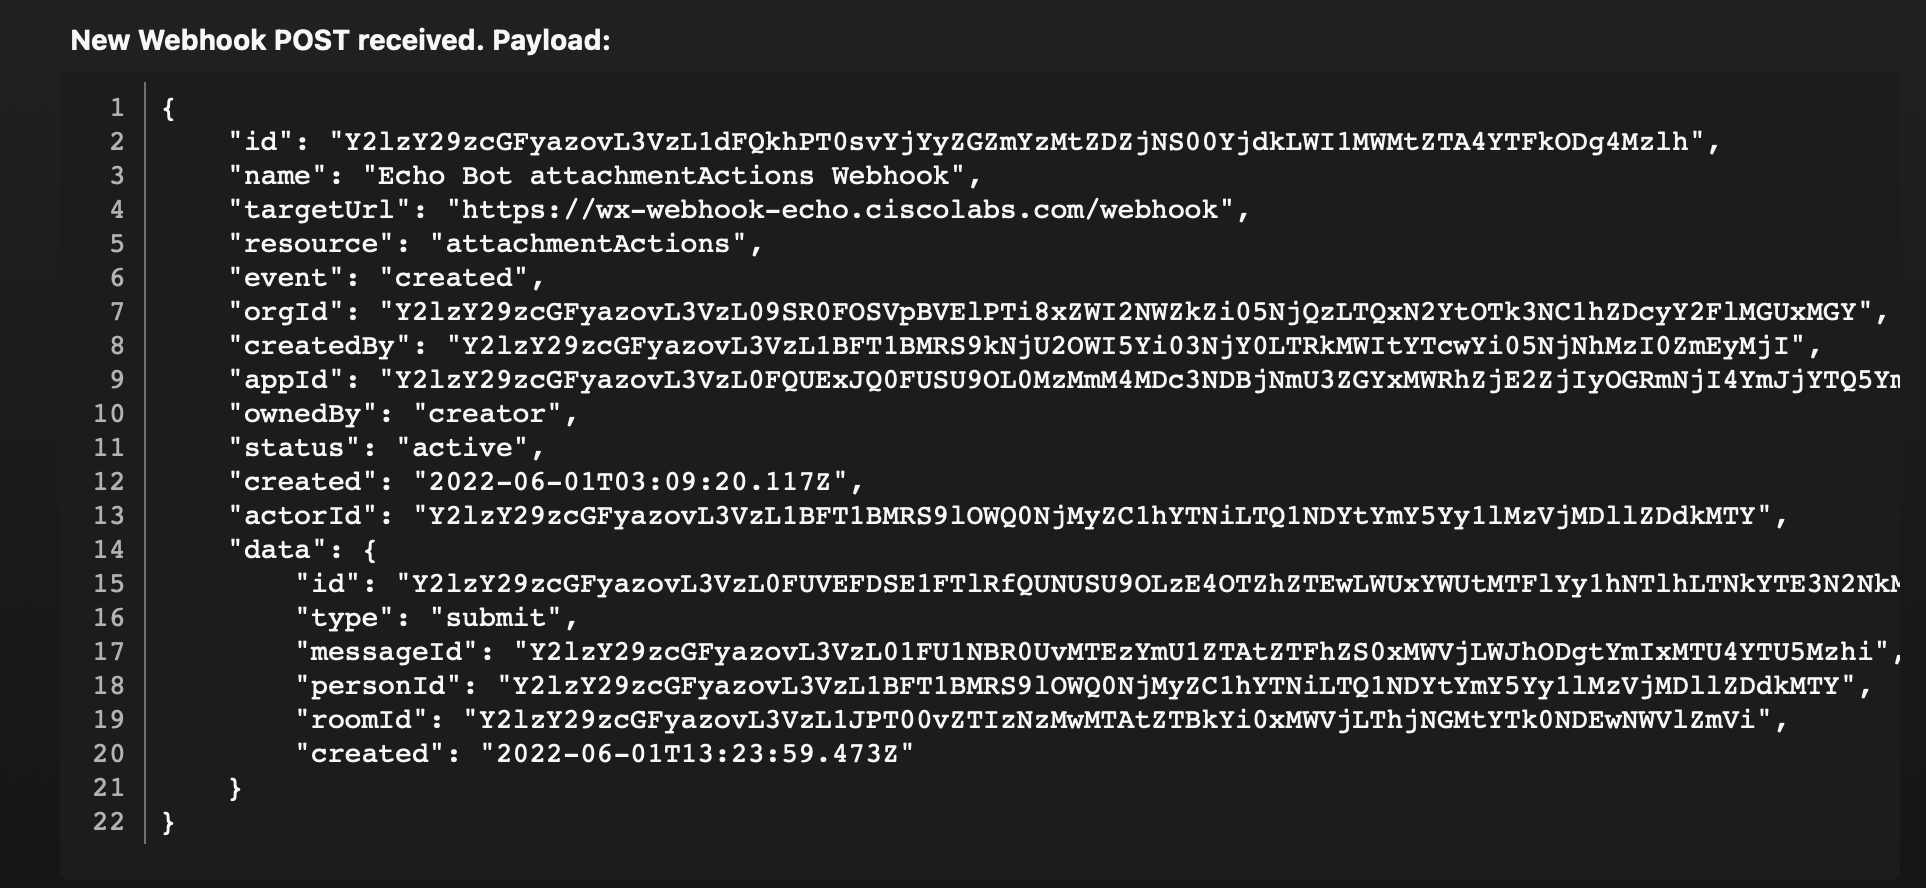
If a bot has been configured with a webhook to receive notifications when a message it sent to the bot, Webex sends a webhook notification immediately upon receiving that message, but what does the webhook actually look like? To illustrate this, we have a pre-configured Bot and web server that simply echos back the webhook data that it receives. This diagram shows how this Bot works. When you send a message to this Bot through the Webex App, Webex sends a webhook message as an HTTP POST to the Bot's configured webhook URL. The bot is configured to read the contents of that webhook notification and just echo it back to the person that sent it.
In subsequent sections of this lab, you will configure your own web server to receive and process webhook events in Python. Before creating your own webhook, it is helpful to understand the structure of the message sent from Webex to a webhook URL.
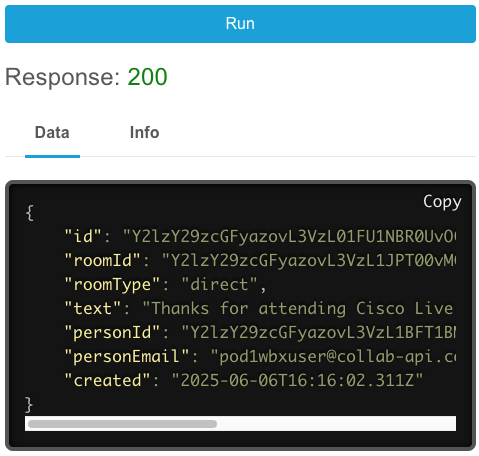
 If you take the id value in the data from the response and place it in the messageId field of the
Get Message Details, while logged in
as
pod6wbxuser@collab-api.com
(with
password:
C1sco.123
), you should see the message as show below in the
text field.
If you take the id value in the data from the response and place it in the messageId field of the
Get Message Details, while logged in
as
pod6wbxuser@collab-api.com
(with
password:
C1sco.123
), you should see the message as show below in the
text field.
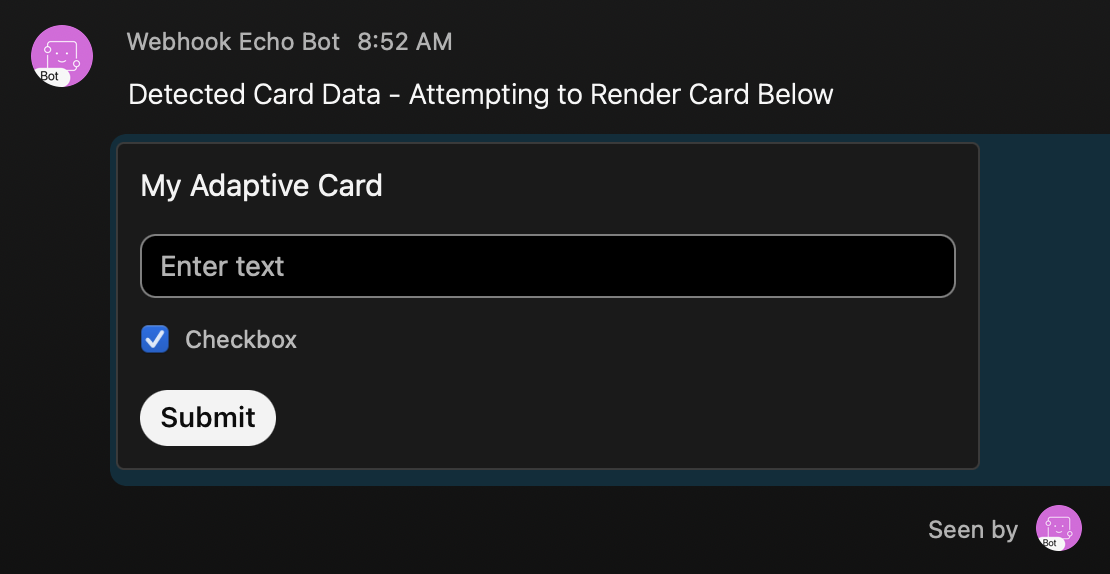
Depending on your requirements, you can have a Bot that interacts with users purely using text-based messages. However, Webex also supports adaptive cards, which are a standard way to present a graphical response with features like buttons, check boxes, various input methods for text, numbers, and date/time elements. They are basically text-based content with JSON formatting that will be rendered by the Webex client as graphics and form items.
What this means is that the web server that handles webhook messages from Webex can reply with more than just text. It can also send an adaptive card, a form of JSON-formatted text, that the Webex client can use to display something graphical. It also means that when the user interacts with this interface, say they click a submit button, a different kind of webhook is triggered. Instead of a message, this will be an attachmentActions type of event. Therefore, on your web server, you may choose to send this kind of data and handle the events.
While this lab won't go into details on designing adaptive cards themselves, there are great resources from the Webex Adaptive Card Designer to the Microsoft Adaptive Card Designer (for the latter, make sure you select the correct Webex Adaptive Card version, currently 1.3). These tools provide a way to construct your card, and then simply copy out the JSON.

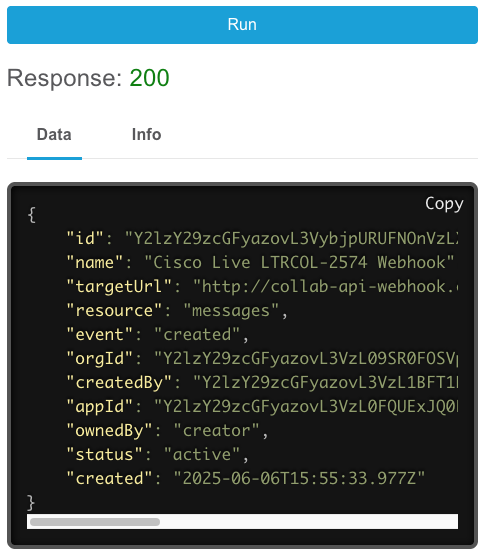
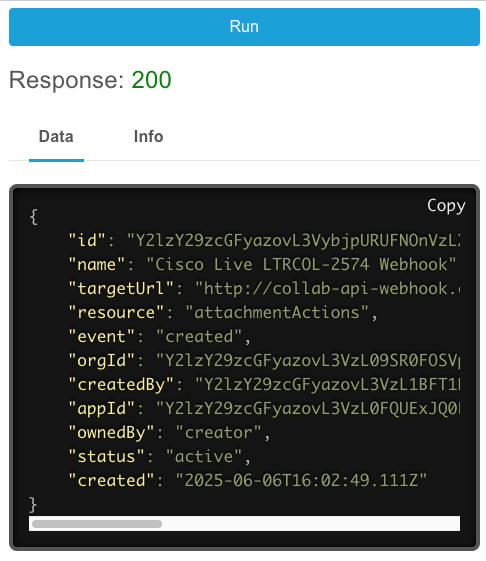
Now that you have explored the data that is sent to a webhook, you can create a webhook for your Bot to receive these messages. Follow the steps below to create a webhook for your Bot.
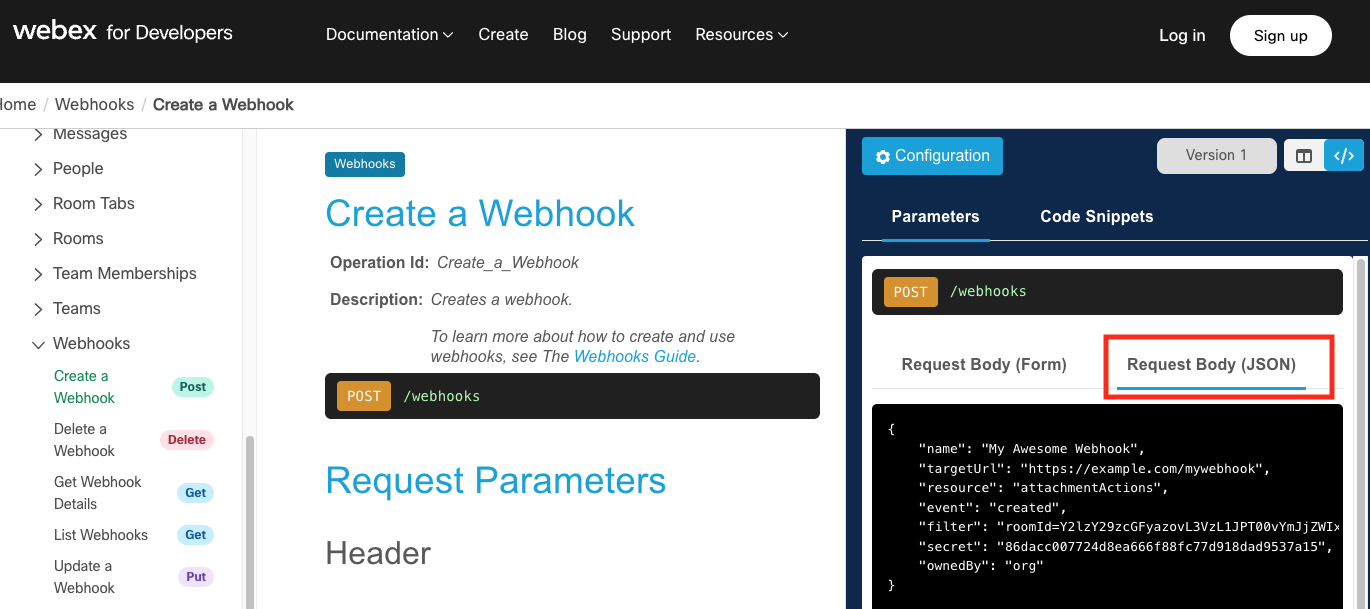
| Parameter | Value | Description |
| event | created | This is a kind of event action. created means any new Message or Attachment Action |
| name | Cisco Live LTRCOL-2574 Webhook | Not visible, so only useful for admins to determine the use of a certain webhook |
| resource | messages | Describes the type of event, either messages or attachmentActions for adaptive cards actions, or a number of other events. Note that you can only ever supply one. To receive webhook notifications for different kinds of events you must create a webhook for each event type. |
| targetUrl | http://collab-api-webhook.ciscolive.com:9006/api/v1/wbxt/events | The "callback" location where Webex will POST webhook events to |
You've learned about different API types in the Cisco Collaboration portfolio and how to build queries to achieve common tasks using both tools and in Python with the help of SDKs. The next section will expand on this knowledge through a provisioning web portal example, covering error handling and Python interactions with webhook messages.