Now that you have explored the Webex Calling APIs, you can take the opportunity to examine the Webex Meetings APIs.
Webex provides several APIs that allow you to automate and integrate Webex Meetings into your applications.
Some of the things you can do with Webex Meeting APIs include:
Creating and managing meetings
Adding and managing meeting invitees
Getting and updating meeting preferences, options, and other details
Retrieving, listing, and deleting recordings, meeting chats, and transcripts
While you will not cover all of these topics in this guide, you'll see that once you understand how to use one
or two of the APIs, you can easily apply the same concepts to the others with the help of the documentation.
We will use this opportunity to also explore another method of obtaining an access token, by using an
Integration.
An Integration allows an application to implement an OAuth 2.0 flow to authenticate a user in Webex
and then obtain an access token with a limited set of permissions, enabling the application
to perform certain actions on behalf of a user. In this case, we will use an Integration to schedule a meeting
on behalf of a user. This differs from using a Service App, which performs actions on behalf of the
Service App itself.
In this example, you will first create an Integration in Webex, then build a simple web application that
presents a login button that kicks off the OAuth flow to authenticate the user and obtain an access token.
This will allow the web application to create a new meeting on behalf of the user using the Webex Meetings API.
You will perform these steps:
Create an Integration
Implement OAuth2 Authentication
Obtain an Access Token
Create a new meeting
Obtain the Join URL
Join the meeting
Step 1 - Create an Integration
The first step to using an Integration is to create one on the Webex Developer Portal. Follow these steps to create an Integration:
If necessary, click Log in at top right and sign in with the following credentials:
Email address:
pod6wbxuser@collab-api.com
Password:
C1sco.123
Once logged in, click on your
icon at the top right.
Click My Webex Apps in the dropdown menu.
Click Create a New App.
Click Create an Integration.
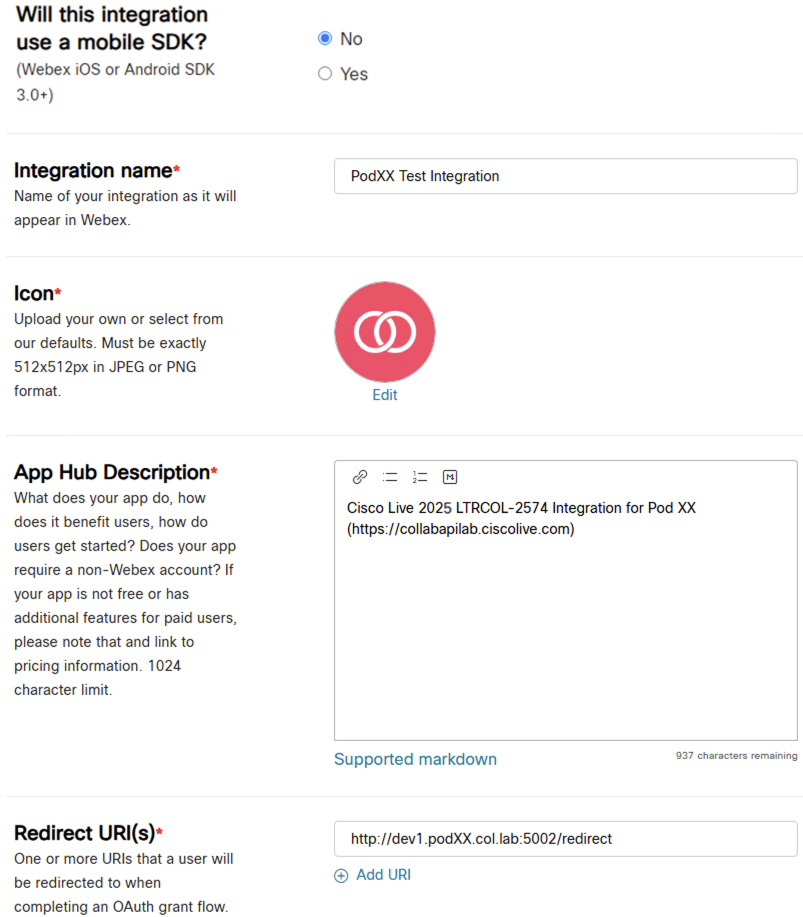
For the Integration name, enter
Pod6 Test Integration
Click on one of the Icon images for your Integration so that it is selected.
In the Description paste the following text:
Cisco Live 2026 LTRCOL-2574 Integration for Pod 6 (https://collabapilab.ciscolive.com)
In the Redirect URI(s) field paste in:
http://dev1.pod6.col.lab:5002/redirect
. This tells Webex where to redirect your user after they have authenticated
and authorized the Integration to access the requested scopes. This URL points to your development machine and the
port number (5002) that the script will be listening on for requests.
For Scopes check the following boxes. NOTE that many of the scope names are very similar. You can click to
copy each of these from the list and then use the Find function in the browser to search for each scope in the list. When
you are done, be sure to double-check that you have three scopes selected and they match the ones on this list. Failure to
select the correct scopes will lead to issues later when you try to use the tokens. In this case the Integration is only
asking the user to give permissions to read and write from their meeting schedule - which basically means the ability to
schedule and obtain their list of scheduled meetings - and to read the user's profile information.
meeting:schedules_read
meeting:schedules_write
spark:people_read
At the bottom, click Add Integration.
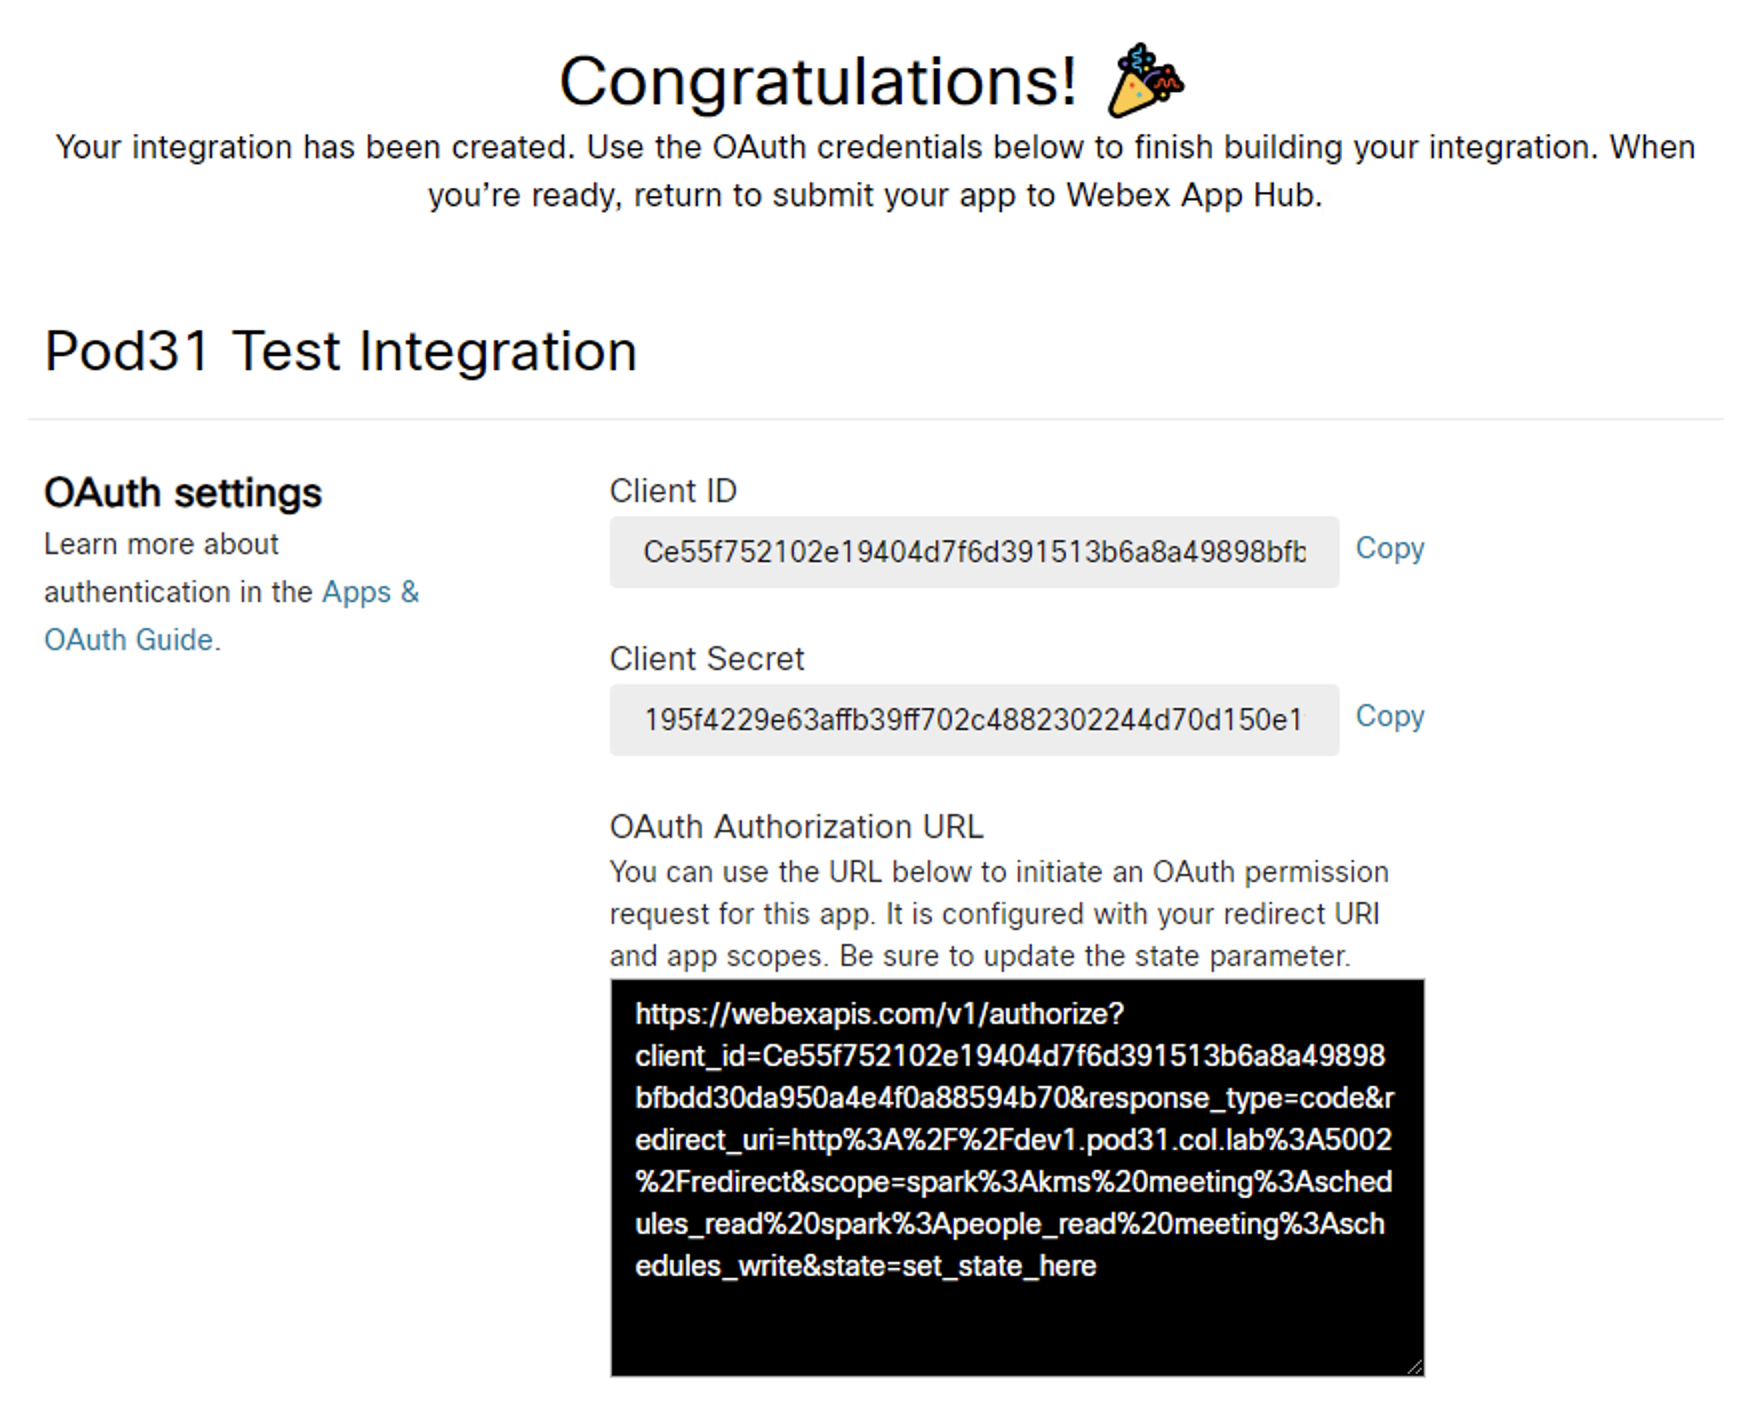
You should now see a Congratulations message and some details about the Integration. This contains three
important pieces of information you will need to use in your code: the Client ID, the Client Secret,
and the OAuth Authorization URL. Be sure to keep this page up until you are done copying the necessary Information
in the following steps.
.
Step 2 - Implement OAuth2 Authentication
Now that you have created the Integration in Webex, you need to configure your code to use the Integration to obtain an access
token. Before diving into the code, it helps to understand the process of obtaining an access token using
OAuth2 authentication for a Webex Integration.
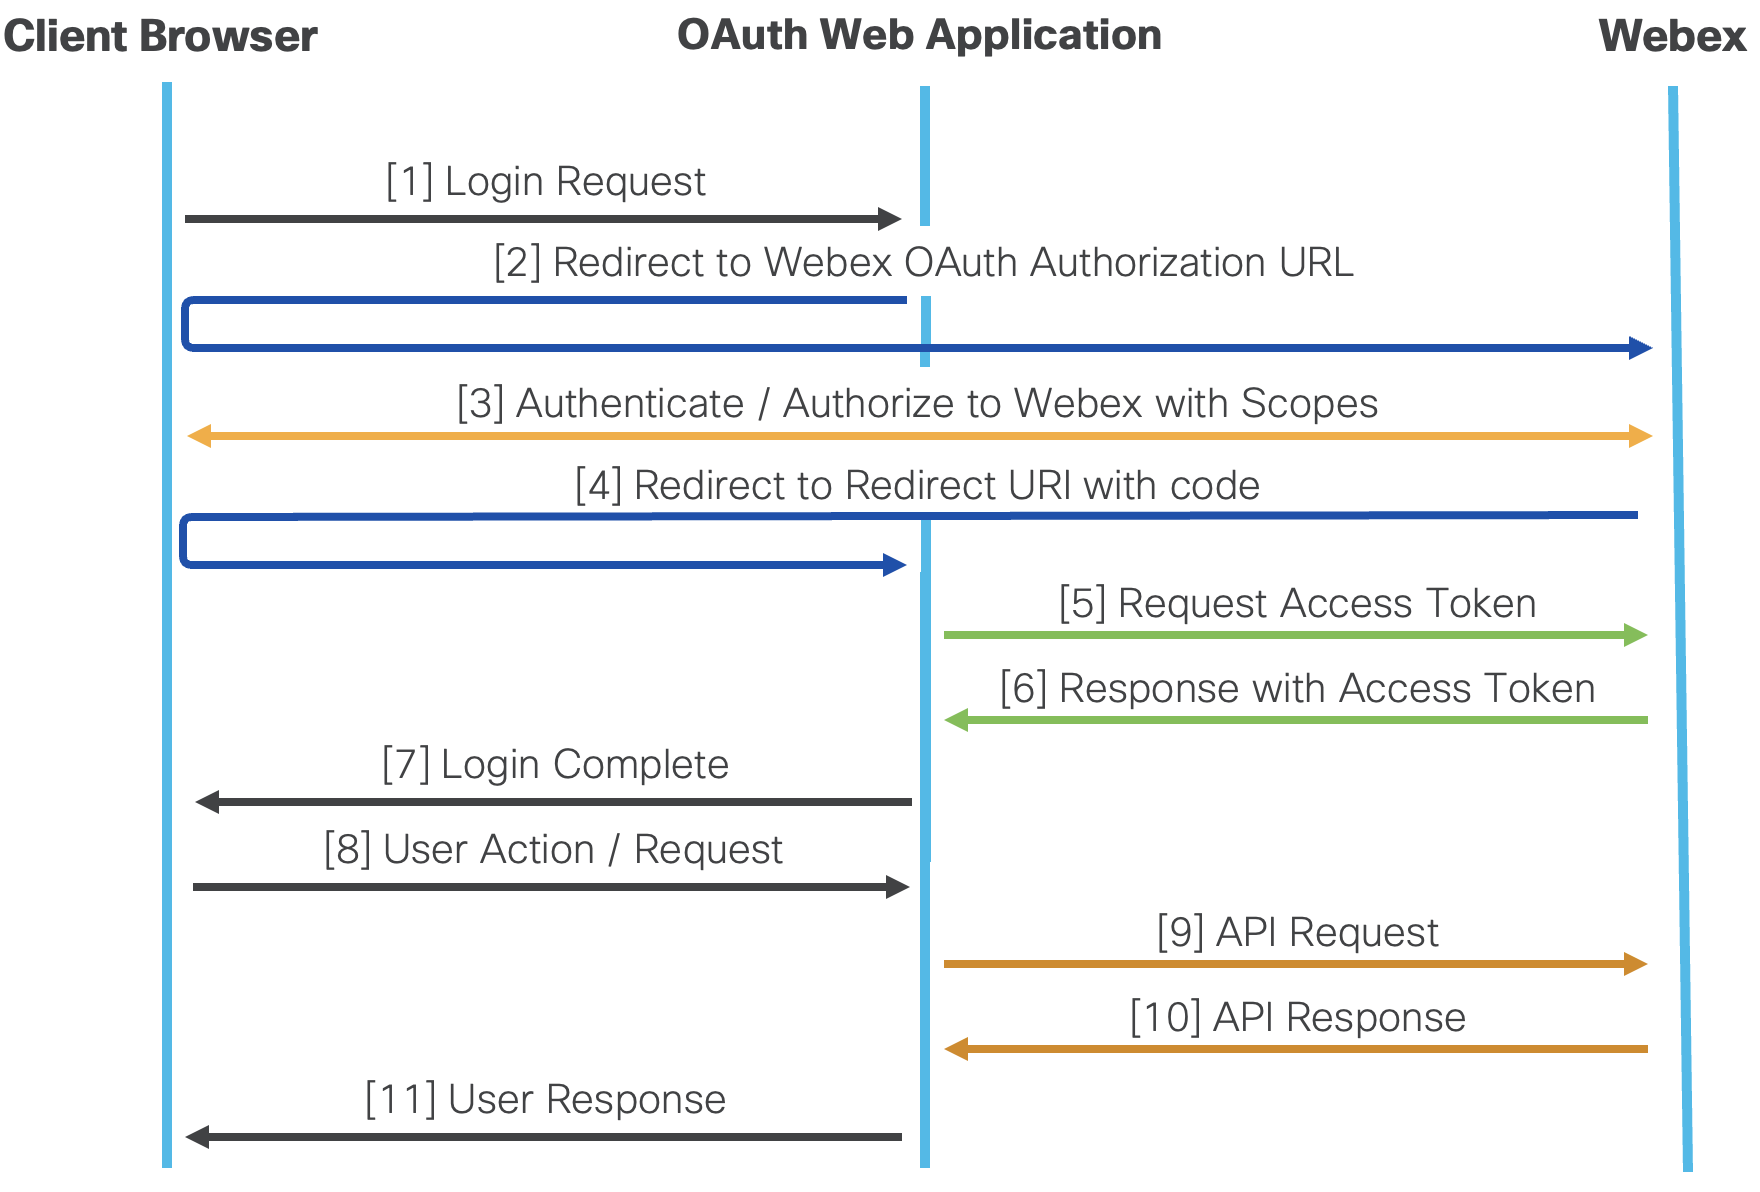
This diagram shows the process at a high level:
.
The process works like this:
[1] You initiate a request to your web app that requires Webex access, such as clicking a "login" button.
[2] Your application redirects your browser to the Webex OAuth Authorization URL,
https://webexapis.com/v1/authorize, which is populated with a variety of parameters:
client_id - This is the Client ID you received when you created the Integration.
response_type - This is the type of response you are expecting. In this case it is code
which means you are expecting a code that you can use to obtain an access token.
redirect_uri - This is the URL that Webex will redirect you to after they have authenticated and
authorized the Integration. This must match the URL you entered when you created the Integration
(http://dev1.pod6.col.lab:5002/redirect).
Your web app will receive this redirect in order and use a code in this message to subsequently
request an access token.
scope - This is the list of scopes you are requesting. The user will be asked to authorize the Integration
to access these scopes and the integration must have been created with these scopes. You do not need to request all the
scopes the Integration was allowed access to, but you cannot request something that was not allowed.
state - This is an optional random string that you generate and include in the request. It is used to prevent
cross-site request forgery attacks.
[3] You are presented with a Webex login page and asked to log in if not already. Any other
multi-factor authentication would occur at this point. You are then asked to
authorize the Integration to access the requested scopes.
[4] If you authorize the Integration, Webex will redirect you to the redirect URI you provided
when you created the Integration and included in the original request (these must match).
The URL will contain a code parameter that you will later use to obtain an access token.
[5] When this redirect is received by your web app, you can now use the code supplied
to request an access token. This request is made to the https://webexapis.com/v1/access_token API.
Along with the previously discussed client_id, client_secret,
and redirect_uri, you will need to include the following parameters:
grant_type - This is the type of grant you are requesting. In this case it is authorization_code.
code - the code returned via the redirect.
[6] - [11] Now that the server receives an access token it can make requests to the Webex API on behalf
of the user. It may reply back with a web page that the login process is complete, or wait for the user
to click something that requires Webex data to be requested. In this lab, you'll be providing a button to
create a Webex Meeting. If the access token expires, the server can use the refresh token to obtain a
new access token without requiring the user to re-authenticate, as was the case with the Service App.
You should still have the Webex Developer Portal open to the page for the Integration you created.
Click the Copy button next to the Client ID.
Access your VS Code
instance: https://dev1.pod6.col.lab:8443 and from
the Explorer open wxm_create_meeting.py in the examples folder.
This file implements a simple web server using Python Flask. This server
has a few pre-defined "routes", which define the URL paths that the server will respond to. These are:
the root path (/), which will display a "Login with Webex" button, the /login path which will perform [2]
the redirect to the Webex OAuth Authorization URL, the /redirect path which will receive the
redirect initiate from Webex in [4] along with the subsequent access token retrieval in [5].
The /create_meeting path will create a new meeting in Webex using the access token obtained.
Find and replace the ___PASTE_INTEGRATION_CLIENT_ID___ text in between the quotes with
your Client ID that you just copied:
Click the Copy button next to the Client Secret on the Webex Developer Portal for the integration you created.
Access VS Code again and replace the ___PASTE_SERVICE_APP_CLIENT_SECRET___ text
in between the quotes with the new Client Secret that you just created and copied:
Add the variables for the redirect URL and the scopes to the wxm_create_meeting.py file by pasting
in the following lines after the client ID and client secret lines. The redirect URL matches the one you
entered in the Webex Developer Portal. The scopes are the ones you selected when creating the Integration
and must match for the integration to work. One additional scope, "spark:kms" is always added for every
integration and permits interaction with encrypted content. In the code, we use the quote function
from urllib.parse module to encode the spaces and colons in the scopes since this will be used as
a parameter in a URL.
You are now ready to start up the OAuth script that will temporarily create a web server to facilitate the process
of obtaining an access token for your Integration. Click the
Run and Debug button in the left column.
Make sure the predefined configuration for running this script, called
Python: wxm_create_meeting.py is selected:
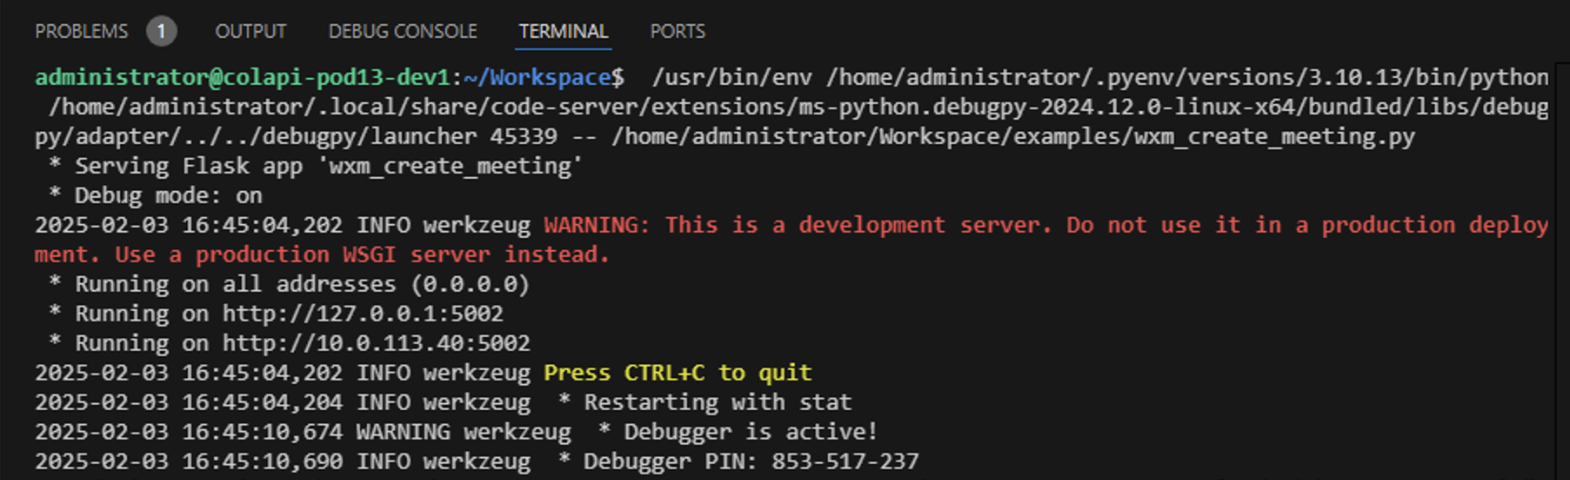
Click the green Start Debugging
button left of the Python: wxm_create_meeting.py text. Doing so launches a
Terminal with the complete logging output at the bottom. You should see the application
start up the web server listening on port 5002. Wait until you see the text "* Running on http://10.0.106.40:5002"
Now that your temporary web server is running, you can proceed to the next step to obtain the access token.
Now your web server is running and pointing your bowser to
http://dev1.pod6.col.lab:5002 where you should see a
page with a Login with Webex button. Clicking this will let you know that "Authorization redirect not yet implemented".
That is exactly what you will do next.
For now, stop the web service by clicking the red square in the control bar at the top of the VS Code window.
Step 3 - Obtain an Access Token
As you saw, the root web page on the web server you just created presents a simple "Login with Webex". This
button redirects you to the /login route which you will implement next. This route needs to redirect the user
to the Webex OAuth Authorization URL that you received when you created the Integration. To do this, we will
construct the URL and then use the imported Flask redirect function to redirect the user to the URL.
Return to your VS Code instance: https://dev1.pod6.col.lab:8443 with
wxm_create_meeting.py opened in the examples directory.
Locate the existing line return ("***** Authorization redirect not yet implemented!"), remove
it and replace it with the following highlighted lines:
The rest of the authentication and authorization process is completely between the end user and Webex.
If successful, Webex will redirect the user's browser back to the redirect URI you provided when you
created the Integration. This URI points to this same web server to the /redirect route. You will
implement this next. The redirect posted will contain a code element that you will
use to construct a POST request similar to the Service App, but with a different grant type. The
response to this will be a valid access token.
Locate the existing line return ("***** Access token request not yet implemented!"), remove
it and replace it with the following highlighted lines:
Start the web server by clicking the green Start Debugging
button left of the Python: wxm_create_meeting.py text. Wait until you see the
text "* Running on http://10.0.106.40:5002".
Open a new browser tab to http://dev1.pod6.col.lab:5002
and click the Login with Webex button.
You may be prompted to authenticate with Webex. Enter the following credentials:
Email address:
pod6wbxuser@collab-api.com
Password:
C1sco.123
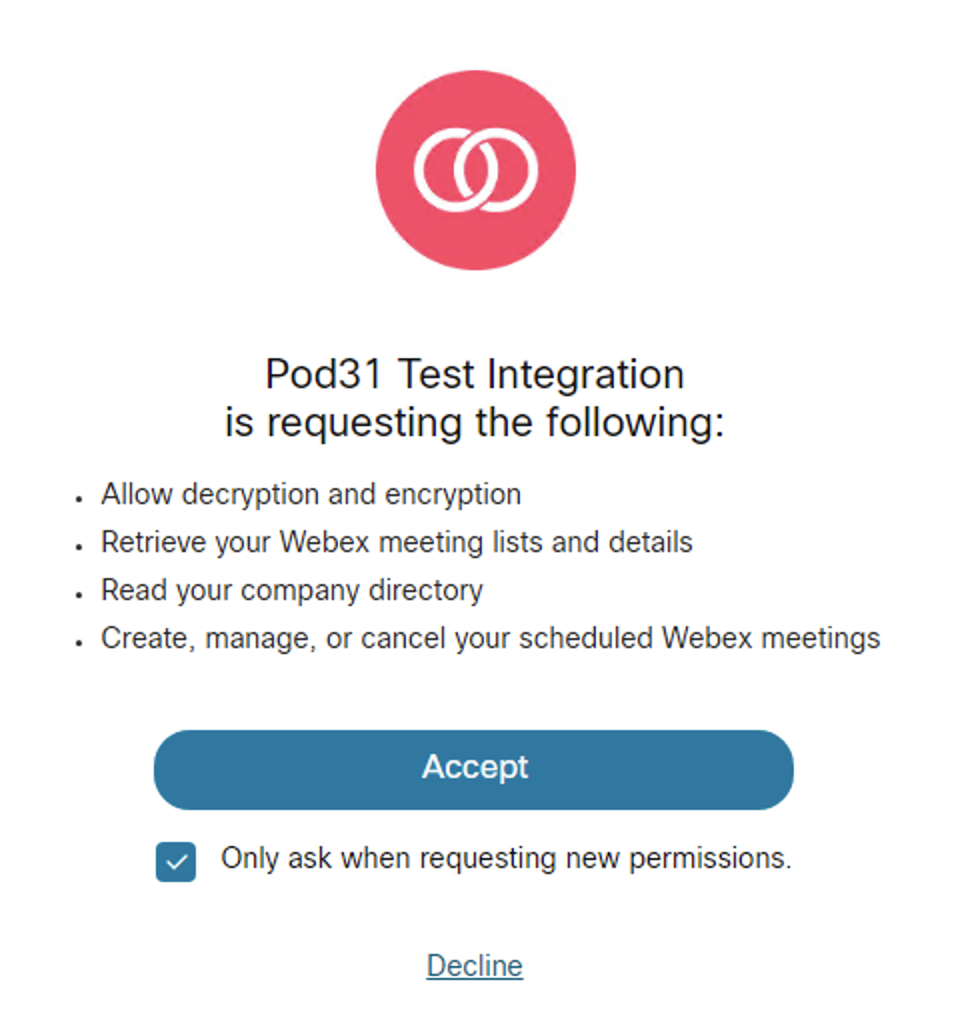
You should now be asked to accept the permissions that the Integration is requesting. You should see a list of the scopes
in a human-readable format. For example, the meetings:schedules_write scope is displayed as
"Create, manage, or cancel your scheduled Webex meetings".
Click Accept to authorize the Integration to access these scopes.
Webex will now redirect your browser back to your redirect URI which will obtain an access token. Following
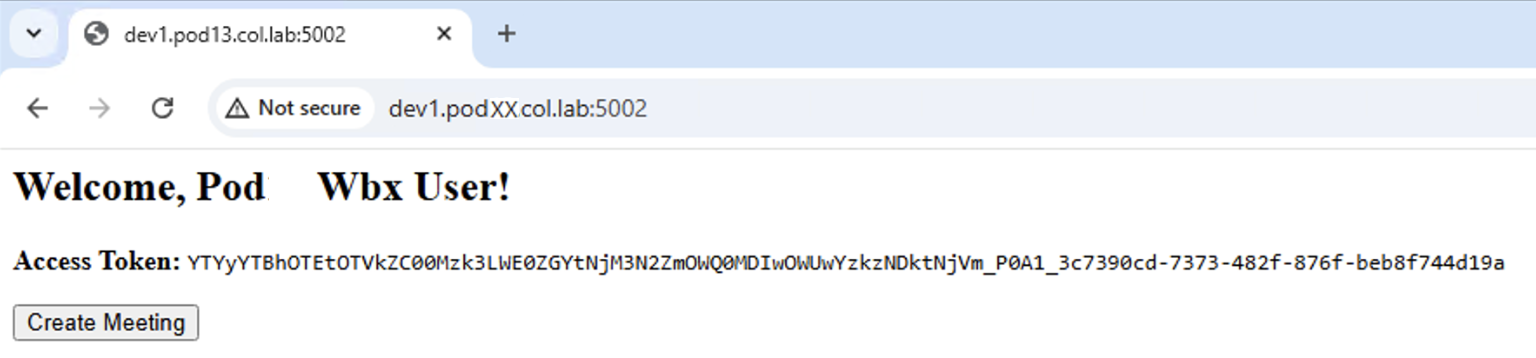
the redirection to the redirect URI, the page again redirects to the /login URI. This time an access token is found, so
a query is made to Webex to retrieve the account's display name and present a "Create Meeting" link.
Stop the Web server again by clicking the red square in the control bar at the top of the VS Code window.
Step 4 - Create a new meeting
To create a new meeting, you need to use the Create a Meeting API. The
wxc_sdk has a MeetingsAPI submodule that provides access to the various meetings APIs.
The Webex Documentation for the Meetings API object is located at:
The Create a Meeting API is one of the more
complex APIs because of the number of parameters it accepts. Most of the parameters are optional, but they provide
a great amount of flexibility in how you can create a meeting if you need it. If you scroll down in the wxc_sdk link for the
MeetingsApi above, you will find the create() method. As you can see, this method takes many parameters:
The required parameters to create a meeting are the title, start, and end parameters so
in this example, you will create a simple meeting with just these parameters. The easier way to understand all the parameters required is
through the Create a Meeting API documentation.
Follow these steps to create a meeting:
Return to your VS Code instance: https://dev1.pod6.col.lab:8443 with
wxm_create_meeting.py opened in the examples directory.
As mentioned earlier, the three mandatory parameters to create a meeting are the title,
start, and end parameters. The start and end parameters are timestamps in
ISO 8601 format.
You can use the datetime module to generate these timestamps and the wxc_sdk takes care of
converting the datetime object into an ISO 8601 string, however you must remove the microseconds from the timestamp
and you must be sure to include a time zone so the string is formatted properly.
The API imposes certain restrictions on the start and end times. The documentation states that start cannot
be before the current date and time or after end. Duration between start and end cannot be shorter than
10 minutes or longer than 23 hours 59 minutes.
To create a meeting that starts 5 minutes from the time the script is run and ends 30 minutes later, we will use
the datetime module to generate the timestamps. Add the following code to the script to create the
start and end time variables as well as a variable for the meeting title:
Now use the API to create the meeting, passing in the variables you just created. Copy the following into the
file:
You have now created a meeting and output the meeting ID, meeting number, and meeting link. You could use this meeting link
to join the meeting but a host would need to join to start the meeting. The Webex APIs allow you to generate a different link
that allows a user to join or start the meeting without having to log in. This is documented in the
Join a Meeting API.
You can provide either the id, meeting number, or web link to the join API. In this case you will use the id.
Copy and paste the following code to the script to invoke the Join a Meeting API, generate the join links,
and return the output to the user in the form of a web page with links:
Now run the script to create a meeting.
Make sure the predefined configuration for running this script, called
Python: wxm_create_meeting.py is selected.
Click Start Debugging and examine the Terminal window output.
Open a new browser tab to http://dev1.pod6.col.lab:5002
and click the Login with Webex button.
If necessary, click Log in at top right and sign in with the following credentials:
Email address:
pod6wbxuser@collab-api.com
Password:
C1sco.123
Click Create Meeting
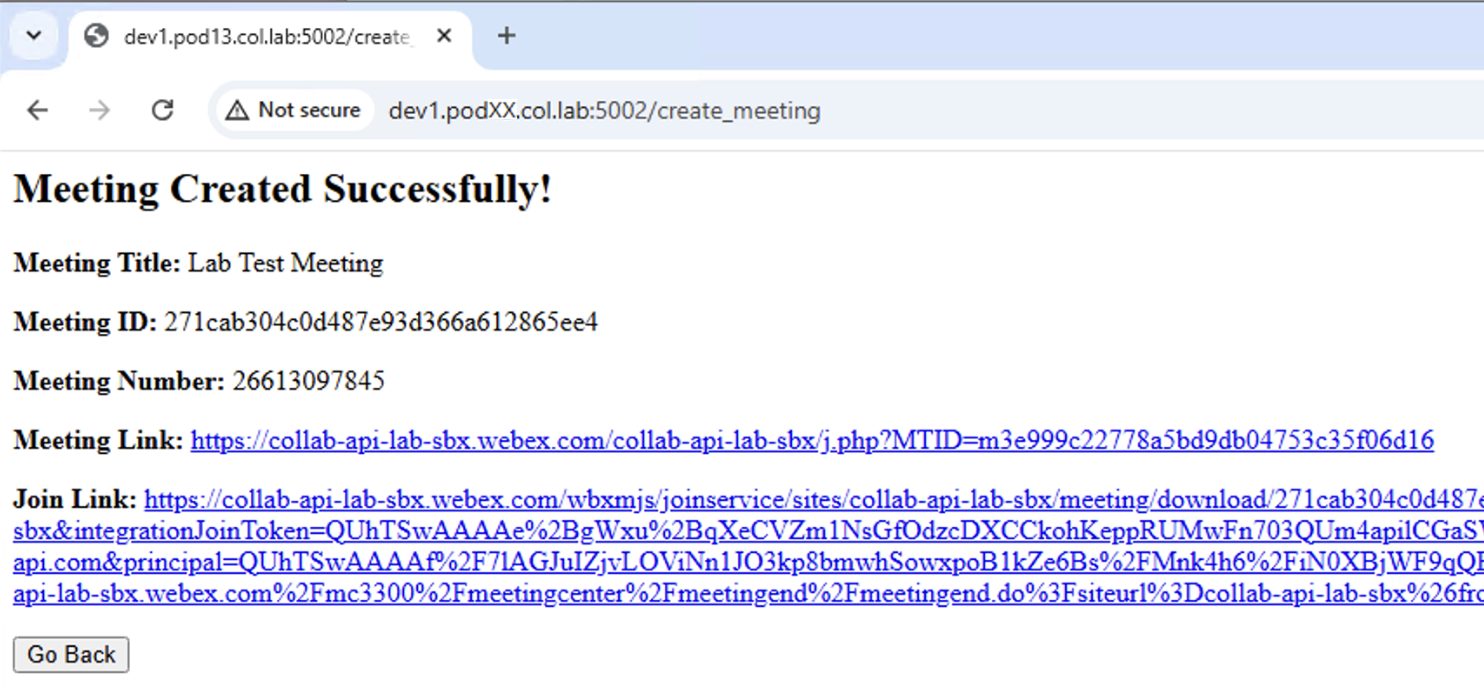
You should see a web page such as the one below. Clicking on the Join link should allow you to launch
Webex right into the meting. You will also receive a meeting reminder pop-up from the Webex App.
Stop the web service by clicking the red square in the control bar at the top of the VS Code window before moving on.
Now that you've worked with Calling and Meetings APIs, you can move on to messaging APIs.
 .
.
 .
.


 button left of the Python: wxm_create_meeting.py text. Doing so launches a
Terminal with the complete logging output at the bottom. You should see the application
start up the web server listening on port 5002. Wait until you see the text "* Running on http://10.0.106.40:5002"
button left of the Python: wxm_create_meeting.py text. Doing so launches a
Terminal with the complete logging output at the bottom. You should see the application
start up the web server listening on port 5002. Wait until you see the text "* Running on http://10.0.106.40:5002"


 The required parameters to create a meeting are the title, start, and end parameters so
in this example, you will create a simple meeting with just these parameters. The easier way to understand all the parameters required is
through the Create a Meeting API documentation.
Follow these steps to create a meeting:
The required parameters to create a meeting are the title, start, and end parameters so
in this example, you will create a simple meeting with just these parameters. The easier way to understand all the parameters required is
through the Create a Meeting API documentation.
Follow these steps to create a meeting: