In previous examples, you used a Personal Access token for all Webex API access. These tokens are great for
quick testing, but they are not suitable for production applications because they are only valid for 12 hours.
There are several other ways to obtain tokens for use in a production application. Which one you use depends on
whose identity and permissions you want to use when interfacing with the API. The following are the different
token types available for use in Webex APIs:
Personal Access Token: This is what you have been using up to now. It is a 12-hour
time-limited token that inherits all the permissions of the user who generated the access token.
Bot Token: A bot is an account that has its own independent identity and performs
actions on its own behalf. Bots are limited in the permissions granted to them. They can send and receive
messages in spaces like other users, but they cannot see messages in a space unless the message is directed
to the bot with an @mention of the bot or in a 1:1 conversation with the bot. Bots have no administrative
access and are only used for messaging as they have no calling or meeting permissions. You will create
a bot using a bot token later in this lab. Bot tokens are generated when you create a bot on developer.webex.com.
As of the time of this writing, bot tokens do not expire for all practical purposes (their expiry is 100 years). If you lose
a bot token, you must re-generate a new one which will invalidate the old bot token and provide you with a
new one.
The identity of a bot token is always a user id you create in the @webex.bot domain, not your own
company's domain. This means that the namespace for bots is global to all of Webex, so if you want to
create a bot named, for example, "mybot@webex.bot" you can only do so if no one else has already created
a bot with that name. The display name, however, can be anything you want and may overlap with another bot
much in the same way that you can have two people named Chuck Robbins as long as they have diferent user IDs.
Integration Token: An integration
uses the OAuth2 Grant Flow to ask a user to grant
your application permission to perform actions on their behalf. You have likely experienced an OAuth2 grant
flow on websites that ask for permission to read data from another website - for example, a financial aggregation site
wanting you to grant permissions to view your credit card balance from your banking site without giving
the financial aggregation site your banking login information. When you create an integration, you specify the scopes that the integration
is requesting and that list is presented to the end-user so they know what permissions they are granting your
application. Following the above example, the financial aggregation site should only be requesting access to read your account balance and
perhaps transaction history, but should not have access to make changes to your account in any way, so they would
request scopes from your bank that limit what they can do. It is up to your bank to define what those scopes are and
every bank could potentially define scopes differently.
An integration gives your application both an access token and what is known as a refresh
token. The refresh token allows the application to obtain a new access token and refresh token before the access token
expires. Like access tokens, refresh tokens have a lifetime as well, but their expiry is typically longer then that of an access token. In many
implementations, requesting a new access token by using a refresh token resets the expiry of the refresh token.
This means that as long as you keep using the refresh token periodically, you can stay authenticated indefinitely, provided
that the refresh token does not have an absolute expiry date set by the service.
Service App Token: This token type is similar to an Integration in that you are granting
the application permissions to perform actions defined through a set of scopes, but instead of impersonating a
specific user, a service app token gives an applcation administrative access to a specific Webex organization after
being granted permission by an administrative user in that organization. As long as a service app is authorized
in a given organization, it continues to have access until revoked by an administrator. The access is not based
on the specific person who granted the access, so its access is retained even if users leave the organiation.
Behind the scenes, a service app creates a hidden machine account user associated with each organization who is
granting access to the application and it is this hidden user's permissions that are being granted to the service app.
Like an integration, a service app will obtain both an access token and a refresh token.
Guest Token: There are some occasions where you want to interact with a user who
does not have a Webex account, for example to provide a mechanism for users to send messages from a website or
have a video call using Webex with an external user and have this integrated into a web portal of some kind.
Webex previously had special tokens called Guest Issuer Tokens to facilitate these use-cases, but now, there are
special scopes (guest-issuer:write and guest-issuer:read) that allow a
service app to generate tokens for guests. Webex also has a special license type that allows service apps to
generate guest to guest meetings where all participants in the meeting are guests. This can be used to facilitate
use cases like connecting a patient to a doctor - neither of which are licensed Webex users.
In the end, no matter which mechanism is used, your application ends up with an access token that it passes in
the Authorization header of the request to provide the necessary authentication credentials needed to perform
the task in the API call. The differences above are in how you obtain that token, how long it lasts, the user
context under which the request is made, and what level of permissions you get with the token.
The following table summarizes the differences between the various token types available in Webex.
How to Get
Identity
Access Scope
Validity
Personal Access Token
developer.webex.com
The user who generated the token
All permissions available to the user who generated the token
12 hours
Integration
OAuth2 Grant Flow (requires web server)
A user who granted permissions to the integration application
Scopes that were requested by the app and granted by the user
14 day access token + 90 day refresh token
Service App
developer.webex.com + Control Hub Admin
A machine account with access to a specific Webex org
Scopes that were requested by the app and approved by an org administrator
14 day access token + 90 day refresh token
Bot
developer.webex.com
The bot’s own identity (<bot>@webex.bot)
Limited permissions specific to bots
100 years
Guest
Generated by a Service App
Guest user
Limited to specific guest permissions
18 days
Given the various token generation methods available in Webex, the most appropriate one to use for an application
that needs to perform administrative actions in an automated fashion is a Service App.
This allows the application to perform administrative tasks without being tied to a specific administrator user in
the organization. If you were using an integration or a personal access token, the tokens assigned to the application would be
tied to a specific user, so if that user were to leave the company, your application would break. By using a Service App, you remove
this depedency. It also allows administrators to delegate only specific permissions (scopes) to the application
instead of giving it full administrative permissions. So for example, if you want to build an application that provisions users,
you could grant the service app only access to the user provisioning scopes. Similarly, if you wanted to build an application
that only uses reporting APIs to run analytics on your Webex data, you could grant the service app only the reporting scopes.
In this section, you will create a service app and use it to obtain tokens that you can use to perform actions your user account
does not have access to. Once you have these tokens you can use this for a variety of functions later in the lab.
To do this, you will perform the following tasks:
Create a Service App
Generate a new Access Token from the Refresh Token
If necessary, click Log in at top right and sign in with the following credentials:
Email address:
pod6wbxuser@collab-api.com
Password:
C1sco.123
Once logged in, click on your
icon at the top right.
Click My Webex Apps (There should not be any existing Bots or Integrations, but if there are
any Bots, feel free to delete them.)
Click Create a Service App (If another app already exists,
you would need to click Create a New App first.)
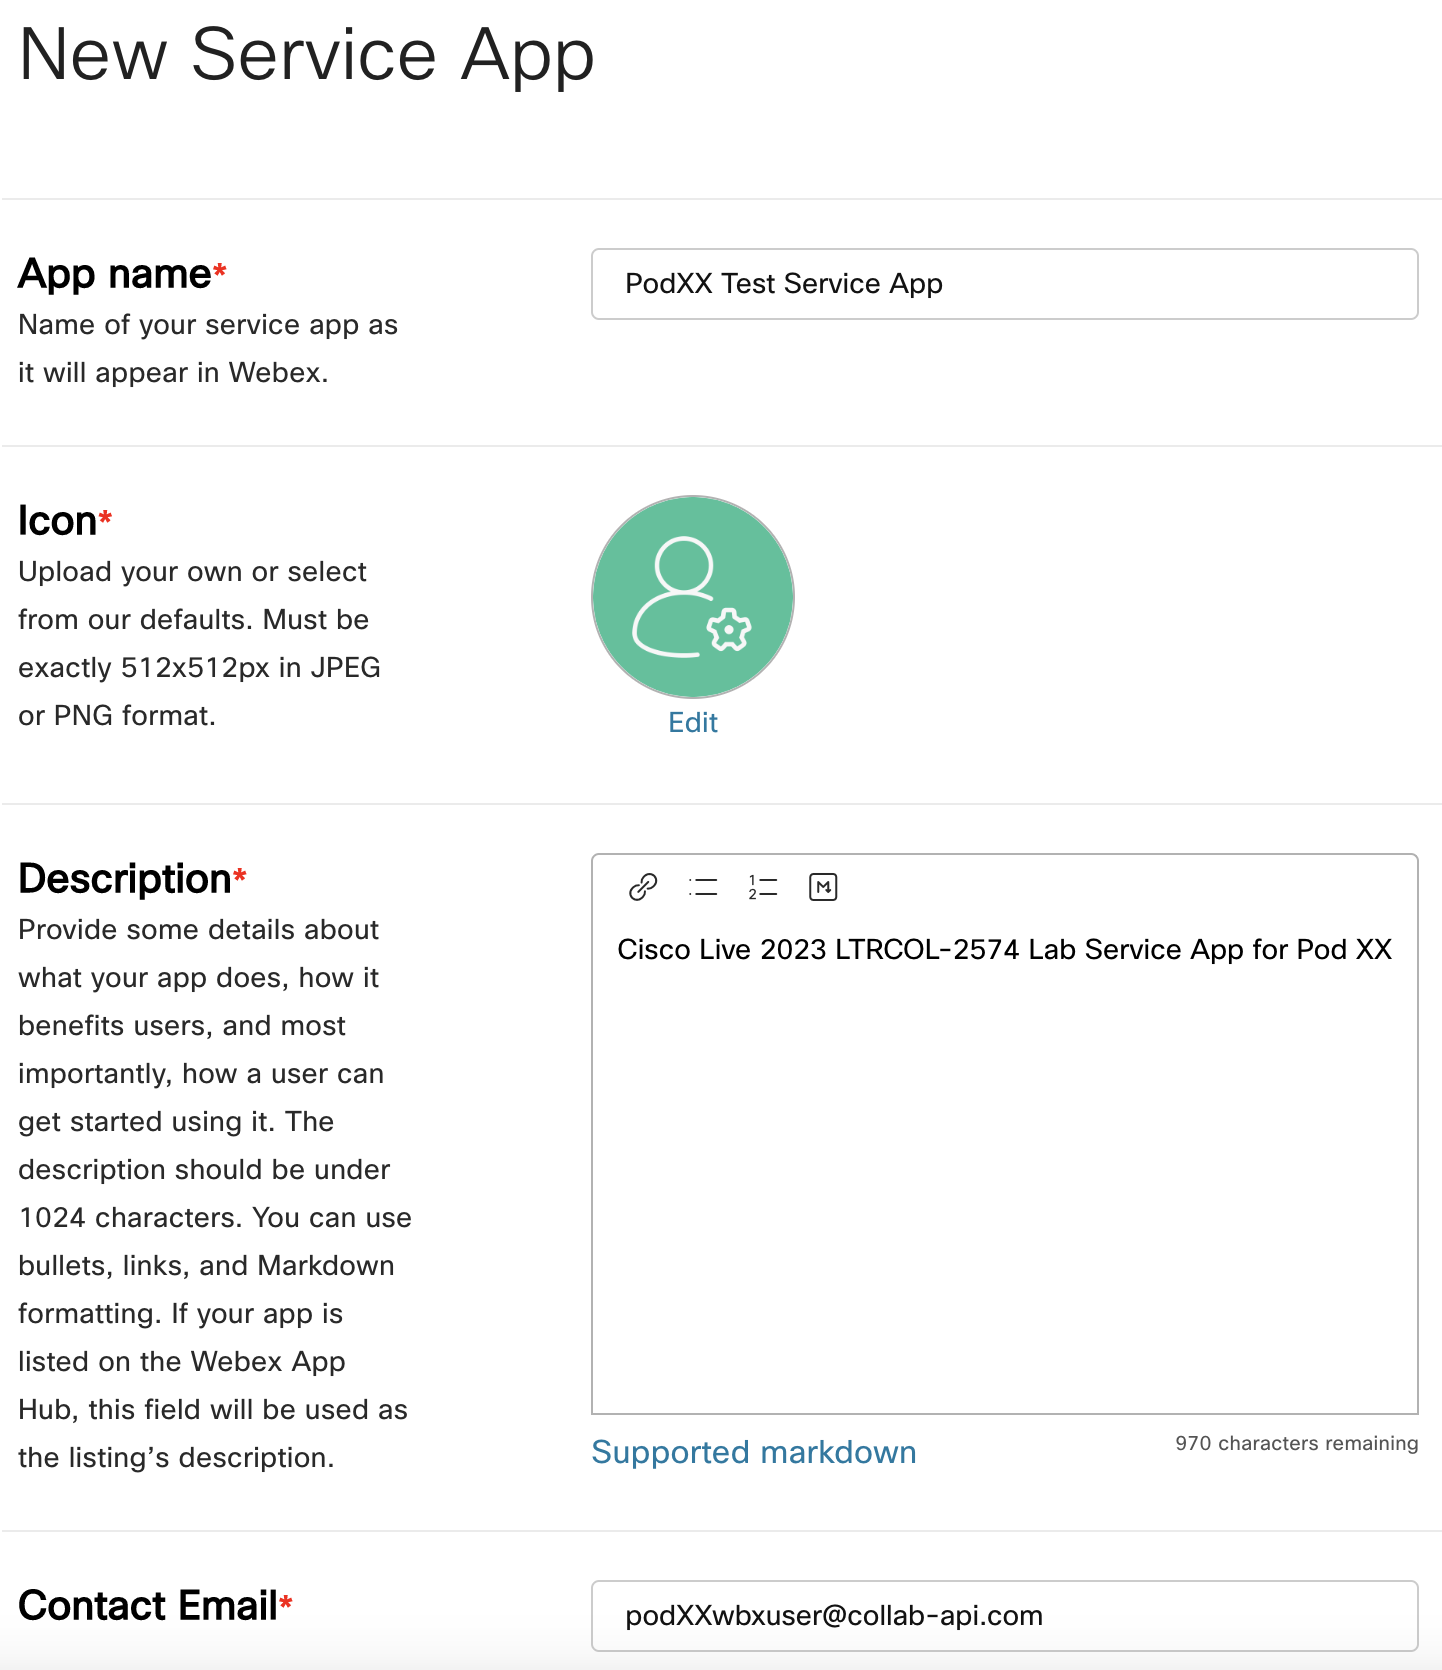
For the App name, enter
Pod6 Test Service App
Click on one of the Icon images for your Service App so that it is selected.
In the Description paste the following text:
Cisco Live 2026 LTRCOL-2574 Service App for Pod 6 (https://collabapilab.ciscolive.com)
In the Contact Email field paste the following text:
pod6wbxuser@collab-api.com
. This email address is only used if submitting the Service App for approval in the Webex App Hub
so that others outside of your organization can use the app.
For Scopes check the following boxes. NOTE that many of the scope names are very similar. You can click to
copy each of these from the list and then use the Find function in the browser to search for each scope in the list. When
you are done, be sure to double-check that you have seven scopes selected and they match the ones on this list. Failure to
select the correct scopes will lead to issues later when you try to use the tokens.
spark-admin:telephony_config_read
spark:calls_read
spark:people_read
spark:people_write
spark-admin:licenses_read
spark-admin:people_read
spark-admin:people_write
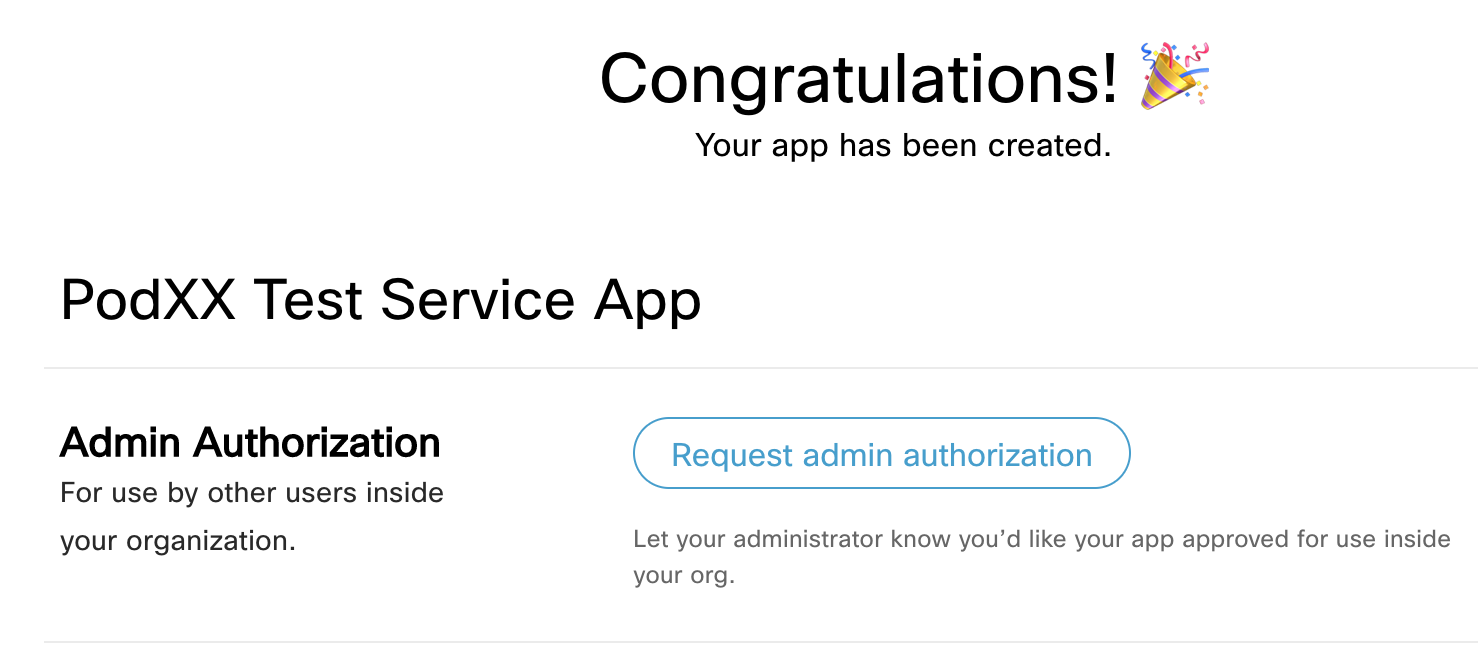
At the bottom, click Add Service App.
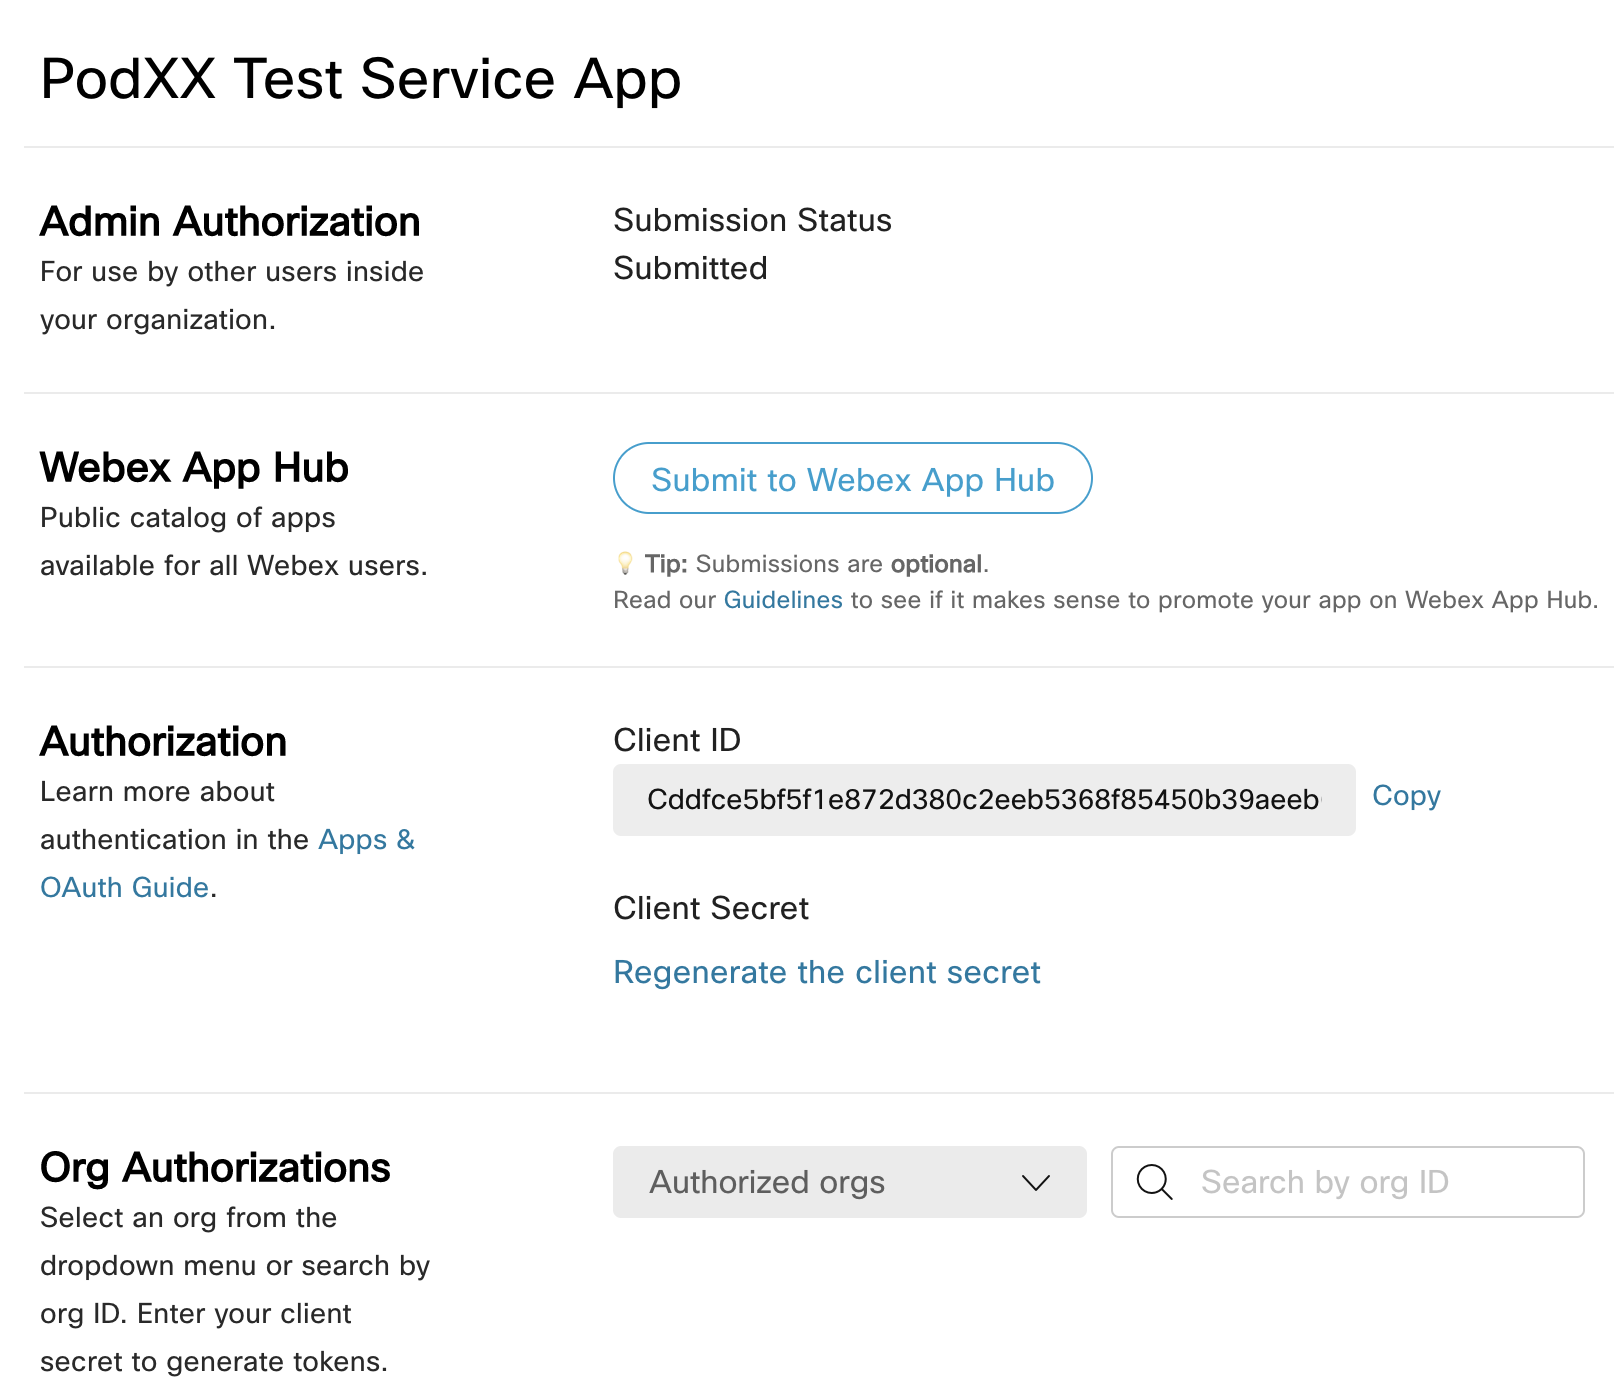
You should now see a Congratulations message and some details about the App. Below that,
Click the button to Request admin authorization.
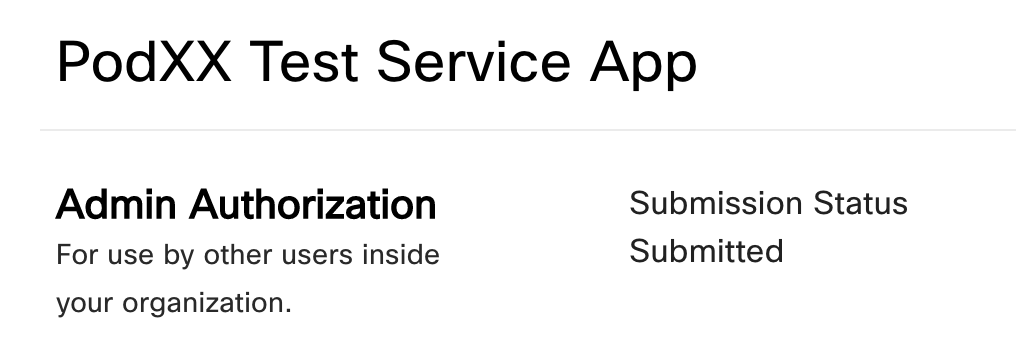
.
The Service has now been submitted for approval. Notify one of the lab proctors
and they will approve the request with an administrator account.
.
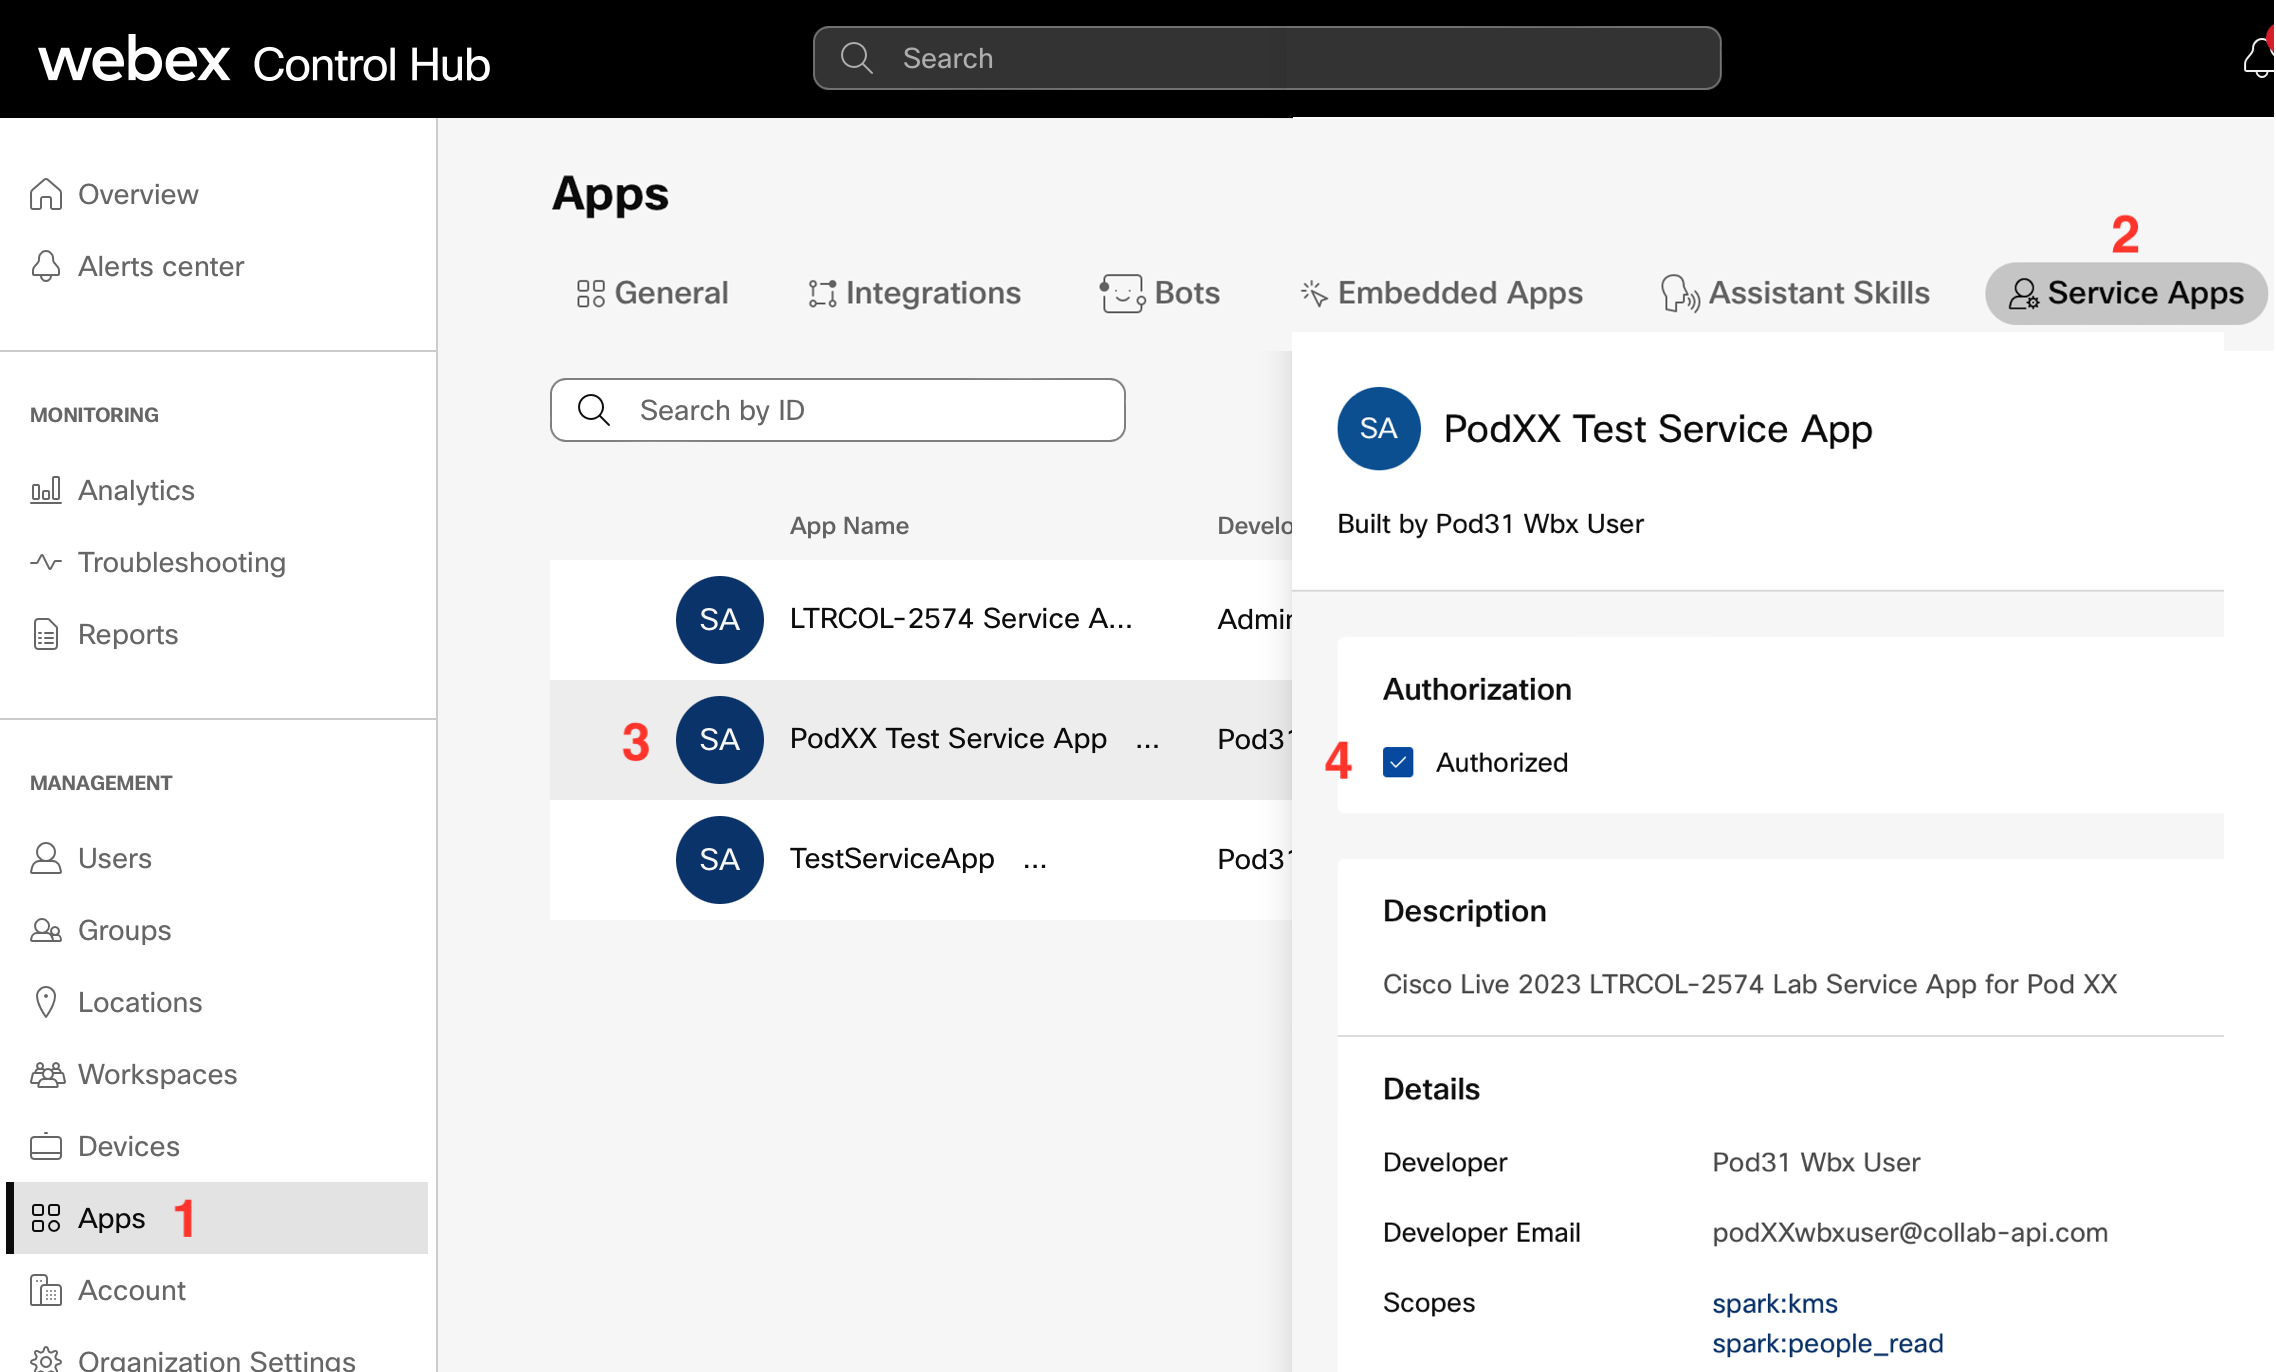
Since you are not an administrator you cannot approve yourself, but here are the steps that an administrator takes
to approve the request. First, an administrator logs into Webex Control Hub, navigates to the
Service Apps tab of the Management > Apps section, selects the
request, reviews the scopes to ensure they approve of the app, and then selects "Authorized".
You will not perform this step in the lab as you do not have the right level of
permissions to approve service apps, but we are including it here as a reference.
.
Once authorization is complete, click the reload button in your browser to obtain the
information needed to generate tokens in a test script in VS Code.
.
Find and replace the ___PASTE_SERVICE_APP_CLIENT_ID___ text in between the quotes with
your Client ID that you just copied:
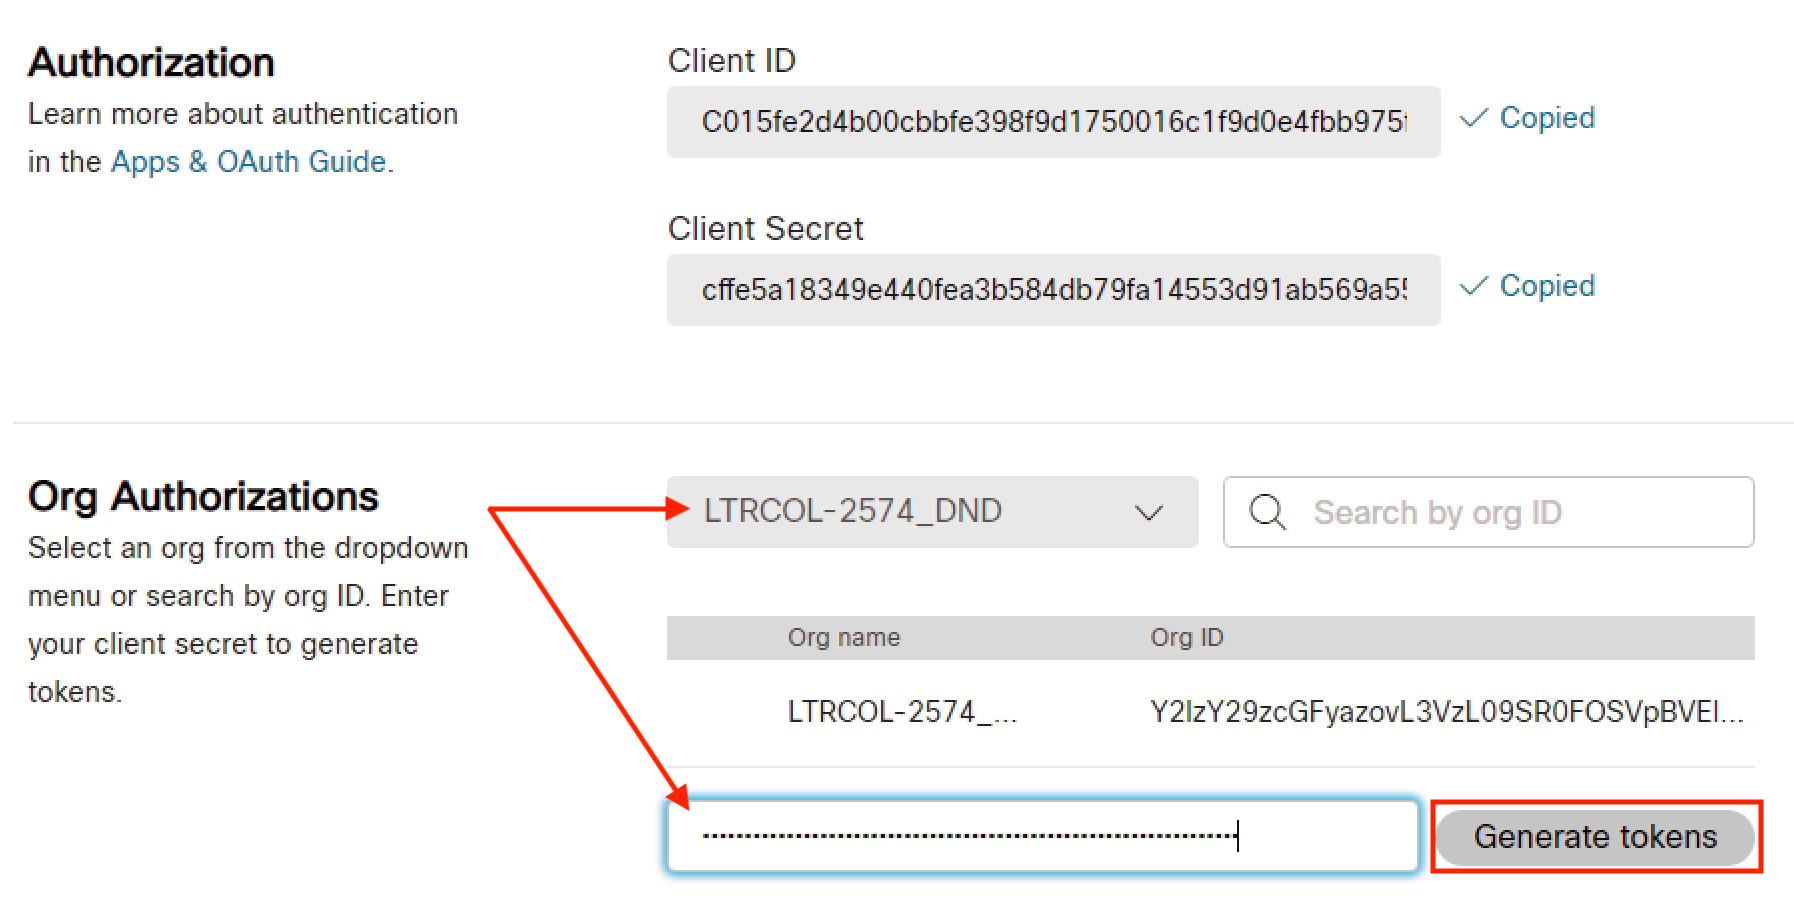
Navigate back to the Service App page and click Regenerate the client secret. When
prompted "By regenerating your secret you will revoke your current secret. Are you sure?", click
Yes
Click the Copy button next to the new Client Secret.
Access VS Code again and replace the ___PASTE_SERVICE_APP_CLIENT_SECRET___ text
in between the quotes with the new Client Secret that you just created and copied:
On the Service App page, in the Org Authorizations section, click the
Authorized orgs drop-down and select LTRCOL-2574_DND.
The Enter Client Secret box will appear and you can paste the previously copied client secret
into this box and click Generate tokens.
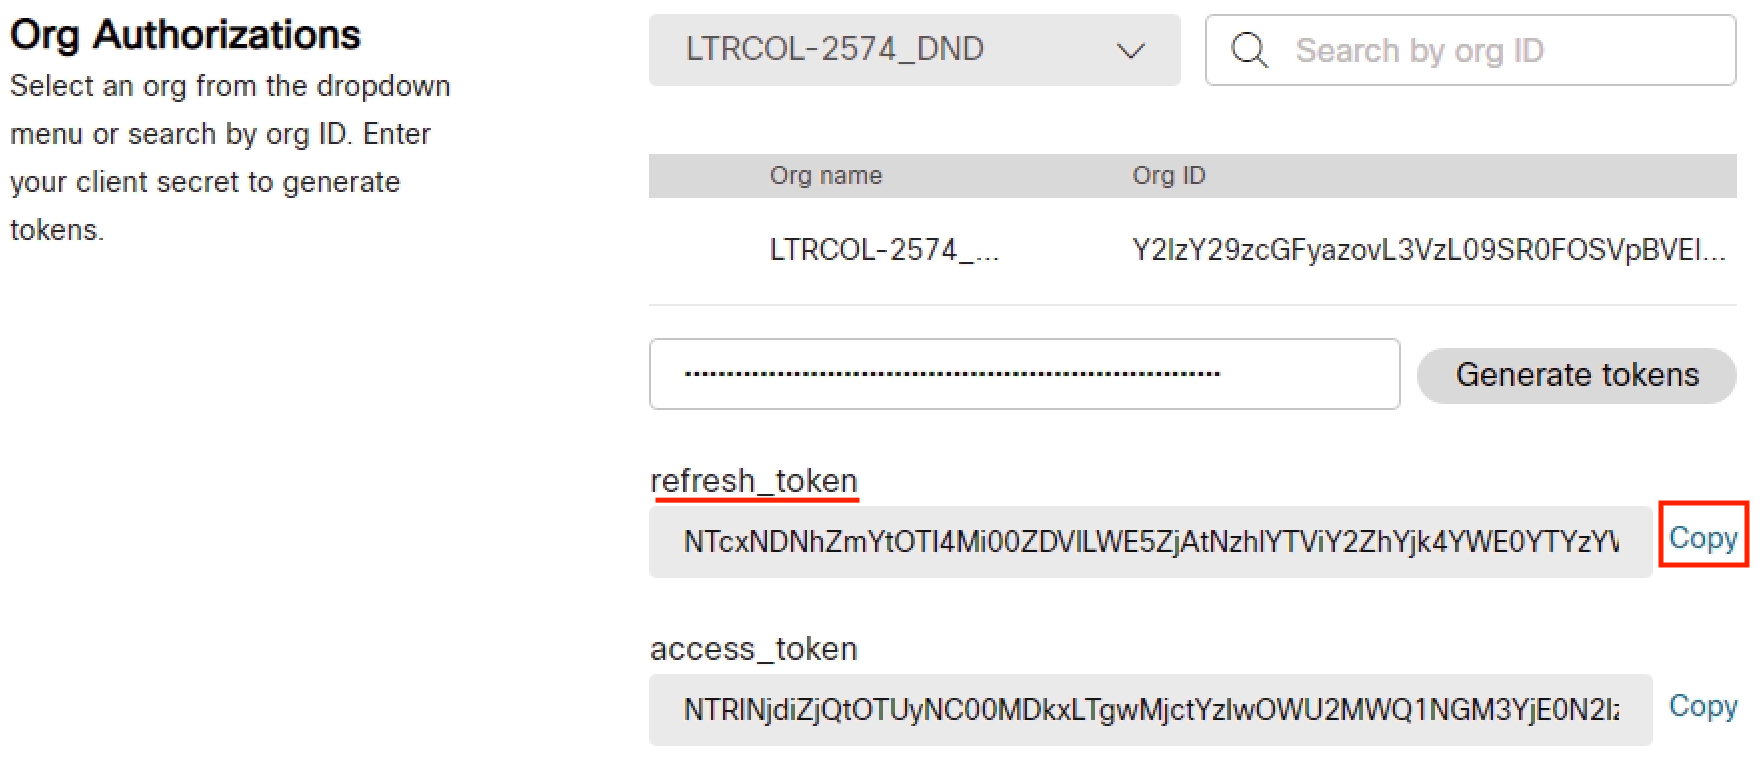
Two tokens are now displayed below, an access_token and a refresh_token.
Copy the refresh_token.
.
Switch back to VS Code and replace the ___PASTE_SERVICE_APP_REFRESH_TOKEN___
text with the refresh token.
That was all the information needed from the Service App.
The access_token that was generated is valid, of course, but we do not know exactly for how long.
The refresh_token, on the other hand, can be used to generate another access token, which you will do
in the sample code.
Step 2 - Generate a new Access Token from the Refresh Token
When your application requests a new access token, Webex will return a new access token, including its
expiration time, as well as a refresh token, which may or may not differ from the one used in the
request, and its expiration time.
Knowing the exact expiration time of the tokens will allow you to request new ones before they
expire, keeping the application up and running.
Add the following lines to construct the payload consisting of the previously supplied client_id, client_secret,
and refresh_token and send a POST request with the data to the Webex access_token request location:
The code following what you just pasted prints out the results and uses the new access token to query the
users in order to validate the token. You can just run this example. Click the
Run and Debug button in the left column.
Once you click anywhere in list of "RUN AND DEBUG" configurations, You should see a predefined Configuration for running a python
script named Python: service_app.py in the list. Make sure it is selected:
Click the green Start Debugging
button left of the Python: service_app.py text. Doing so launches a
Terminal with the complete logging output at the bottom. You will see the new
access_token; its expires_in value in seconds, so basically 14 days;
the refresh_token; and its refresh_token_expires_in in seconds, or 90 days.
The output includes that it was able to log in using the Service App access token
and query users without encountering an authentication or permissions error
Copy the entire access token under the Your new Service App access token is: text, as
highlighted in the above picture.
In VS Code, from the Explorer open wxc_enable_user.py in the
examples folder, the file you began editing earlier.
Locate the position near the top where you previously pasted your personal access token and replace that
token with the Service app access token that you just copied. This new token will give your application
administrative rights to change users, which is essential for the tasks that will follow.
Now that you have an access token with administrative rights, you can continue with enabling a user for
Webex Calling.
 .
.
 .
.
 .
.
 .
.
 .
.
 .
.


 button left of the Python: service_app.py text. Doing so launches a
Terminal with the complete logging output at the bottom. You will see the new
access_token; its expires_in value in seconds, so basically 14 days;
the refresh_token; and its refresh_token_expires_in in seconds, or 90 days.
button left of the Python: service_app.py text. Doing so launches a
Terminal with the complete logging output at the bottom. You will see the new
access_token; its expires_in value in seconds, so basically 14 days;
the refresh_token; and its refresh_token_expires_in in seconds, or 90 days.
